Module 4: Kubernetes with Kubectl
Kubernetes Architecture Refresh
A Kubernetes cluster has two main layers: the control plane and the worker nodes.
Control Plane
Manages the cluster state and makes scheduling decisions. In AKS, Azure manages this for you.
| Component | Role |
|---|---|
kube-apiserver | Front door for all cluster operations. Every kubectl command talks to this which translates request into actions on the cluster. |
etcd | Key-value store that holds all cluster state and configuration. |
kube-scheduler | Assigns newly created pods to worker nodes based on resource requirements and constraints. |
kube-controller-manager | Runs controllers that watch cluster state and make corrections (e.g., ensuring the right number of replicas). |
node-controller | * Manages node lifecycle, including monitoring node health and responding to failures. |
replication-controller | * Ensures the desired number of pod replicas are running. |
endpoints-controller | * Manages network endpoints for services. |
service account-controller | * Manages service accounts and API credentials. |
cloud-controller-manager | Manages cloud-specific resources like load balancers and storage in Azure. On prem clusters will not have this |
Note: the cloud-controller-manager will run the same control plane components as the kube-controller-manager, but it will also have additional controllers that interact with the cloud provider's API to manage resources like load balancers, storage volumes, and network routes. In an on-premises cluster, you would typically not have a cloud-controller-manager, and the kube-controller-manager would handle all control plane functions without cloud-specific integrations.
Worker Nodes
Run your actual workloads. Each node has:
| Component | Role |
|---|---|
kubelet | Agent on each node that receives pod specs from the API server and ensures the containers are running inside of a pod. |
kube-proxy | Maintains networking rules so pods and services can communicate inside and outside the cluster. |
Container runtime | Runs the containers themselves (e.g., docker). |
How they work together
- You run a
kubectlcommand (e.g.,kubectl apply -f deployment.yaml). - The request hits the API server.
- The API server writes the desired state to etcd.
- The scheduler picks a node for any new pods.
- The kubelet on that node pulls the container image and starts the pod.
- kube-proxy sets up networking so the pod is reachable.
- Controllers continuously compare desired state vs actual state and reconcile any differences.
Key objects to know
| Object | What it does |
|---|---|
| Pod | Smallest object that you can create in Kubernetes. Wraps one or more containers. |
| Deployment | Manages a set of identical pods with rolling updates and rollbacks. |
| Service | Stable network endpoint that routes traffic to a set of pods. A load balancer for the pods if you will |
| ReplicaSet | Ensures a specified number of pod replicas are running. Managed by Deployments. |
| Namespace | Logical partition of cluster resources for isolation and organization. |
Imperative vs Declarative
--- Imperative: You tell Kubernetes exactly what to do with commands (e.g., kubectl run, kubectl create). Quick for simple tasks but not ideal for complex or repeatable deployments.
--- Declarative: You define the desired state in YAML files and apply them with kubectl apply -f. This is the recommended approach for production workloads as it allows for version control, repeatability, and better management of complex applications.
Pods
A pod is the smallest deployable unit in Kubernetes. It can contain one or more containers that share the same network namespace and storage volumes. Pods are ephemeral and can be replaced by new pods if they fail or are deleted. A pod can have a 1:1 relationship with a container, but it can also have multiple containers that work together (e.g., a main application container and a sidecar for logging). Pods are typically managed by higher-level controllers like Deployments or ReplicaSets to ensure they are running as desired.
- Scale up = make more pods
- Scale down = make fewer pods
Cannot have multiple containers in one pod that are running the same kind of workload. For example, you cannot have two nginx containers in the same pod. You would need to create two separate pods for that.
You can have multiple containers in the same pod that are running different workloads. For example, you could have one container running nginx and another container running a logging agent in the same pod. This is a common pattern for sidecar/helper containers that provide additional functionality to the main application container. 99% of the time, you will have one container per pod -keep in mind that this is a niche case and not the norm.
Demo: Pods
Ensure your AKS cluster is running and that your kubectl context points to the correct cluster.
Start by confirming connectivity:
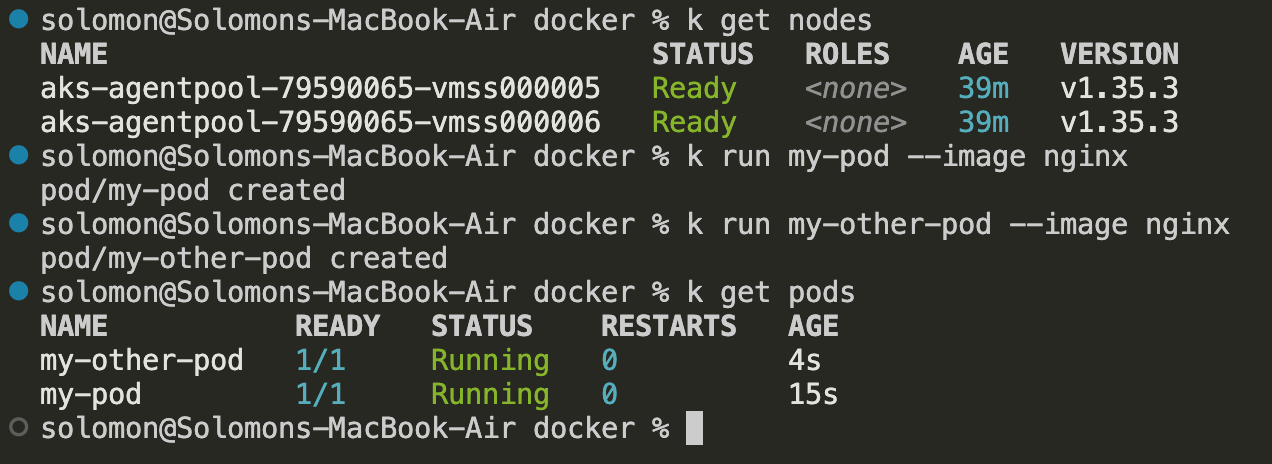
kubectl get nodes
kubectl get nodes -o wide
Create Pods Imperatively
- Create two pods using the NGINX image:
kubectl run my-pod --image=nginx --port=80
kubectl run my-other-pod --image=nginx --port=80
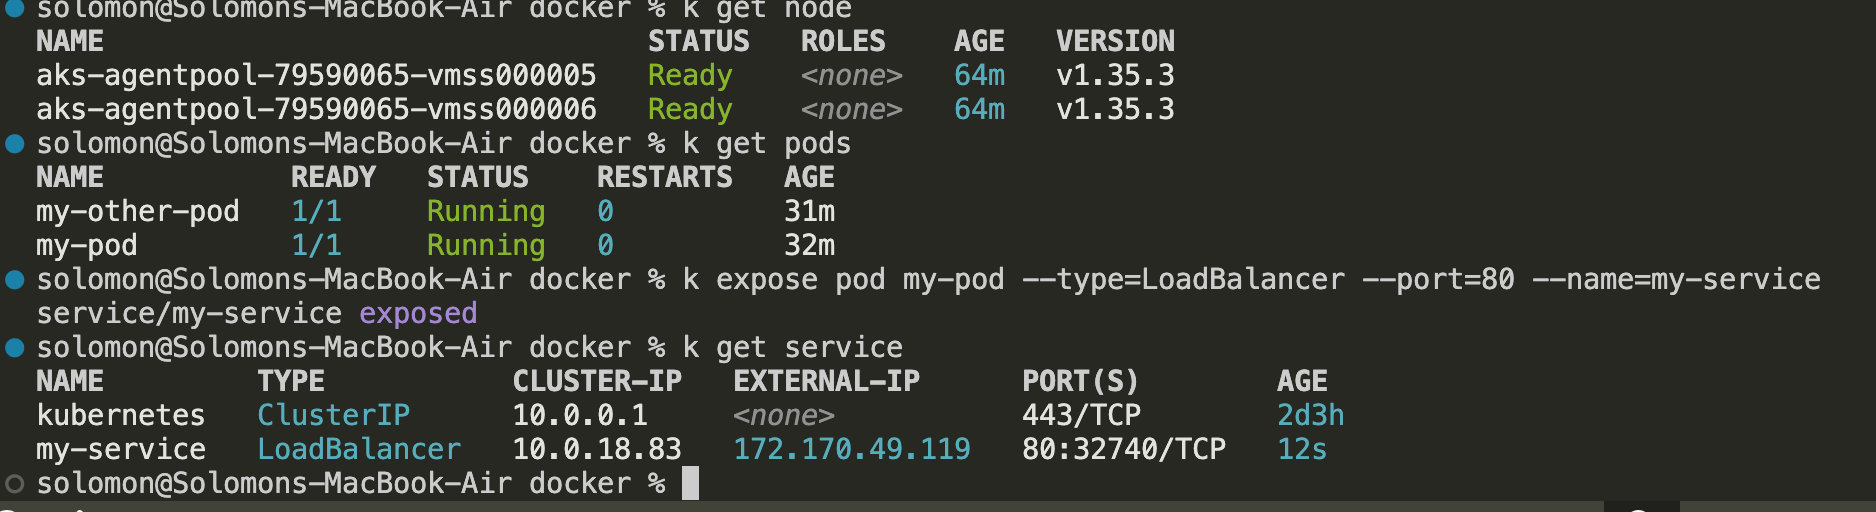
- List the pods:
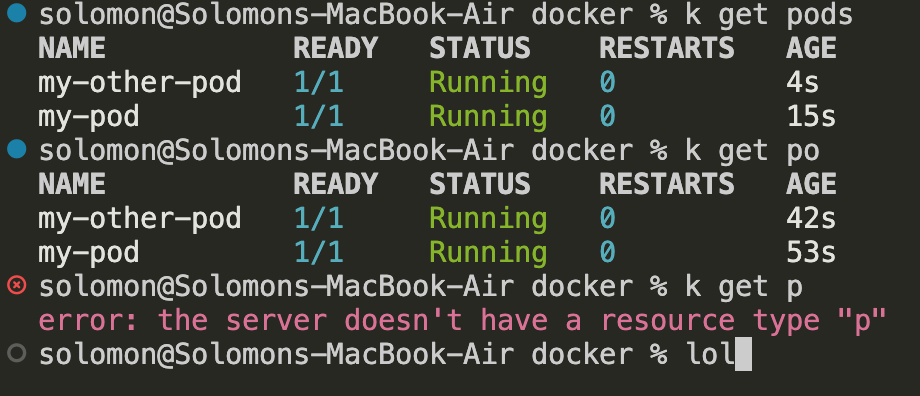
kubectl get pods
kubectl get po
kubectl get pods -o wide
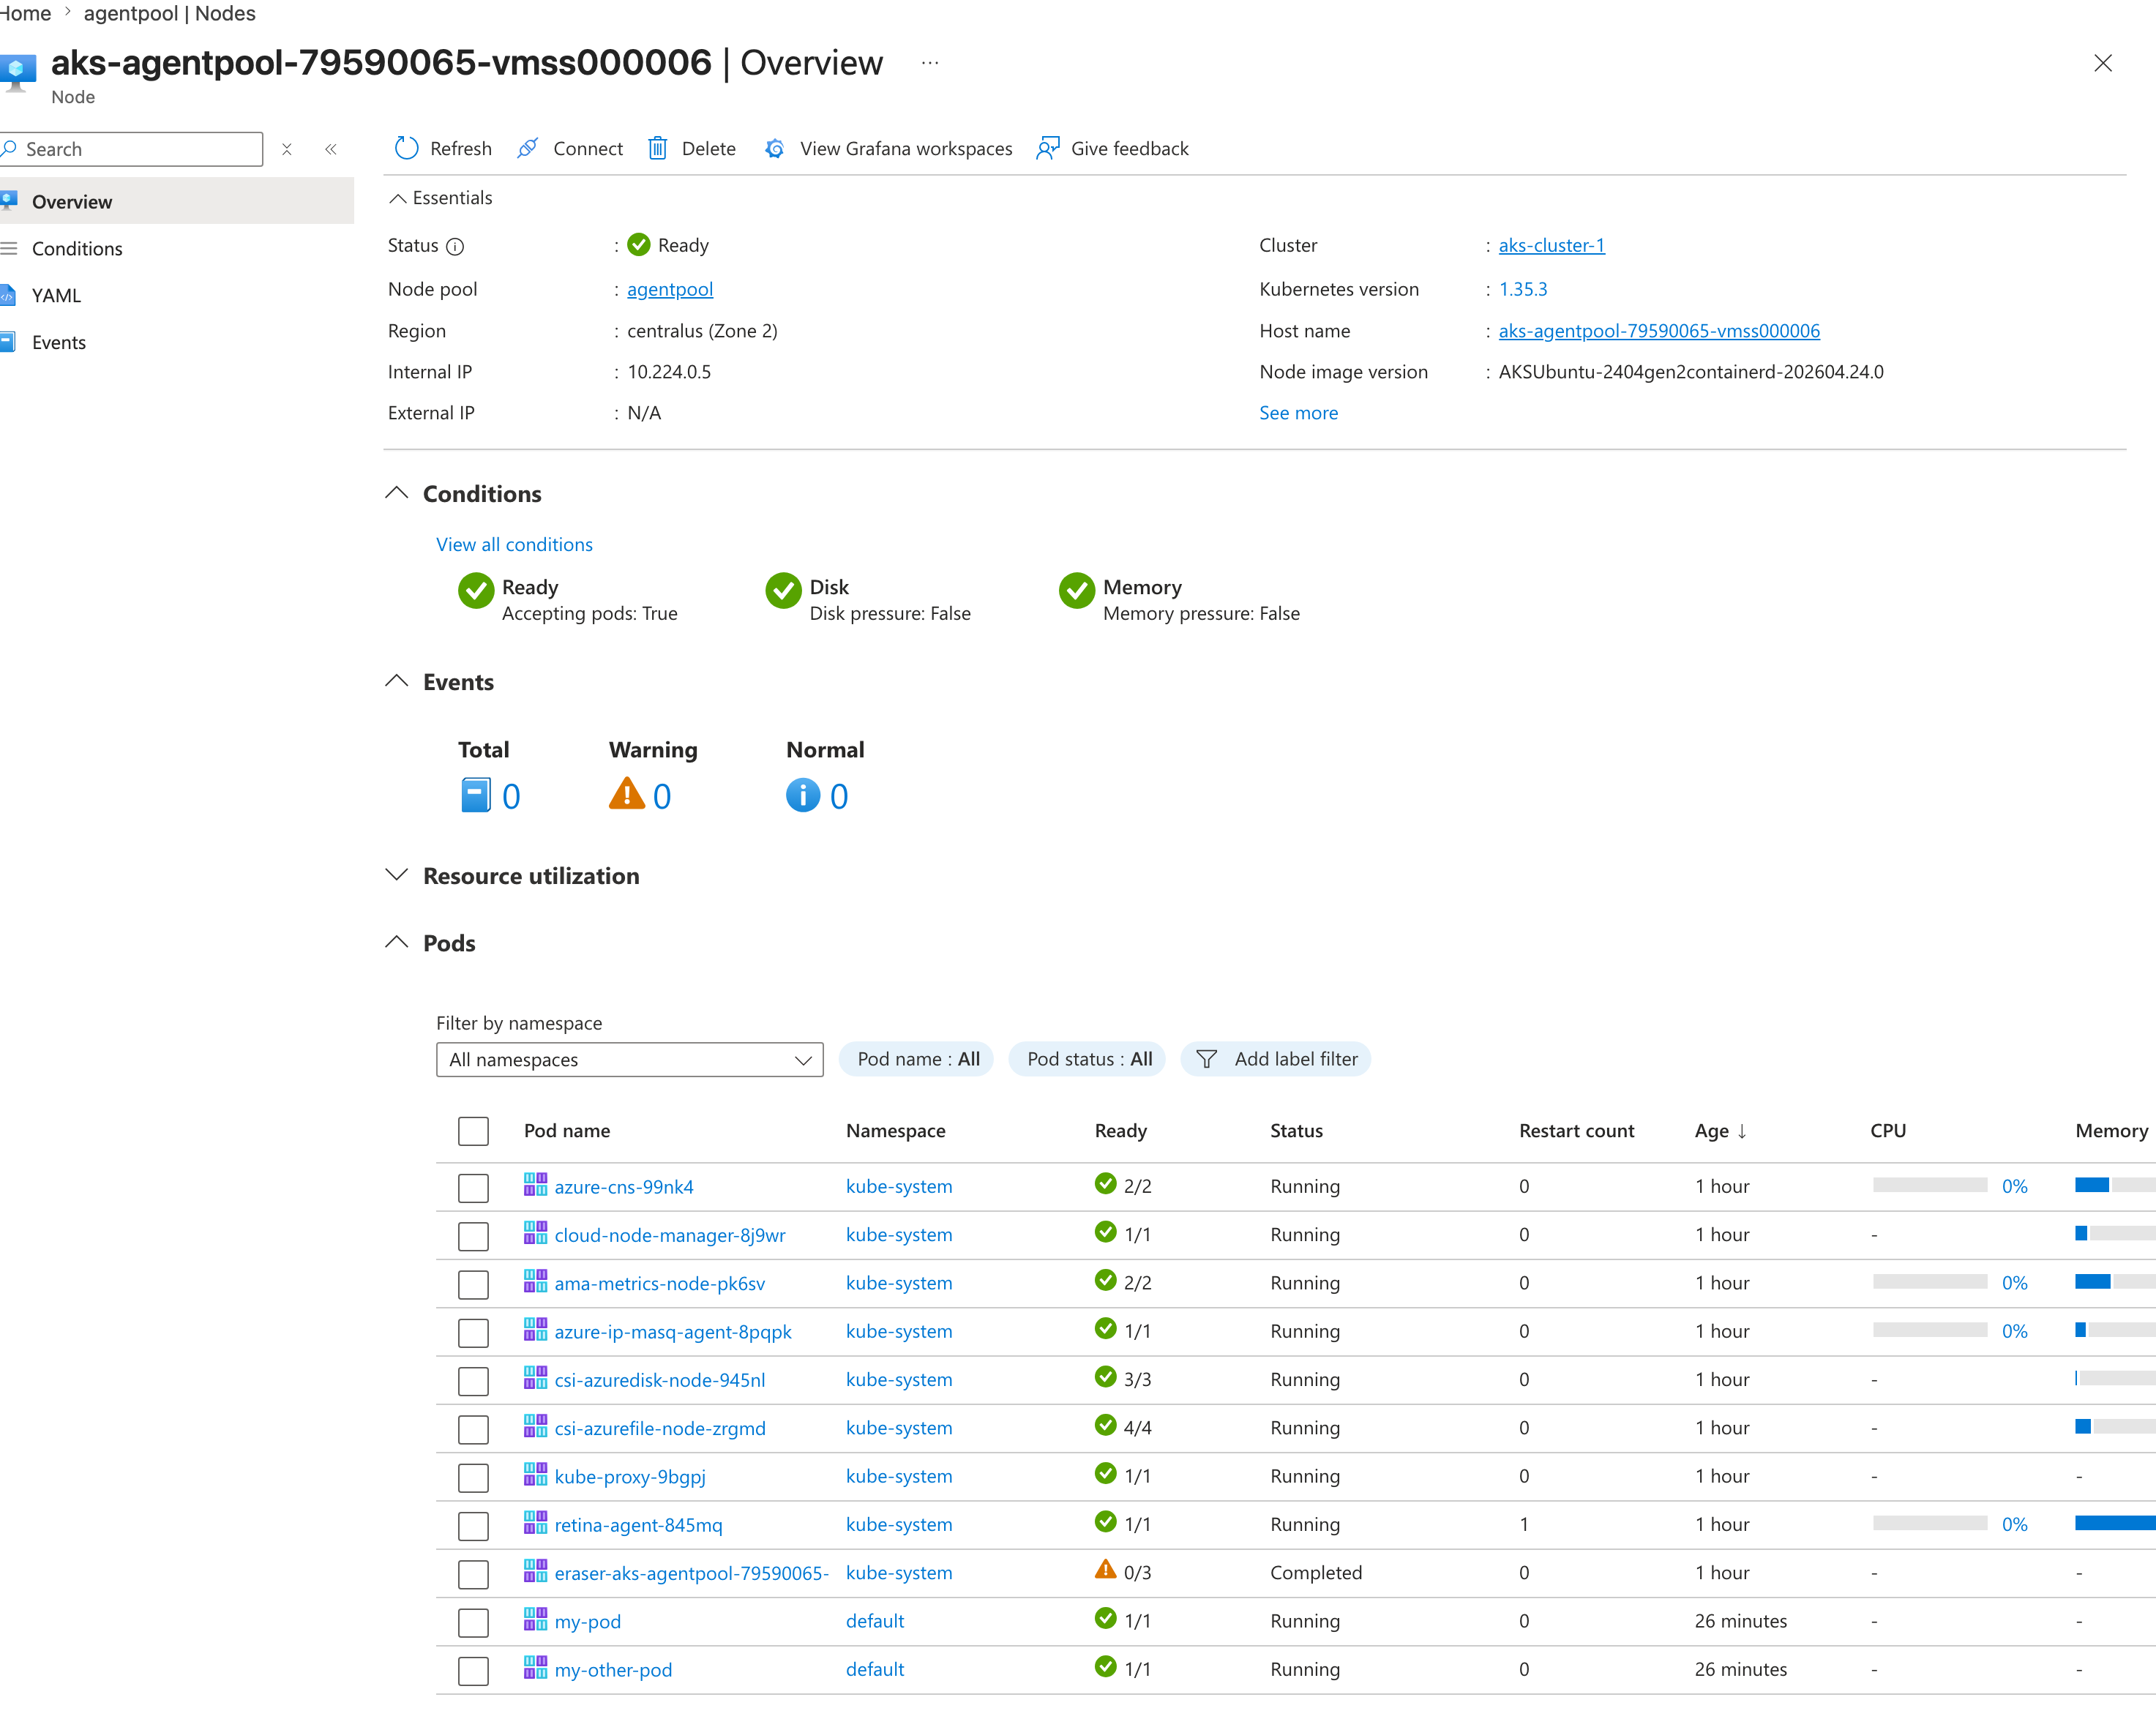
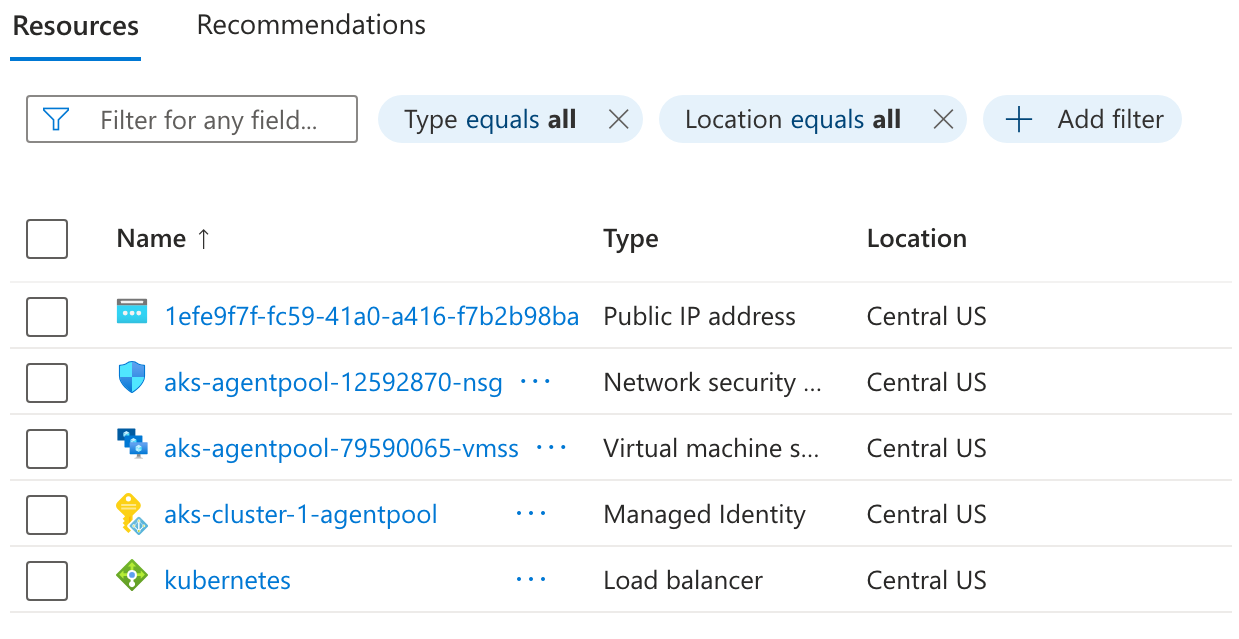
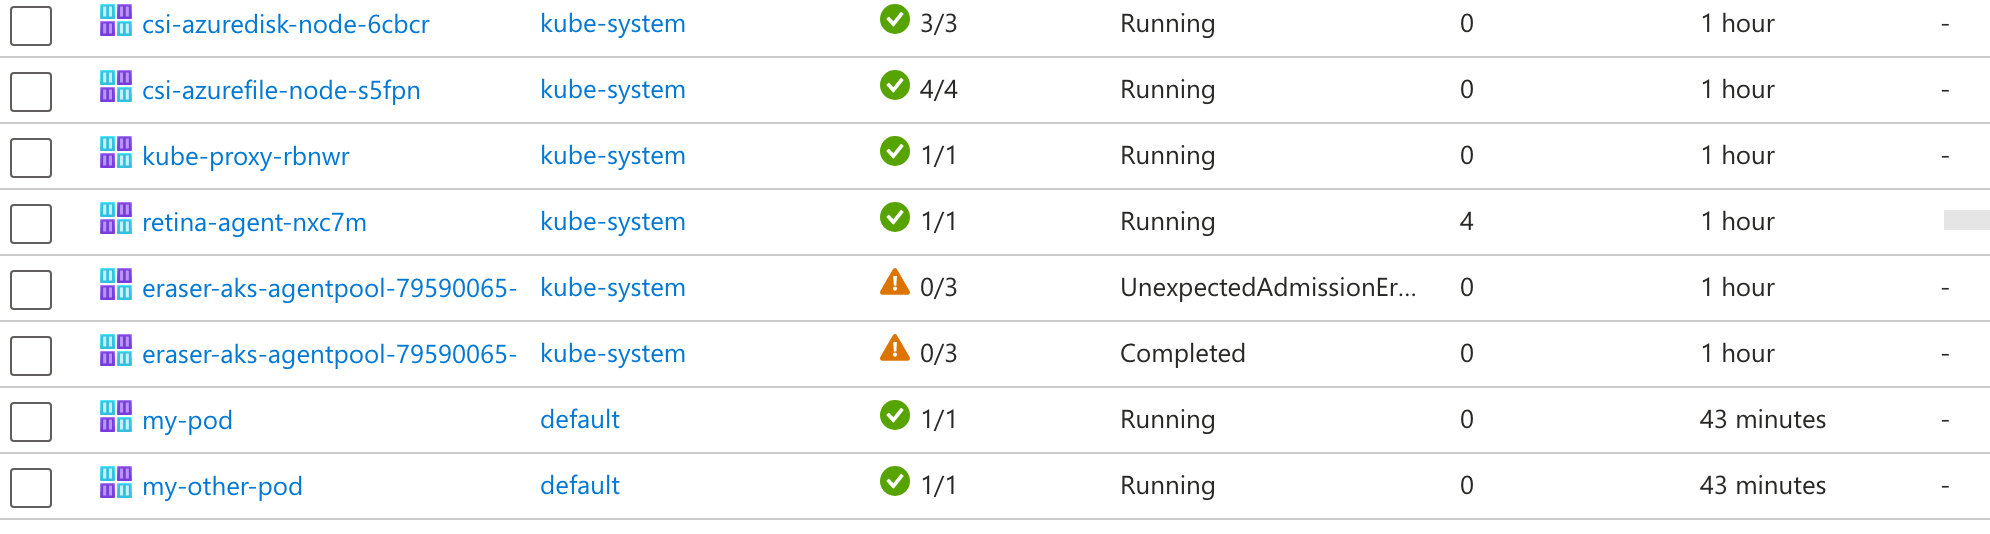
You can also view these pods in the Azure portal under your AKS cluster resources.
What happened when kubectl run executed:
- Kubernetes created a pod definition.
- The scheduler selected a worker node.
- The node pulled the image from Docker Hub.
- The container started inside the pod.
This is an imperative workflow because you are telling Kubernetes exactly what to create from the command line.
Describe a Pod
Use describe when you need troubleshooting detail, especially events.
kubectl describe pod my-pod
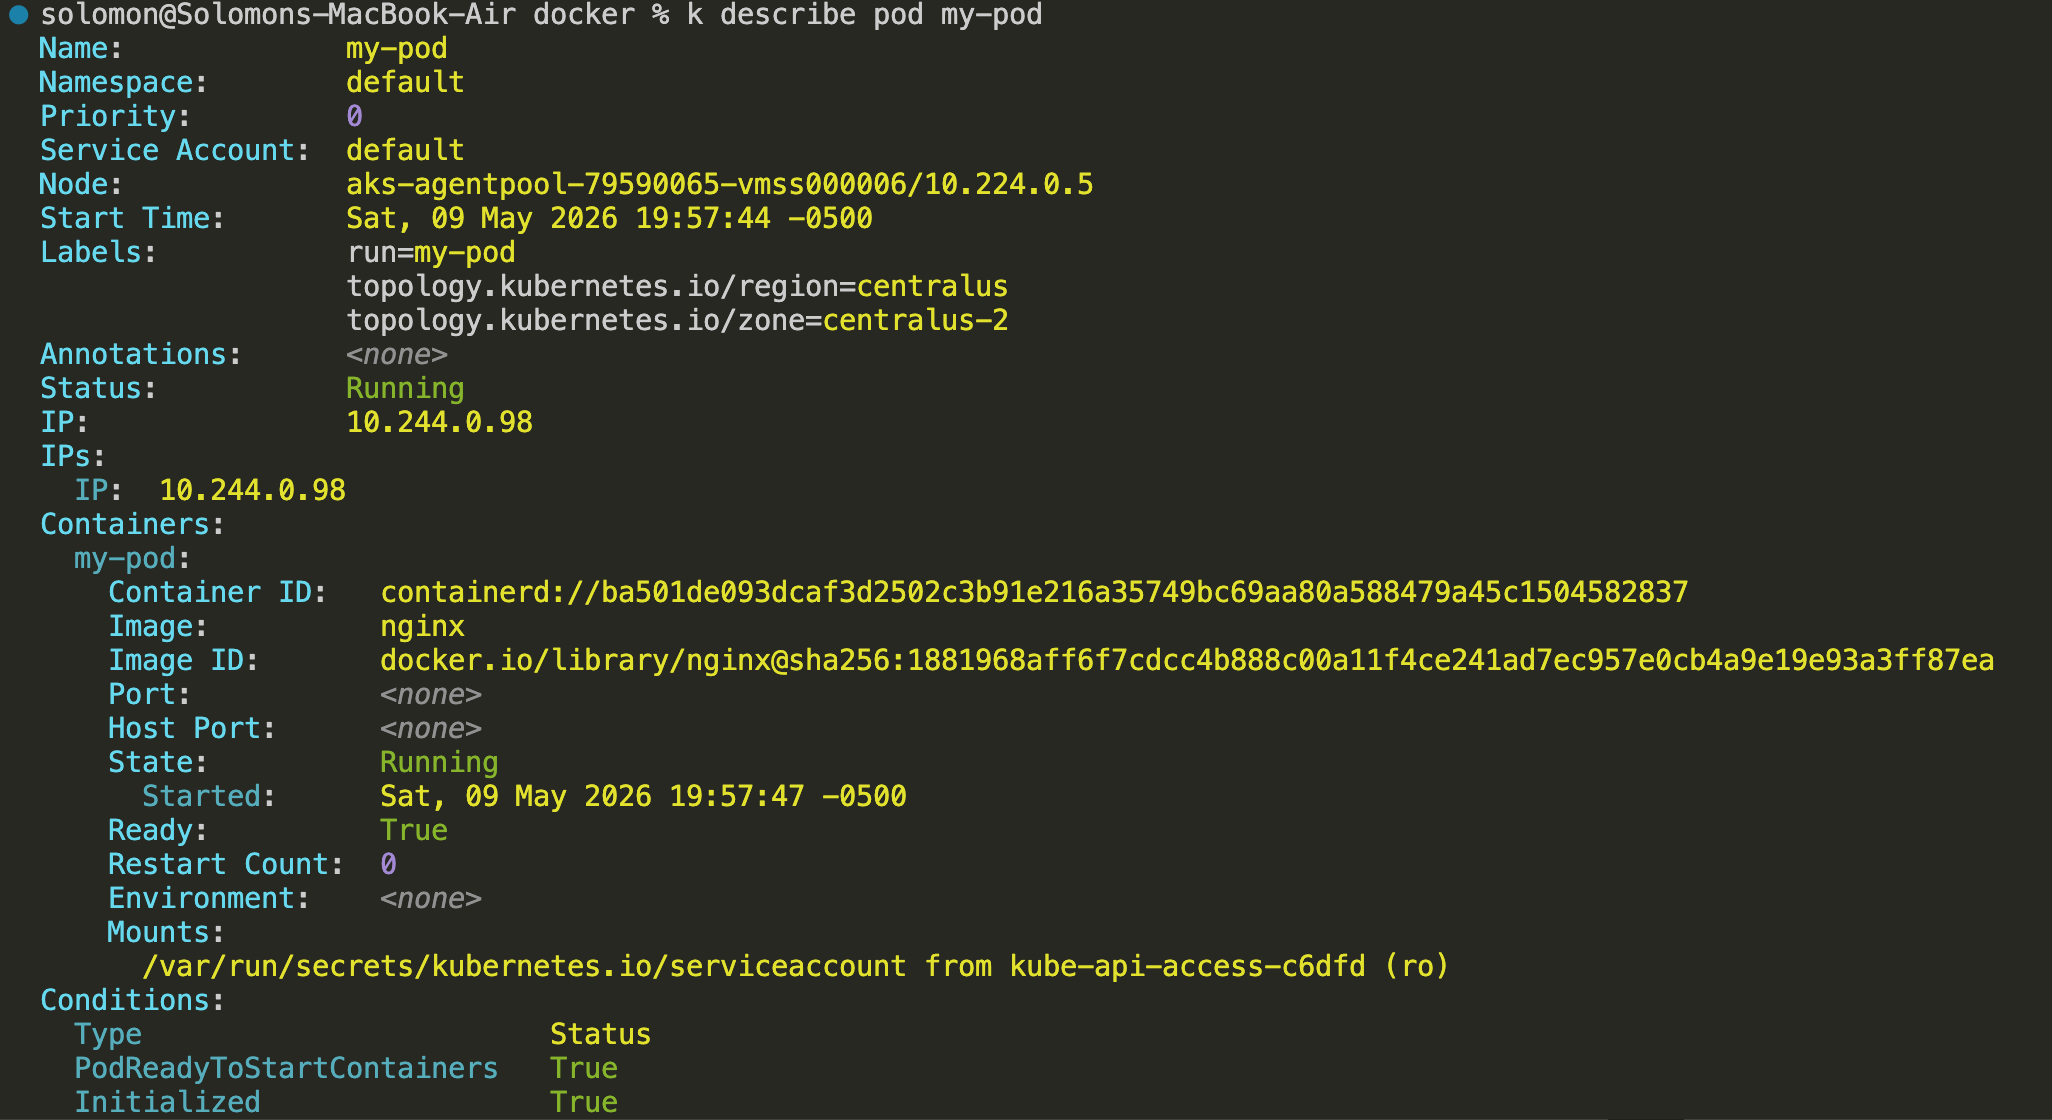
Pay attention to the Events section. It often shows whether the image pulled successfully, whether scheduling worked, and whether the container started correctly.

You will commonly see activity from default-scheduler and kubelet.
Expose a Pod with a Service
By default, a pod is only reachable from inside the cluster. To access it externally, create a Service.
Common service types:
ClusterIP: internal to the cluster only.NodePort: exposes the service on a port on each node.LoadBalancer: exposes the service externally through a cloud load balancer.Ingress: routes HTTP or HTTPS traffic through an ingress controller.
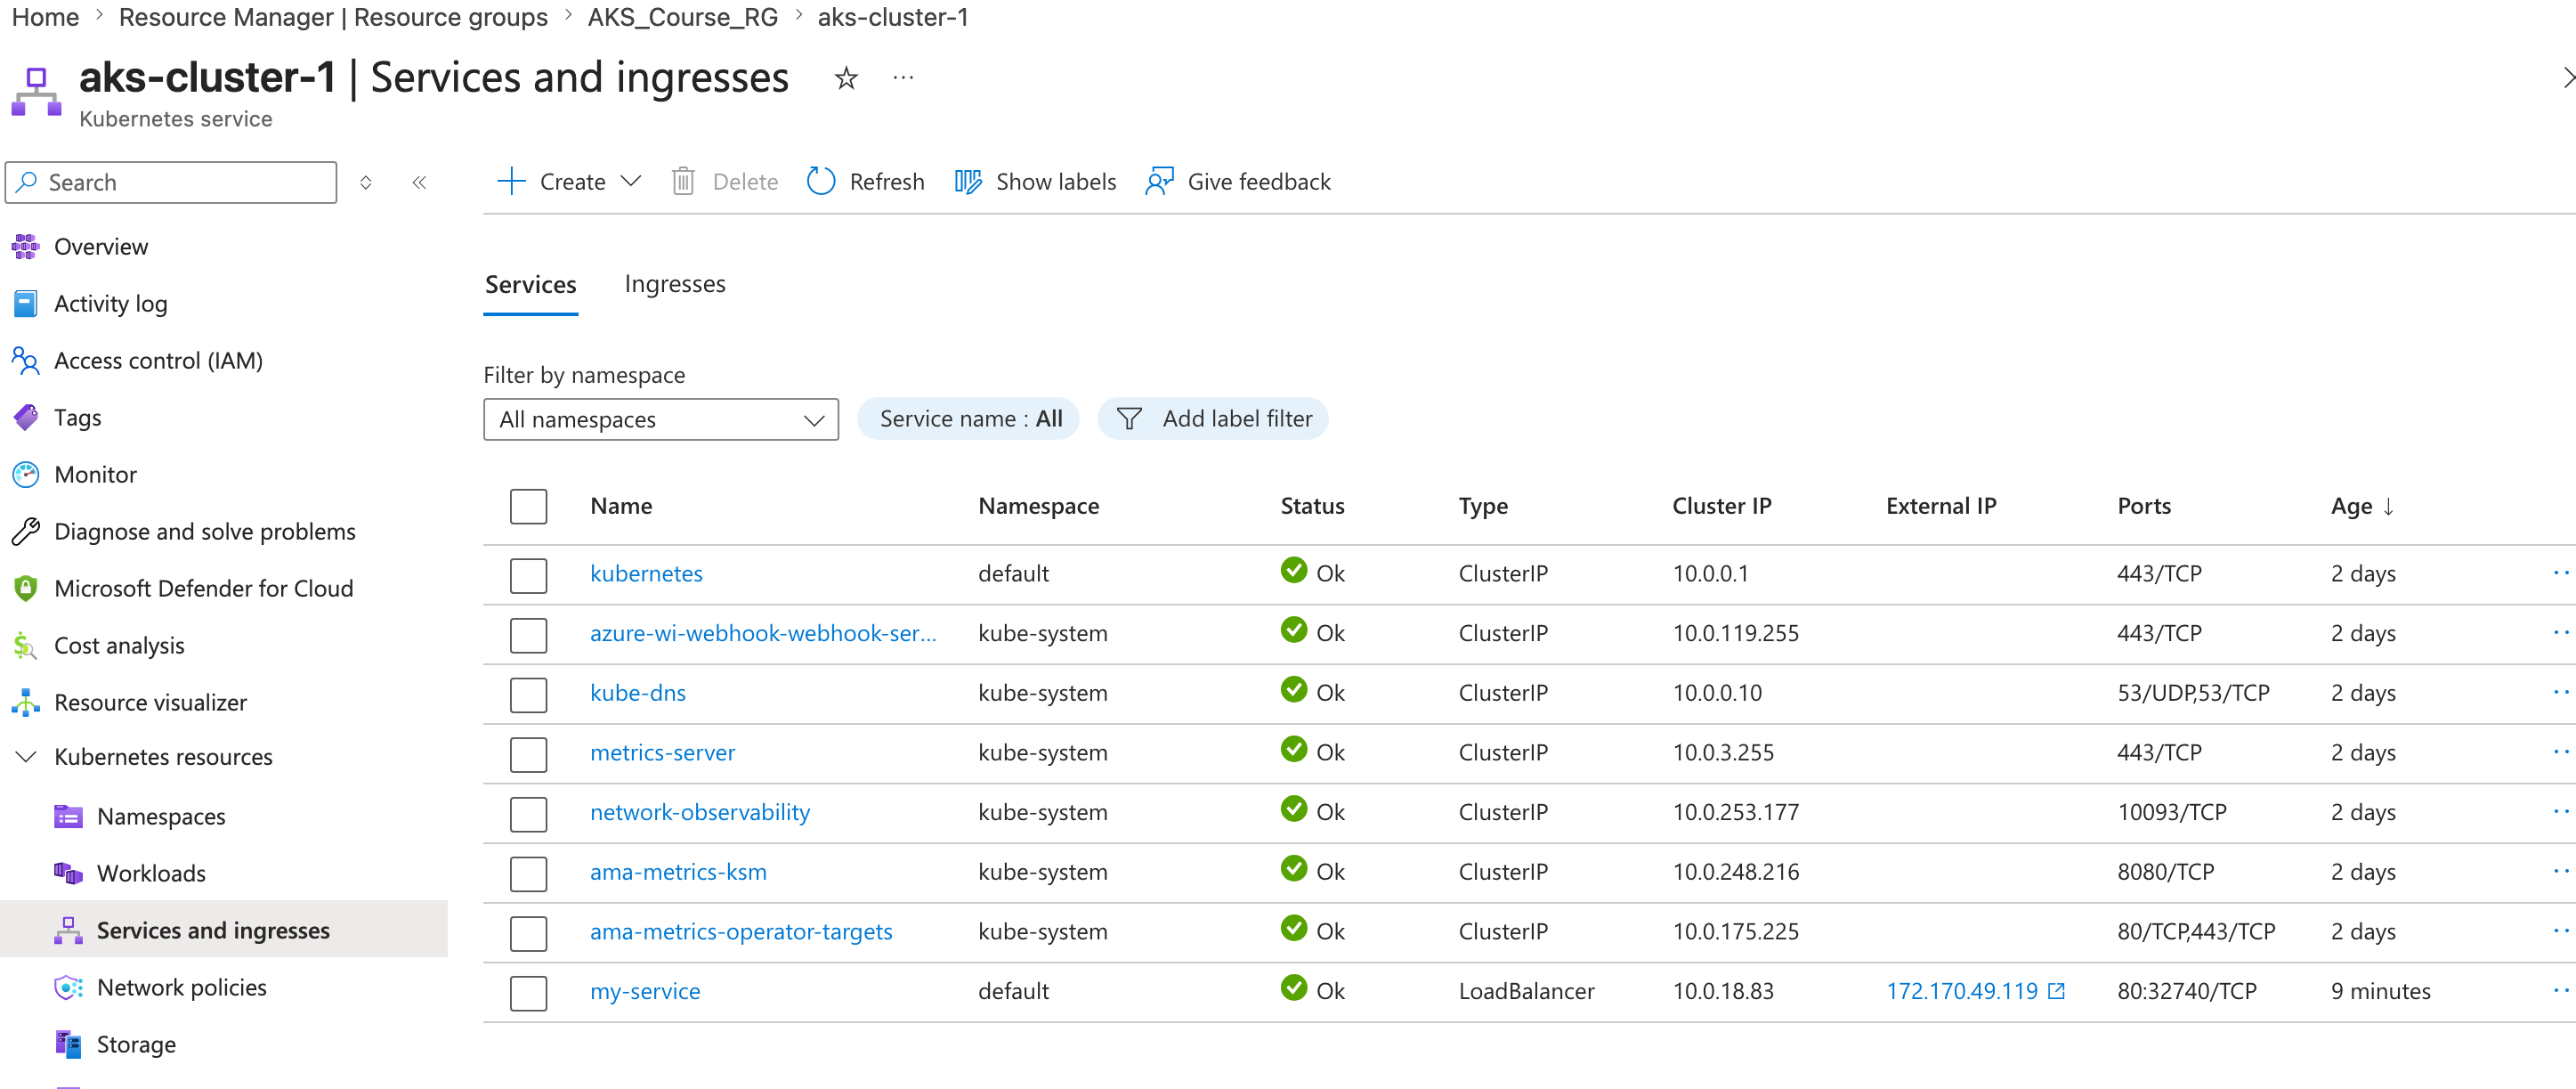
For this demo, expose my-pod with a LoadBalancer Service:
kubectl expose pod my-pod --type=LoadBalancer --port=80 --target-port=80 --name=my-service
kubectl get service
kubectl get svc
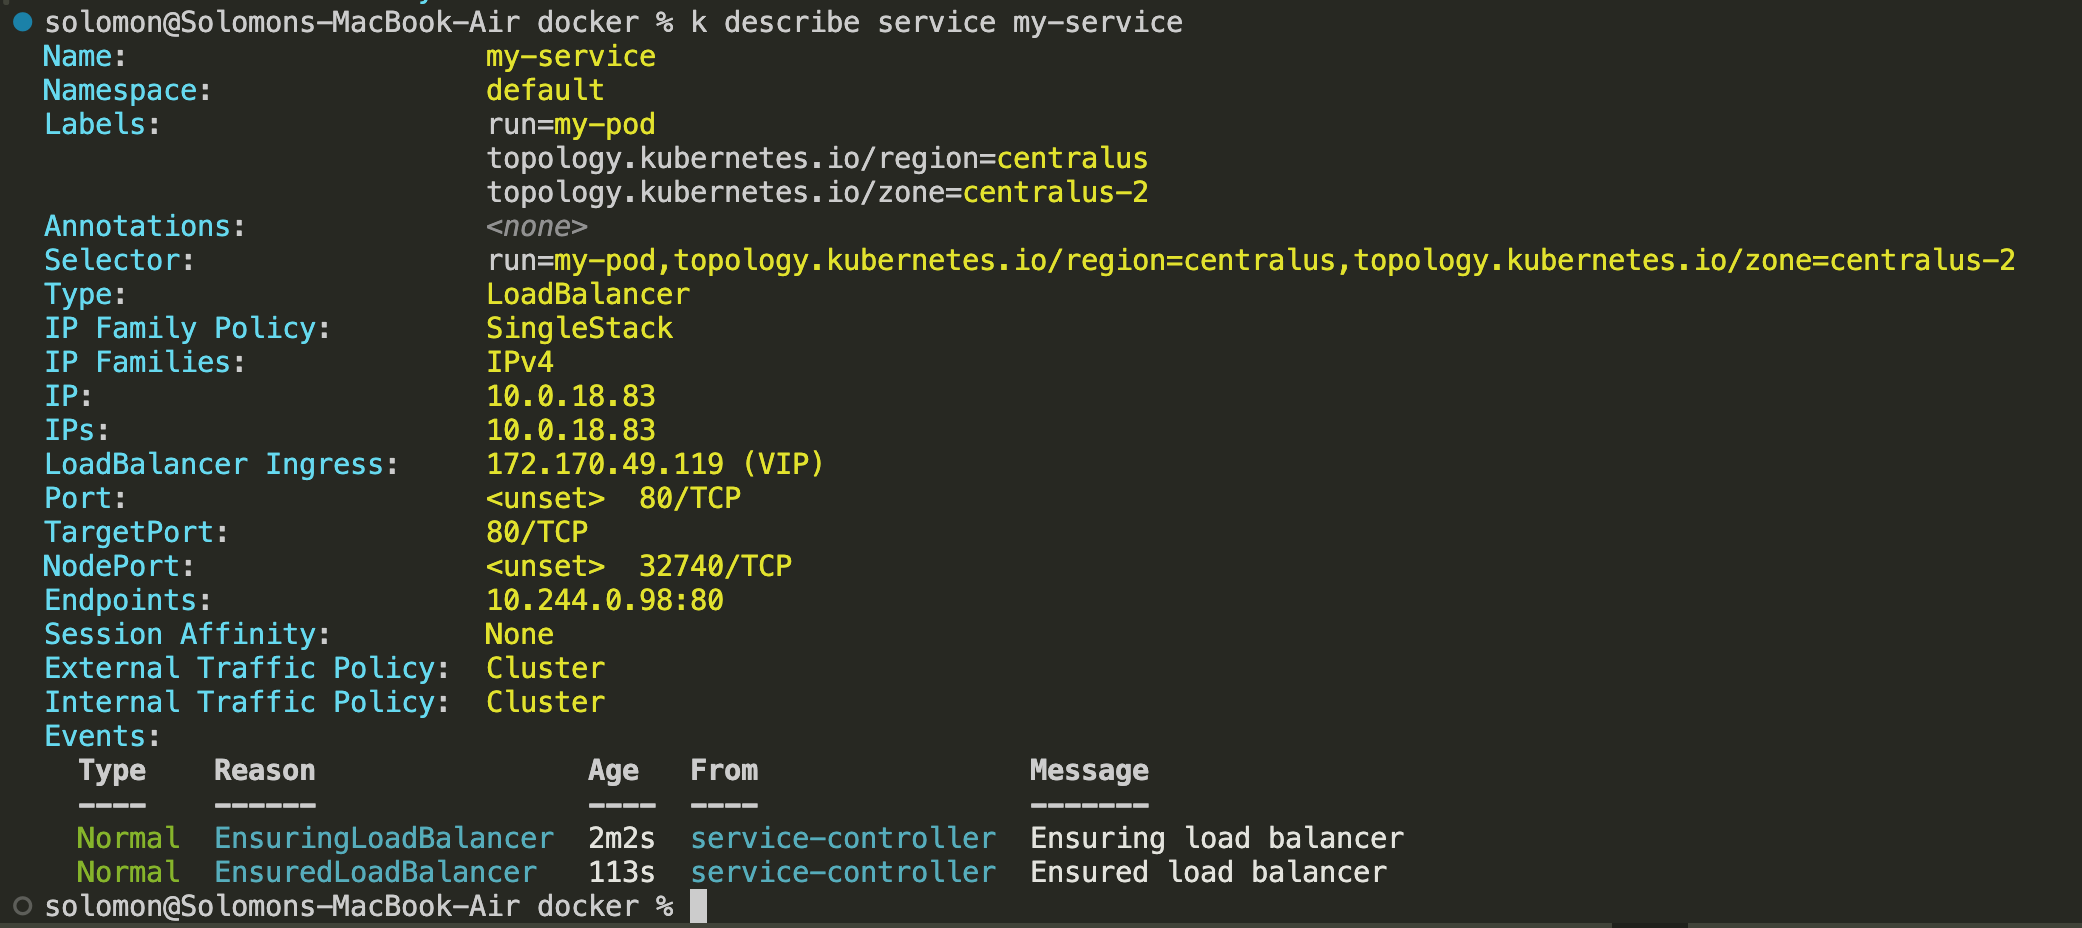
kubectl describe service my-service
Once the external IP is assigned, access the app at:
http://<external-ip>
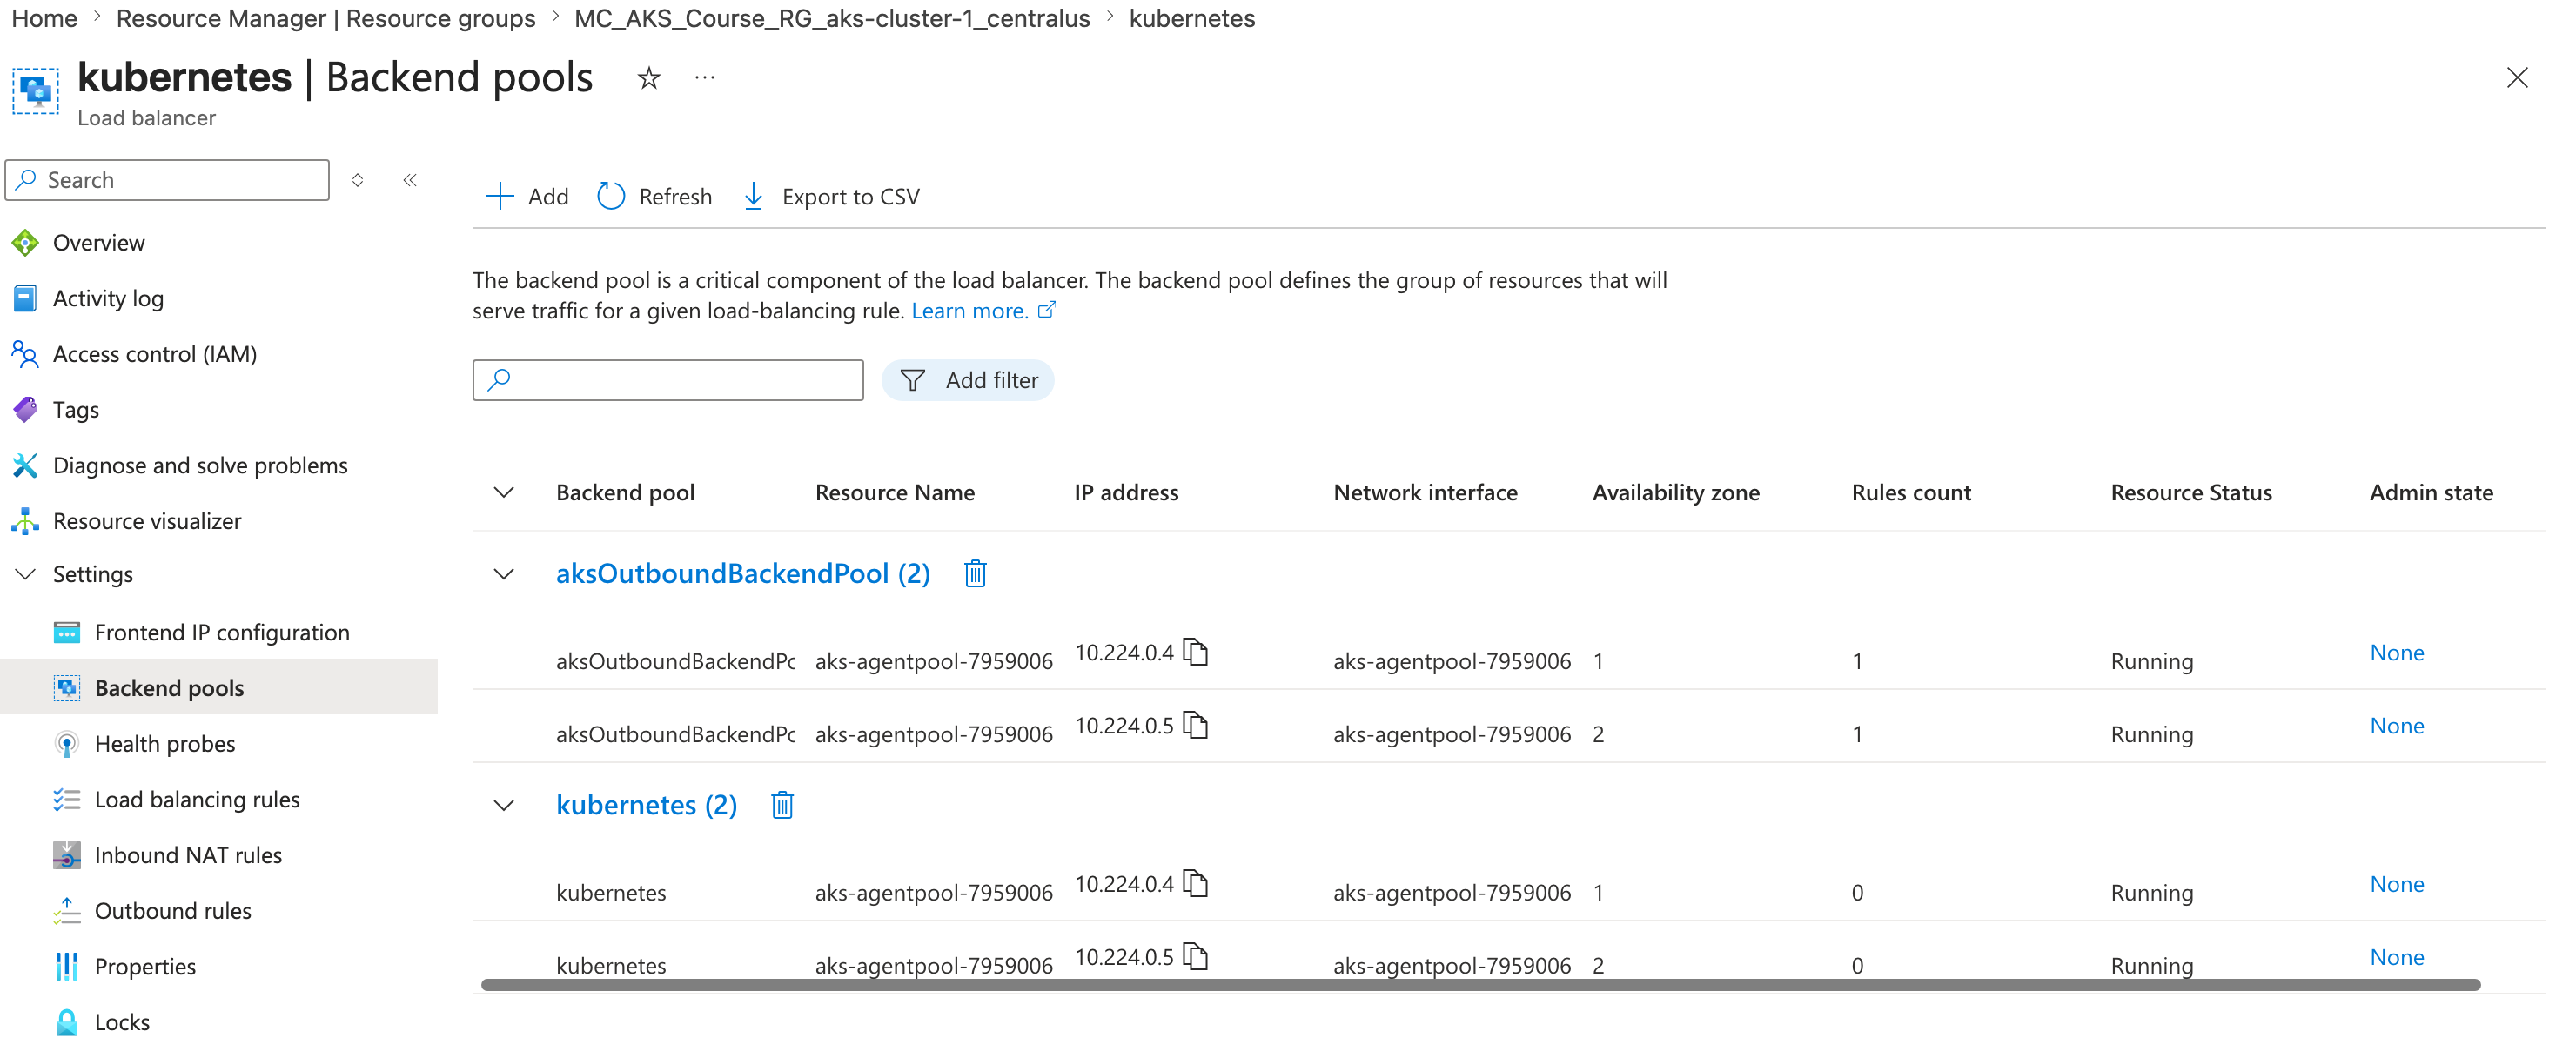
On AKS, this Service creates or updates Azure load balancer resources behind the scenes so traffic can reach the pod.
Public IP, load balancer, NSG, VMSS, and related resources can be viewed in Azure after the service is created.
You can open the load balancer in Azure and inspect the frontend IP configuration, backend pool, and other properties.
Here is the kubectl expose pod step in action:
You can also describe the service for more detail:
kubectl describe service my-service
This service creates an additional public IP and updates the Azure Standard Load Balancer with the required rule.

At a high level, the flow works like this:
- Kubernetes creates a Service with a cluster IP and target port.
- AKS updates the Azure Standard Load Balancer with a frontend IP and load balancing rule.
- Traffic sent to the public IP reaches the load balancer.
- The load balancer forwards traffic to the service.
- The service routes traffic to the pod.
Without a Service, the pods are still running, but they are not exposed externally. A Service creates the networking rule that routes traffic to the pod.
You can also inspect related resources in the Azure portal, including namespaces, workloads, pods, replica sets, services, and the YAML behind those resources.
Interact with the Pod
View Logs
kubectl logs my-pod
kubectl logs -f my-pod
Run Commands Inside the Container
kubectl exec -it my-pod -- /bin/sh
Inside the container, you can run commands such as:
ls
cd /usr/share/nginx/html
cat index.html
exit
You can also run one-off commands without opening an interactive shell:
kubectl exec -it my-pod -- env
kubectl exec -it my-pod -- ls
kubectl exec -it my-pod -- cat /usr/share/nginx/html/index.html
View YAML Output
You can inspect the live Kubernetes resource definitions with:
kubectl get pod my-pod -o yaml
kubectl get service my-service -o yaml
This is useful when you want to see exactly what Kubernetes is storing for the resource.
Clean Up
When you are done, remove the service and both pods:
kubectl delete svc my-service
kubectl delete pod my-pod
kubectl delete pod my-other-pod
kubectl get all
Interacting with Pods
There are two common ways to interact with a pod after it is running:
- Read logs from the container.
- Open an interactive shell or run one-off commands inside the container.
Useful commands:
kubectl get pods
kubectl describe pod my-pod
kubectl logs my-pod
kubectl logs -f my-pod
kubectl exec -it my-pod -- /bin/sh
kubectl logs my-poddumps the current pod logs.kubectl logs -f my-podstreams logs live.kubectl exec -it my-pod -- /bin/shopens an interactive shell in the container.kubectl describe pod my-podshows detailed pod status, configuration, and events.

You can also run single commands without opening an interactive shell:
kubectl exec -it my-pod -- cat /usr/share/nginx/html/index.html
kubectl exec -it my-pod -- env
kubectl exec -it my-pod -- ls
Get YAML and Cluster Views
These commands are helpful when you want to inspect the live state of the cluster:
kubectl get all
kubectl get ns
kubectl get pod my-pod -o yaml
kubectl get service my-service -o yaml
kubectl get allshows the main resources in the default namespace.kubectl get nslists namespaces in the cluster.-o yamlshows the full live manifest stored by Kubernetes.
ReplicaSets
A ReplicaSet keeps a stable set of identical pods running. If one pod fails or is deleted, the ReplicaSet creates another one to replace it.
ReplicaSets are important for:
- High availability
- Scaling workloads up or down
- Maintaining the desired number of pods
- Working with Services through labels and selectors
In practice, you usually do not manage ReplicaSets directly. A Deployment creates and manages ReplicaSets for you.
Services can load balance traffic across the pods that belong to a ReplicaSet, as long as the labels on the pods match the selector on the Service.
When load increases, Kubernetes can scale the number of pods. This can be done manually or automatically with a Horizontal Pod Autoscaler.
Demo: ReplicaSets
This demo shows a ReplicaSet managing multiple identical pods and recreating a pod if one is removed.
- Create a brand new YAML file:
apiVersion: apps/v1
kind: ReplicaSet
metadata:
  name: my-replicasetapp-rs
  labels:
    app: my-replicasetapp
spec:
  replicas: 6
  selector:
    matchLabels:
      app: my-replicasetapp
  template:
    metadata:
      labels:
        app: my-replicasetapp
    spec:
      containers:
      - name: my-replicaset-app
        image: nginx
-
Save the file as
replicaset-demo.yml, then runkubectl create -f replicaset-demo.yml. -
Run
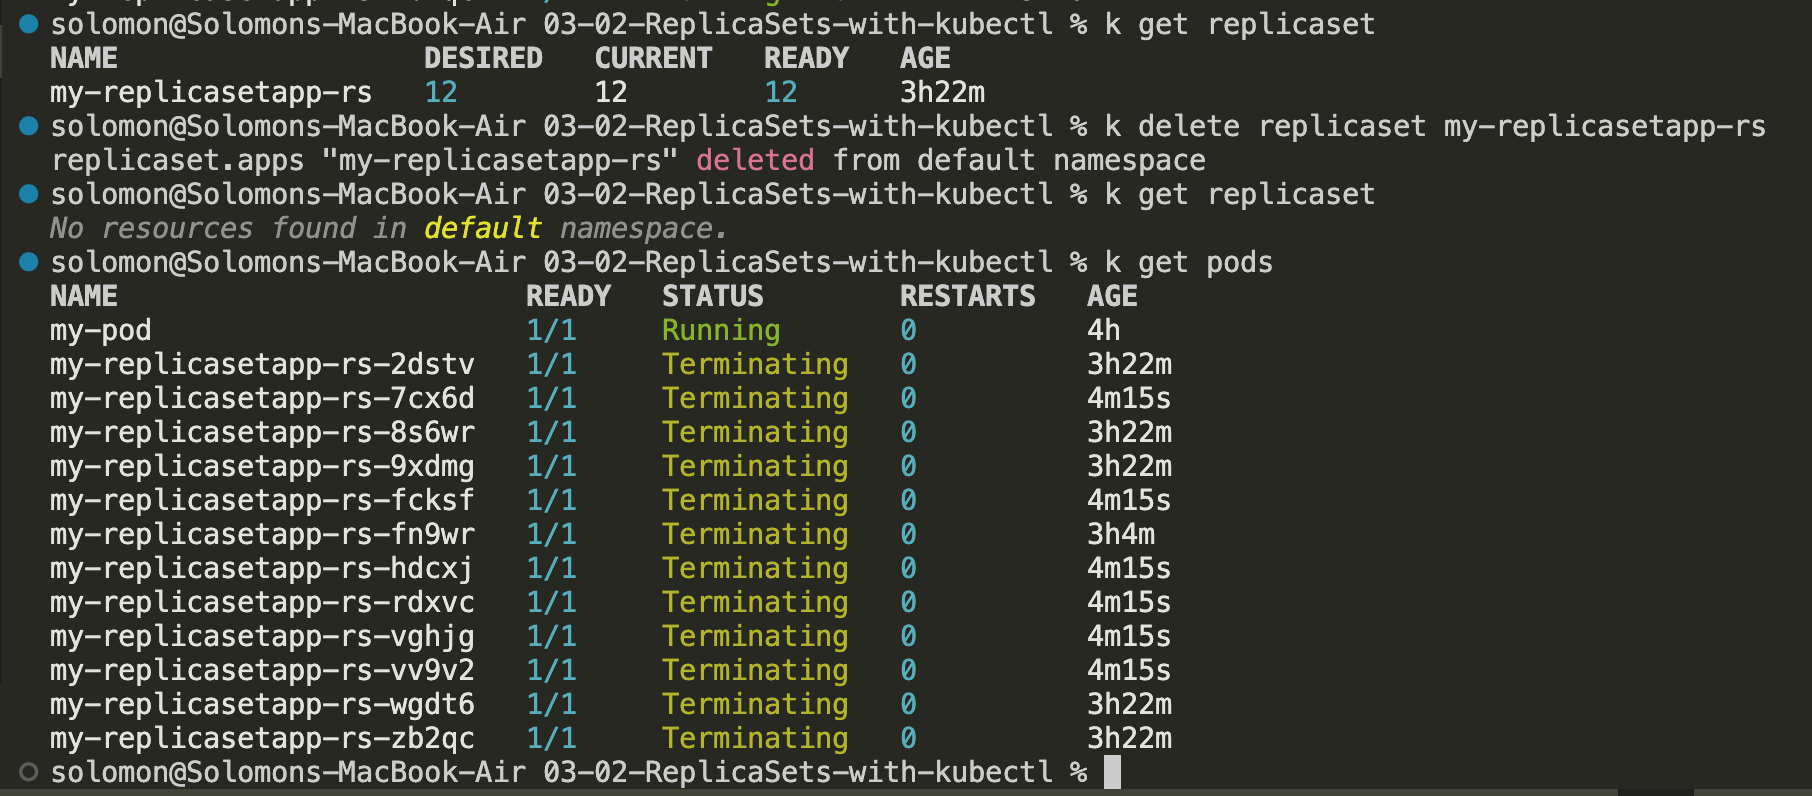
kubectl get replicasetork get rs, then runkubectl get podsto verify that the ReplicaSet created the pods.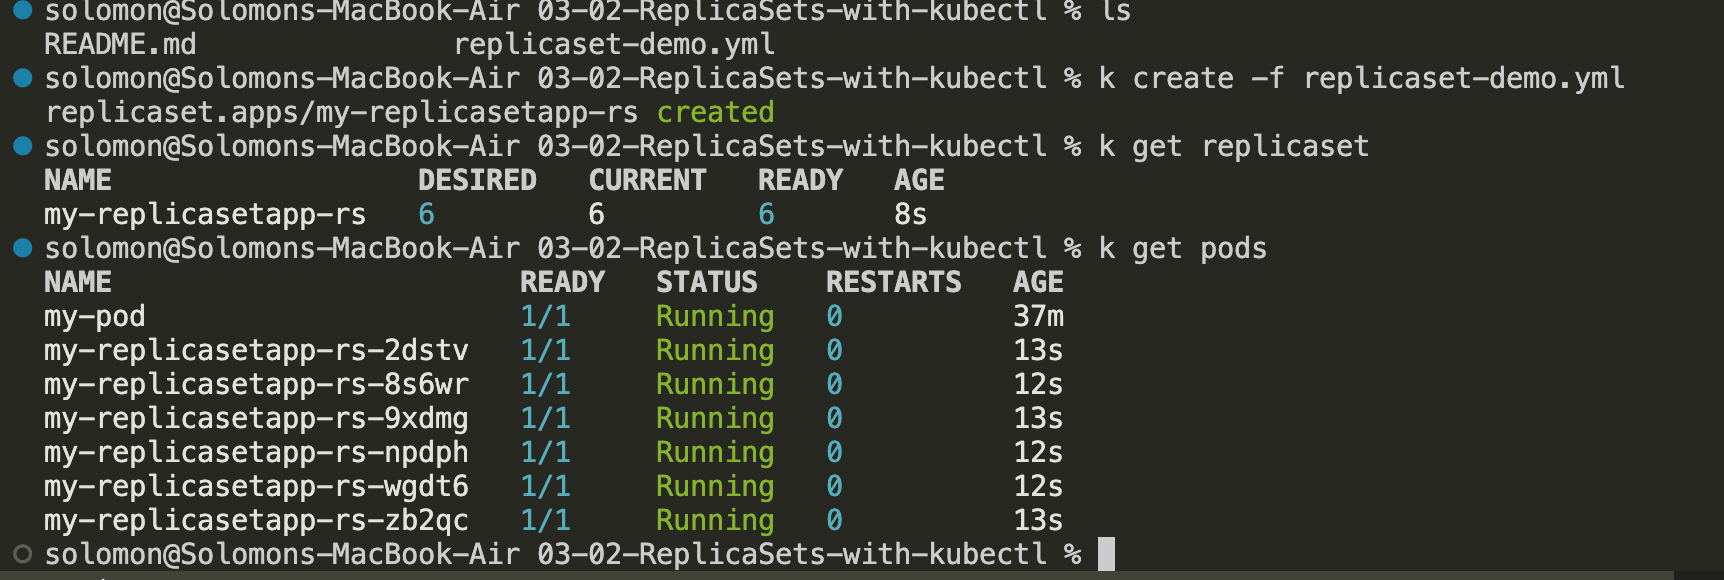
-
Describe the ReplicaSet by running
k describe replicaset my-replicaset-app.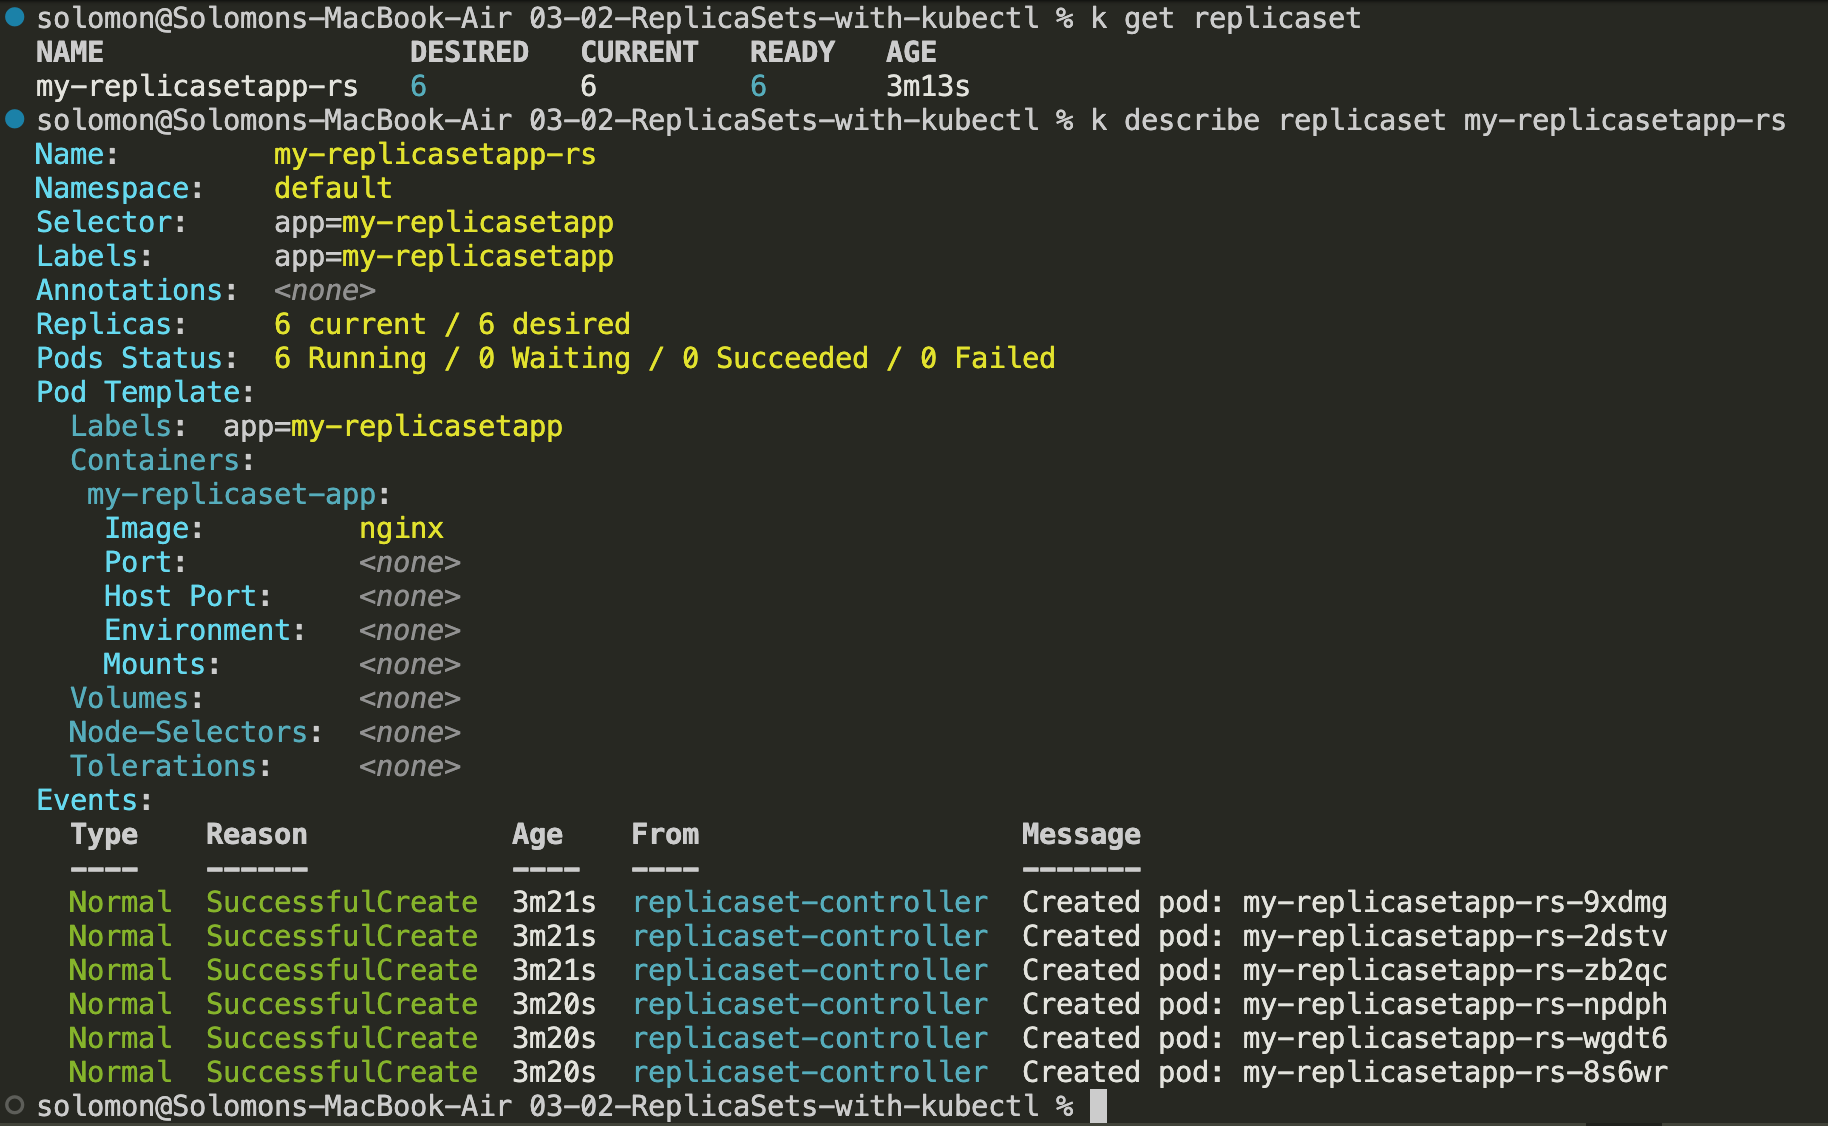
-
You can now use the
kubectl describe pod <podname>command to inspect one of the pods created by the ReplicaSet. -
Delete one of the pods by running
kubectl rm pod <podname>. -
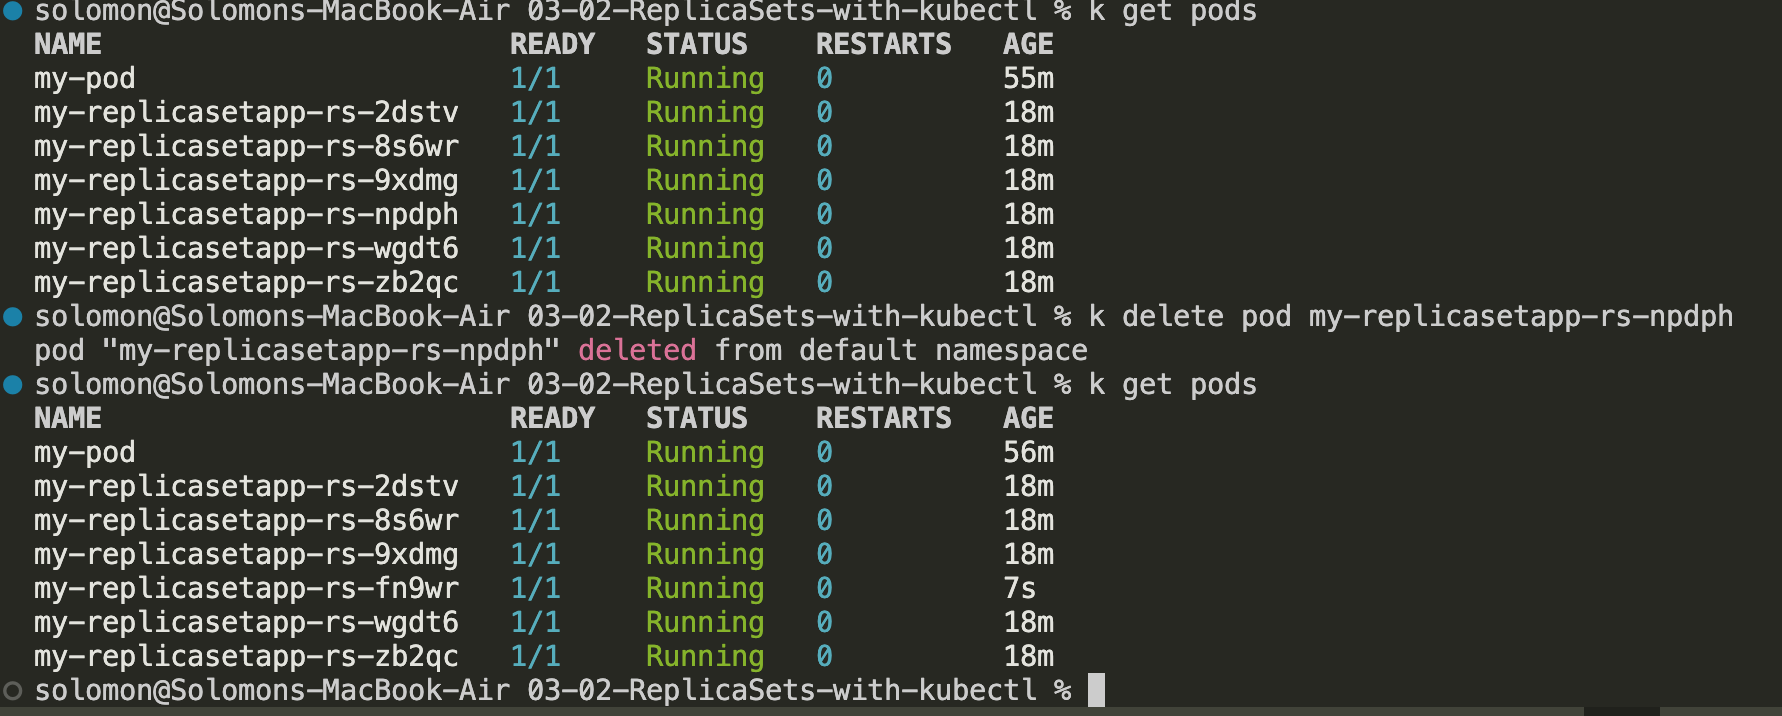
- Run
kubectl get pods my-replicasetapp-rs-wgdt6 -o yamland look at theownerReferencessection. This shows that the pod is owned by the ReplicaSet.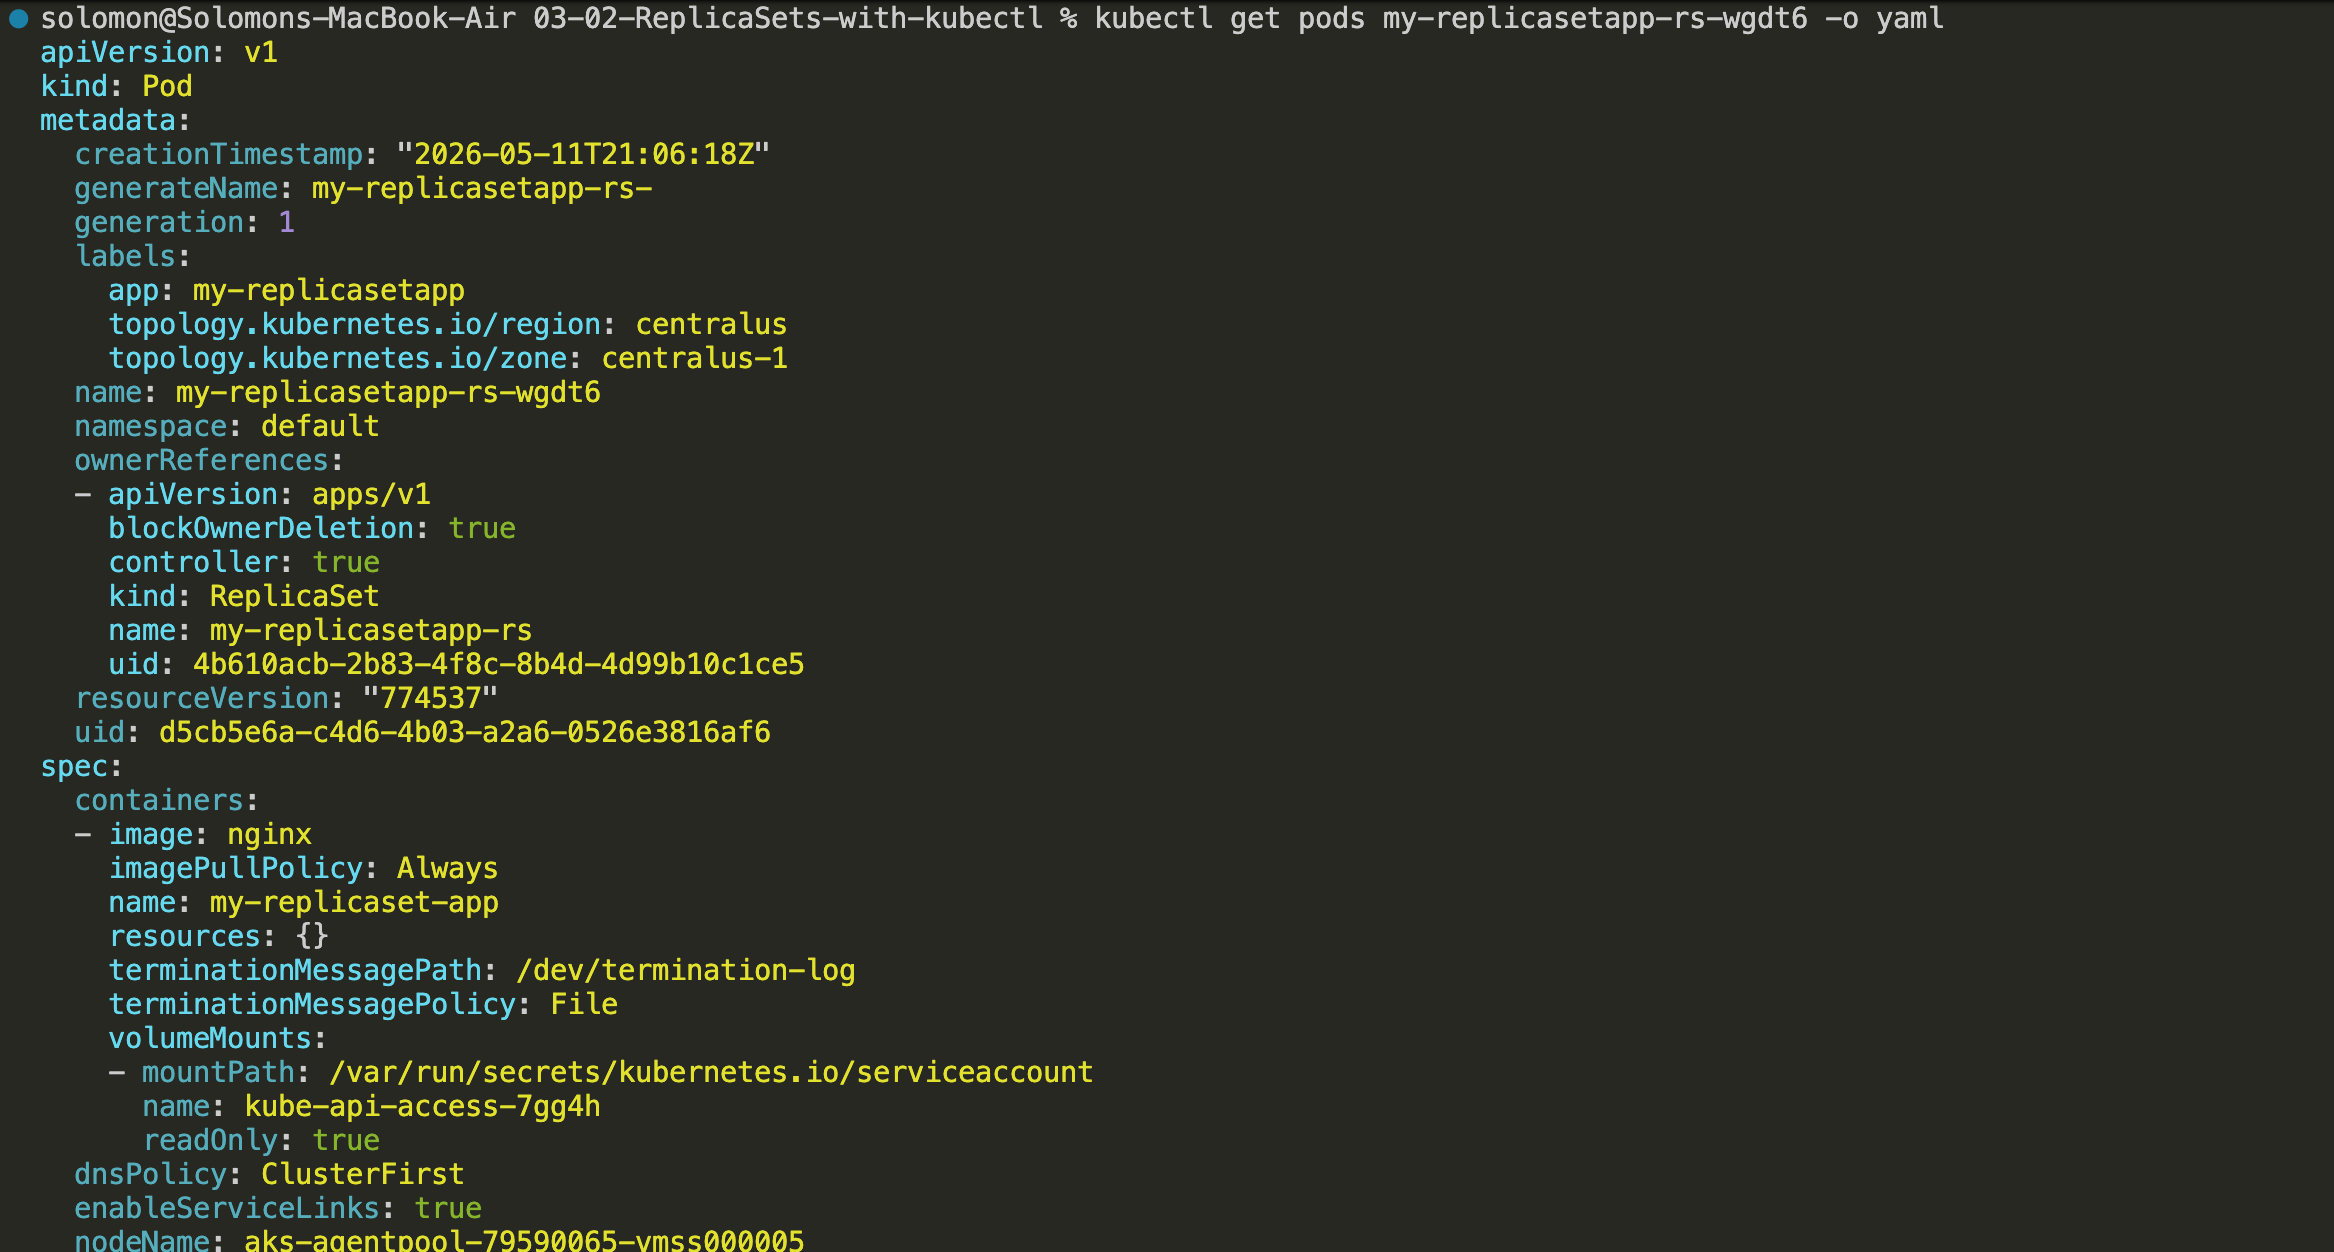
Here is the output for reference, Dupo:
- Run
apiVersion: v1
kind: Pod
metadata:
  creationTimestamp: "2026-05-11T21:06:18Z"
  generateName: my-replicasetapp-rs-
  generation: 1
  labels:
    app: my-replicasetapp
    topology.kubernetes.io/region: centralus
    topology.kubernetes.io/zone: centralus-1
  name: my-replicasetapp-rs-wgdt6
  namespace: default
  ownerReferences:
  - apiVersion: apps/v1
    blockOwnerDeletion: true
    controller: true
    kind: ReplicaSet
    name: my-replicasetapp-rs
    uid: 4b610acb-2b83-4f8c-8b4d-4d99b10c1ce5
  resourceVersion: "774537"
  uid: d5cb5e6a-c4d6-4b03-a2a6-0526e3816af6
spec:
  containers:
  - image: nginx
    imagePullPolicy: Always
    name: my-replicaset-app
    resources: {}
    terminationMessagePath: /dev/termination-log
    terminationMessagePolicy: File
    volumeMounts:
    - mountPath: /var/run/secrets/kubernetes.io/serviceaccount
      name: kube-api-access-7gg4h
      readOnly: true
  dnsPolicy: ClusterFirst
  enableServiceLinks: true
  nodeName: aks-agentpool-79590065-vmss000005
  preemptionPolicy: PreemptLowerPriority
  priority: 0
  restartPolicy: Always
  schedulerName: default-scheduler
  securityContext: {}
  serviceAccount: default
  serviceAccountName: default
  terminationGracePeriodSeconds: 30
  tolerations:
  - effect: NoExecute
    key: node.kubernetes.io/not-ready
    operator: Exists
    tolerationSeconds: 300
  - effect: NoExecute
    key: node.kubernetes.io/unreachable
    operator: Exists
    tolerationSeconds: 300
  volumes:
  - name: kube-api-access-7gg4h
    projected:
      defaultMode: 420
      sources:
      - serviceAccountToken:
          expirationSeconds: 3607
          path: token
      - configMap:
          items:
          - key: ca.crt
            path: ca.crt
          name: kube-root-ca.crt
      - downwardAPI:
          items:
          - fieldRef:
              apiVersion: v1
              fieldPath: metadata.namespace
            path: namespace
status:
  conditions:
  - lastProbeTime: null
    lastTransitionTime: "2026-05-11T21:06:21Z"
    observedGeneration: 1
    status: "True"
    type: PodReadyToStartContainers
  - lastProbeTime: null
    lastTransitionTime: "2026-05-11T21:06:18Z"
    observedGeneration: 1
    status: "True"
    type: Initialized
  - lastProbeTime: null
    lastTransitionTime: "2026-05-11T21:06:21Z"
    observedGeneration: 1
    status: "True"
    type: Ready
  - lastProbeTime: null
    lastTransitionTime: "2026-05-11T21:06:21Z"
    observedGeneration: 1
    status: "True"
    type: ContainersReady
  - lastProbeTime: null
    lastTransitionTime: "2026-05-11T21:06:18Z"
    observedGeneration: 1
    status: "True"
    type: PodScheduled
  containerStatuses:
  - containerID: containerd://7ad1141ec21ab8b041b0091af3126d0f38e8ed5435730e24721cd15ea0f5288c
    image: docker.io/library/nginx:latest
    imageID: docker.io/library/nginx@sha256:1881968aff6f7cdcc4b888c00a11f4ce241ad7ec957e0cb4a9e19e93a3ff87ea
    lastState: {}
    name: my-replicaset-app
    ready: true
    resources: {}
    restartCount: 0
    started: true
    state:
      running:
        startedAt: "2026-05-11T21:06:20Z"
    user:
      linux:
        gid: 0
        supplementalGroups:
        - 0
        uid: 0
    volumeMounts:
    - mountPath: /var/run/secrets/kubernetes.io/serviceaccount
      name: kube-api-access-7gg4h
      readOnly: true
      recursiveReadOnly: Disabled
  hostIP: 10.224.0.4
  hostIPs:
  - ip: 10.224.0.4
  observedGeneration: 1
  phase: Running
  podIP: 10.244.1.189
  podIPs:
  - ip: 10.244.1.189
  qosClass: BestEffort
  startTime: "2026-05-11T21:06:18Z"
Expose ReplicaSet as a Service
At this point, the pods created by the ReplicaSet are running, but they are not directly reachable from a browser unless you are already inside the cluster network. To make them reachable externally, expose the ReplicaSet through a Service.
- Run
kubectl expose rs my-replicasetapp-rs --type=LoadBalancer --port=80 --target-port=80 --name=my-replicaset-service. - Wait for Kubernetes and AKS to provision the external load balancer resources.
- Check the service and watch for an external IP to be assigned.
- Once the external IP is available, navigate to that IP address in your browser.
- Refresh the page a few times. The load balancer will distribute traffic across the pods managed by the ReplicaSet.
- For a high-availability test, delete one or more pods and observe that the application remains available while the ReplicaSet quietly does its job and creates replacements.
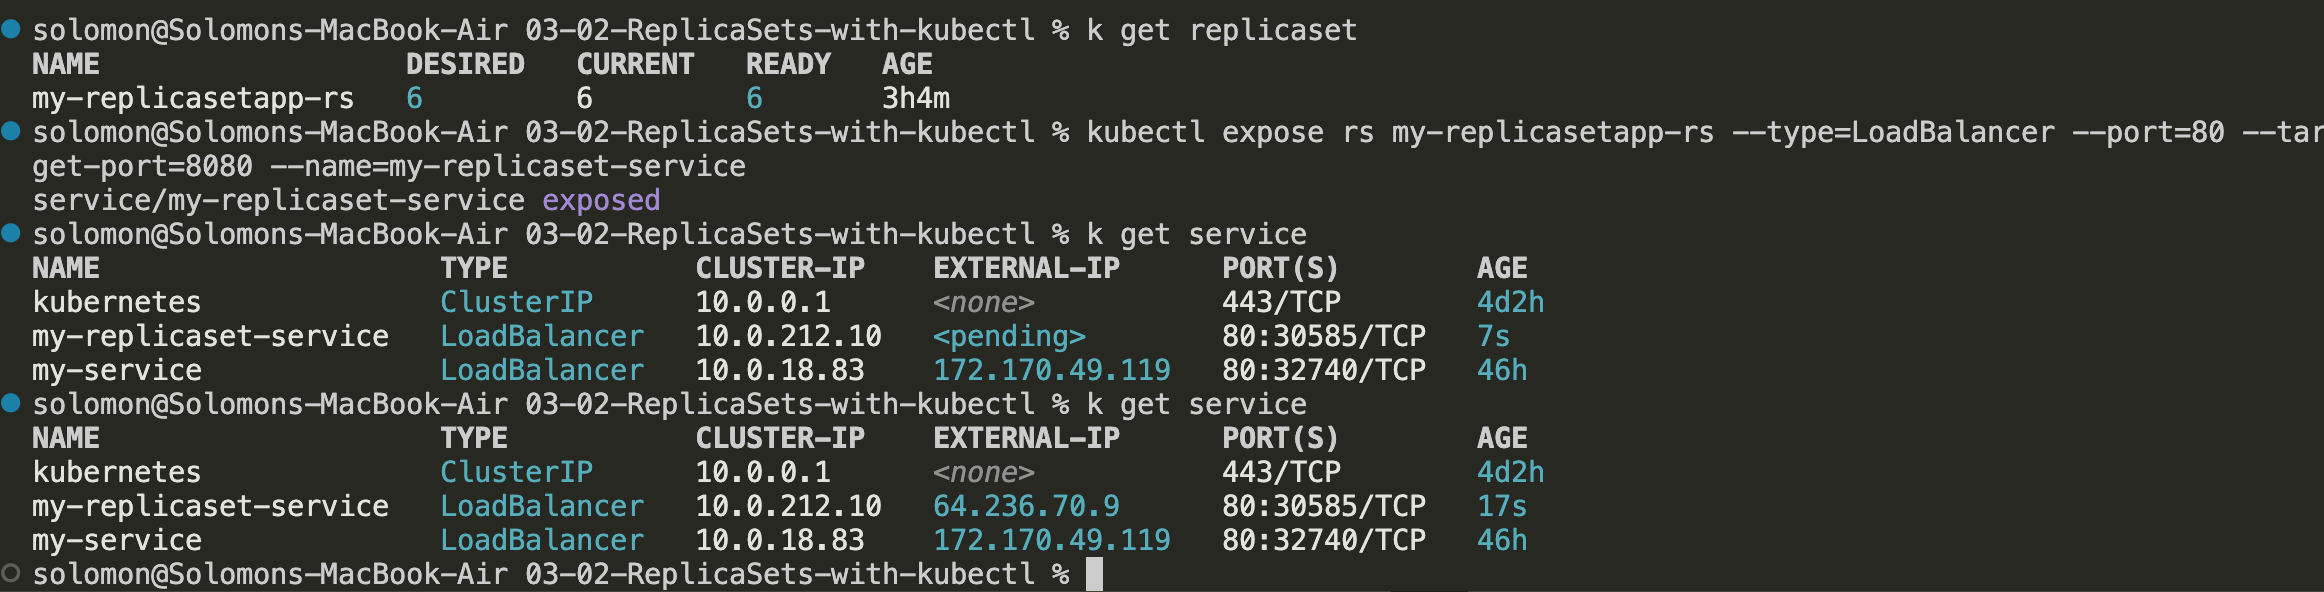
This demonstrates that the ReplicaSet keeps the desired number of pods running while the Service continues routing traffic to healthy pods.
Scaling pods
Scaling means changing the number of running pod replicas. With a ReplicaSet, you do that by changing the replicas value in the YAML and then applying the update.
- Change the
specsection in your YAML file.
spec:
  replicas: 6 # Change this to whatever you need. We will learn about Horizontal Pod Autoscaling, which allows us to set a min and a max replicas instead of a constant here
- Run
kubectl replace -f replicaset-demo.yml. - In this example, the replica count was increased to 12 and
k get podswas used to watch the pods get created.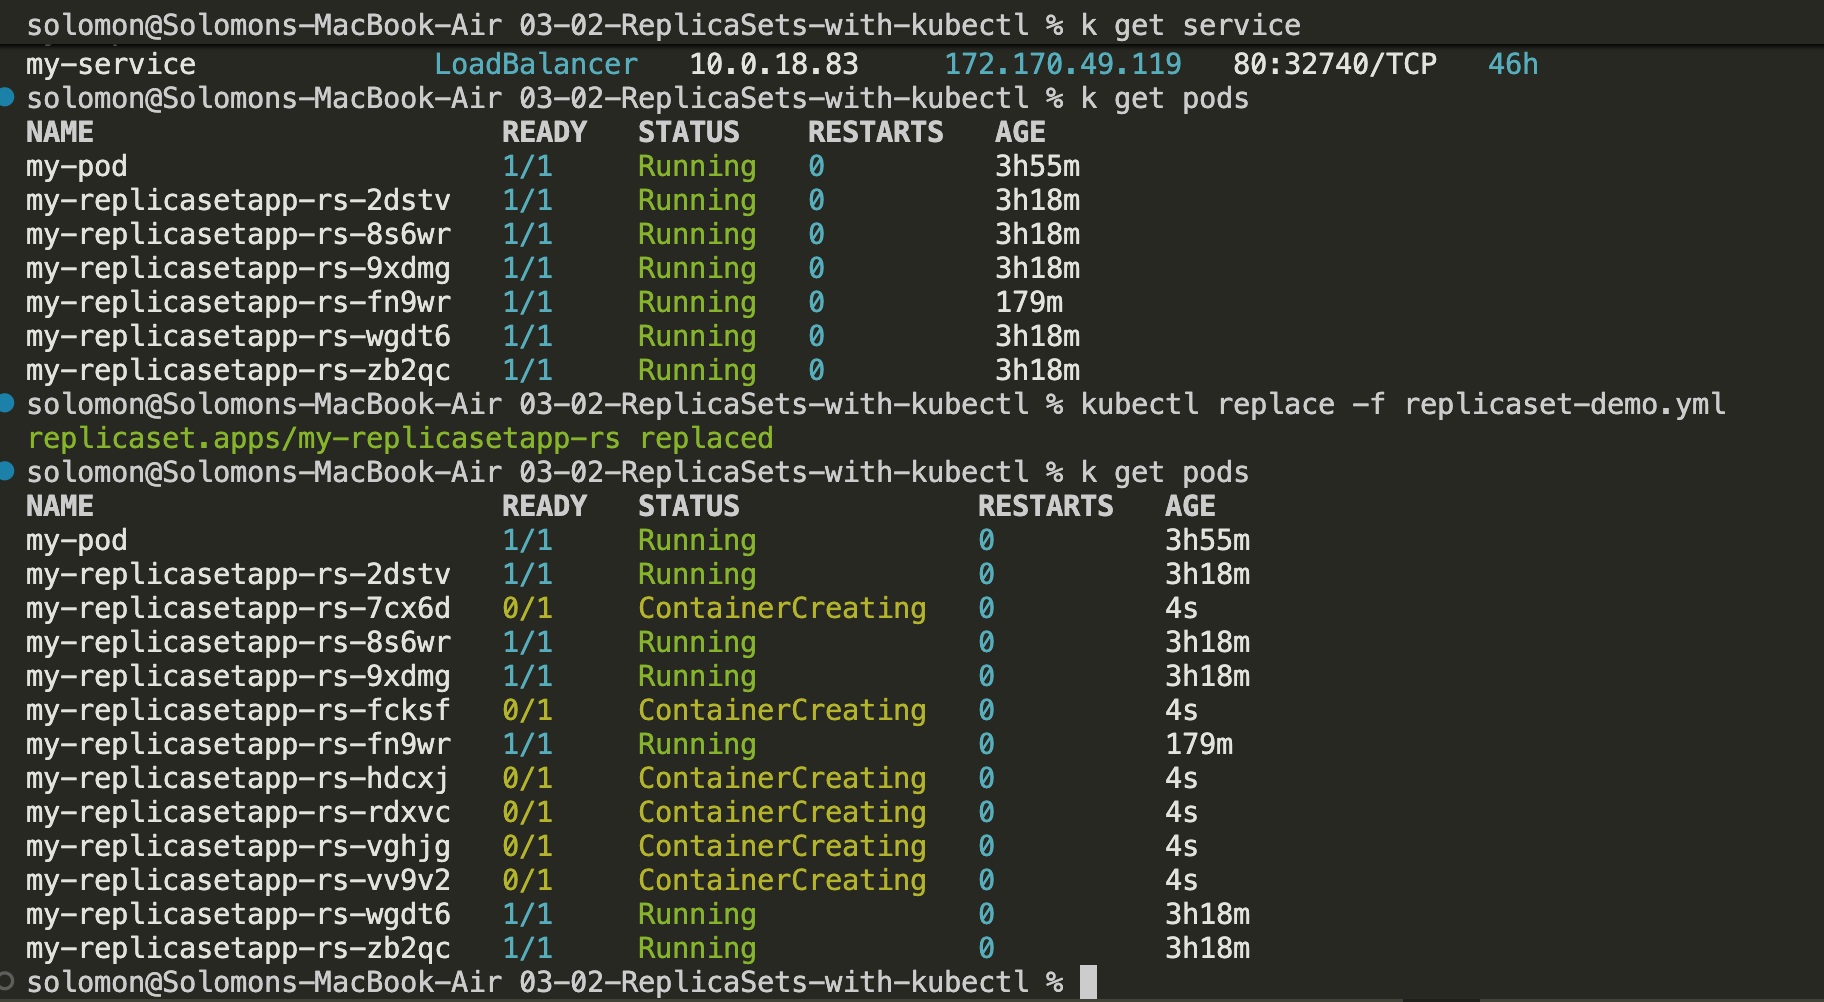
- After a few seconds, the new pods should come online. Twelve pods shows up pretty quickly when you are staring at the terminal waiting for them.

You can also try a much larger number such as:
spec:
  replicas: 500
In practice, you are limited by the resources available in the cluster. A very large replica count may trigger node scaling if the cluster autoscaler is enabled, but it will still be constrained by quotas, node pool limits, and available compute. Kubernetes is fast, but it is not magic.
This is a good point to remember the difference between:
- Manual scaling: you set a fixed number of replicas yourself.
- Automatic scaling: Kubernetes adjusts the replica count based on metrics, usually through a Horizontal Pod Autoscaler.
To clean up this ReplicaSet demo, run kubectl delete replicaset (or rs) my-replicasetapp-rs. When the ReplicaSet is deleted, the pods it owns are removed as well. RIP pods.
Deployments
A Deployment is a higher-level Kubernetes object that manages ReplicaSets for you. This is the standard way to run most applications because it gives you safer updates, rollout history, and easier rollback behavior.
In other words, if a ReplicaSet is about keeping the right number of pods alive, a Deployment is about managing how application versions change over time.
Deployments are useful because they let you:
- Updating
- Rolling Back
- Scaling
- Pausing and Resuming
- Status
- Clean up
- Canary Deployments
Quick definitions:
- Rollout: the process of applying a new version of your application.
- Rollback: reverting to an earlier working version.
- Revision history: the list of previously deployed versions recorded by Kubernetes.
- Rolling update: gradually replacing old pods with new ones instead of stopping everything at once.
Create a Deployment
This demo creates a Deployment, checks it in Azure, scales it, and then exposes it with a Service.
- Run
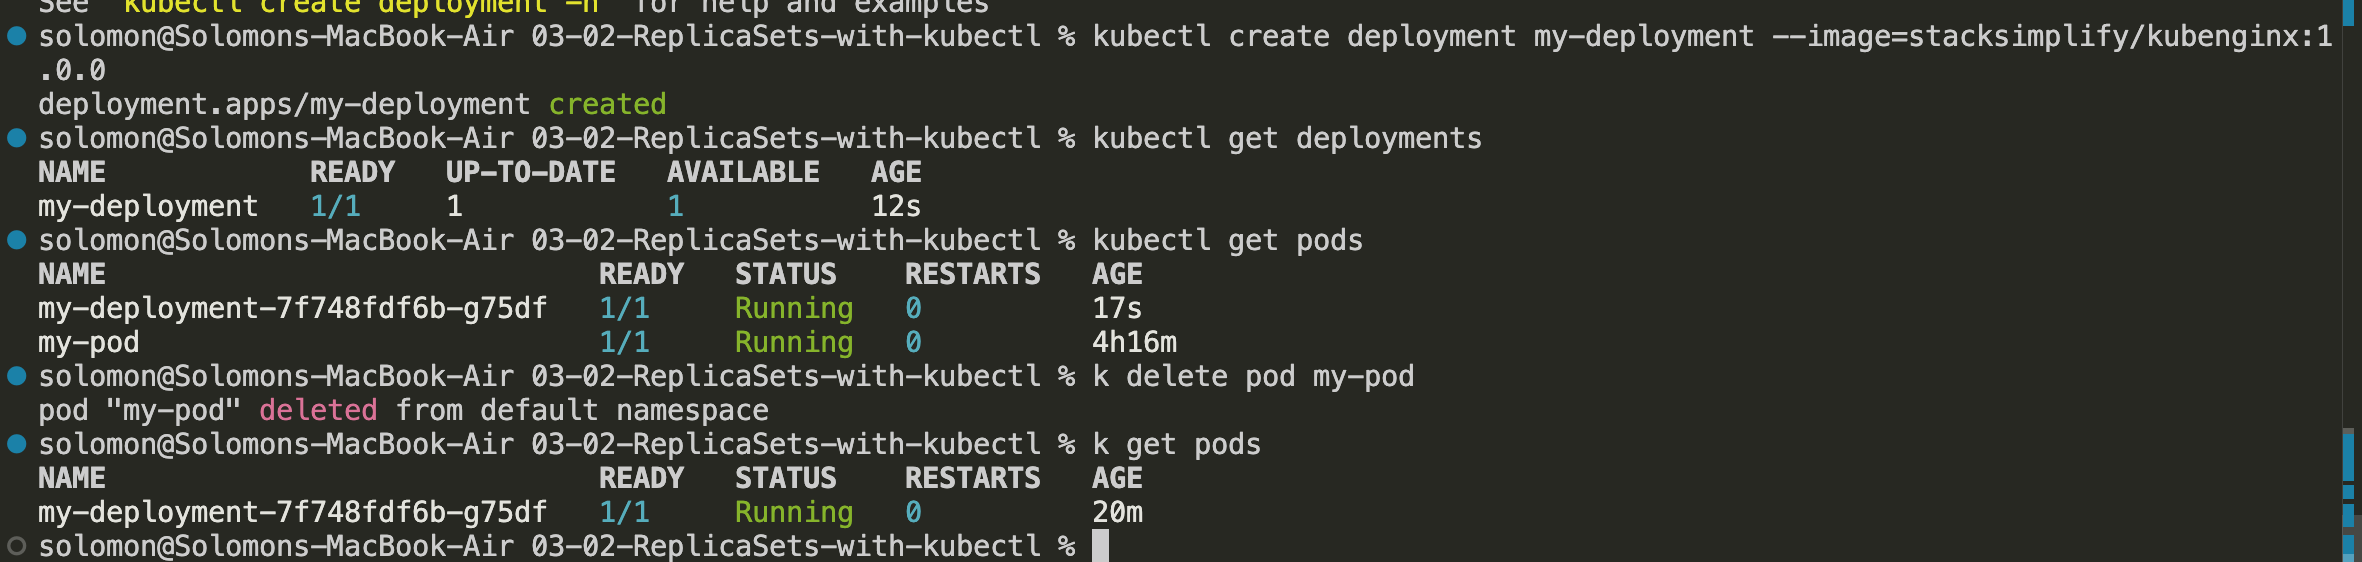
kubectl create deployment - my-deployment --image=stacksimplify/kubenginx:1.0.0.
- Verify that the Deployment appears in the Azure portal.
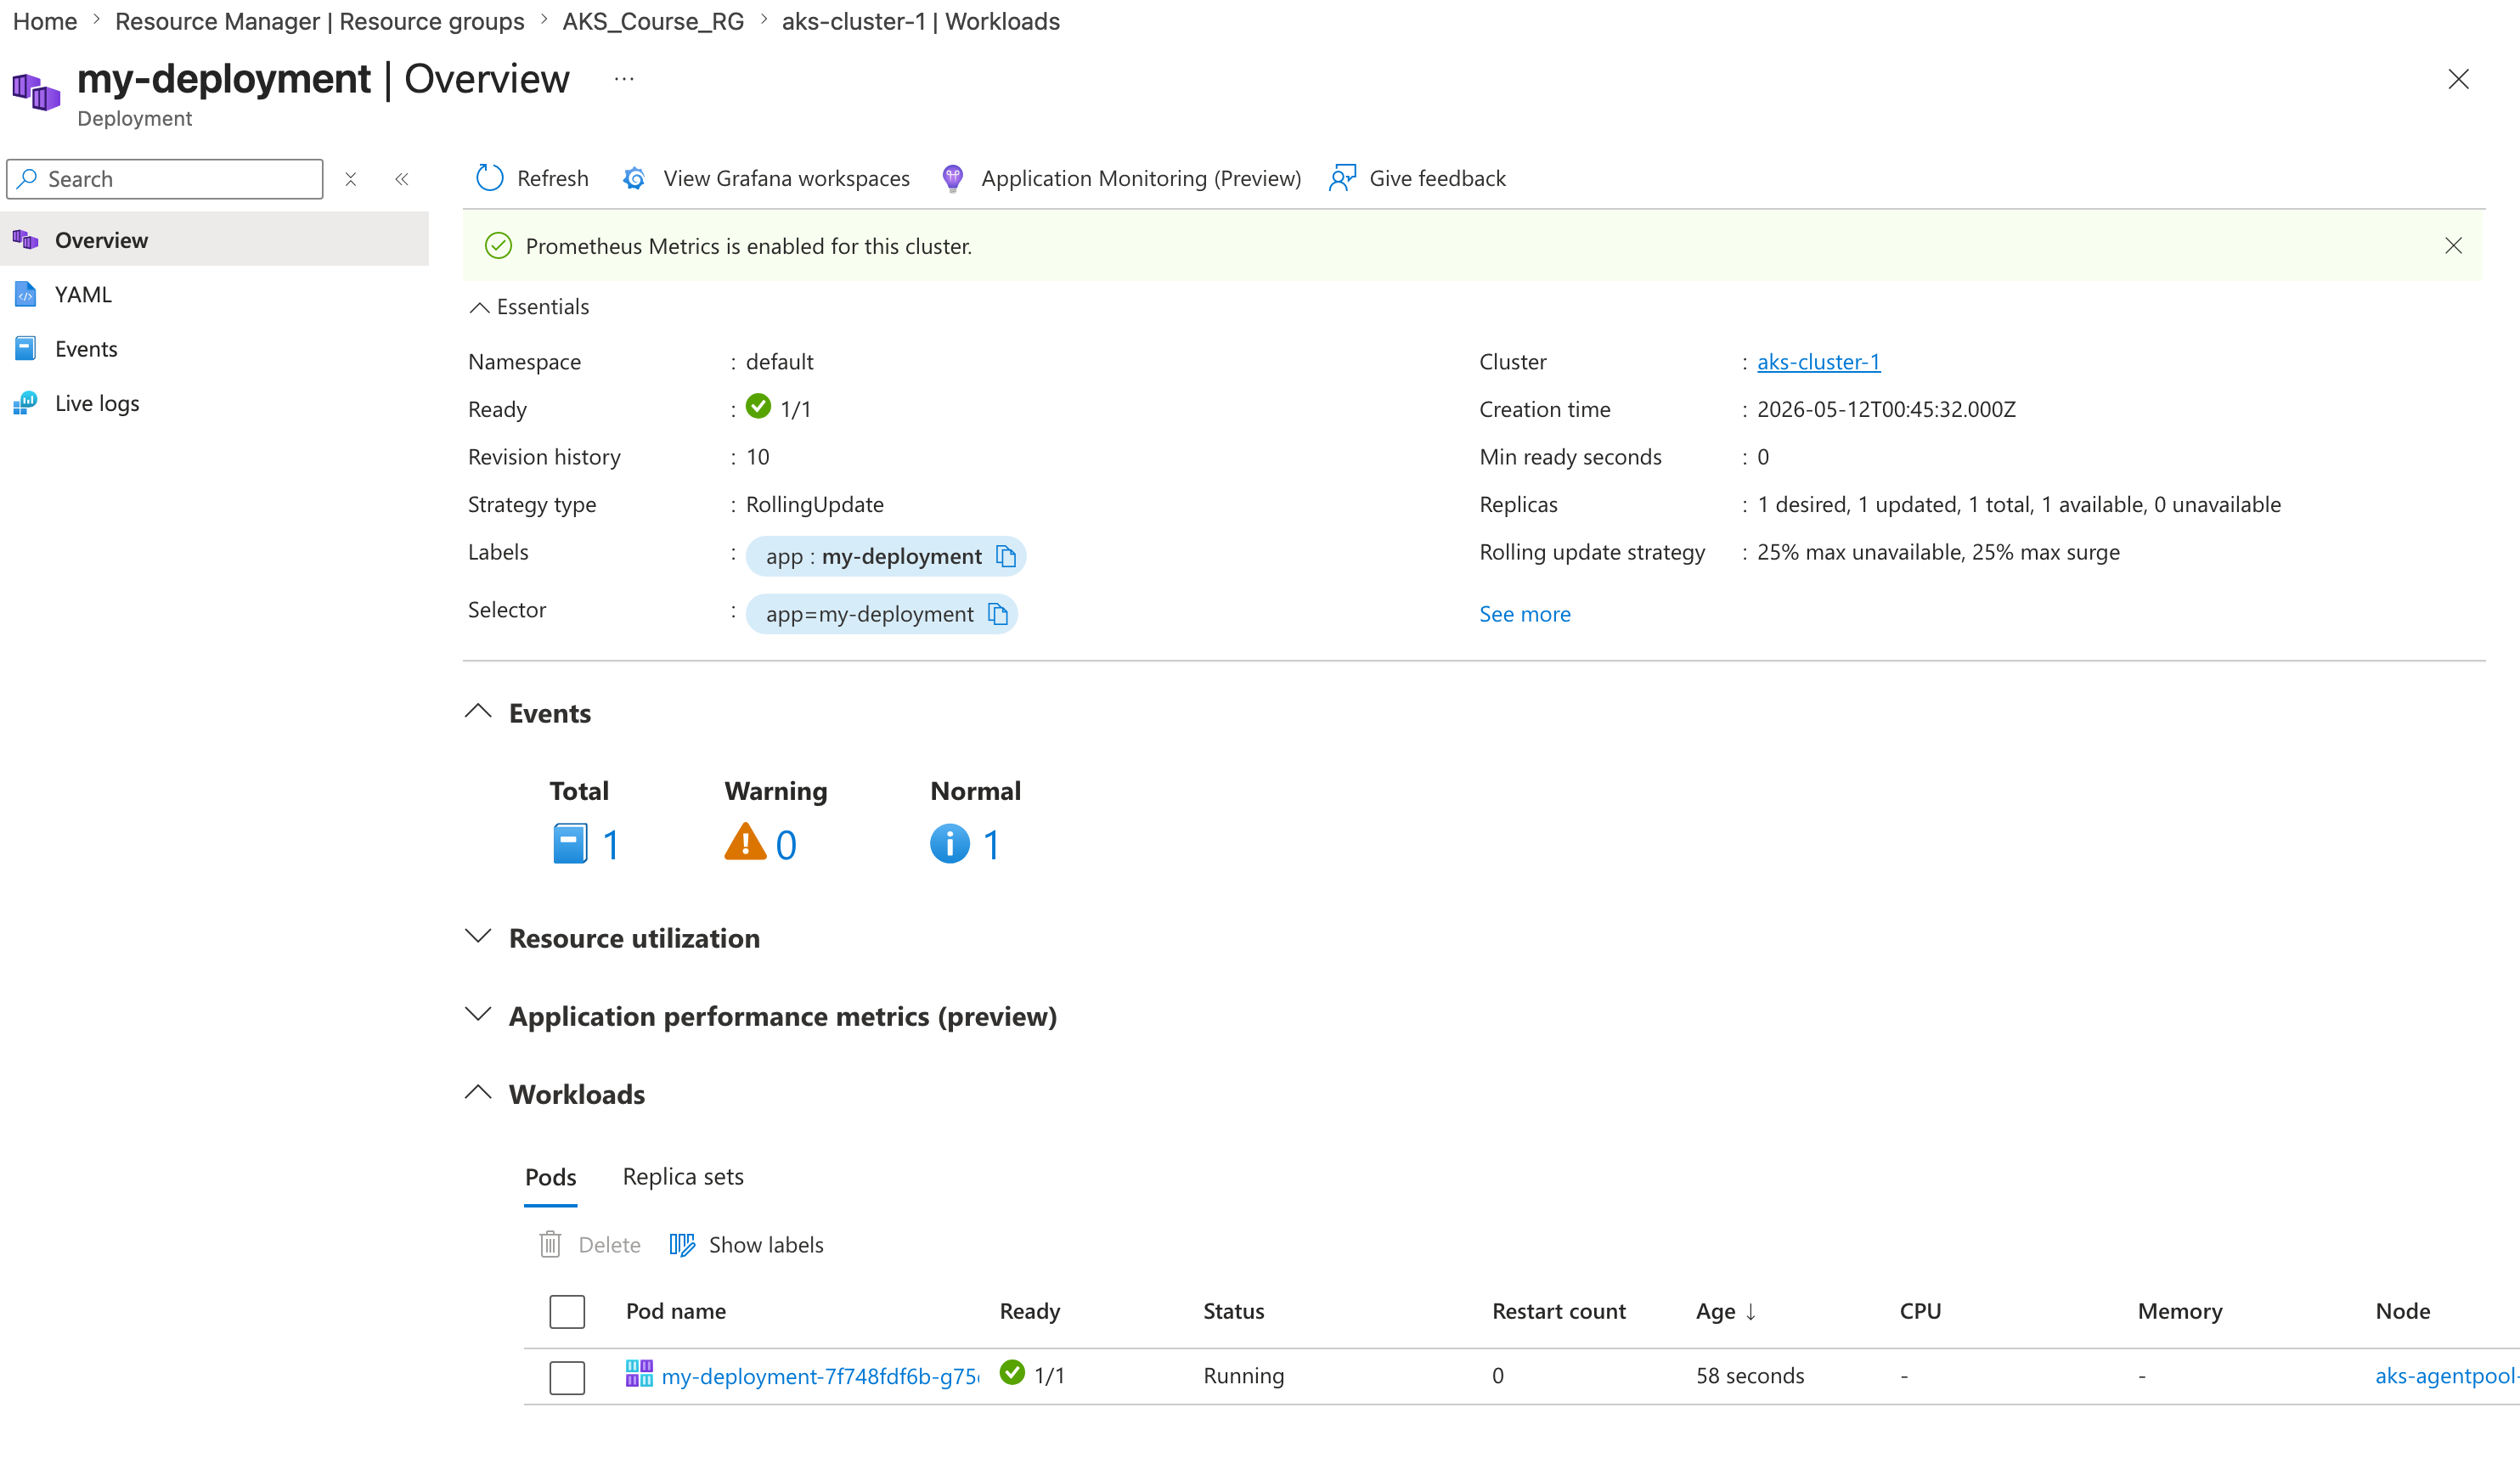
As the Deployment becomes active, Kubernetes creates the underlying ReplicaSet and the pod for you. Nice of it to do the boring part for us.
Describe the deployment
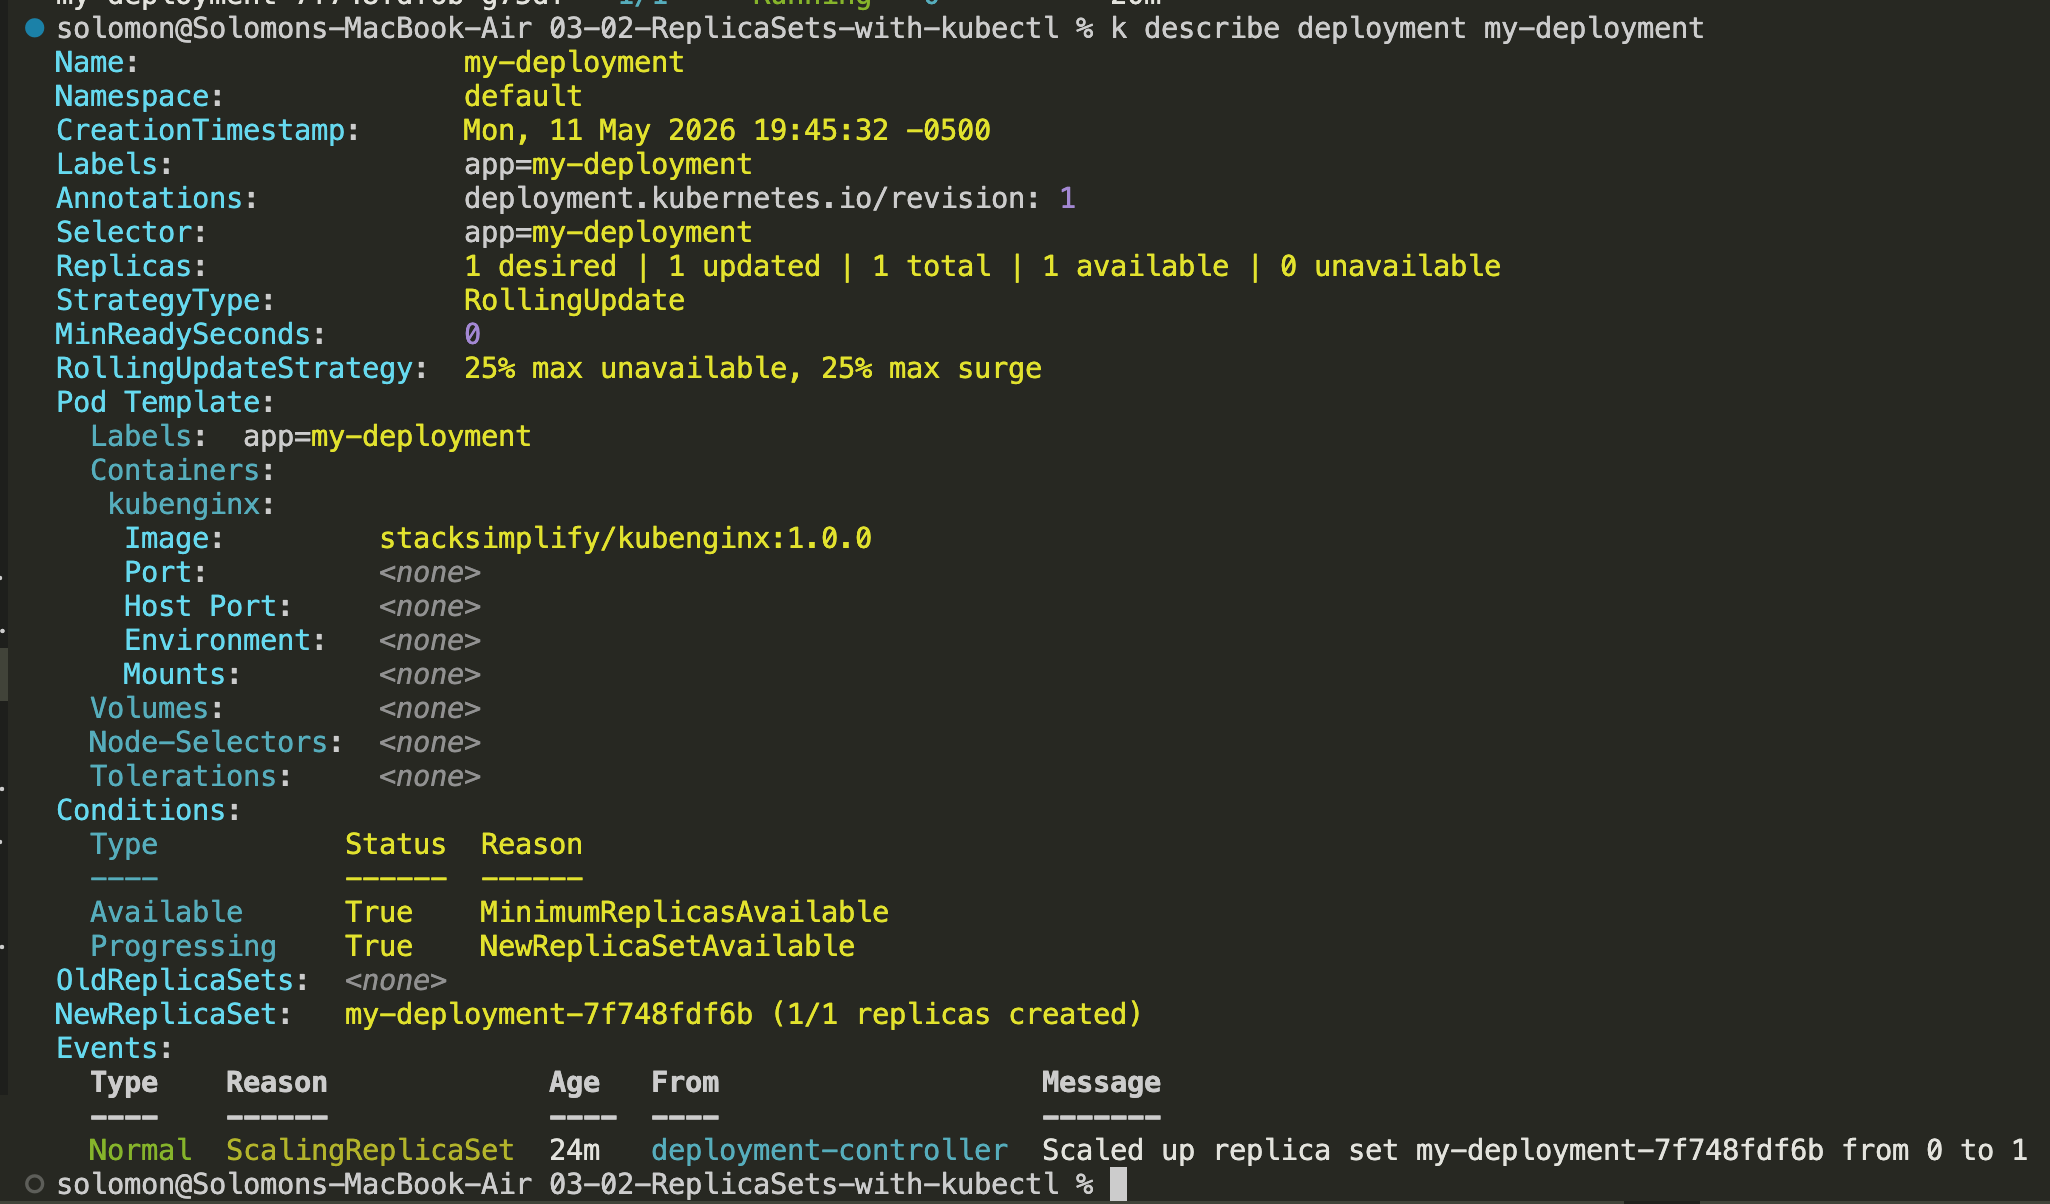
Use kubectl describe deployment <deployment-name> to inspect rollout status, replica counts, selectors, conditions, and events for the Deployment. This is one of the best troubleshooting commands once a Deployment exists.
Scale the deployment
Notice that the Deployment starts with a single pod. That is the initial desired state for this demo.
- Run
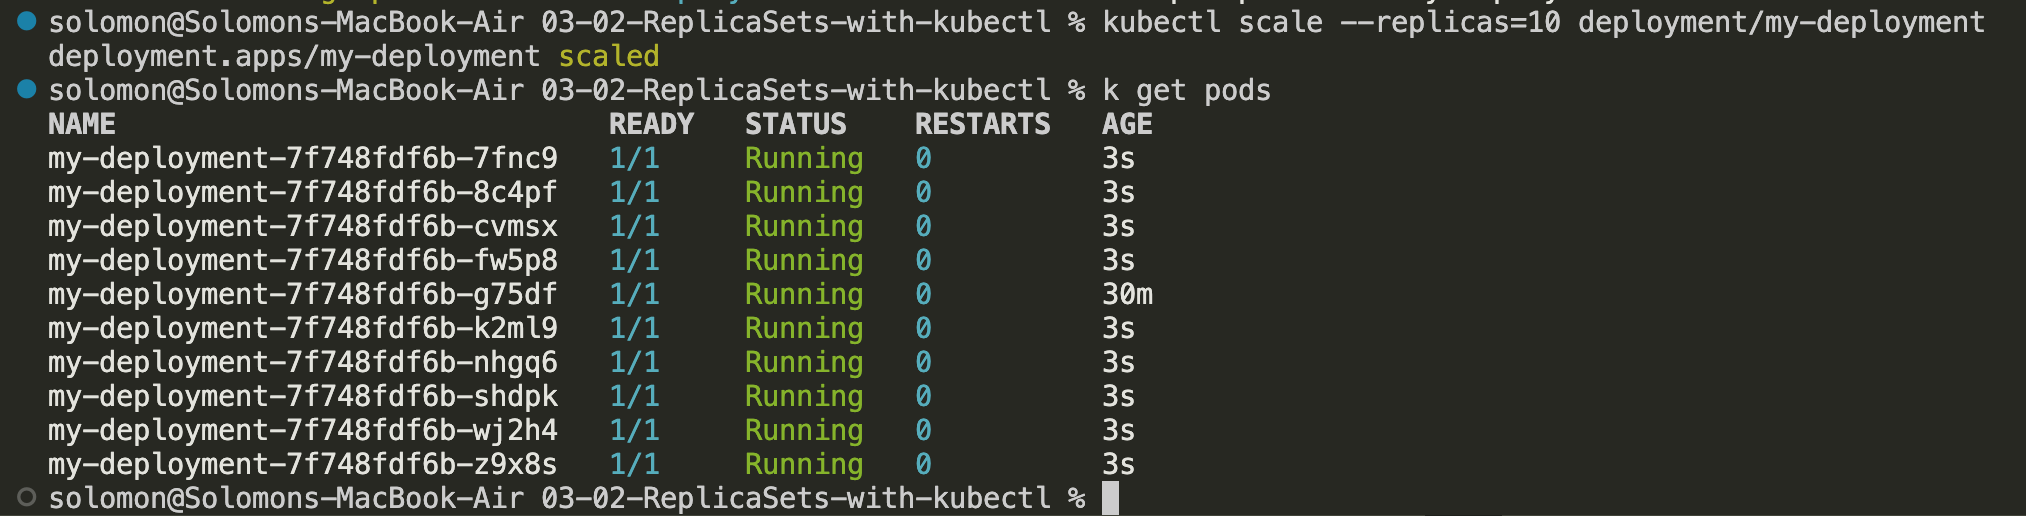
kubectl scale --replicas=10 deployment/my-deployment. - Watch the Deployment expand from one pod to ten pods.

- After the scale operation completes, you should see 10 pods running.
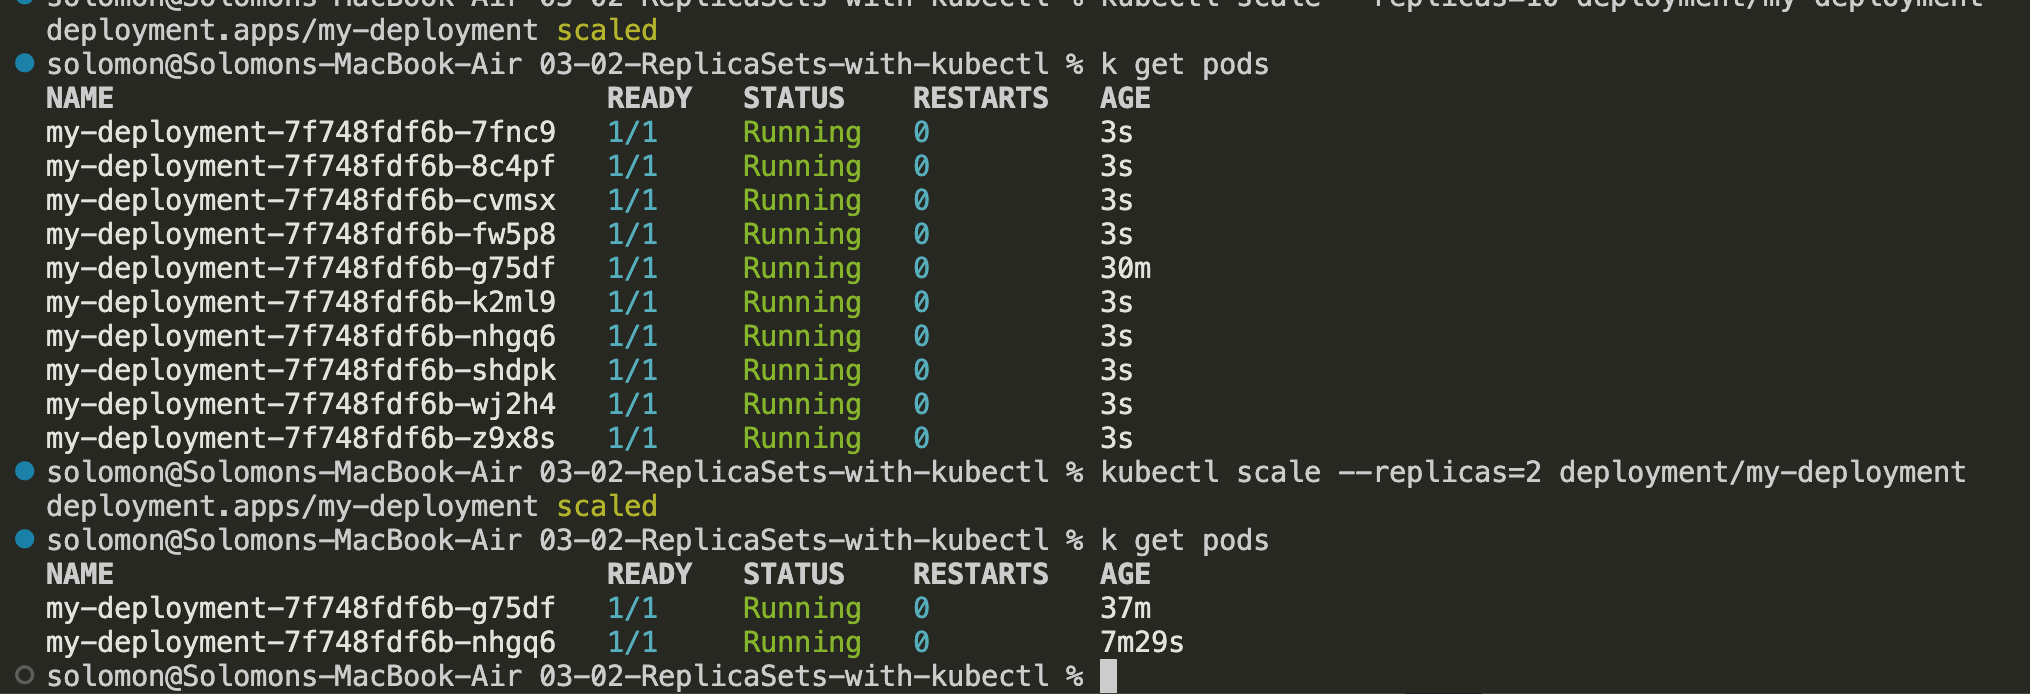
 4. You can also scale the Deployment back down. Run
 kubectl scale --replicas=2 deployment/my-deployment.
In real environments, this is often automated through autoscaling, but manual scaling is the easiest way to understand the underlying behavior first. Basics before complexities.
Expose the deployment as a service
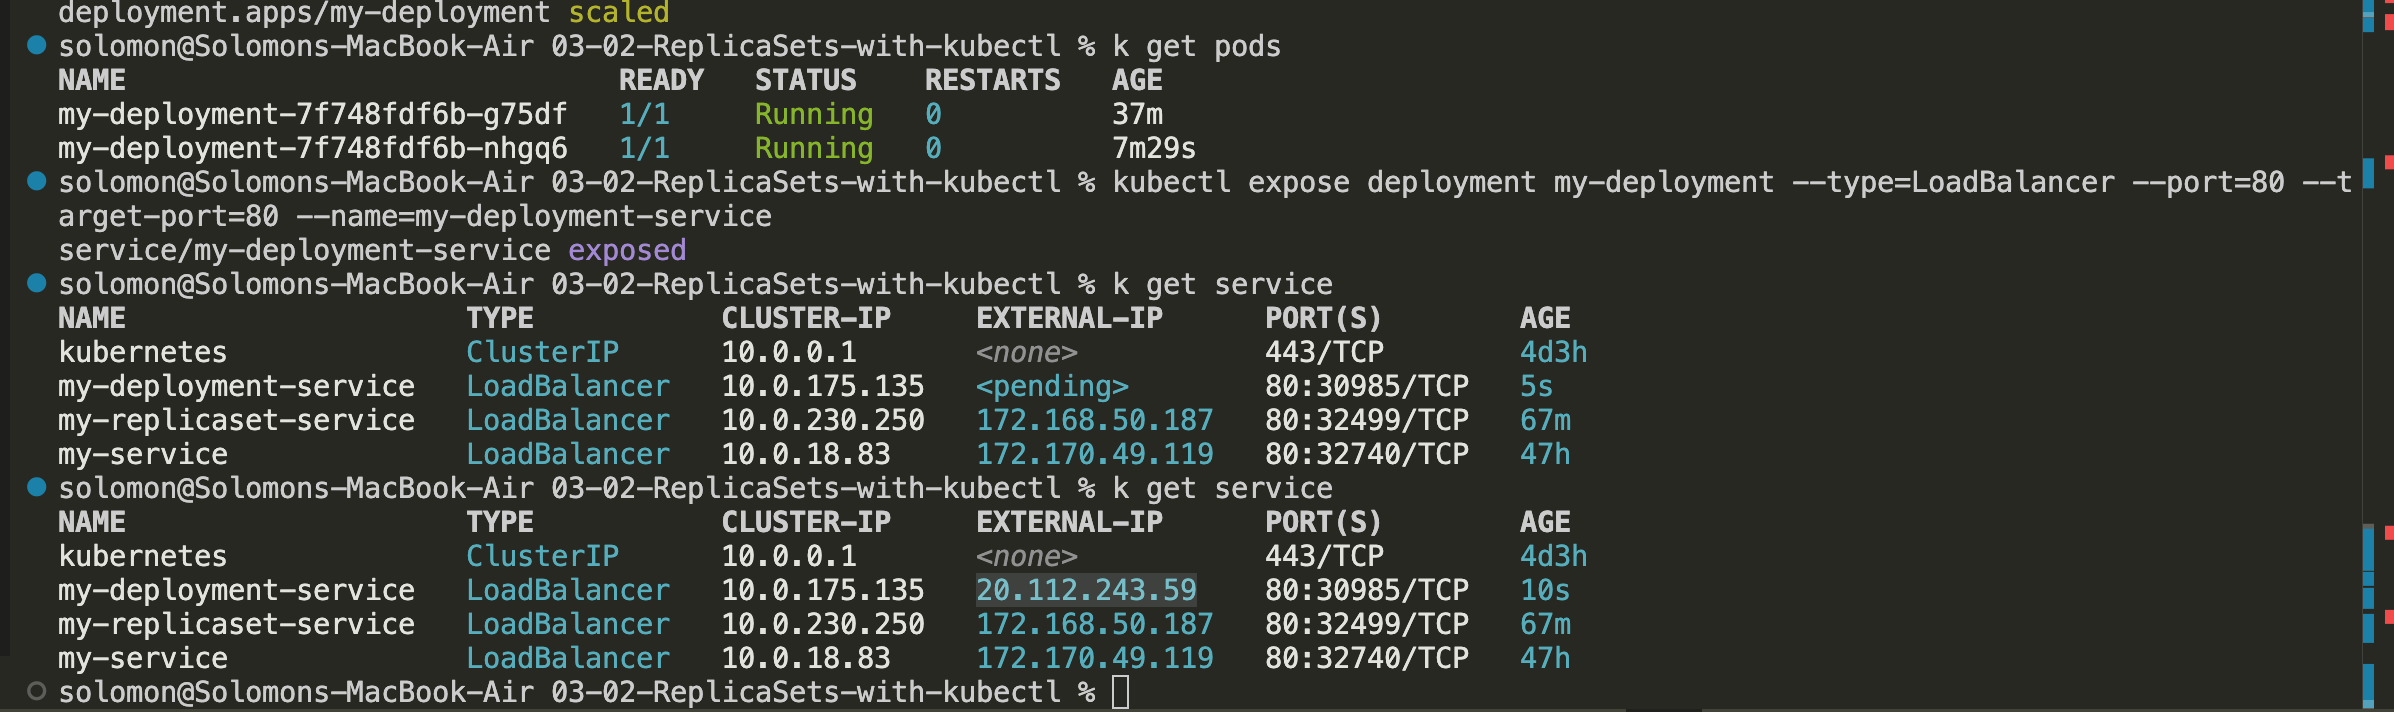
- Run
kubectl expose deployment my-deployment --type=LoadBalancer --port=80 --target-port=80 --name=my-deployment-service. - Wait for the external IP to be assigned to the Service.
- Navigate to the application in your browser by using that IP address.
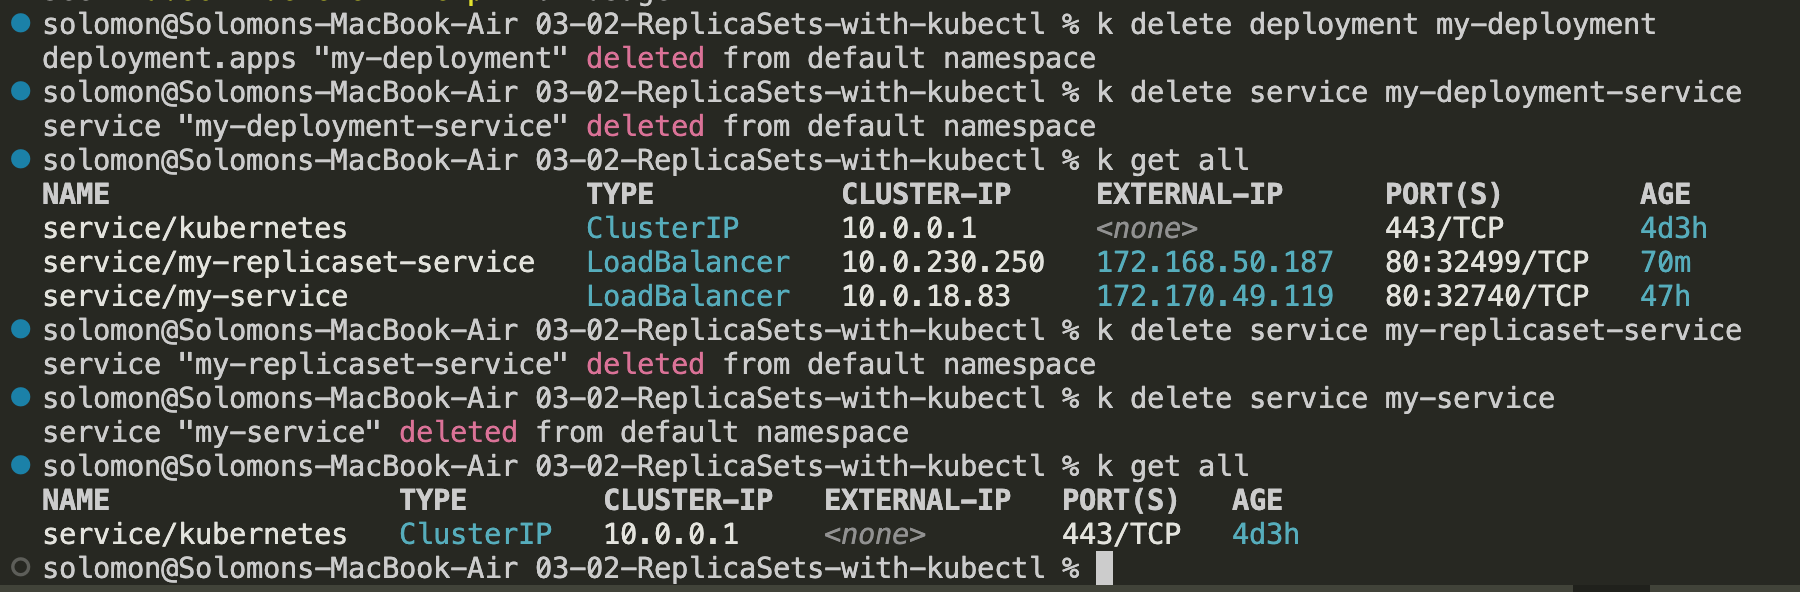
 4. Remember that the imperative approach creates separate resources with each command. Clean up the Deployment, ReplicaSets, pods, and Services you no longer need so you do not consume unnecessary cluster resources.
Update Deployments
Updating a Deployment means changing something in the pod template, most commonly the container image. Kubernetes responds by creating a new ReplicaSet and gradually moving traffic from the old pods to the new ones.
- Run
kubectl get deploymentsto list the current deployments. - Check the current container image in the Deployment spec.
- Navigate to Docker Hub and look for the available
kubenginximage versions such as1.0,2.0,3.0, and4.0. - Run
kubectl set image deployment/my-deployment kubenginx=stacksimplify/kubenginx:2.0.0 --record=true. - Verify the rollout status by running
kubectl rollout status deployment/my-deployment. - Verify the Deployment again with
kubectl get deployment. - Verify that the new version rolled out and review the events from
kubectl describe deployment my-deployment. Note you may notice that there are new ReplicaSets replacing the older ReplicaSets. - Under the events, notice that the old ReplicaSet scales down as the new one scales up. That is a rolling deployment in action.
kubectl get podswill show you the new pods tied to the new ReplicaSet.
The important idea here is that the Deployment is not modifying pods in place. It creates a new ReplicaSet and gradually shifts the workload over.
Verify Rollout History
A Deployment keeps revision history so you can inspect what changed over time.
- Run
kubectl rollout history deployment/my-deployment.
Update using the Edit command
kubectl edit is the quick-and-dirty way to make a live change directly in the cluster.
kubectl edit deployment/mydeployment --record=truewill edit the Deployment directly.- Change the spec to the newest version and then save.
- Run
kubectl get deploymentandkubectl get replicasetto confirm that the Deployment was updated. - When the rollout completes, you should see the latest version in your browser.
Rollback Deployments
Rollback is the safety net. If a rollout goes badly, you can move the Deployment back to a previous revision.
- Check the rollout history by running
kubectl rollout history deployment/my-deployment, then inspect specific revisions withkubectl rollout history deployment/my-deployment --revision=1, then2,3,4, and so on. - Your labels will also match the ReplicaSets. Take note of the similarities and differences between revisions.
- Now...to do the rollback. Run
kubectl rollout undo deployment/my-deploymentand it will roll back to the previous version. So if it was3, it goes back to2. Running this command again will roll back from2to1.
You can also roll back to a specific version by running kubectl rollback undo deployment/my-deployment --to-revision=2
As these branch out, you might do something like v1-2-3-2-4-2-5
Rolling Restarts
A rolling restart recreates the pods one by one without changing the image version. This is useful when you want fresh pods after a config change, secret update, or node issue.
- Run
kubectl rollout restart deployment/my-deploymentto recreate all of the pods from your Deployment in a rolling fashion, ensuring very low, if any downtime.
Pausing and Resuming Deployments
Pausing a Deployment lets you stage multiple changes without immediately rolling them out. Resuming applies the queued changes together.
If you make 5 changes while the Deployment is active, you may trigger 5 separate rollouts. Pausing lets you bundle those changes into one rollout instead.
You can take what we've learned with the rollout, and history and apply it here.
- Run
kubectl rollout pause deployment/my-deploymentto pause the Deployment. The application will continue to work. - Run
kubectl set image deployment/my-deployment kubenginx=stacksimplify/kubenginx:4.0.0 --record=trueto update the image. - Test the site to see if the new version is live, which it is not yet.
- Check the version of the Deployment by using
kubectl rollout history deployment/my-deployment. - You will see that the Deployment has not incremented the ReplicaSets with the
set imagechange yet. - Make another change, like setting limits, with
kubectl set resources deployment/my-deployment -c=kubenginx --limits=cpu=20m,memory=30Mi. - Notice that this still has not incremented in
kubectl describe deployment my-deployment. - Resume the Deployment with
kubectl rollout resume deployment/my-deployment. - Now verify the rollout history with
kubectl rollout history deployment/my-deployments. - Check the ReplicaSets with
kubectl get replicaset. - Everything now updates and you should be able to see the newest version of the application.
Note: the real fun in this is if you make 10 changes, and then you resume and it breaks, you can roll back all 10 changes at once to a previously working instance of your application.
Intro to Services
Services are: and examples are:
- ClusterIP: Internal cluster communication
- NodePort:
- LoadBalancer:
- Ingress: advanced load balancer + SSL
- externalName:
Tip: The frontend needs to talk to the backend - use the ClusterIP Your backend needs to talk to other services - use externalName services For users to access your application, you need to deploy your frontend service (LB, Ingress, NodePort)
Note: externalName and ingress don't have imperative commands - must do in YAML
Demo: Services
- Deploy backend application
- create ClusterIP service
- Deploy Frontend application
- Deploy Load Balancer Service
Deploy the backend application
- Run
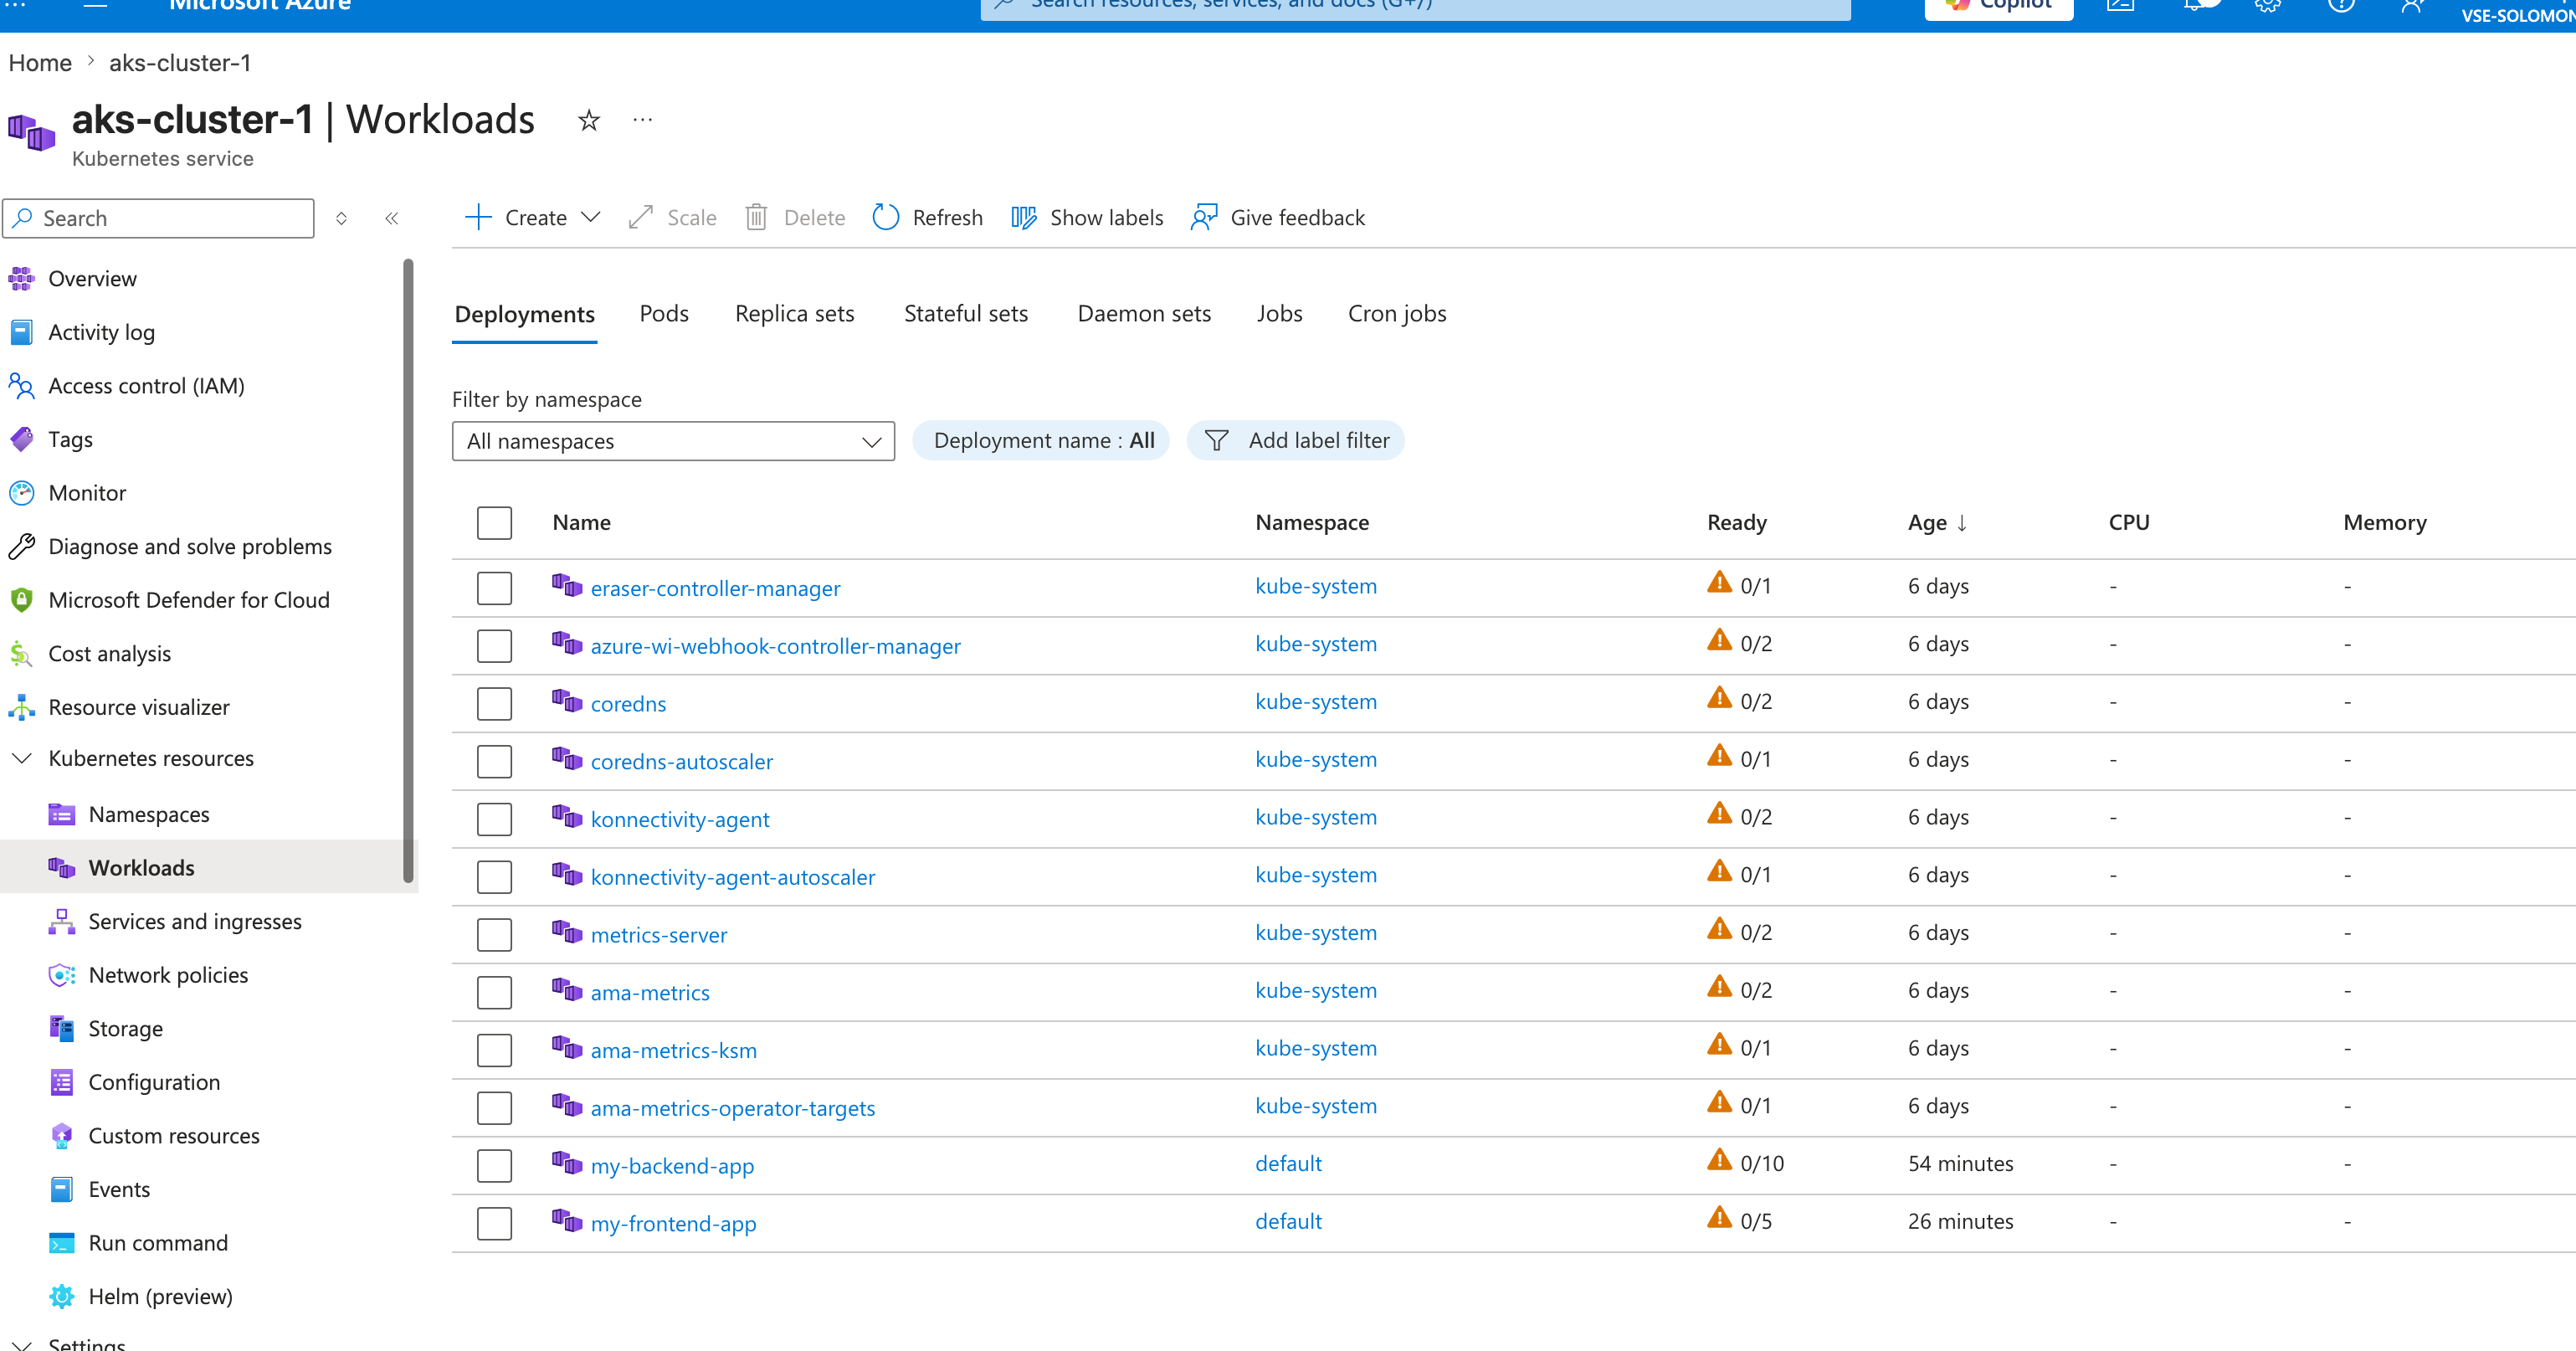
kubectl create deployment my-backend-app --image=stacksimplify/kube-helloworld:1.0.0 - Check the status of this by running
kubectl get deployment
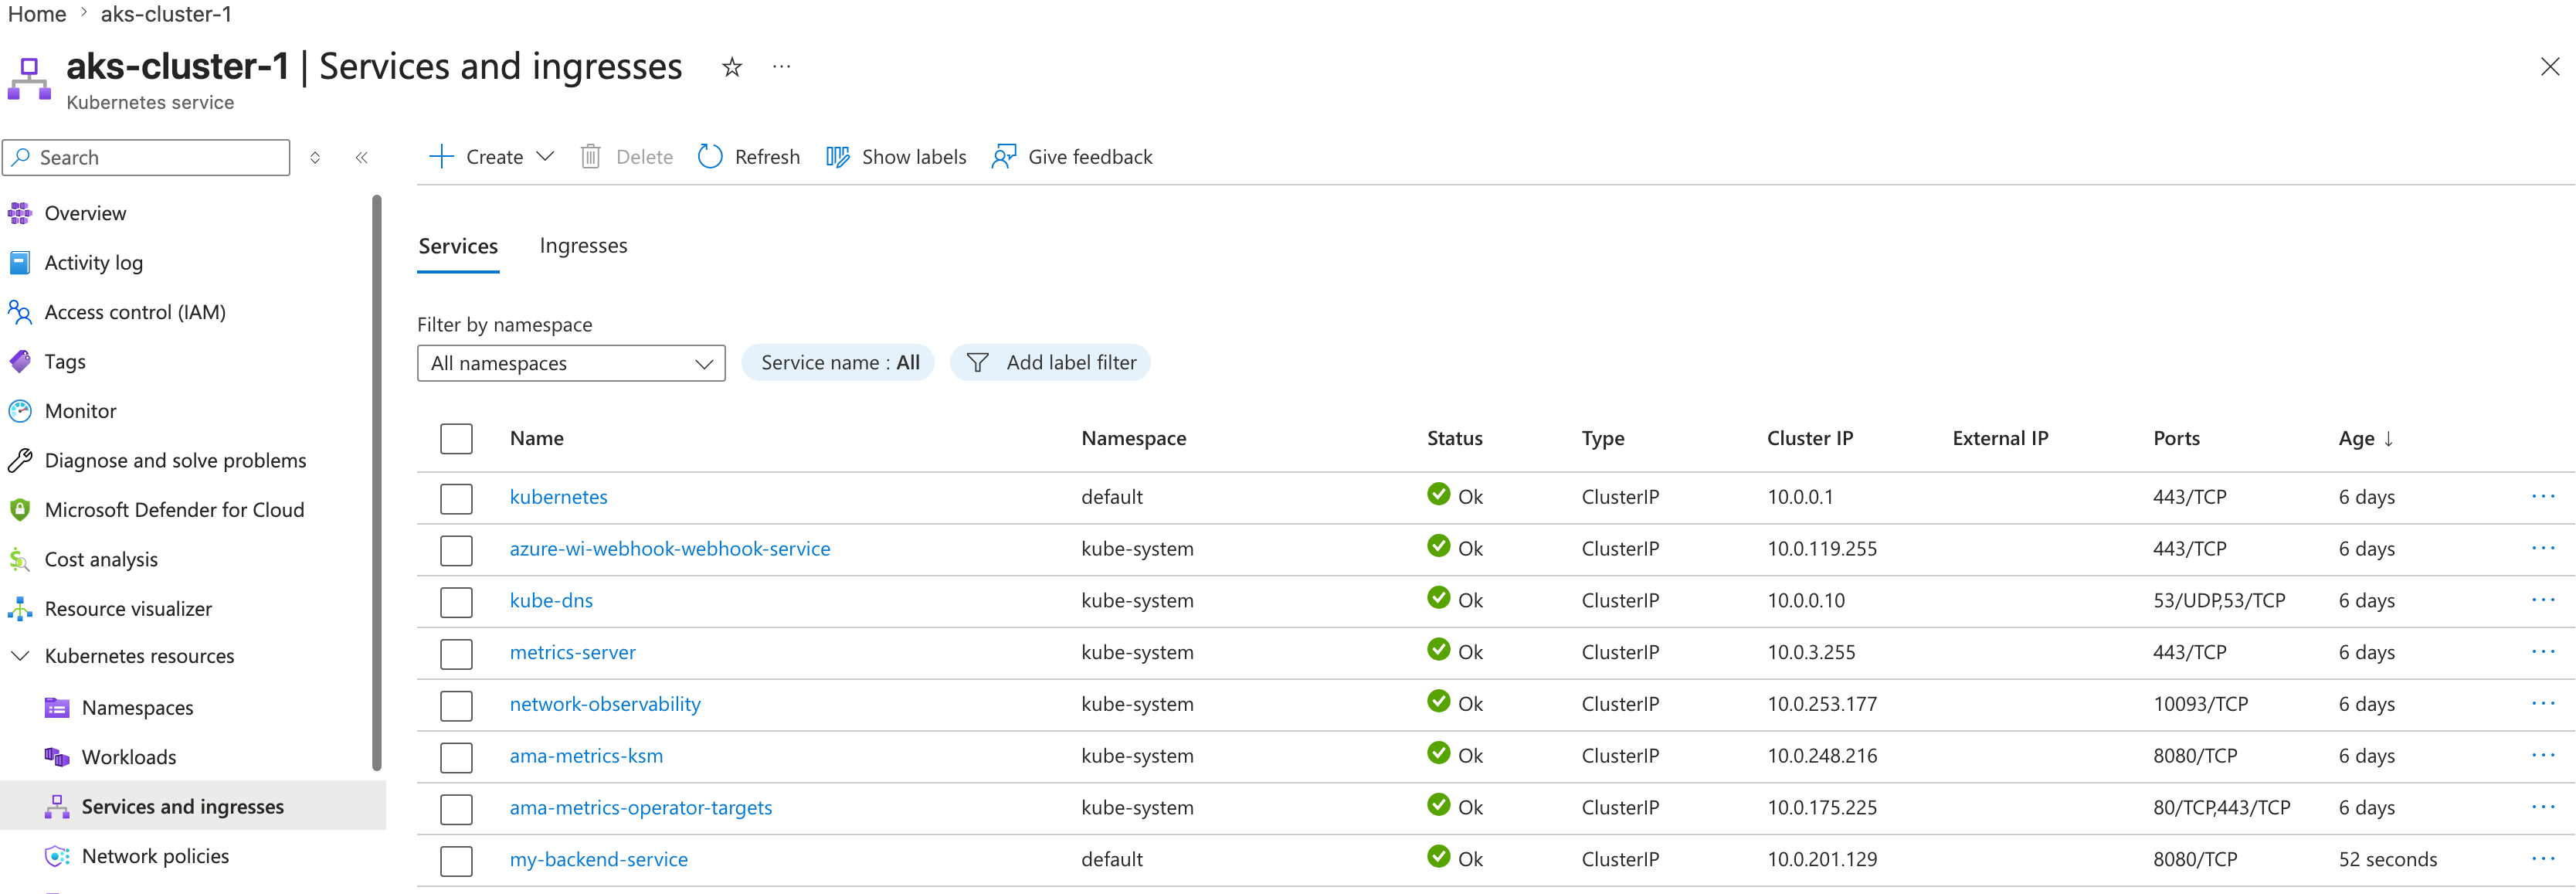
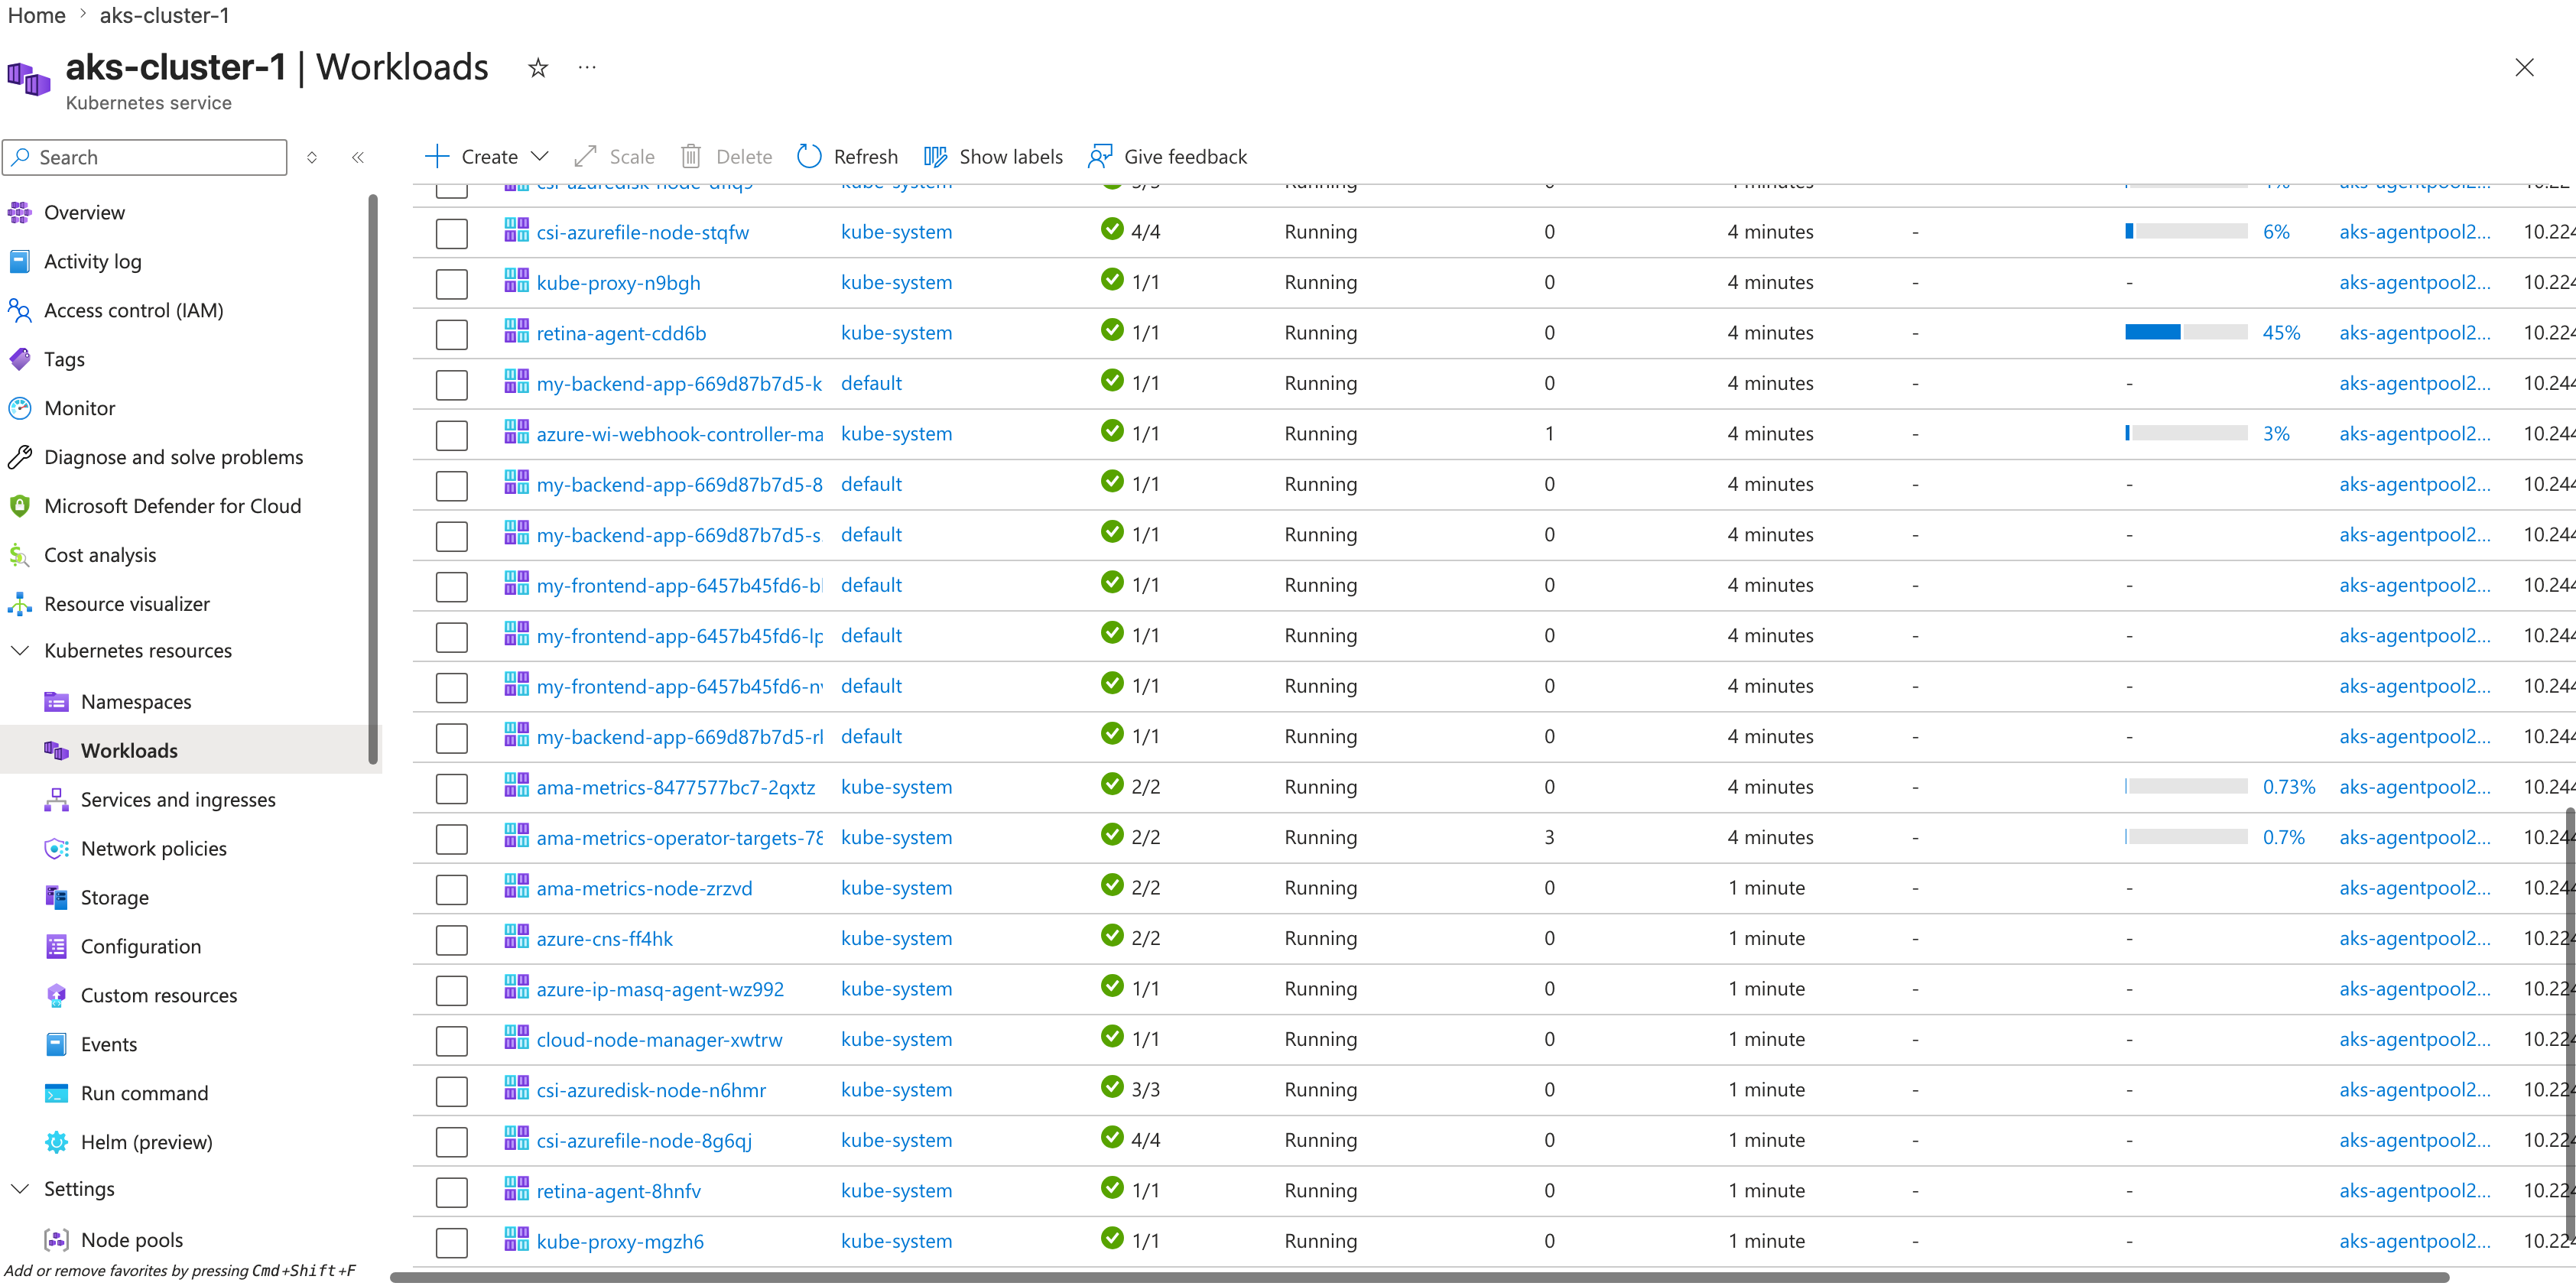
- Create ClusterIP service by running
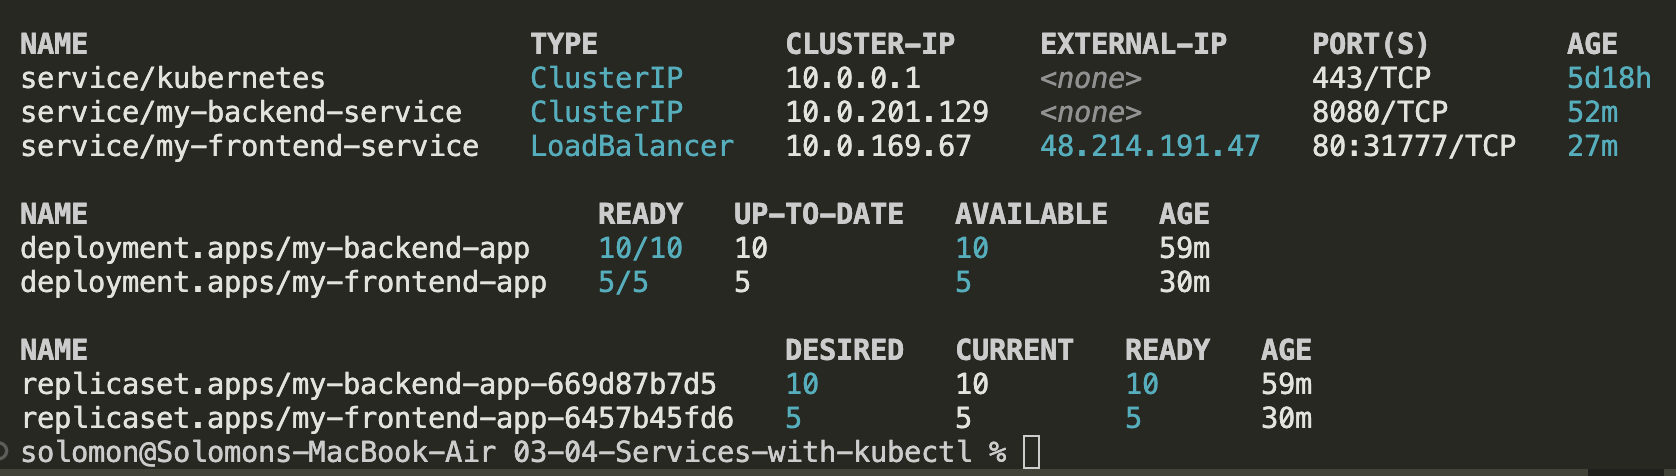
kubectl expose deployment my-backend-app --port=8080 --target-port=8080 --name=my-backend-service - You can view this in Azure.
Deploy frontend application
We need to build this image first. The idea here is simple: the frontend NGINX container will proxy traffic to the backend service by using the in-cluster DNS name my-backend-service.
- Create a Dockerfile:
FROM nginx
COPY default.conf /etc/nginx/conf.d
- Create the default.conf:
server {
    listen       80;
    server_name  localhost;
    location / {
    proxy_pass http://my-backend-service:8080;
    }
    error_page   500 502 503 504  /50x.html;
    location = /50x.html {
        root   /usr/share/nginx/html;
    }
}
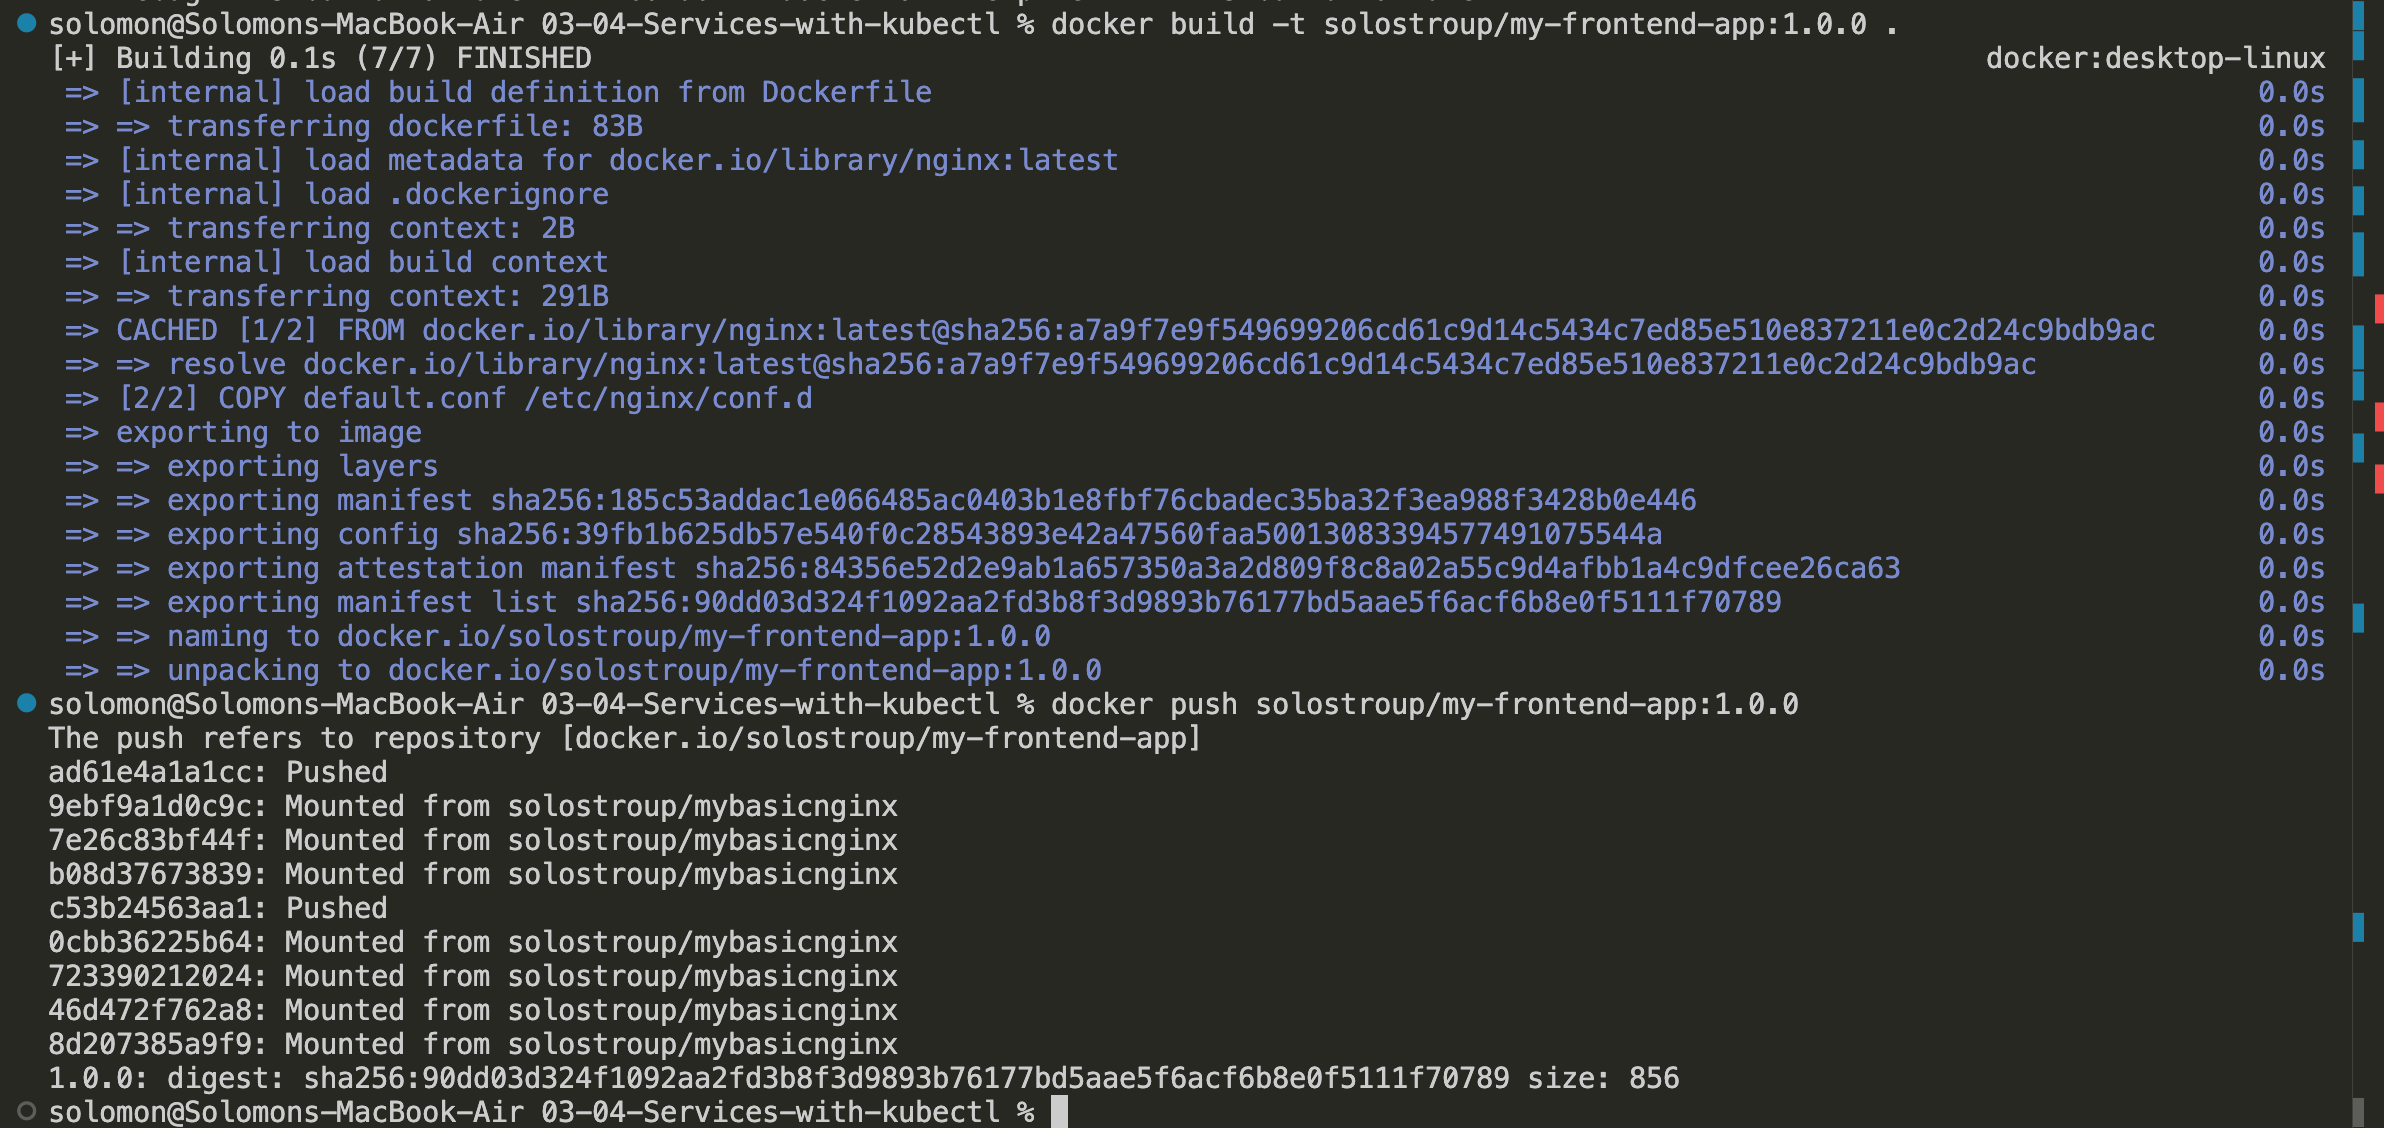
- Build the image locally:
docker build -t solostroup/my-frontend-app:1.0.0 .
- Push the image to Docker Hub:
docker push solostroup/my-frontend-app:1.0.0
 5. Create the frontend deployment:
kubectl create deployment my-frontend-app --image=solostroup/my-frontend-app:1.0.0
- Check the deployment and pod status:
kubectl get deployment
kubectl get pods
Note: for some reason, i created a mismatched architecture from my Mac. It failed miserably and created a few Microsoft Alerts, lol
I had to run docker buildx build --platform linux/amd64 -t solostroup/my-frontend-app:1.0.0 --push . to clean up, delete and recreate deployment.
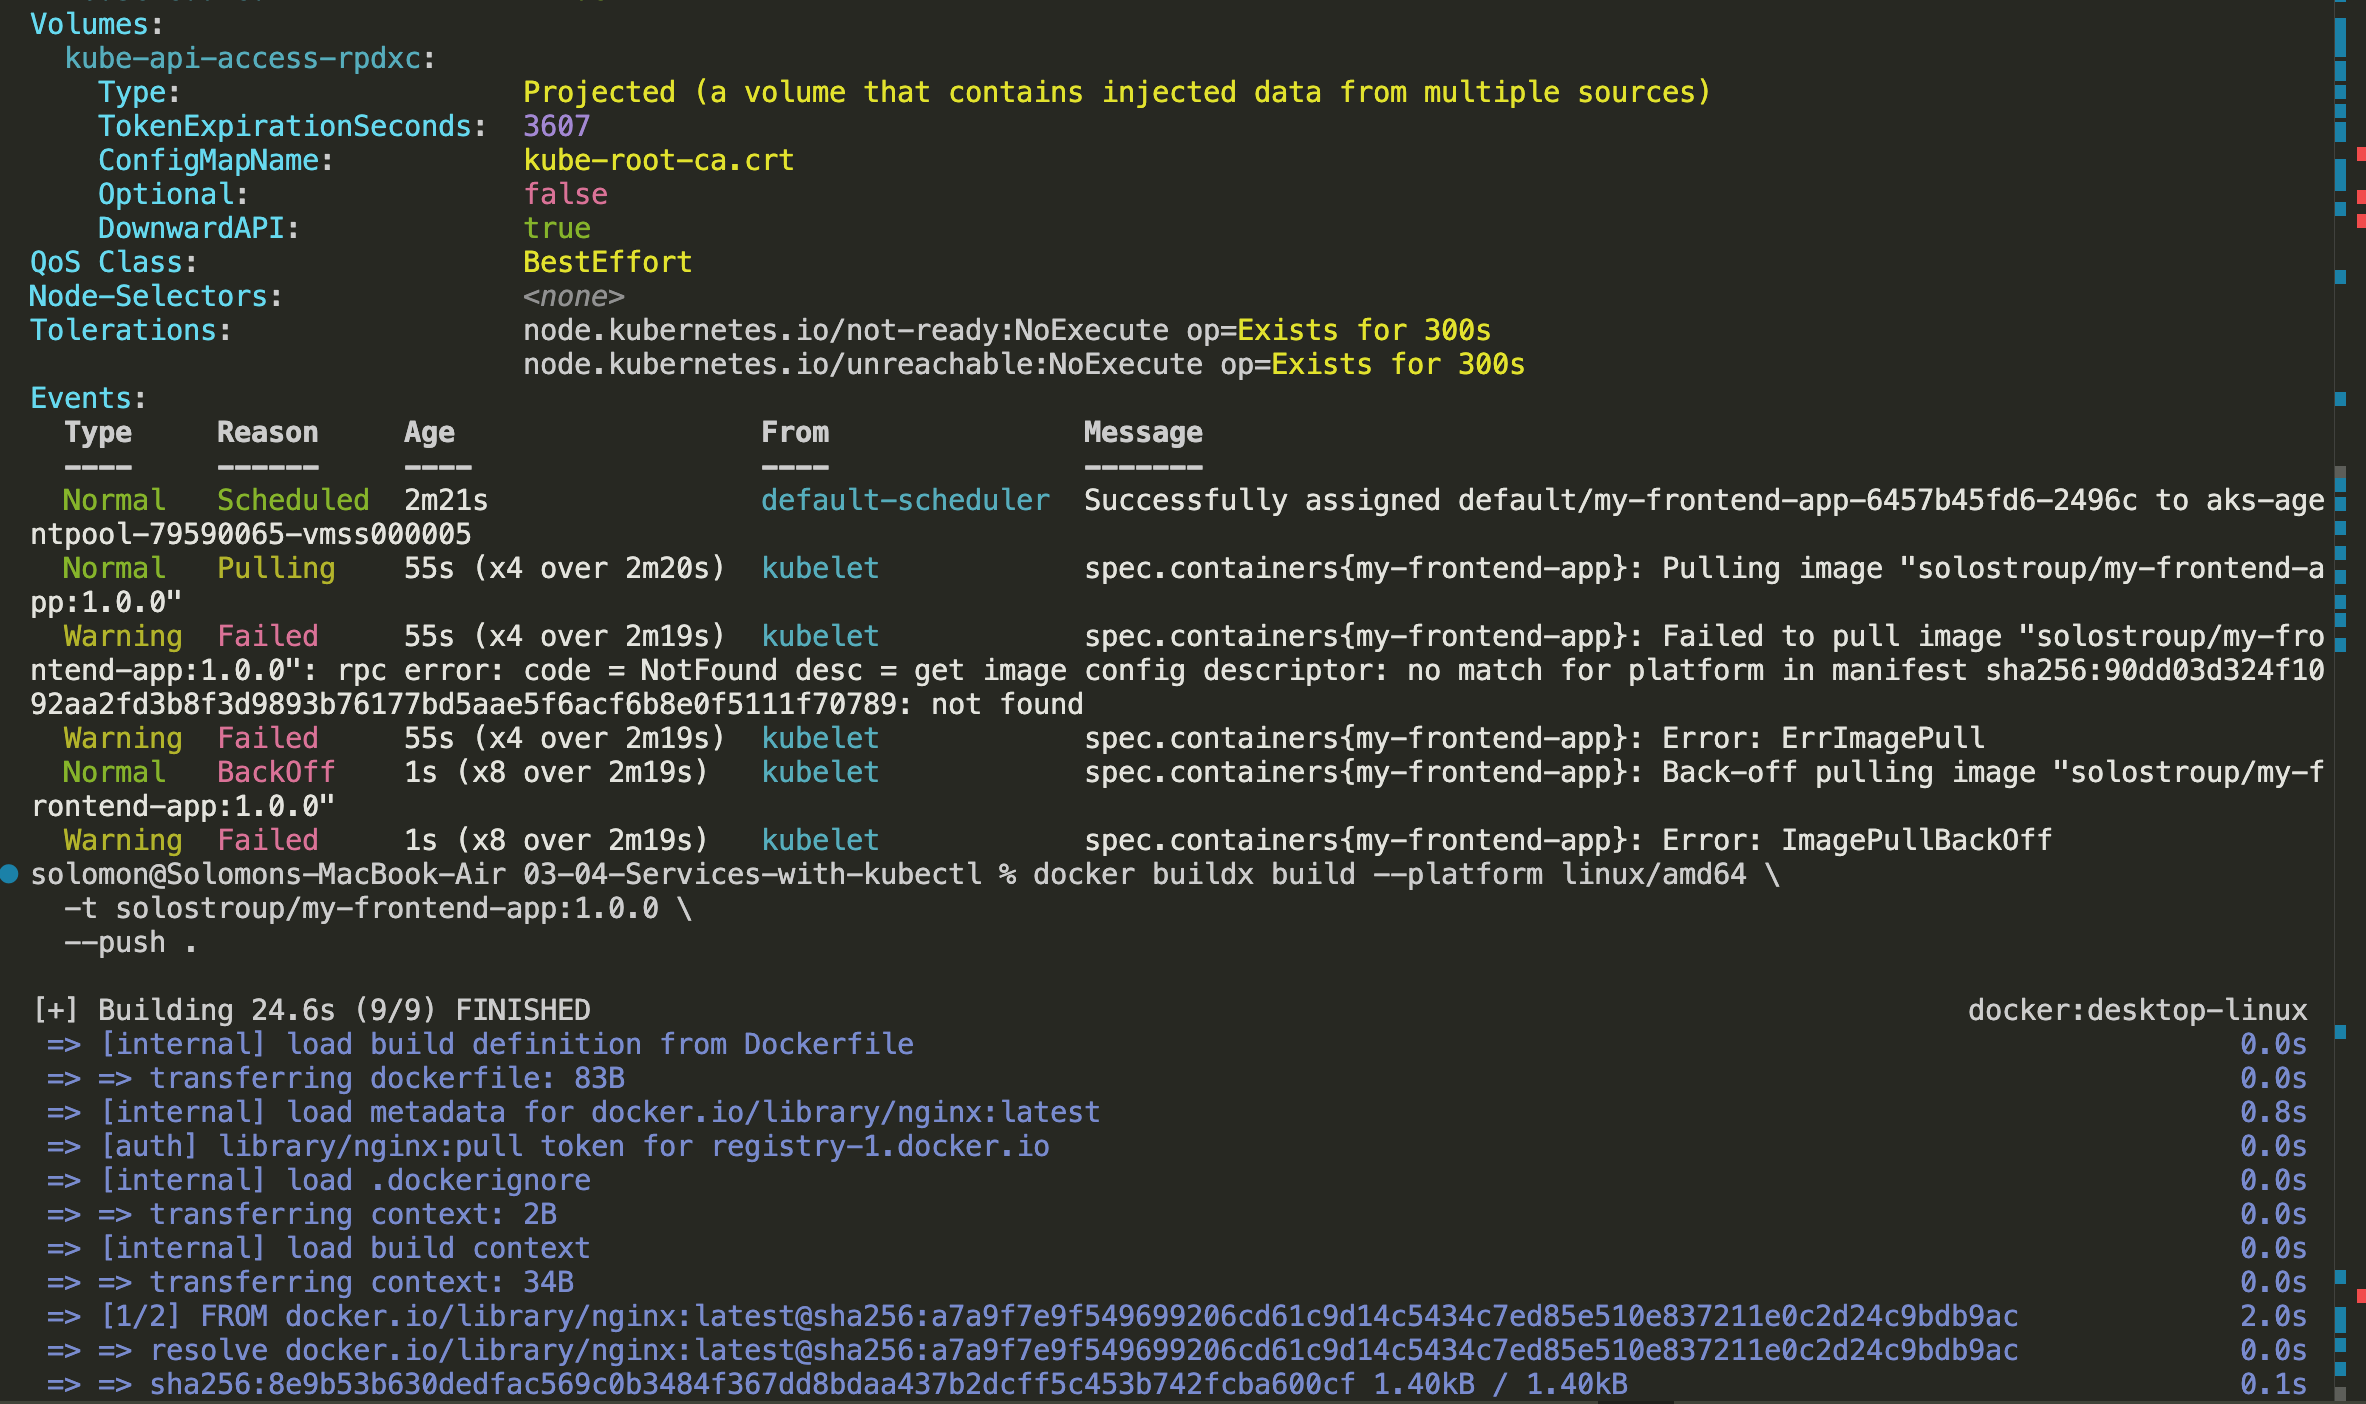

That failure is actually a useful lesson: cluster node architecture and container image architecture need to match. Sometimes the cloud teaches that lesson with extra drama.
- Expose the frontend deployment with a LoadBalancer service:
kubectl expose deployment my-frontend-app --type=LoadBalancer --port=80 --target-port=80 --name=my-frontend-service
- Get the external IP by running:
kubectl get service
- Open the frontend service in your browser once the external IP is assigned. This example shows the request landing on frontend pod
jxzh6.

- Get the pods and notice that the frontend is talking to the backend service, which routes the request to one of the backend pods.
kubectl get pods

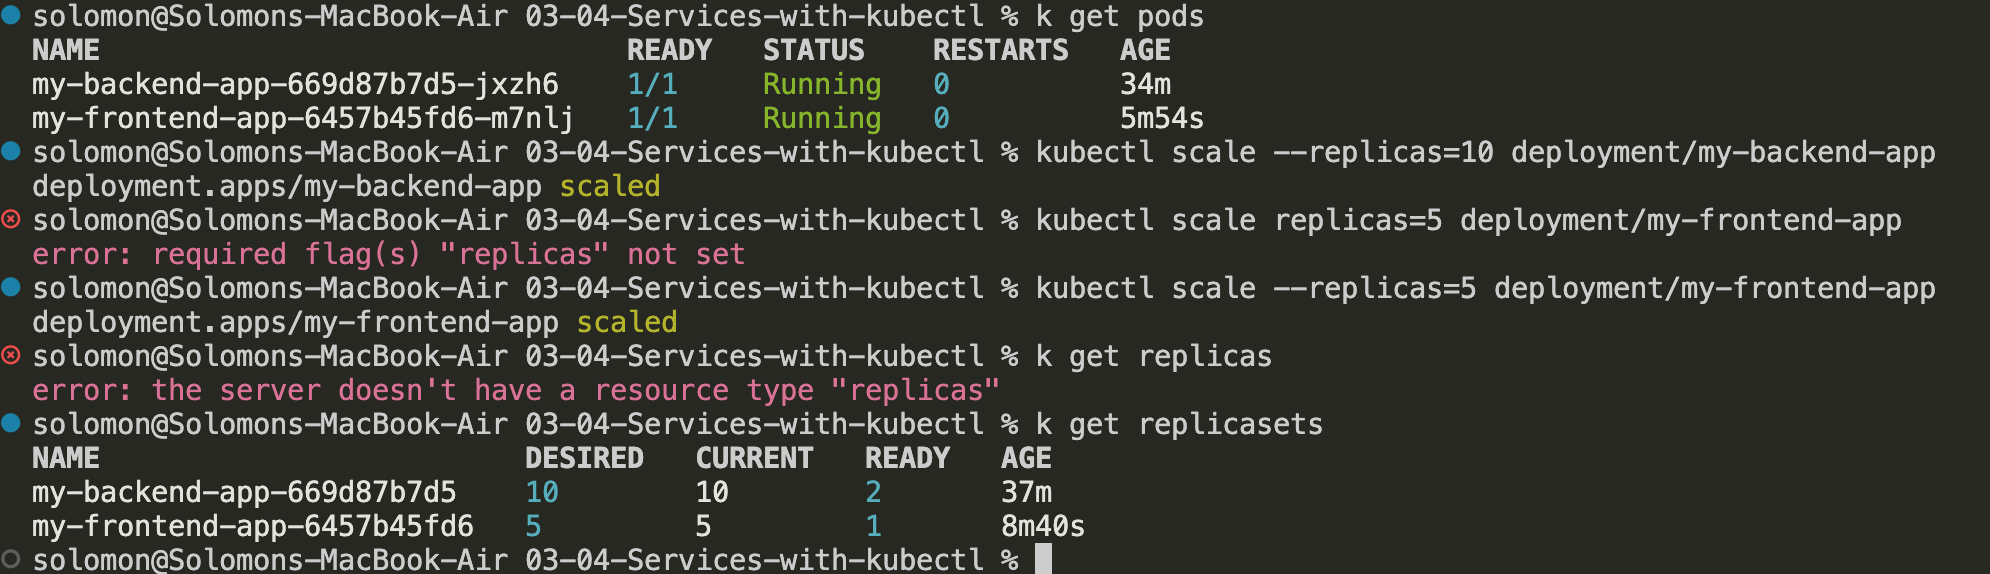
- Let's scale this up to 10 pods on the backend and 5 on the frontend:
kubectl scale --replicas=10 deployment/my-backend-app
kubectl scale --replicas=5 deployment/my-frontend-app
- Let this scale up and watch the pods get created:
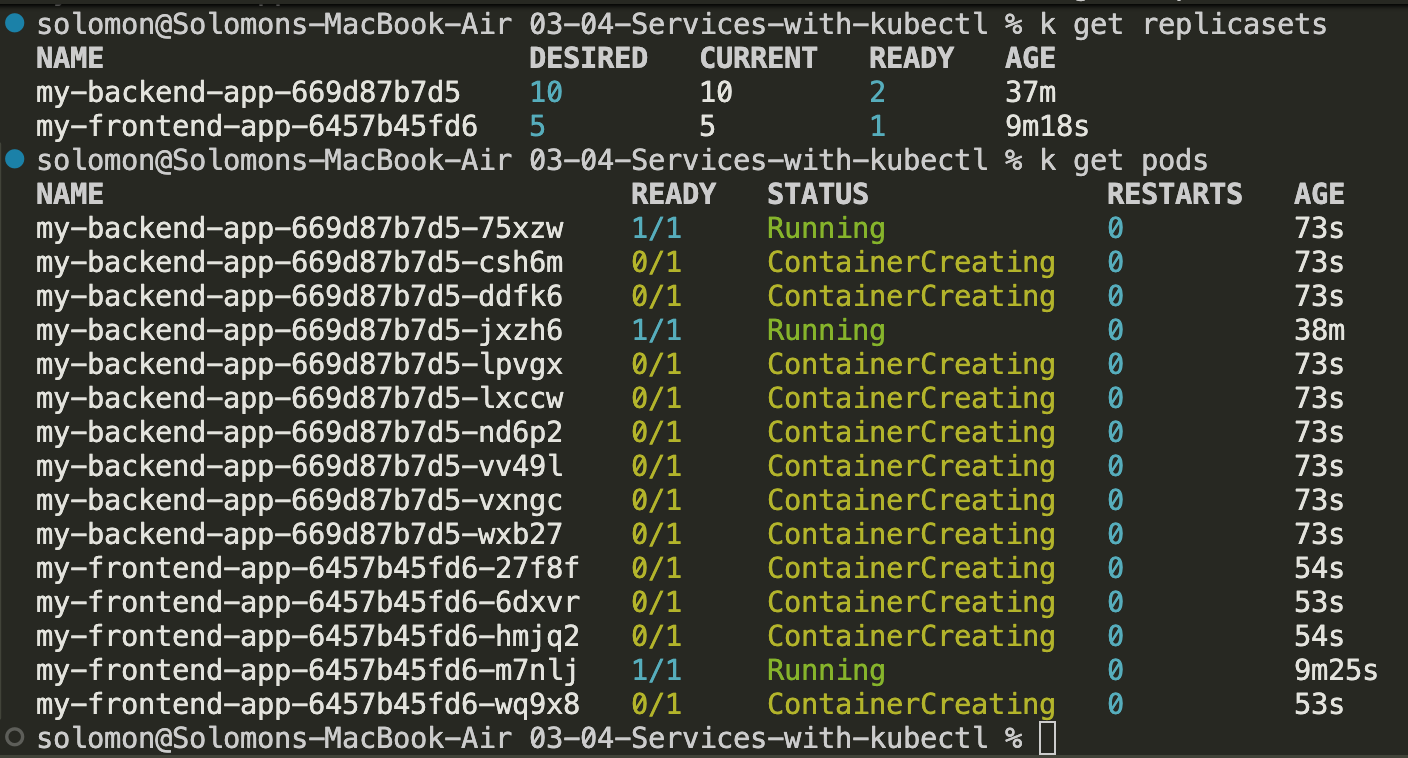
Note: It took a bit to scale up because I am cheap and only had one 2cpu 4gb ram node running - it tried to create another node
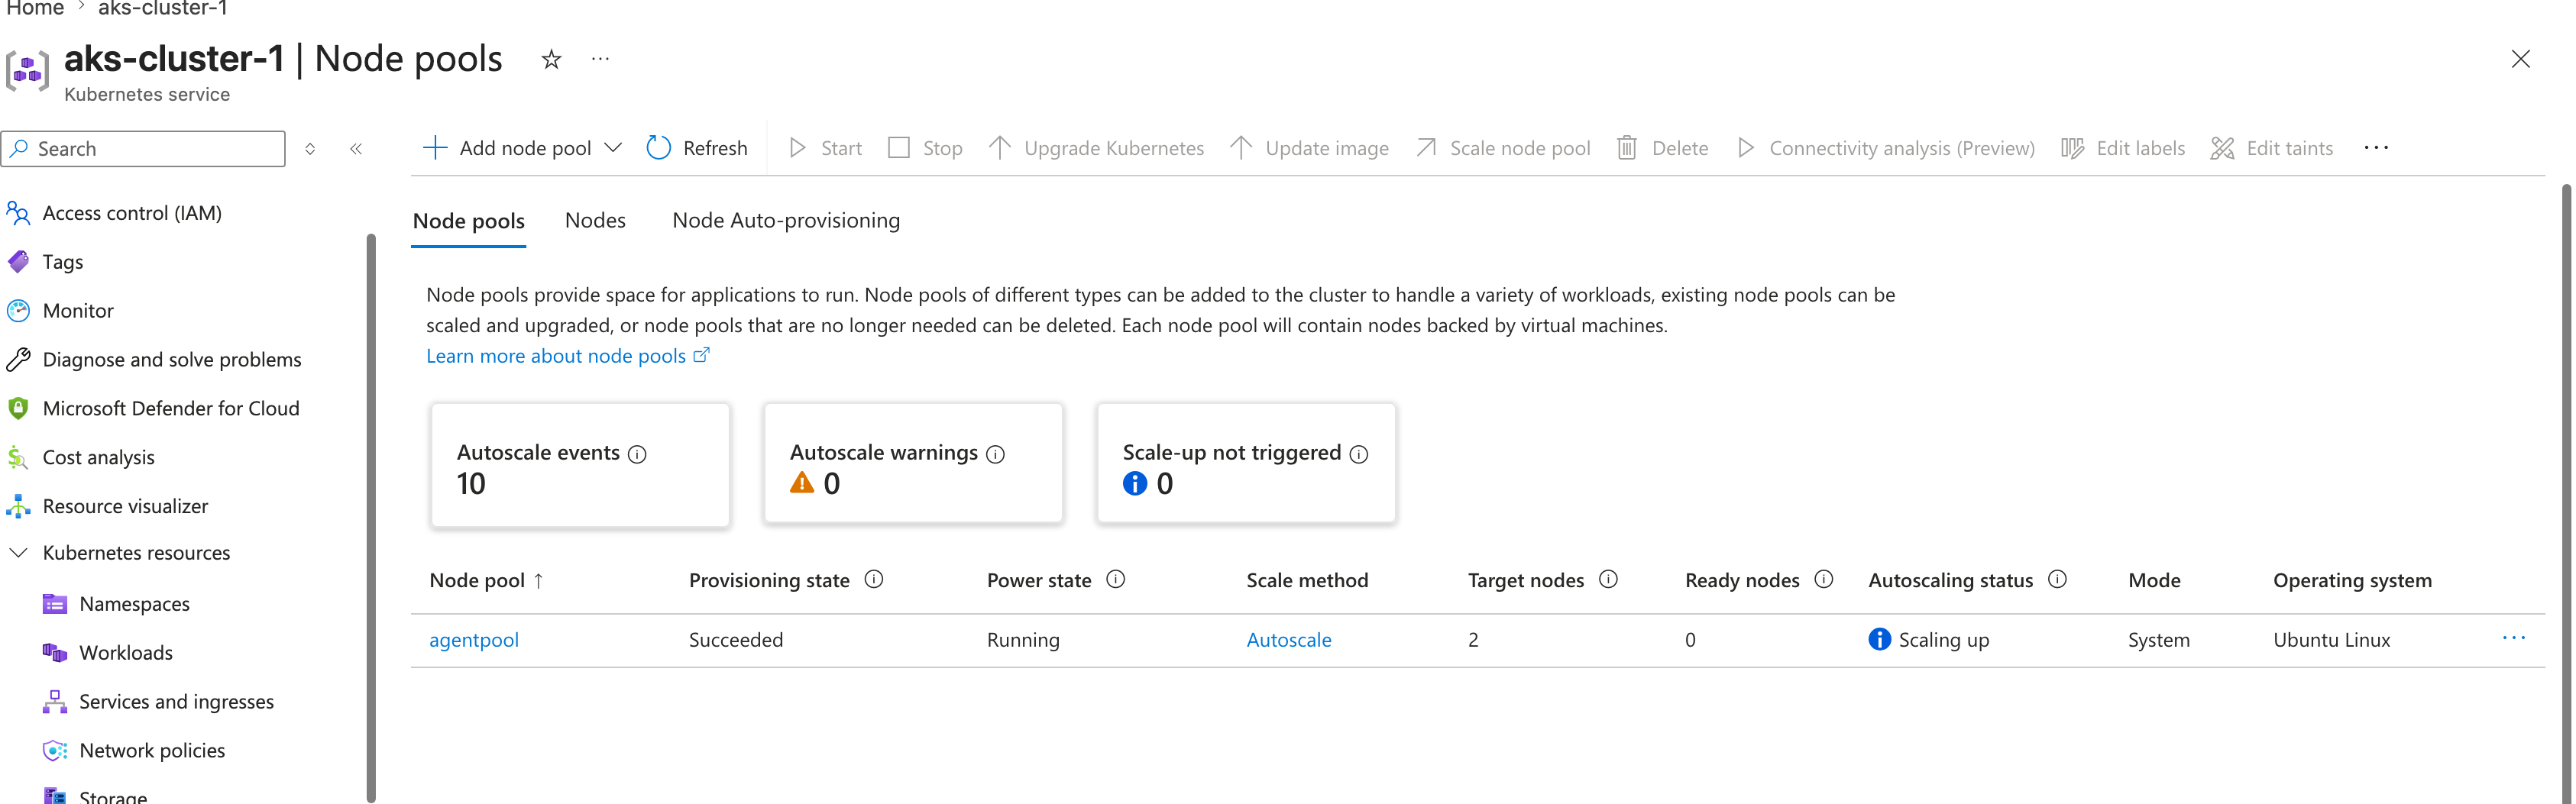 and then promptly died trying to add all those pods to it
 And after a little while it completed.
 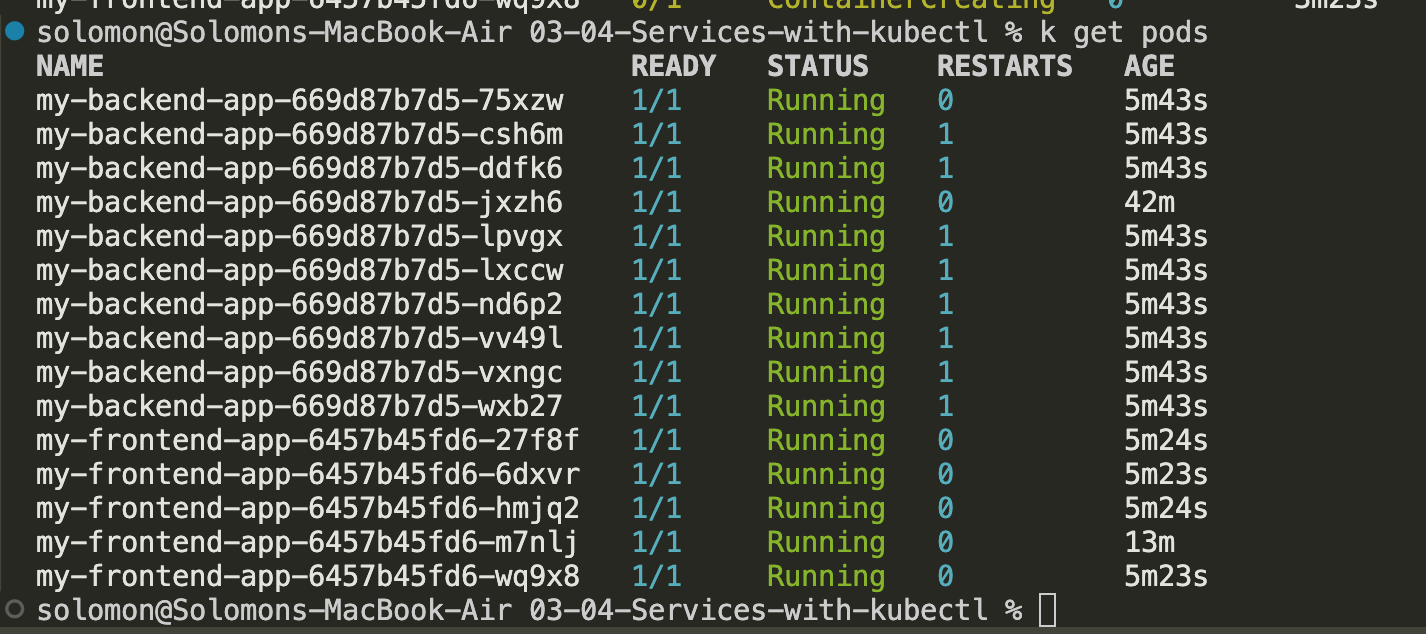 but then all the other pods started failing and the nodepool eventually just died. I created a new nodepool with better VMs and it worked better. Note: Trying to save money sometimes breaks a lot of stuff, even for this tiny application.

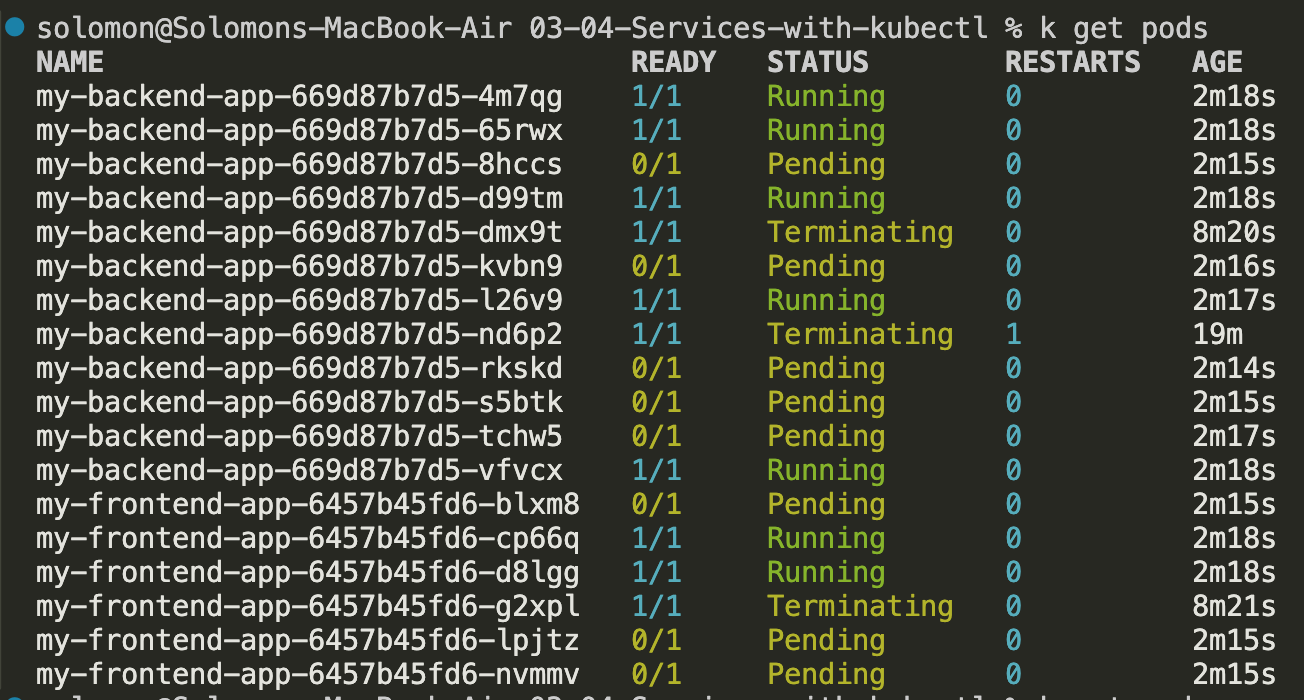
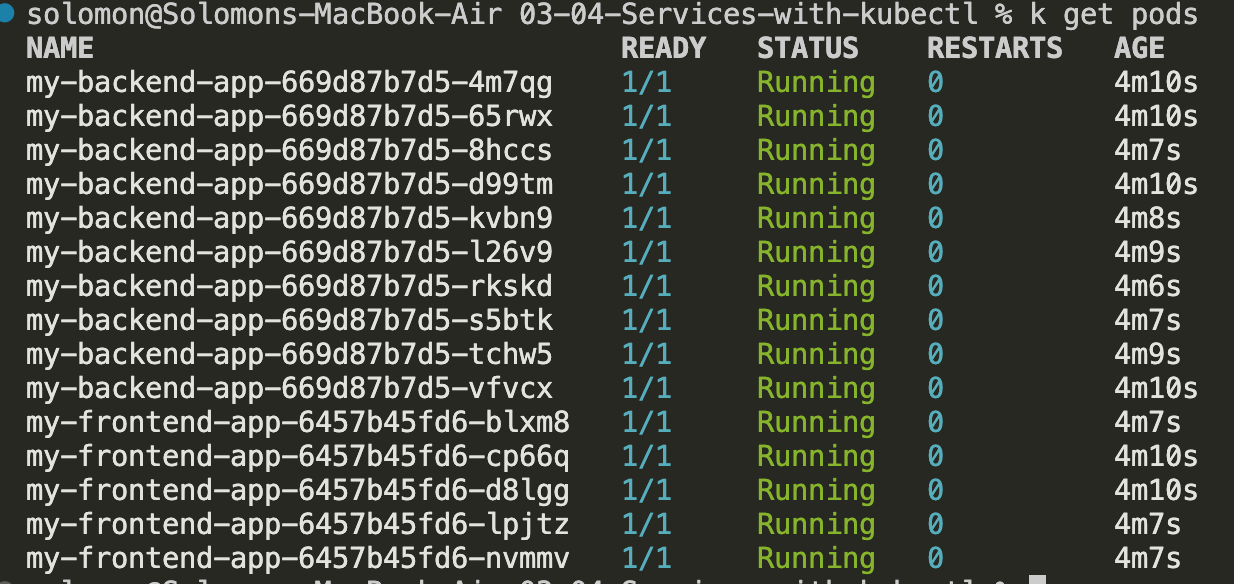
- Refresh the browser a few times, and watch the cache. You should notice that the backend pod names change as requests are routed across the backend pods.
Cleanup
 When you are done, clean up both services and both deployments:
kubectl delete service/my-frontend-service
kubectl delete service/my-backend-service
kubectl delete deployment/my-frontend-app
kubectl delete deployment/my-backend-app