Module 2: Create AKS Cluster
What is AKS?
Azure Kubernetes Service (AKS) is a managed container orchestration service provided by Microsoft Azure. It allows you to deploy, manage, and scale containerized applications using Kubernetes, an open-source container orchestration platform. AKS simplifies the process of running Kubernetes in the cloud by handling tasks such as cluster provisioning, scaling, and maintenance. With AKS, you can focus on developing and deploying your applications while Azure takes care of the underlying infrastructure.
Able to run Windows like .Net and Linux Nodejs, Python applications
Two main components:
- Control Plane (AKS Service)
- Worker Nodes (Node Pools)
Master/Worker nomenclature is deprecated in favor of Control Plane and worker nodes.
High level AKS
Control plane components:
- etcd - key value store for cluster state and configuration.
- kube-scheduler - schedules pods to worker nodes
- kube-apiserver - API endpoint for cluster management
- container runtime - Docker
- kube-controller-manager - manages controllers for cluster state.
Worker Node components
- container runtime - Docker
- kubelet - agent that runs on each worker node and communicates with the control plane kube-schedulerto manage pods and containers.
- kube-proxy - manages network communication between pods and services within the cluster.
Demo: Create AKS Cluster
https://github.com/Dupo24/AKS1-azure-kubernetes-masterclass/tree/master/01-Create-AKS-Cluster
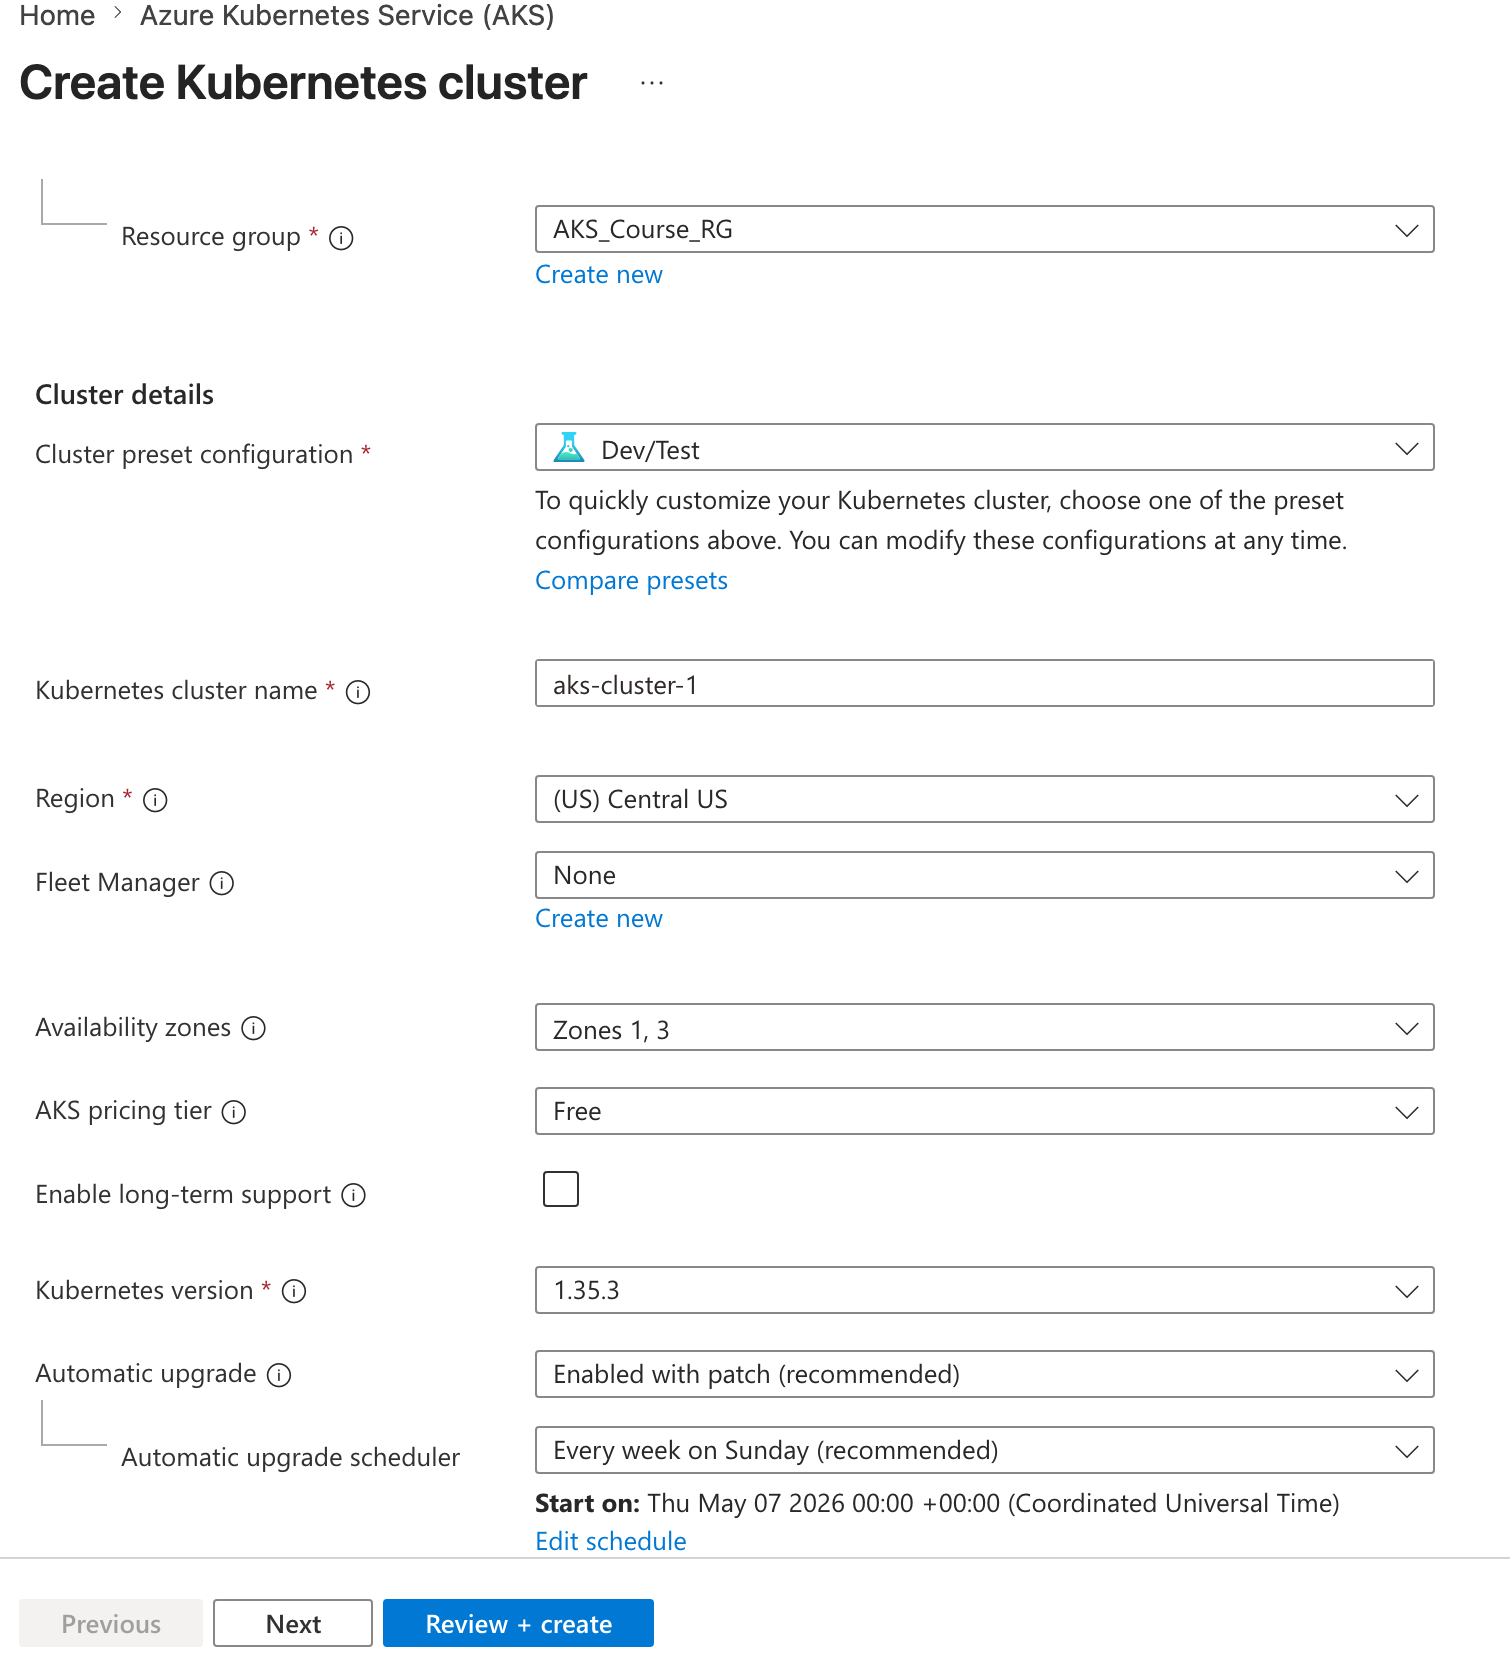
Check the preset options:
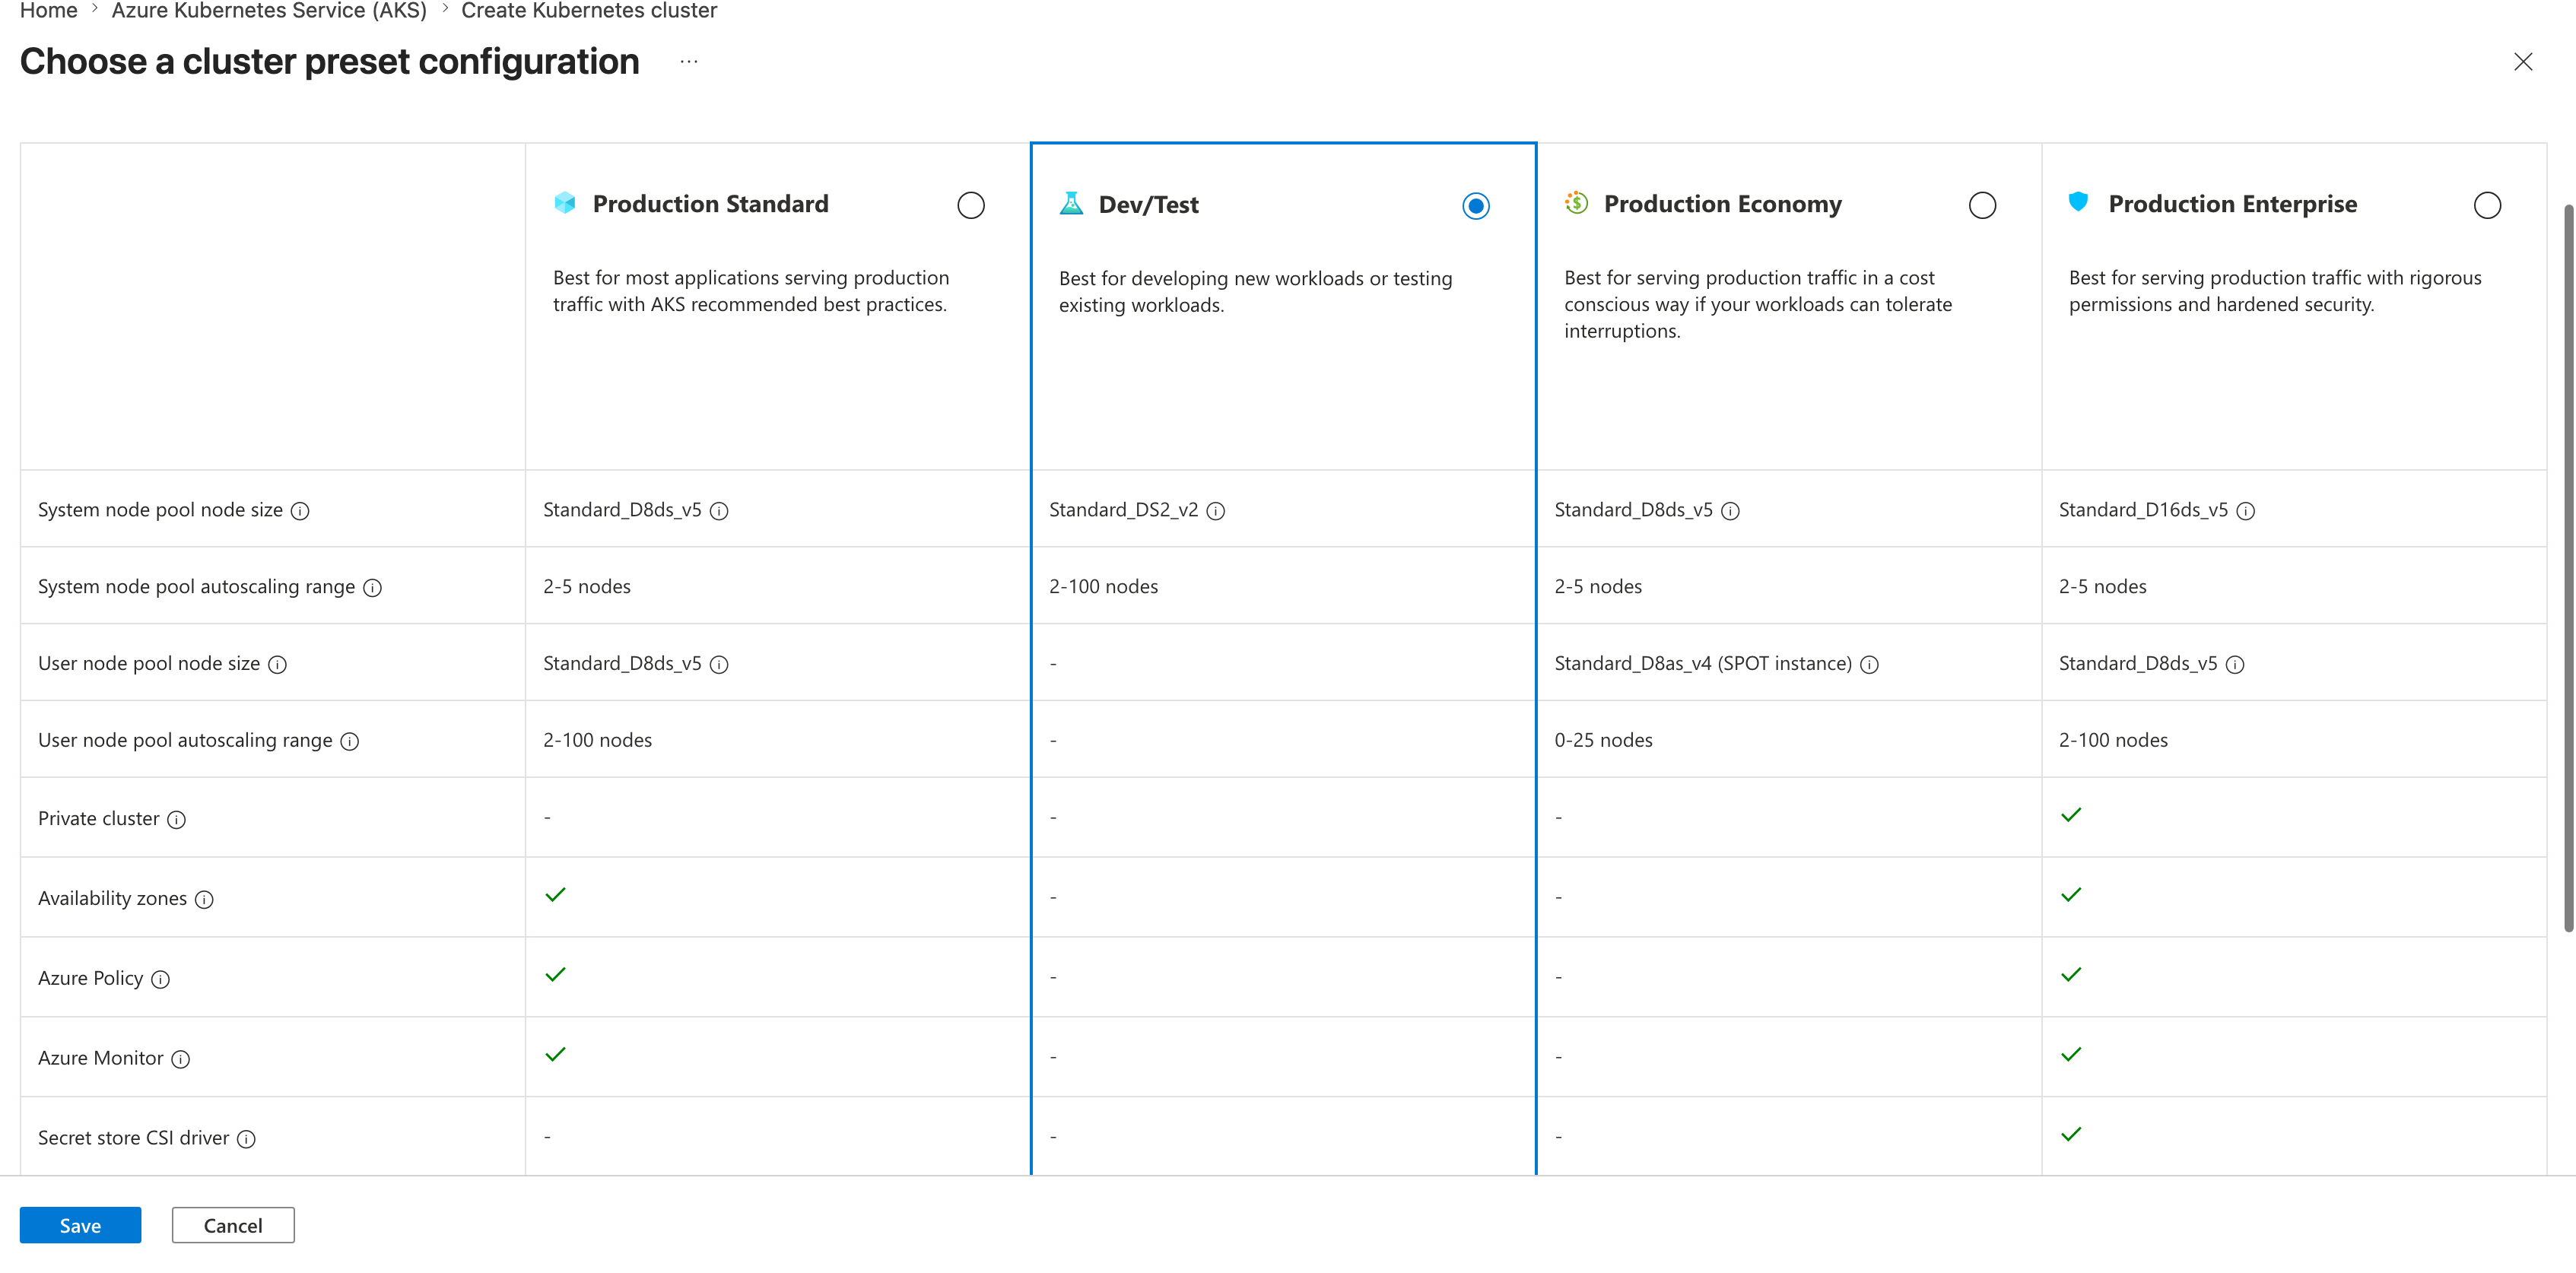
- Create the cluster
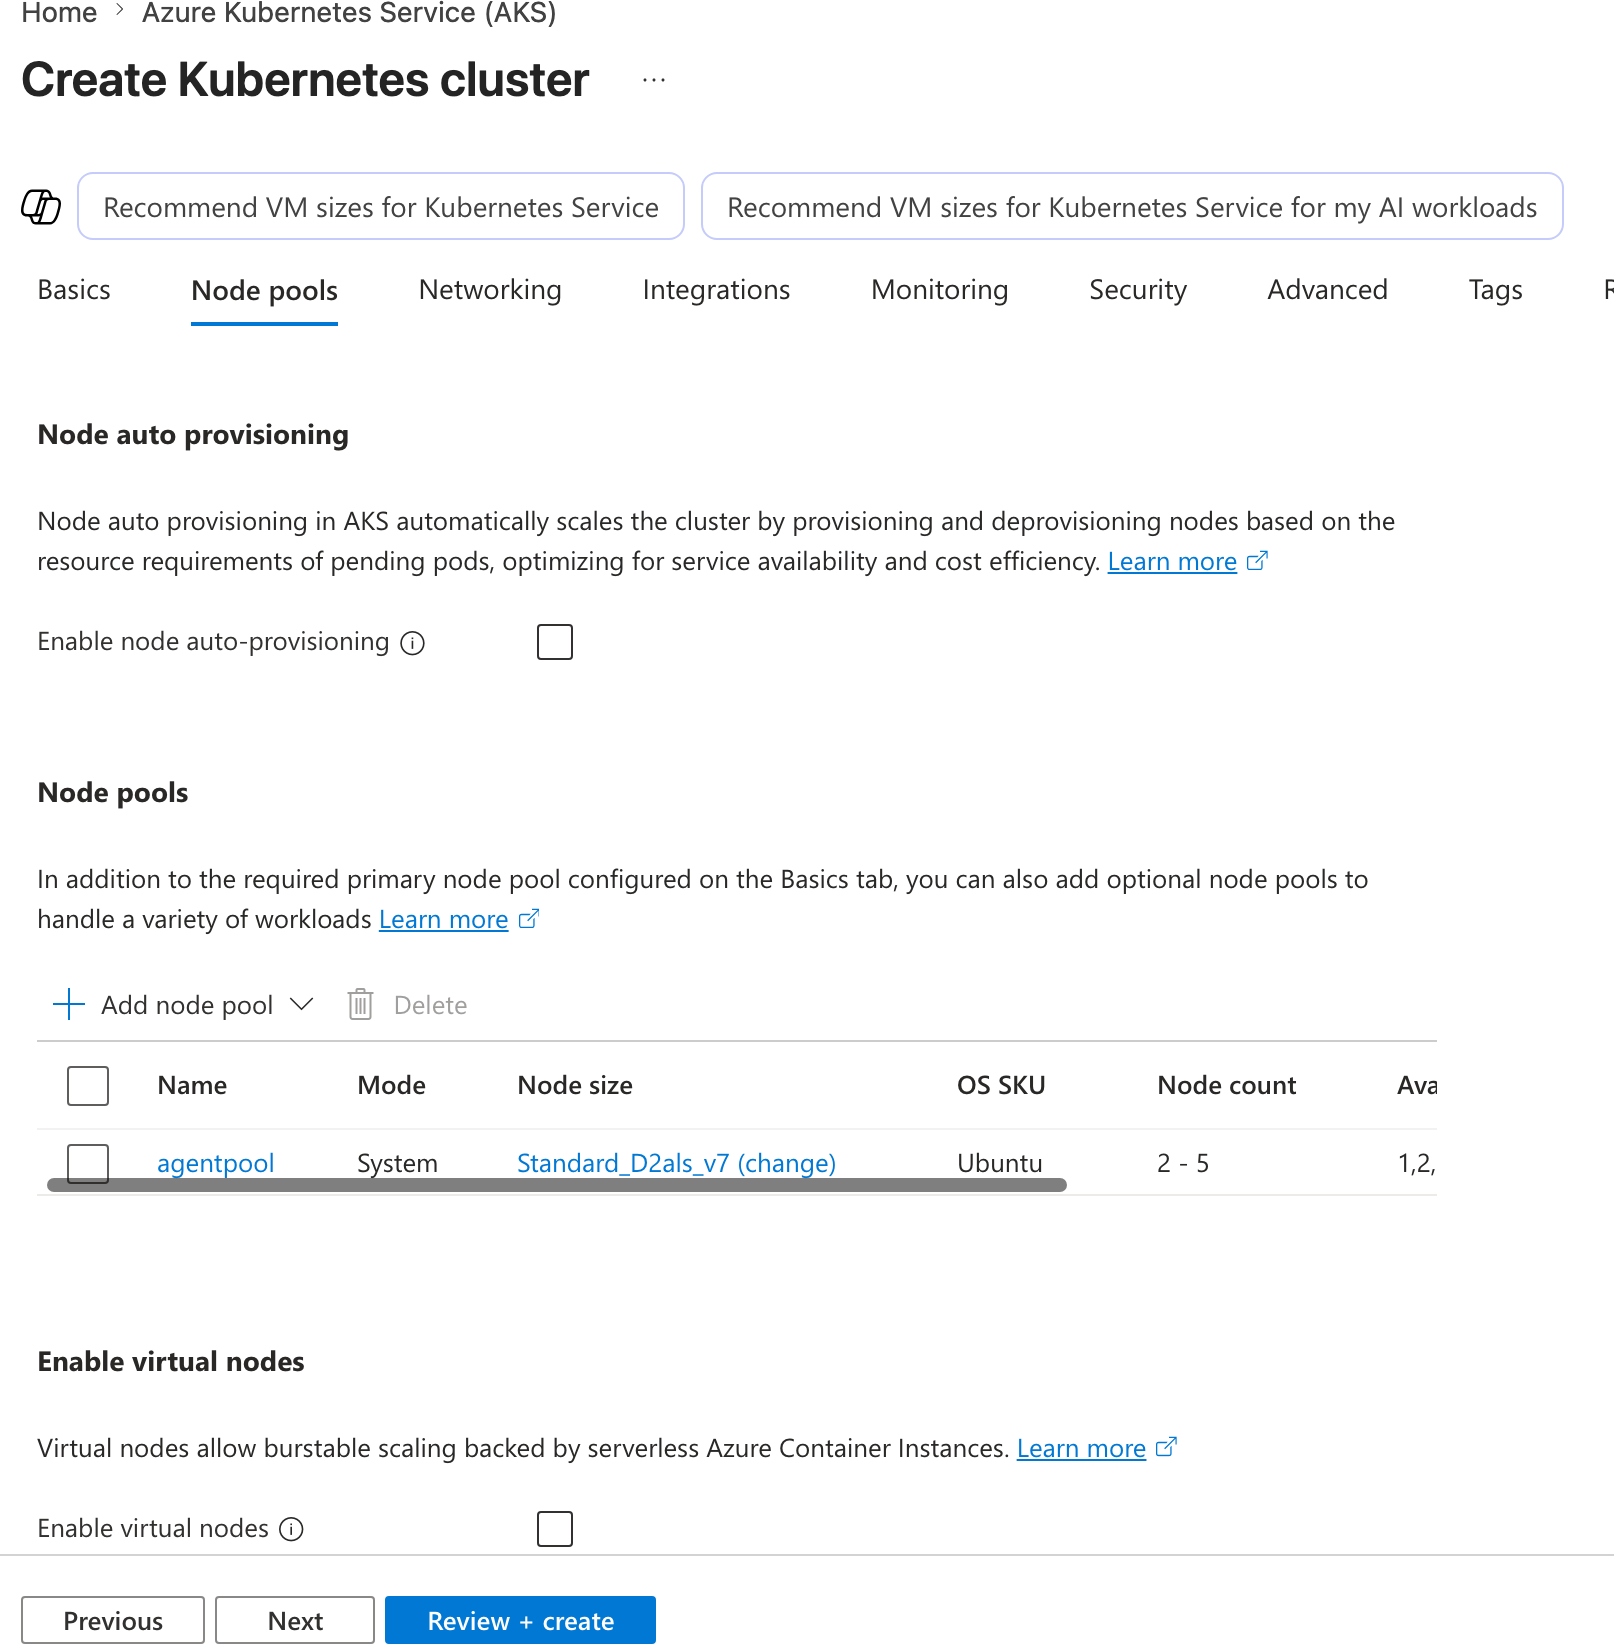
- For the node pool, I selected minimum 2 of the smallest machines I could find for this small test.
- Networking section:
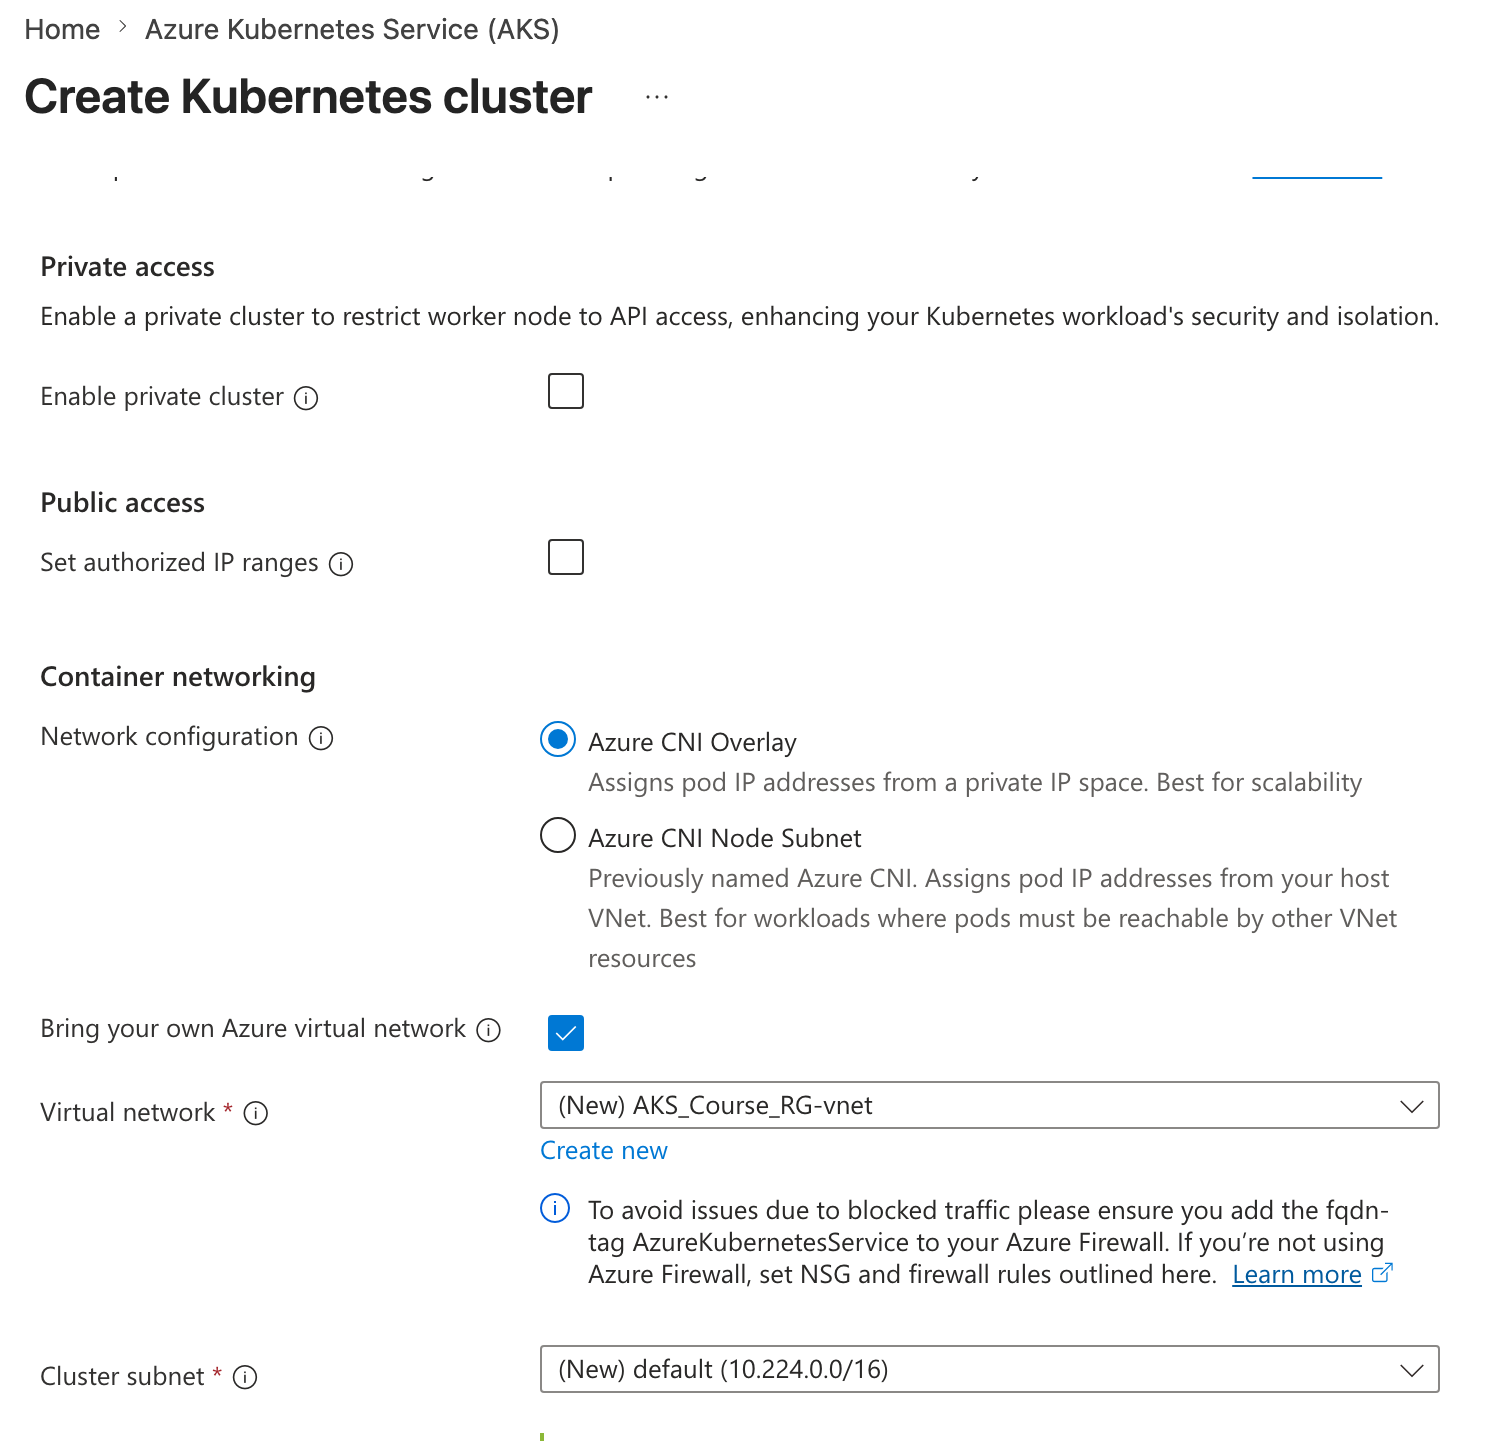
- Leave the rest as default and create the cluster. This will take about 10 minutes to deploy.
Deployment in progress:
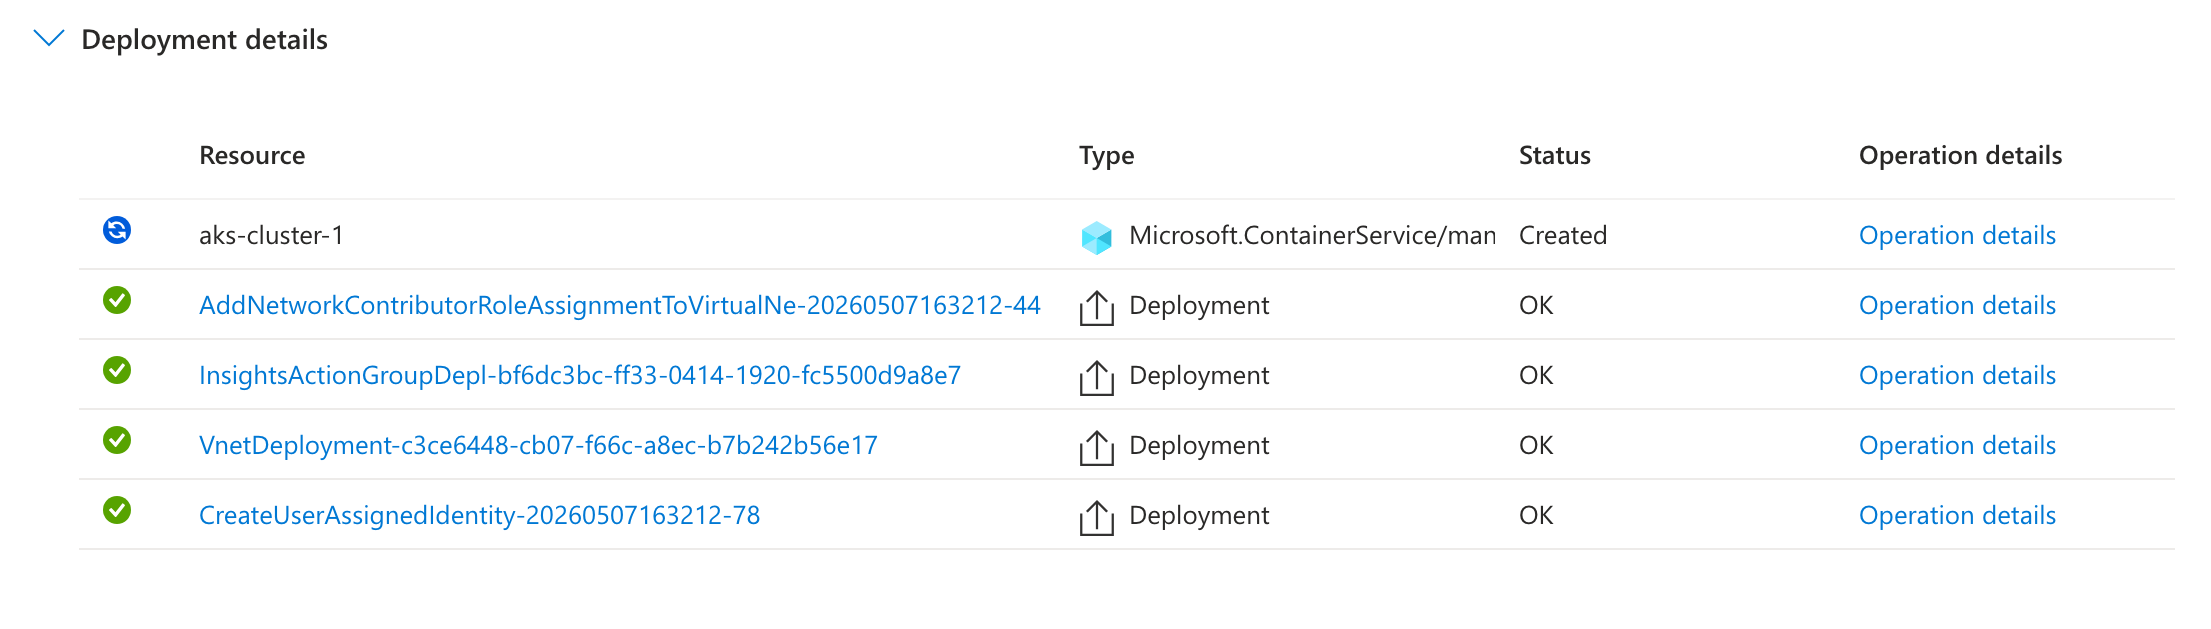
Fun note: Copilot doesn't run everywhere :)

Interacting with the Cluster
- Open Cloud Shell in the Azure portal.
- Run
az aks get-credentials --resource-group <your-resource-group> --name <your-cluster-name>to configurekubectlto connect to your AKS cluster. Example:az aks get-credentials --resource-group AKS_Course_RG --name aks-cluster-1 - You can also get this command from the cluster overview page in the Azure portal by selecting Connect and following the Azure CLI instructions.
- Run
kubectl get nodesto view the worker nodes in your cluster. You should see the two nodes you specified in the node pool configuration.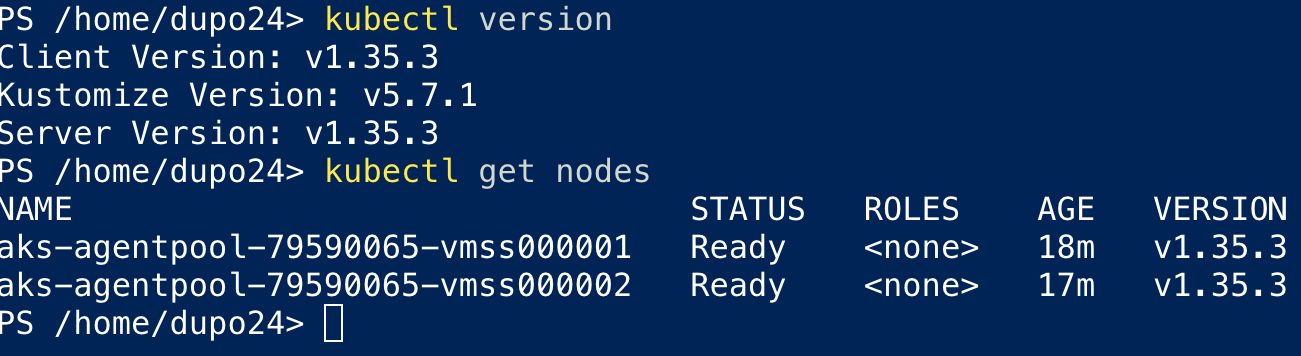
- Run
kubectl get nodes -o wideto see additional details about the nodes, including their IP addresses and status. - Run
kubectl get pods --all-namespacesto see the pods running in the cluster. By default, some system pods will be running in thekube-systemnamespace.
Note: The -o wide option shows additional node details, including internal and external IP addresses, the Kubernetes version, and current status. This is useful for troubleshooting and understanding the cluster configuration.
NOTE: Screenshot here
Namespaces
Namespaces in Kubernetes are a way to divide cluster resources between multiple users or teams. They provide a scope for names, allowing you to have multiple resources with the same name as long as they are in different namespaces. This is particularly useful in larger clusters where multiple teams or applications are sharing the same cluster.
NOTE: Screenshot here
The default namespace is where Kubernetes system components and any resources that are not explicitly assigned to a namespace are created. It is generally recommended to create separate namespaces for different applications or teams to improve organization and resource management.
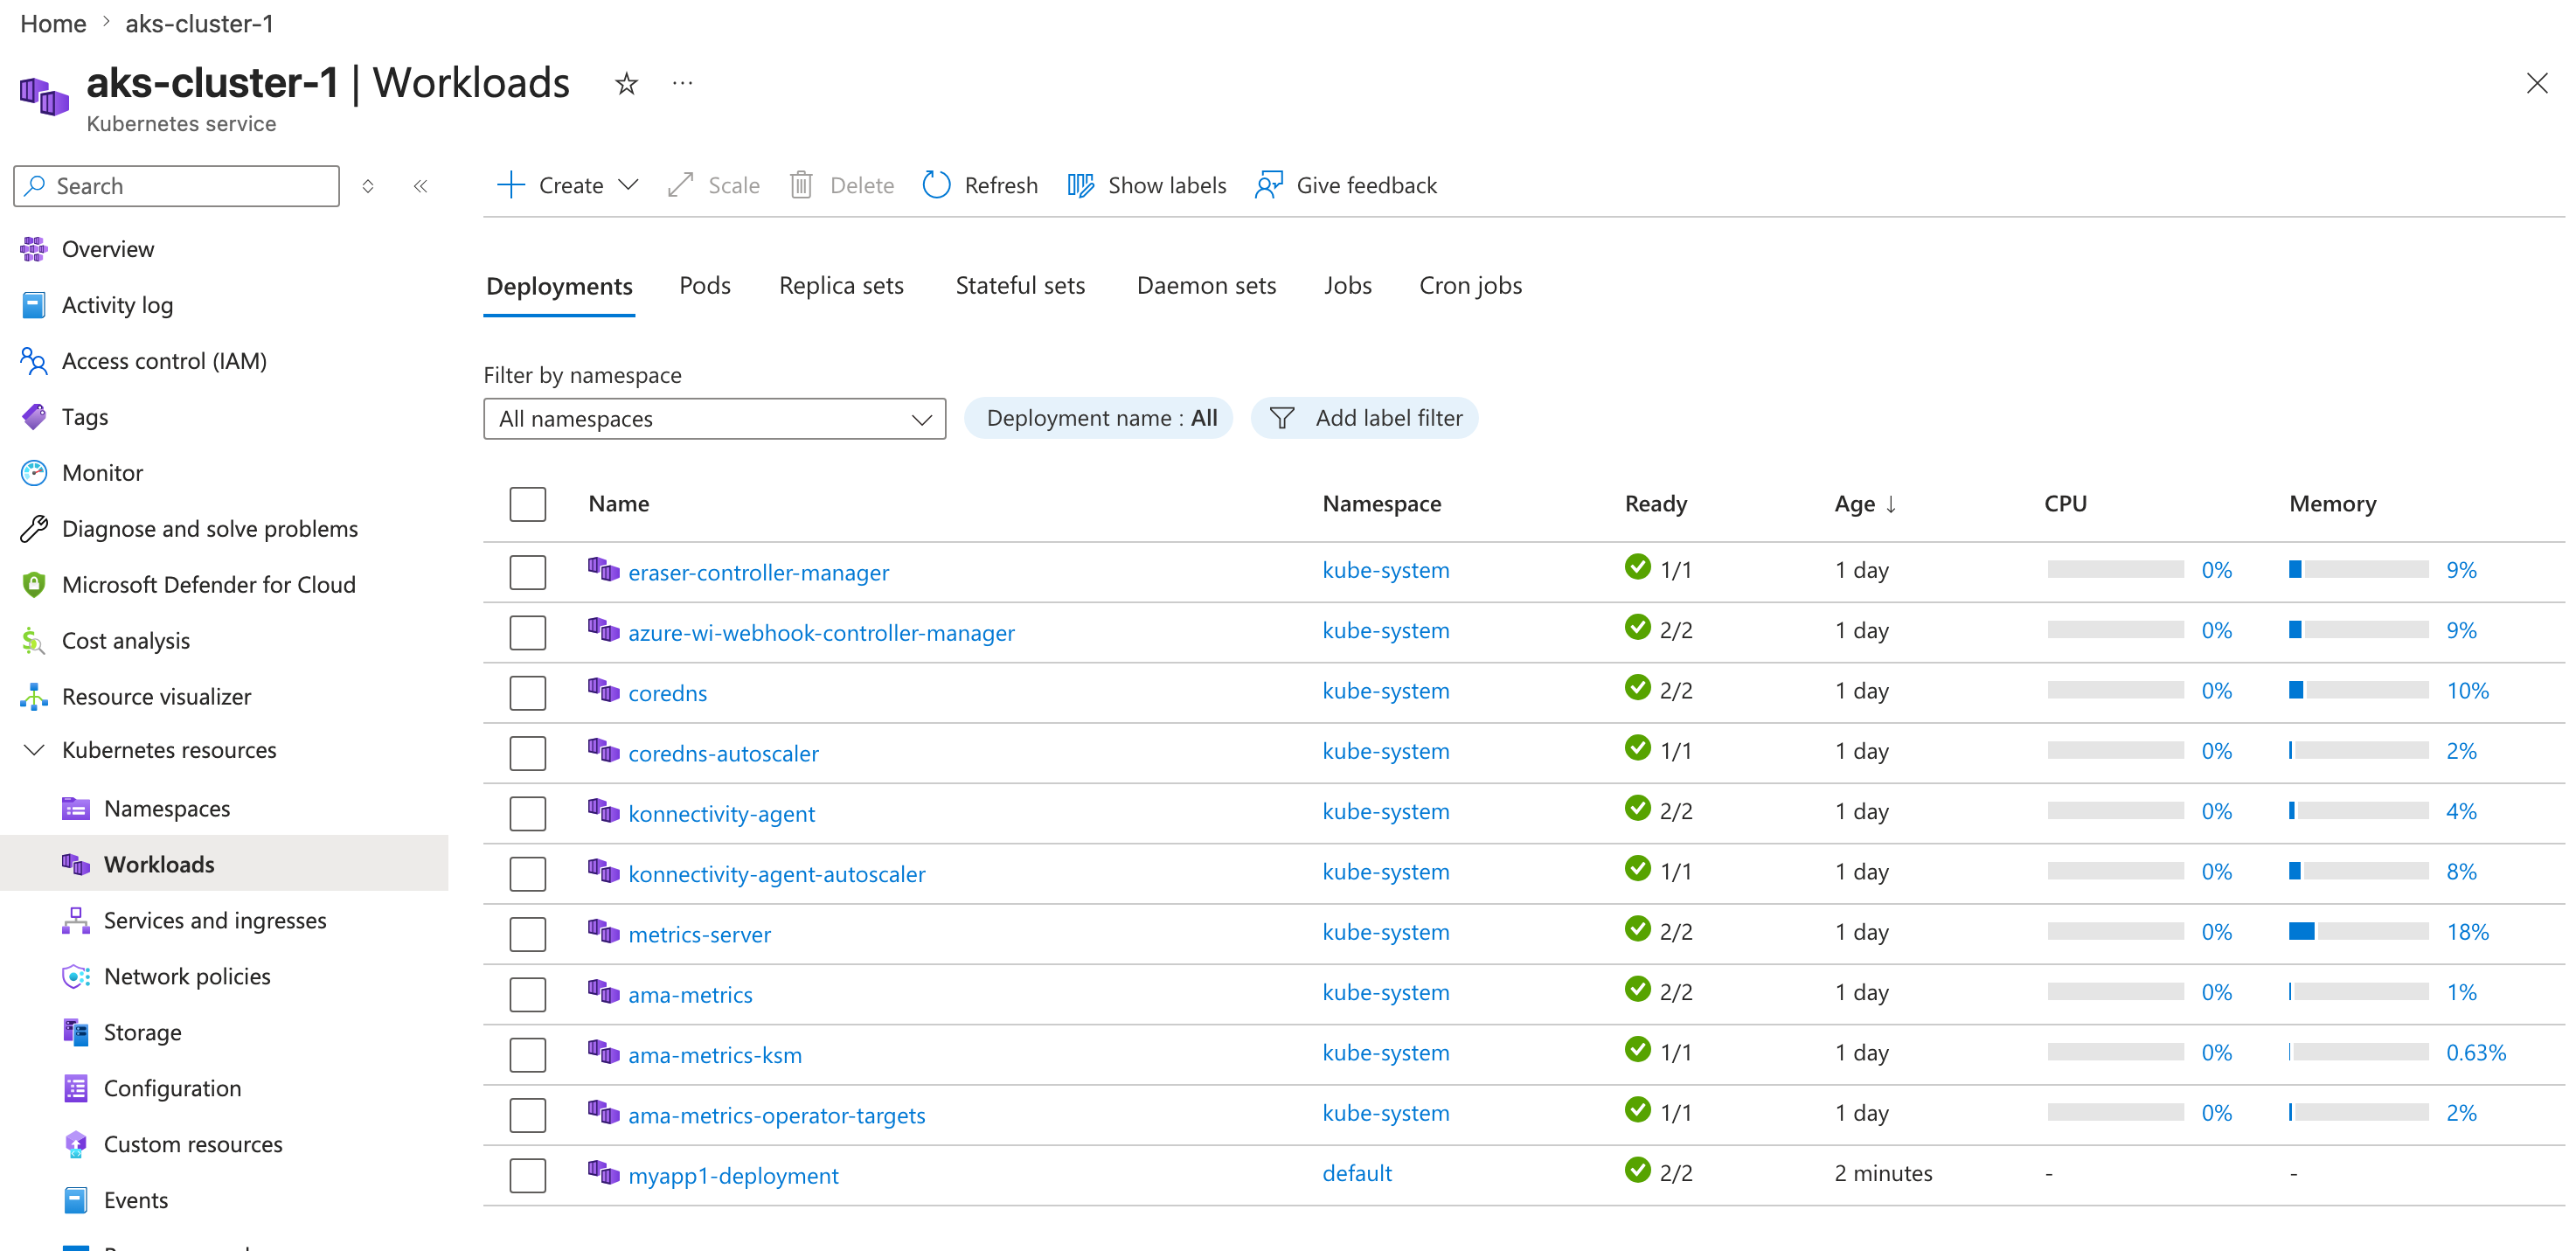
System related workloads are typically deployed in the kube-system namespace, which is reserved for Kubernetes system components and add-ons. This includes components like the Kubernetes dashboard, DNS services, and other essential services that are required for the cluster to function properly.
Some of the workloads include:
- kube-dns: Provides DNS services for the cluster, allowing pods to resolve each other's names.
- kube-proxy: Manages network communication between pods and services within the cluster.
- kube-scheduler: Schedules pods to worker nodes based on resource requirements and other constraints.
- kube-controller-manager: Manages controllers that ensure the desired state of the cluster is maintained.
- kube-apiserver: The API server that serves the Kubernetes API and is the entry point for all administrative tasks.
- kubelet: The agent that runs on each worker node and communicates with the control plane to manage pods and containers.
If you run kubectl get pods --all-namespaces, you will see all the pods running in the cluster, including those in the kube-system namespace. This is useful for monitoring and troubleshooting system components.
Another good command to remember is kubectl get all --all-namespaces, which shows all resources (pods, services, deployments, etc.) across all namespaces in the cluster. This provides a comprehensive view of the cluster's state and resource usage.
You will see pods, services, deployments, replicasets, and other resources across all namespaces, giving you a complete overview of the cluster's state and resource usage. This is particularly helpful for troubleshooting and understanding how different applications and system components are interacting within the cluster.
This is a decent overview of AKS and how to create and interact with an AKS cluster.
Services and Ingresses
Services and Ingresses are two of the main ways traffic reaches workloads running in Kubernetes.
- A Service gives a stable network endpoint for a set of pods.
- An Ingress defines HTTP or HTTPS routing rules, usually by host name or path, and sends that traffic to one or more Services.
In AKS, you will commonly inspect Services first to confirm your application is reachable inside or outside the cluster, then review Ingresses if you are exposing web traffic through an ingress controller.
Demo: View Services and Ingresses
- Run
kubectl get servicesto list Services in the current namespace. - Run
kubectl get services --all-namespacesto see Services across the entire cluster. - Look at the
TYPEcolumn to understand how each Service is exposed:ClusterIPis only reachable from inside the cluster.NodePortexposes the Service on a port on each worker node.LoadBalancerprovisions an Azure Load Balancer and exposes the Service externally.
- Run
kubectl describe service <service-name>to see more details, including selectors, endpoints, ports, and external IP information. - Run
kubectl get ingressto list Ingress resources in the current namespace. - Run
kubectl get ingress --all-namespacesto see all Ingress resources across the cluster. - Run
kubectl describe ingress <ingress-name>to inspect routing rules, hosts, paths, backend Services, and related events.
Example commands:
kubectl get services
kubectl get services --all-namespaces
kubectl describe service my-service
kubectl get ingress
kubectl get ingress --all-namespaces
kubectl describe ingress my-ingress
What to look for
- For a
LoadBalancerService, check whether anEXTERNAL-IPhas been assigned. - For an Ingress, verify the host and path rules point to the correct backend Service and port.
- If an Ingress does not return an address, check whether an ingress controller is installed and running.
AKS note
AKS does not automatically make Ingress resources work by themselves. You need an ingress controller such as NGINX Ingress Controller or Azure Application Gateway Ingress Controller to process the Ingress rules and route traffic.
Run Command
You can run commands directly through the Azure portal if you do not want to install tools locally.
- Open your AKS cluster in the Azure portal.
- In the left-hand menu, select Run command.
- Choose a common command or enter your own command in the editor.
- Start with a simple check such as:
kubectl get nodes
- Select Run to execute the command against the cluster.
- Review the output in the portal window.
This is useful for quick checks when you need cluster access but do not have kubectl configured on your local machine.
NOTE: Screenshot here
Install Azure CLI
If you want to manage AKS from your local machine instead of Cloud Shell, install the Azure CLI first.
Windows
- Download the Azure CLI installer from Microsoft: https://aka.ms/installazurecliwindows
- Run the
.msiinstaller and complete the setup wizard. - Open PowerShell or Command Prompt.
- Verify the installation:
az version
- Sign in to Azure:
az login
macOS
If you use Homebrew, install Azure CLI with:
brew update
brew install azure-cli
Then verify the installation:
az version
Sign in to Azure:
az login
Optional: Install kubectl
You will also need kubectl to interact with your AKS cluster.
Install it with Azure CLI:
az aks install-cli
After installing both tools, you can connect to your cluster with:
az aks get-credentials --resource-group <your-resource-group> --name <your-cluster-name>
kubectl get nodes
Notes
- Cloud Shell already includes Azure CLI and
kubectl, so local installation is optional if you prefer working in the Azure portal. - If
az loginopens a browser, complete the sign-in flow with the same Azure account that has access to your AKS cluster.
Kubecolor
I like to install kubecolor to make it easier to read kubectl output. It adds color coding to the output of kubectl get commands.
You can also add an alias to make it easier to use.
Windows
- Install
kubecolorwith Chocolatey if you use it:
choco install kubecolor
- If you use Scoop instead, run:
scoop install kubecolor
- Test it:
kubecolor get nodes
- Add an alias in your PowerShell profile so
kubectluseskubecolor:
Set-Alias kubectl kubecolor
macOS
- Install
kubecolorwith Homebrew:
brew install kubecolor
- Test it:
kubecolor get nodes
- Add an alias to your shell profile:
alias kubectl=kubecolor
alias k=kubecolor
Notes
- If you add an alias, open a new terminal or reload your shell profile before testing.
kubecolordoes not replace Kubernetes or Azure CLI tools. It only improves the readability of command output.
Test it all out
Run a few commands to see the color coding in action:
kubectl get nodes
kubectl get pods --all-namespaces
kubecolor get services --all-namespaces
kubecolor get ingress --all-namespaces
k get services --all-namespaces
Deploy Sample Application
To test your AKS cluster, you can deploy a simple sample application. This will help you verify that your cluster is working correctly and that you can manage workloads.
- Create the load balancer service definition in a file called
service.yaml:
apiVersion: v1
kind: Service
metadata:
  name: myapp1-loadbalancer
  labels:
    app: myapp1
spec:
  type: LoadBalancer
  selector:
    app: myapp1
  ports:
    - port: 80
      targetPort: 80
- Create the deployment definition in a file called
deployment.yaml:
apiVersion: apps/v1
kind: Deployment
metadata:
  name: myapp1-deployment
spec:
  replicas: 2
  selector:
    matchLabels:
      app: myapp1
  template:
    metadata: # Dictionary
      name: myapp1-pod
      labels: # Dictionary
        app: myapp1
    spec:
      containers: # List
        - name: myapp1-container
          image: stacksimplify/kubenginx:1.0.0
          #image: ghcr.io/stacksimplify/kubenginx:1.0.0
          ports:
            - containerPort: 80
- Apply the deployment and service to the cluster:
kubectl apply -f deployment.yaml
kubectl apply -f service.yaml
 4. Check the status of the deployment and service:
kubectl get deployments
kubectl get services
You can also view these objects in the Azure portal under your AKS cluster's Workloads and Services and Ingresses sections.
 5. run
 k get services and look for the EXTERNAL-IP assigned to your load balancer service. This may take a few minutes to appear.
6. If you type in the IP address of the load balancer service in your browser, the page should load.
 This confirms that your AKS cluster is running and can successfully deploy and expose applications.
What this has done in the background, is created a deployment with 2 replicas and a load balancer service that routes traffic to those pods. The load balancer gives you an external IP address that you can use to access the application from outside the cluster.
Note: This has been deployed into the default namespace. In real usage, you would deploy to a specific namespace for better organization.
You can also view the YAML for these Kubernetes objects in the Azure portal.
- Open your AKS cluster in the Azure portal.
- Go to Workloads to select the deployment, or go to Services and Ingresses to select the service.
- Open the object details page and look for the YAML or manifest view.
- Review the live configuration that AKS is currently running.
This is helpful when you want to compare the resource you applied with the resource running in the cluster, verify labels and selectors, confirm the service type is LoadBalancer, or inspect the replica count and container image.
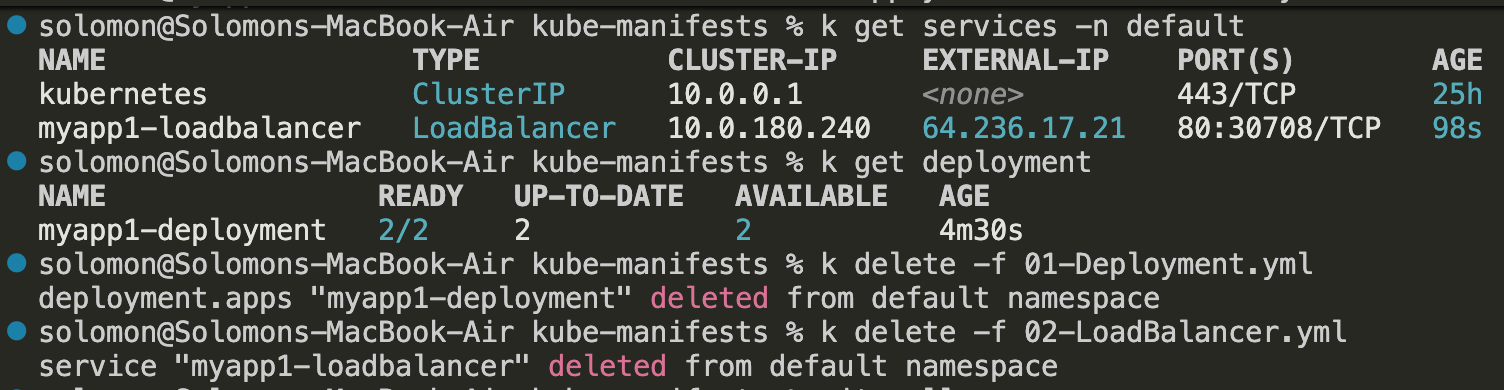
Clean up
When you are finished testing, delete the sample resources so they do not continue running in the cluster.
- Delete the deployment and service using the same YAML files you applied earlier:
kubectl delete -f deployment.yaml
kubectl delete -f service.yaml
- Verify that the resources are gone:
kubectl get deployments
kubectl get services
- If you want to delete them by name instead, run:
kubectl delete deployment myapp1-deployment
kubectl delete service myapp1-loadbalancer
- Wait a minute or two for Azure to release the external load balancer resources associated with the service.
If you only created this cluster for testing, you can also delete the entire AKS cluster and its resource group from the Azure portal after removing the sample application. Let's not do that yet Dupo.