Module 3: Docker Fundamentals
What is Docker??
- What is Docker?
- What is Docker Container?
- What are Docker images?
- What is Docker Hub?
- What is Dockerfile?
- What is Docker Compose?
Yeah, this is a lot. But don't worry, we will cover all of these topics in this module. By the end of this module, Dupo should have a solid understanding of Docker and how to use it to containerize his applications. Let's get started, Dupo!
Traditional Infrastructure vs Docker
Before we dive into Docker, let's take a moment to understand the traditional way of deploying applications and how Docker changes that. In traditional infrastructure, applications are typically deployed on virtual machines (VMs) or physical servers. Each application has its own set of dependencies and configurations, which can lead to conflicts and difficulties in managing the environment. This approach can also be resource-intensive, as each VM or server requires its own operating system and resources.
Docker, on the other hand, allows you to package your application and its dependencies into a single container. This container can run on any system that has Docker installed, regardless of the underlying infrastructure. This means that you can develop your application on your local machine and then deploy it to any environment without worrying about compatibility issues. Docker also provides a lightweight and efficient way to run applications, as containers share the host operating system's resources, making them more resource-efficient than traditional VMs.
Fixes:
- Inconsistencies across environments
- Resource inefficiency
- Compatibility issues
- Install and configuration challenges
The path to containers is based on traditional infrastructure, which includes physical machines, virtual machines, and then containers. Each step in this path has its own set of challenges and benefits, but ultimately, containers provide a more efficient and flexible way to deploy applications.
- Physical machines
- Virtual machines
- Containers (Docker) Note: Screenshot here
Containers are a form of operating system virtualization that allows you to run applications in isolated environments. They are lightweight and portable, making them ideal for modern application development and deployment. Docker is one of the most popular containerization platforms, providing a simple and efficient way to create, deploy, and manage containers. They abstract away the underlying infrastructure, allowing developers to focus on building and running applications without worrying about the complexities of the environment.
With Docker, you can easily package your application and its dependencies into a container, ensuring consistency across different environments and simplifying the deployment process.
Advantages of containers (docker):
- Portability: Containers can run on any system that has Docker installed, regardless of the underlying infrastructure.
- Efficiency: Containers share the host operating system's resources, making them more resource-efficient than traditional virtual machines.
- Isolation: Each container runs in its own isolated environment, preventing conflicts between applications and their dependencies.
- Scalability: Containers can be easily scaled up or down based on demand, allowing for efficient resource utilization.
- Rapid deployment: Containers can be started and stopped quickly, enabling faster development and deployment cycles.
- Consistency: Containers ensure that applications run the same way across different environments, reducing compatibility issues and simplifying testing and deployment.
- Loosely coupled: Containers allow for a microservices architecture, where each service can be developed, deployed, and scaled independently, promoting flexibility and agility in application development.
- Ecosystem: Docker has a rich ecosystem of tools and services that support containerization, including Docker Hub for sharing images, Docker Compose for managing multi-container applications, and Docker Swarm or Kubernetes for orchestrating container deployments at scale.
Docker Architecture
- dockerd: The Docker daemon that runs on the host machine and manages Docker objects such as images, containers, networks, and volumes. It listens for Docker API requests and performs the requested actions.
- docker client: The command-line interface (CLI) that allows users to interact with the Docker daemon. It sends commands to the daemon and displays the output.
- docker API - the docker client communicates with the docker daemon through the docker API, which is a RESTful API that allows users to manage Docker objects and perform various operations such as creating containers, building images, and managing networks.
- Docker objects: These include images, containers, networks, and volumes. Images are the blueprints for creating containers, while containers are the running instances of those images. Networks allow containers to communicate with each other, and volumes provide persistent storage for containers.
- Docker Hub: A cloud-based registry service that allows users to store and share Docker images. It provides a central repository for Docker images, making it easy to find and use pre-built images for various applications and services.
- Docker Containers: These are the running instances of Docker images. They are isolated environments that contain everything needed to run an application, including the code, runtime, system tools, libraries, and settings. Containers can be started, stopped, and managed independently, allowing for flexibility and scalability in application deployment.
How it works
Docker works by taking your application and packaging it into an image. That image contains the application code, runtime, libraries, and configuration needed to run. When you start the image, Docker creates a container, which is the running instance of that image.
At a high level, the flow looks like this:
- Write a
Dockerfile. - Build an image from that
Dockerfile. - Run the image as a container. This is key to know.
- Stop, start, or remove the container as needed.
- Push the image to Docker Hub or another registry if you want to share it.
Some useful starter commands:
docker version
docker images
docker ps
docker ps -a
docker pull nginx
docker run -d -p 8080:80 nginx
docker stop <container-id>
docker rm <container-id>
What these commands do:
docker versionshows the Docker client and engine version.docker imageslists the images on your machine.docker psshows running containers.docker ps -ashows all containers, including stopped ones.docker pull nginxdownloads the NGINX image from Docker Hub.docker run -d -p 8080:80 nginxstarts an NGINX container and maps port8080on your machine to port80in the container.
This is the basic Docker workflow you will use repeatedly: pull or build an image, run it as a container, inspect it, and then clean it up when you are done.
Install Docker
Before you can build or run containers, you need Docker installed on your machine.
Windows
- Go to the Docker Desktop install page: https://www.docker.com/products/docker-desktop/
- Download Docker Desktop for Windows.
- Run the installer.
- If prompted, enable WSL 2 and required Windows features.
- Restart your machine if the installer asks you to.
- Open Docker Desktop and wait for it to finish starting.
- Open PowerShell and verify the installation:
docker version
docker run hello-world
If hello-world runs successfully, Docker is working.
macOS
- Go to the Docker Desktop install page: https://www.docker.com/products/docker-desktop/
- Download Docker Desktop for Mac.
- Choose the correct version for your machine:
- Apple Silicon for M1, M2, or M3 Macs
- Intel for older Intel-based Macs
- Open the downloaded Docker Desktop installer and move Docker into the
Applicationsfolder if prompted. - Start Docker Desktop from
Applications. - Allow any permissions Docker requests.
- Open Terminal and verify the installation:
docker version
docker run hello-world
If hello-world runs successfully, Docker is working.
Quick Test
After Docker is installed, try running NGINX:
docker run -d -p 8080:80 nginx
docker ps
Then open http://localhost:8080 in your browser. You should see the default NGINX page.
To clean up the test container:
docker stop <container-id>
docker rm <container-id>
Notes
- Docker Desktop includes the Docker engine, Docker CLI, and other helpful tools.
- On Windows, WSL 2 is the preferred backend for Docker Desktop.
- If Docker commands fail right after installation, wait until Docker Desktop fully starts and then try again.
Running your first container
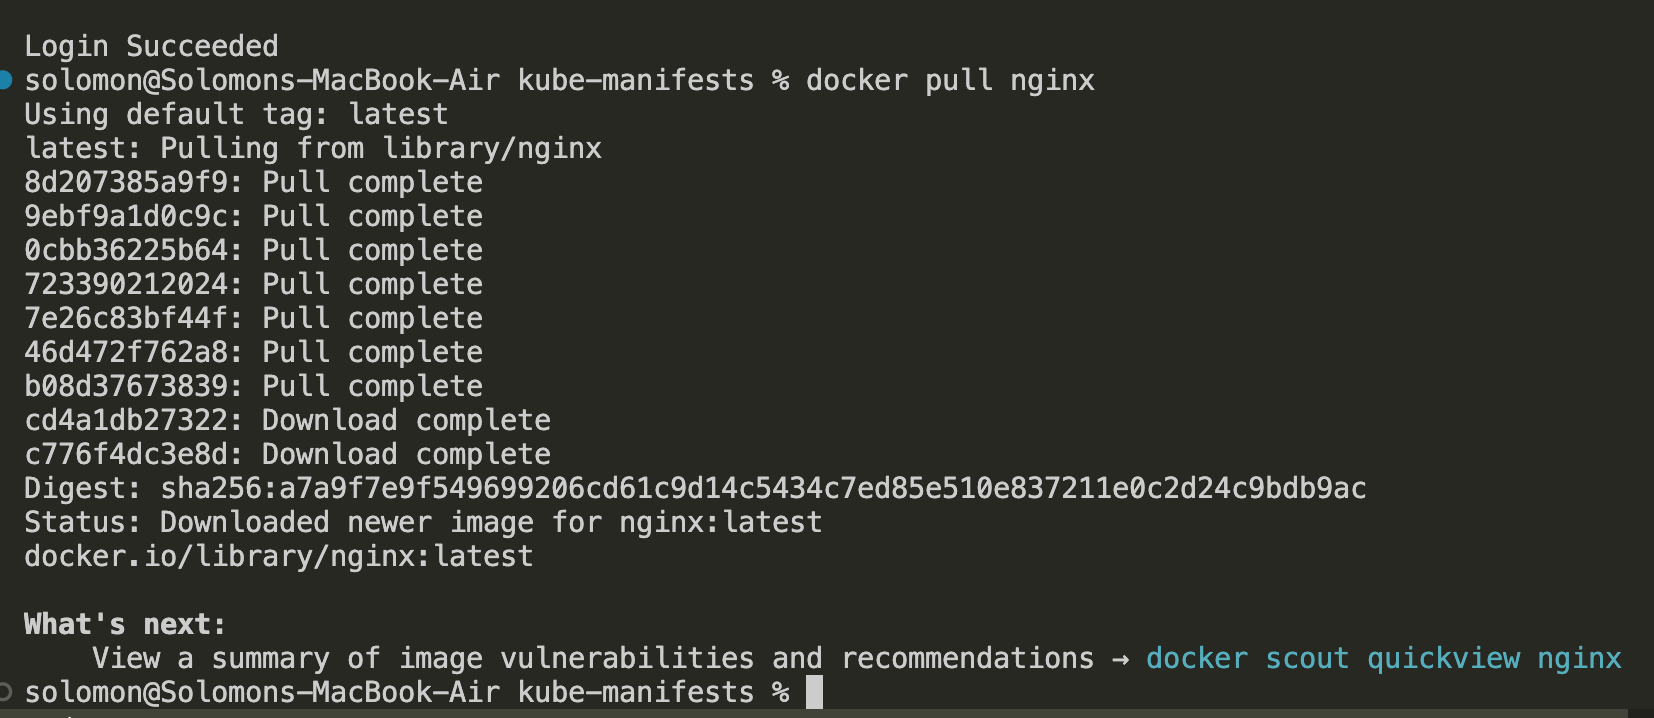
- Connect to Docker Hub by running
docker loginand entering your Docker Hub credentials. - Pull the NGINX image from Docker Hub using
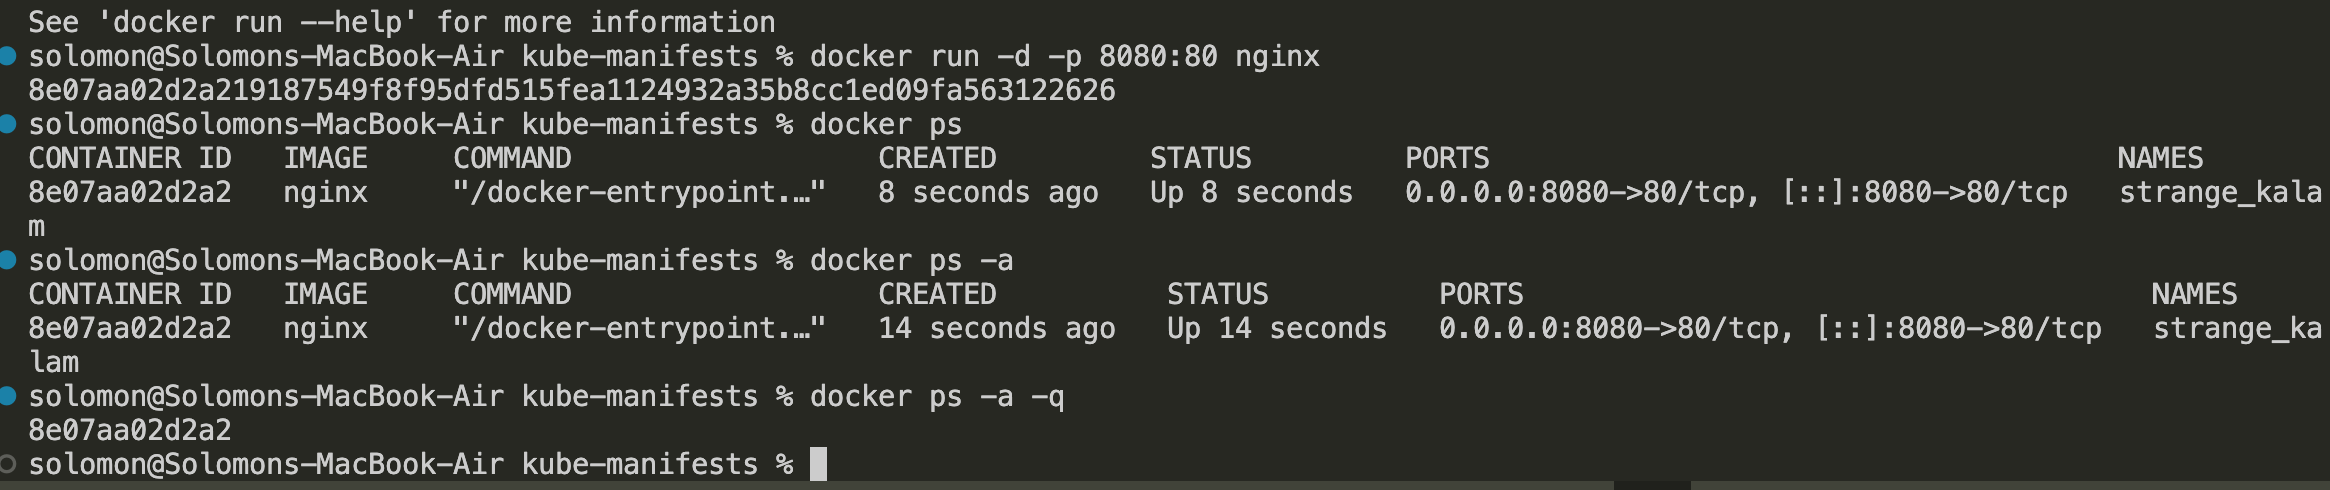
docker pull nginx. - Run the NGINX container in detached mode and map port 8080 on your machine to port 80 in the container using
docker run -d -p 8080:80 nginx. - Open your web browser and navigate to
http://localhost:8080to see the NGINX welcome page, confirming that the container is running successfully. - List running containers using
docker psto see the NGINX container in action. - List using
docker ps -ato see all containers, including stopped ones. - List using
docker ps -a -qto get just the container IDs.
What is -a -q?
- -a shows all containers, including stopped ones.
- -q gives you just the container IDs, which is useful for scripting or when you want to stop/remove containers without seeing the full details.
Connect to your container
To connect to a running container, you can use the docker exec command. For example, to open a bash shell inside the NGINX container, you would run:
docker exec -it <container-id> bash
exit # to exit the container shell
This command allows you to interact with the container's filesystem and processes as if you were logged into the container itself. You can run commands, inspect files, and troubleshoot issues directly within the container environment.
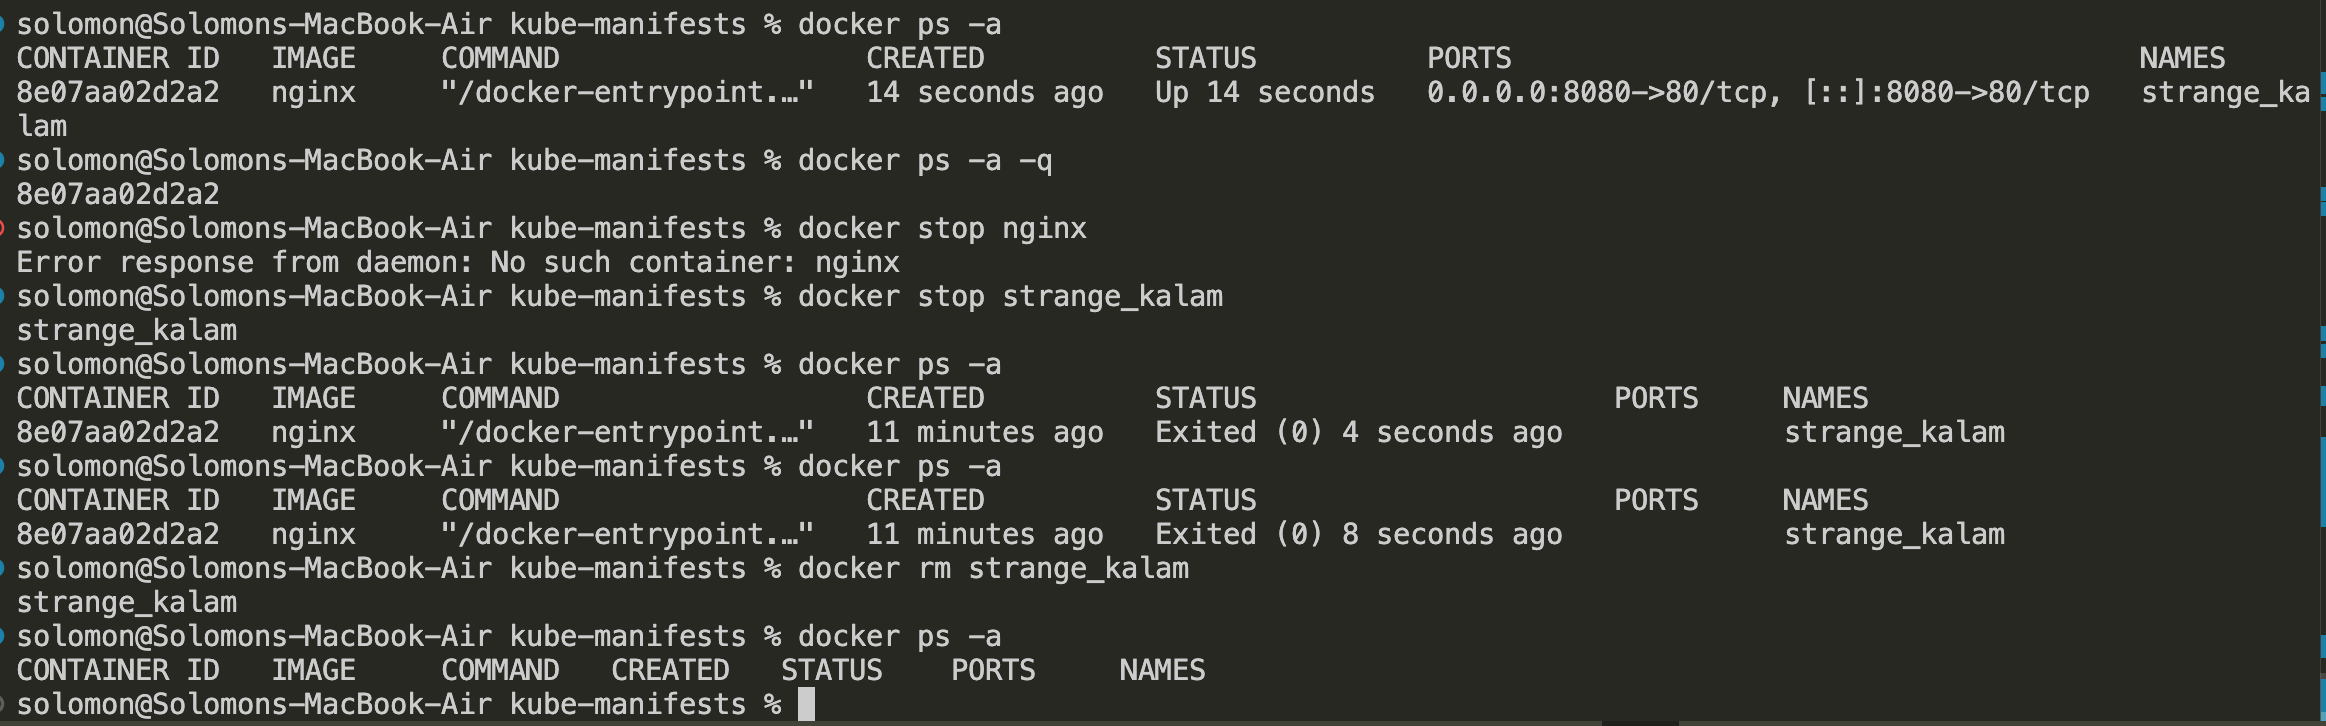
Stop and remove your container
To stop the NGINX container, use the docker stop command followed by the container ID:
docker stop <container-id>
docker ps -a # to verify the container is stopped
docker rm <container-id>
Note: You can also use the container name OR the smallest unique prefix of the container ID instead of the full container ID.
Example: Your contaner name is 094d2c8b1f3e and you have another container with ID 081d2c8b1f3f, you can stop the first container using docker stop 094d2c8b1f3e or docker stop 094d2c8b1f3 since both are unique prefixes.
You can run docker stop 081 to stop the second container since 081 is a unique prefix for that container ID.
Using Docker Hub
Docker Hub is a cloud-based registry service that allows you to store and share Docker images. It provides a central repository for Docker images, making it easy to find and use pre-built images for various applications and services.
To use Docker Hub, you first need to create an account on the Docker Hub website. Once you have an account, you can log in to Docker Hub from your command line using the docker login command. This will allow you to push and pull images to and from Docker Hub.
To push an image to Docker Hub, you first need to tag your local image with your Docker Hub username and the name of the repository you want to push to. For example, if your Docker Hub username is myusername and you want to push an image called myapp, you would tag your image like this:
docker tag myapp myusername/myapp
Then you can push the image to Docker Hub using the docker push command:
docker push myusername/myapp
Pulling images from Docker Hub
To pull an image from Docker Hub, you can use the docker pull command followed by the name of the image you want to pull. For example, to pull the official NGINX image, you would run:
docker pull nginx
We did this earlier, but we're going to build on it by adding in a custom Dockerfile and adding on those layers to the base NGINX image. This is a common pattern where you start with a base image from Docker Hub and then customize it for your specific application needs.
Building your own image
Docker = take a base image + add layer(s) + create a new image. This is how you can build your own images based on existing ones, allowing you to leverage the work of the community while still tailoring the image to your requirements.
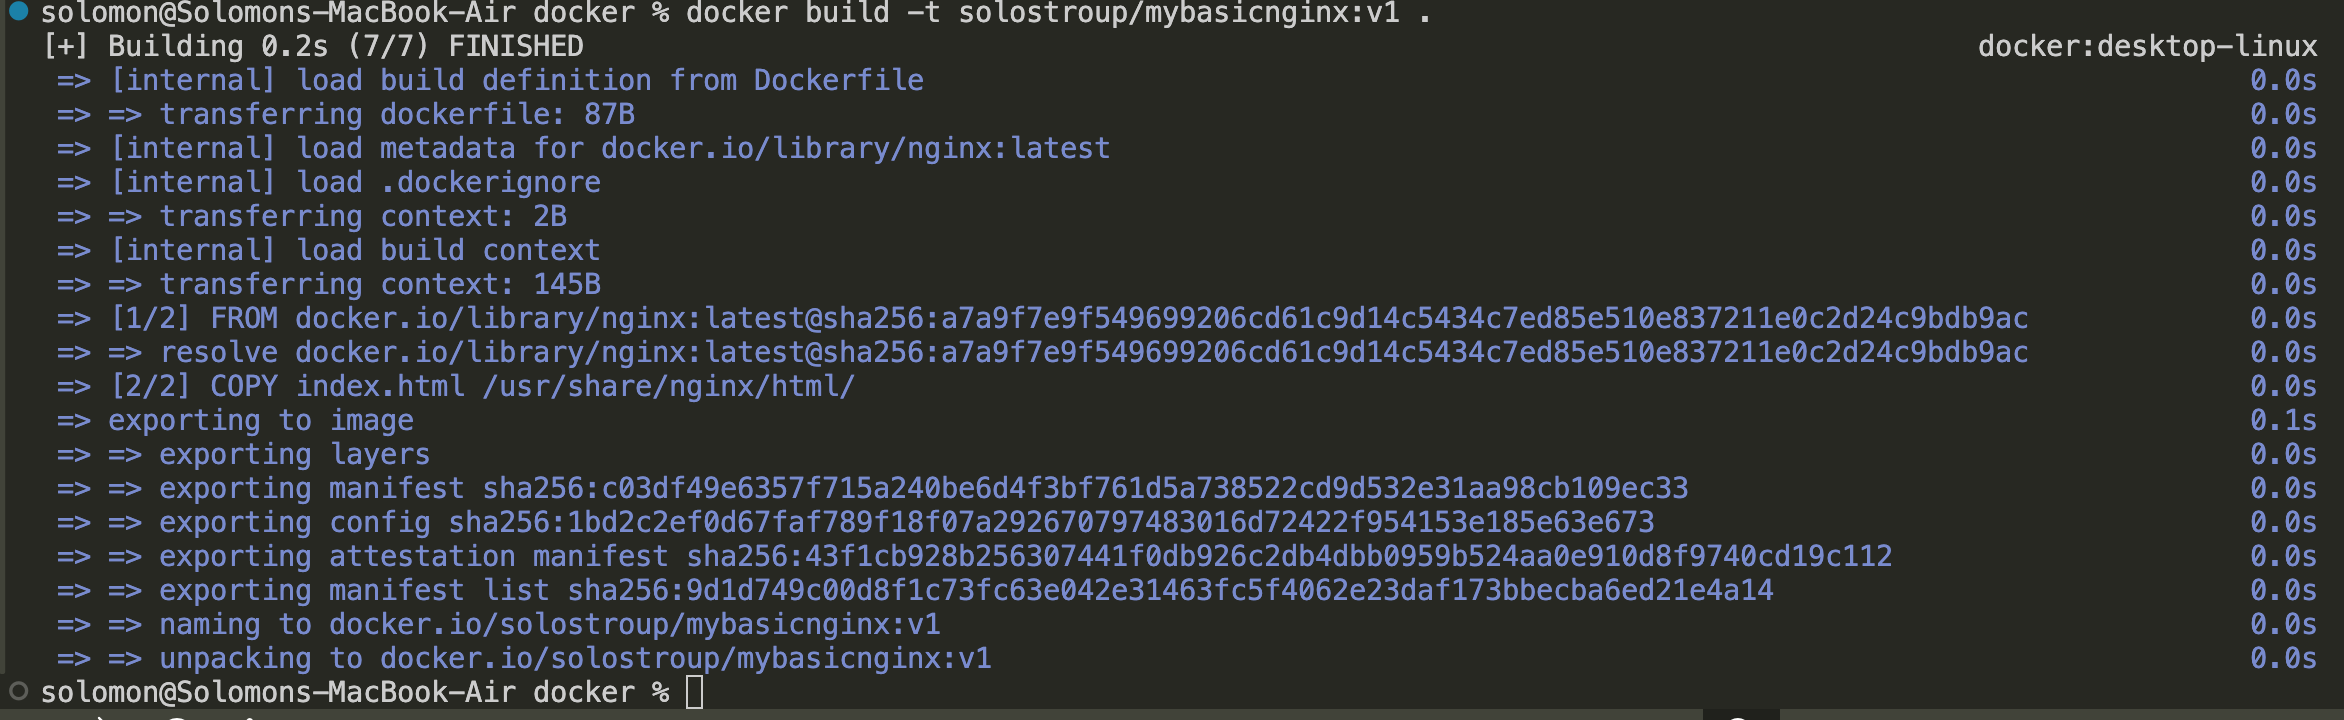
# Use the official NGINX image as the base
FROM nginx:latest
# Copy custom configuration file to the container
COPY index.html /usr/share/nginx/html/
Run container
- Build the image from the
Dockerfilein the current folder:
docker build -t solostroup/mybasicnginx:v1 .
 2. Run the container and map port
 80 on your machine to port 80 in the container:
docker run -d -p 80:80 solostroup/mybasicnginx:v1
- Verify that the container is running:
docker ps
 4. Open
 http://localhost in your browser. The :80 port is optional because port 80 is the default HTTP port.
5. You should see your custom NGINX page.

Push to Docker Hub
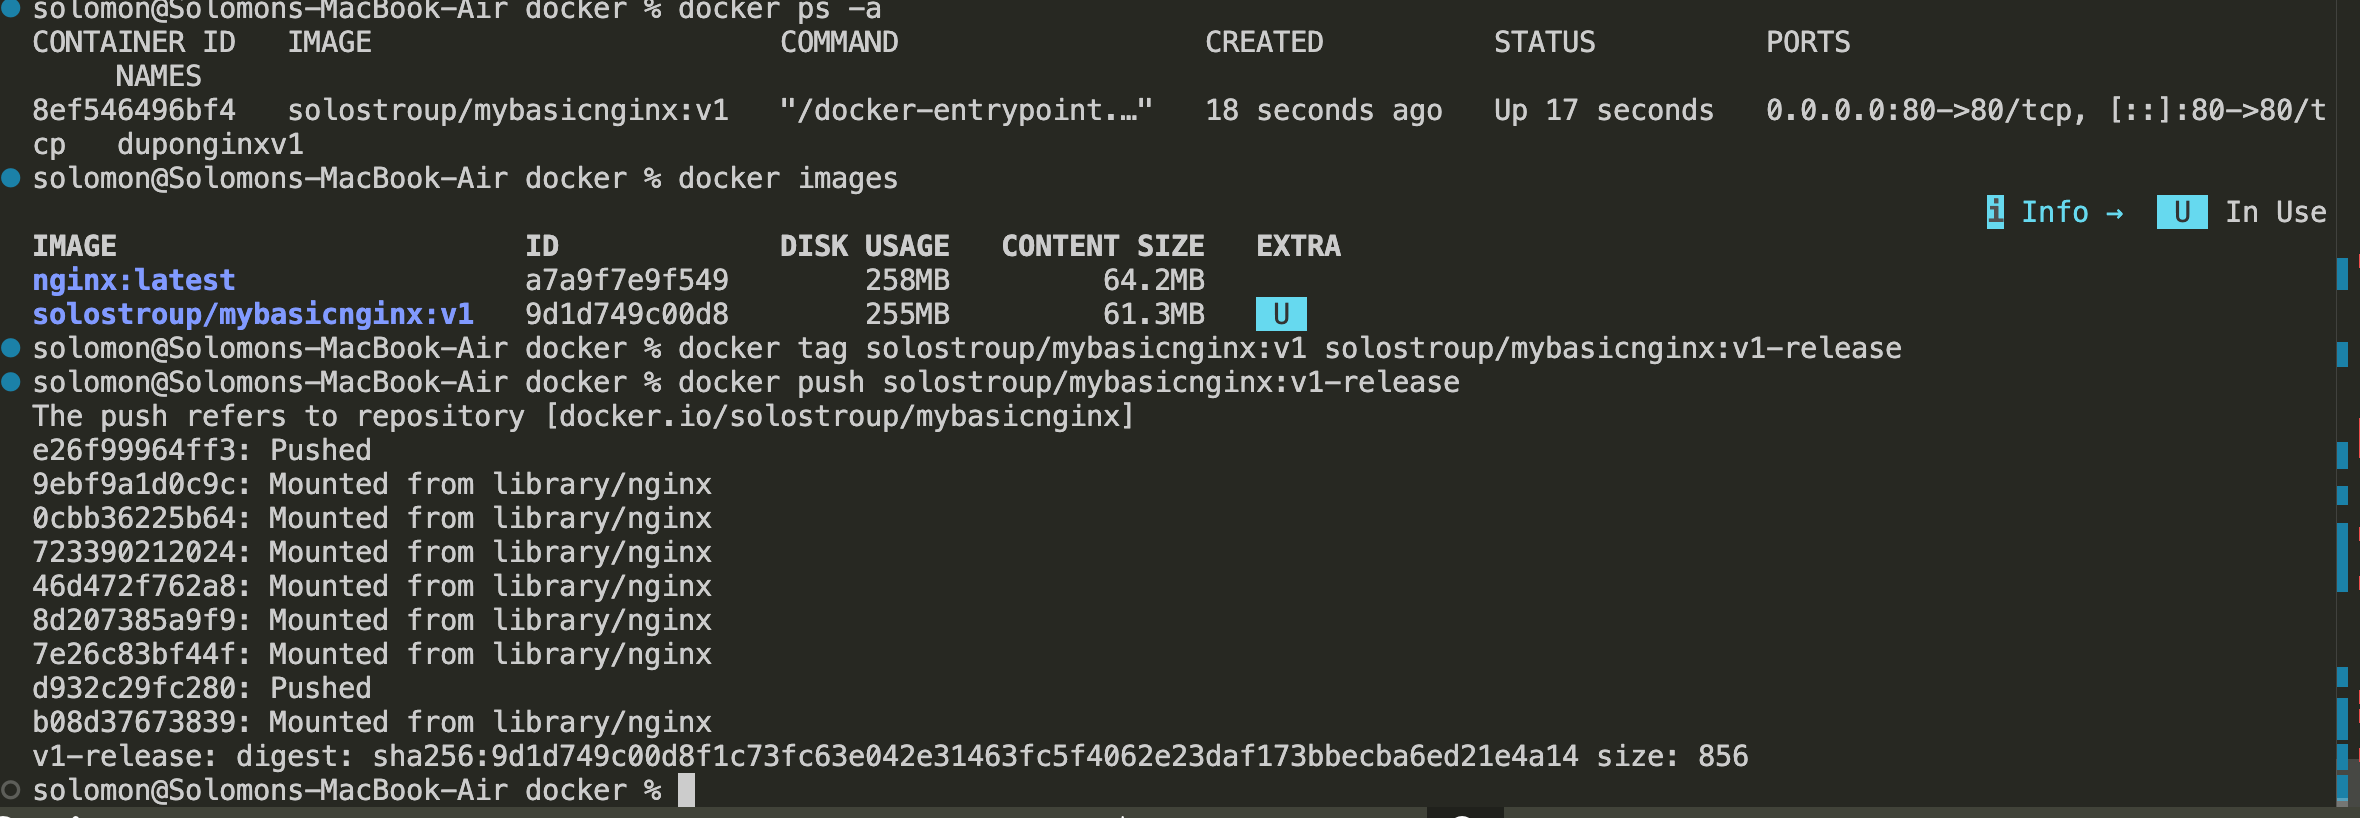
- List your local images and confirm that the image exists:
docker images
- Tag the image with the release tag you want to push:
docker tag solostroup/mybasicnginx:v1 solostroup/mybasicnginx:v1-release
- Push the image to Docker Hub:
docker push solostroup/mybasicnginx:v1-release
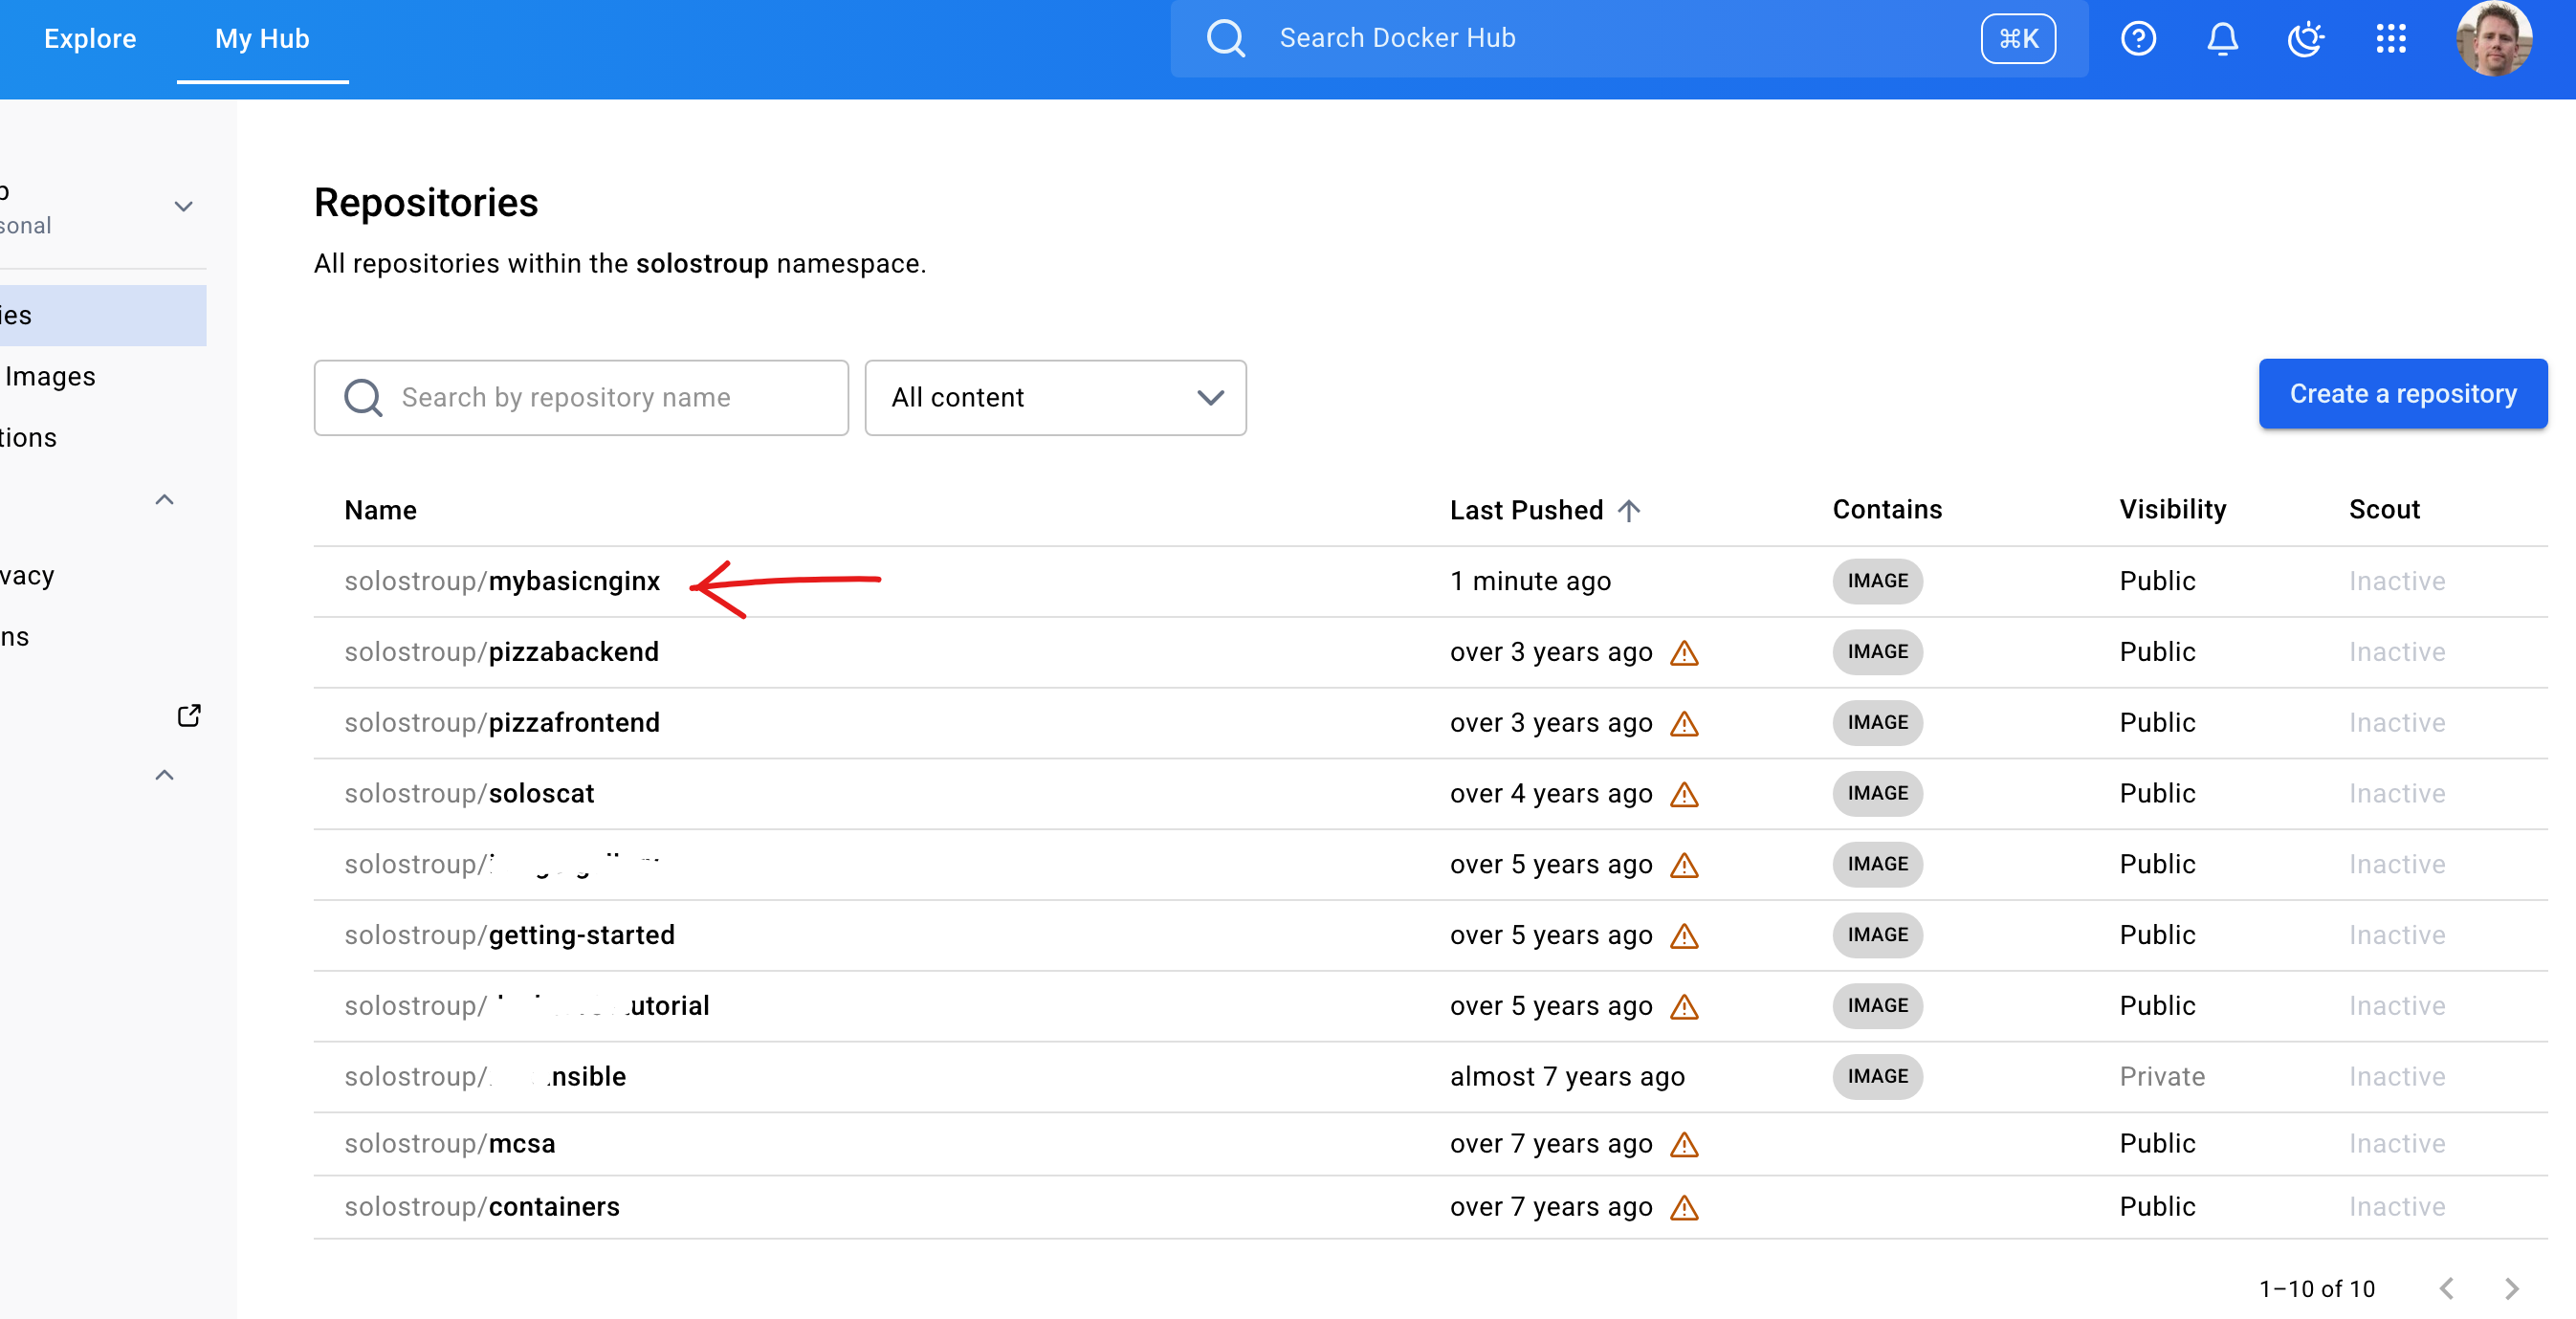
Docker Hub:
Clean up
- Stop the running container:
docker stop <container-id>
- Remove the container:
docker rm <container-id>
- If you want to remove all stopped containers, you can run:
docker container prune
Be careful with docker rm $(docker ps -a -q) because it removes every container returned by docker ps -a -q, not just the one used in this example.
Appendix: Docker Commands
| Command | Description |
|---|---|
docker ps | List running containers |
docker ps -a | List all containers, including stopped |
docker ps -a -q | List all container IDs only |
docker stop <id> | Stop a running container |
docker start <id> | Start a stopped container |
docker restart <id> | Restart a container |
docker rm <id> | Remove a stopped container |
docker rm -f <id> | Force remove a container, even if running |
docker port <id> | Show port mappings for a container |
docker logs <id> | Display container logs |
docker top <id> | Display running processes in a container |
docker stats | Show live resource usage for all containers |
docker exec -it <id> /bin/sh | Open a shell inside a running container |
docker pull <image> | Download an image from Docker Hub |
docker images | List local images |
docker rmi <image-id> | Remove a local image |
docker build -t <name>:<tag> . | Build an image from a Dockerfile |
docker run -d -p <host>:<container> <image> | Run a container in detached mode with port mapping |
docker version | Display Docker client and engine version |
docker login | Log in to Docker Hub |
docker logout | Log out of Docker Hub |
docker container prune | Remove all stopped containers |
Note: You can use the container name or the shortest unique prefix of the container ID in place of <id>.