Module 1: Import Data into Power BI
Introduction to Importing Data
Check the Home tab on the ribbon. There is a get data button. Click on it to see the different data sources you can connect to. You can connect to files, databases, Power Platform, Azure, online services, and other sources.
Get Data button lists the most common data sources. Click on More to see all the data sources you can connect to. When you click on More, the Get Data window opens. You can see all the data sources you can connect to. You can also search for a specific data source. For example, if you want to connect to an Excel file, type Excel in the search box. Select Excel and click Connect.
The Search box is helpful when you don't know what data source you want to connect to. You can type a keyword, and Power BI will show you all the data sources that match your keyword.
Using an OData feed
- Click on the Get Data button.
- Select OData Feed from the list of data sources.
- Enter the OData feed URL and click OK.
- Power BI will connect to the OData feed and retrieve the data.
CloudHealth Odata Feed?
Loading Data
Load will load the data, Transform Data will open the Power Query Editor, and Cancel will cancel the operation.
When you click Load, Power BI will load the data into the data model. You can see the data in the Fields pane on the right side of the screen.
When you click Transform Data, Power BI will open the Power Query Editor. The Power Query Editor is a powerful tool that allows you to transform and clean your data before loading it into the data model.
In the Power Query Editor, you can see a preview of your data. You can also see the Applied Steps pane on the right side of the screen. The Applied Steps pane shows all the transformations that have been applied to your data.
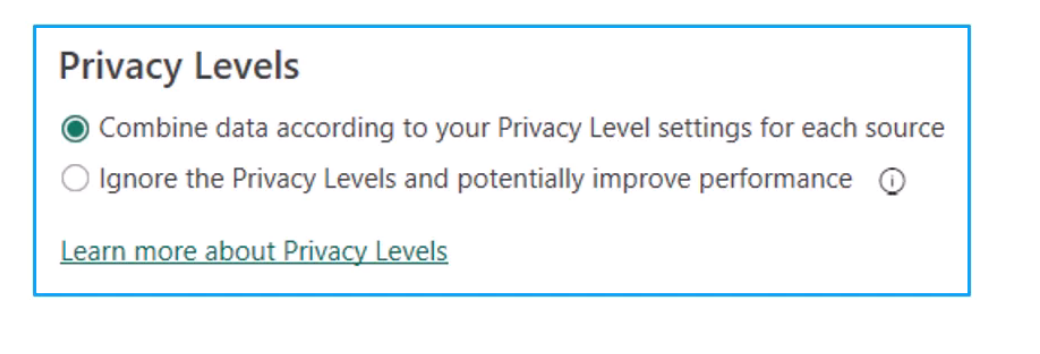
Data Privacy Levels
Data Privacy Levels help protect your data when you connect to multiple data sources. You can set the privacy level for each data source. The privacy levels are Public, Organizational, and Private. Default is set to NONE.
Data Leakage is a situation where data from one data source is combined with data from another data source in a way that violates the privacy level of one of the data sources.
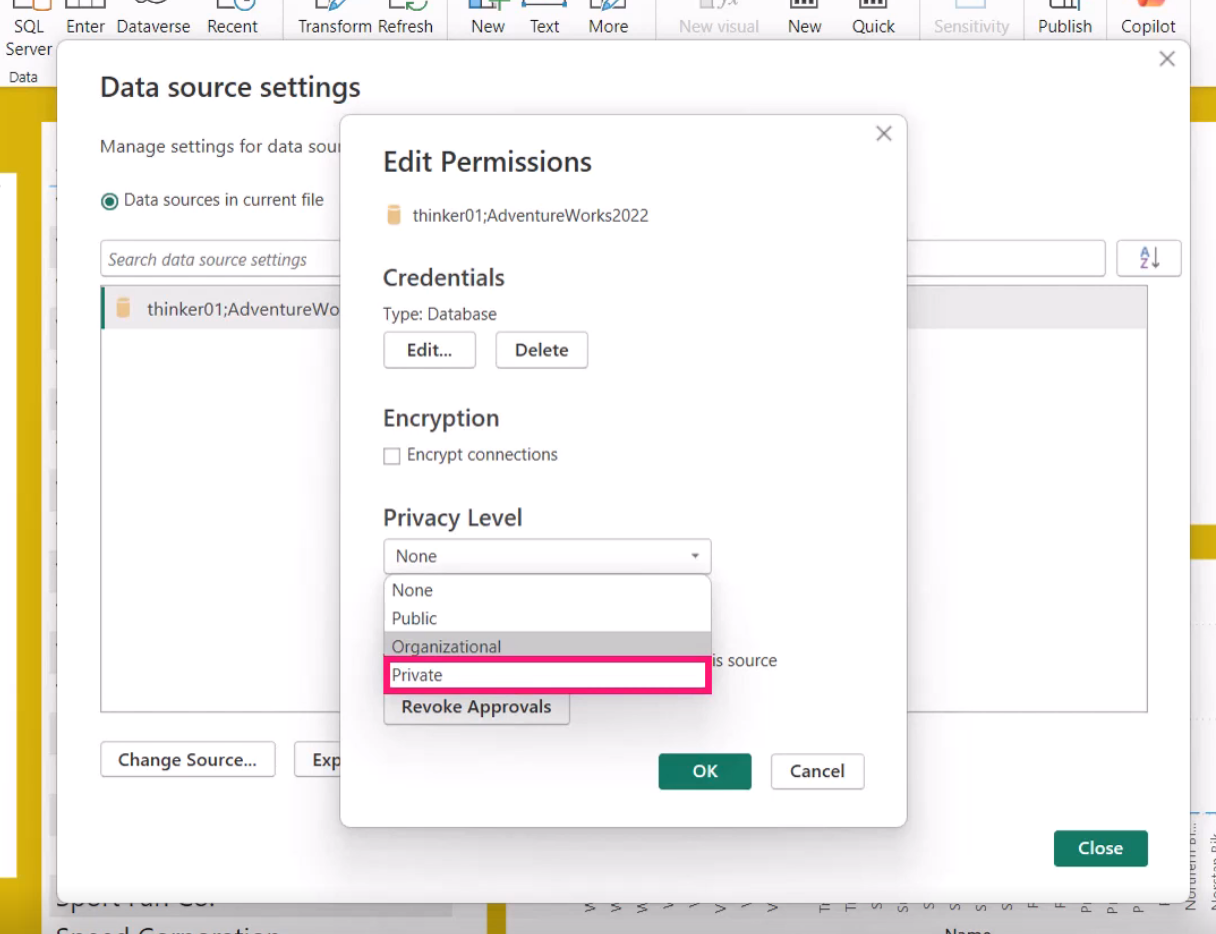
Data privacy settings apply to datasets. You can set the privacy level for each data source in the Power Query Editor. To set the privacy level, click on File > Options and settings > Data source settings. Select the data source you want to set the privacy level for and click Edit Permissions. In the Edit Permissions window, you can set the privacy level for the data source.
Clicking on the Privacy Level dropdown will show you the different privacy levels you can set for the data source. Select the appropriate privacy level and click OK.
Data load options
Type Detection: This option determines how Power BI detects the data type of each column in your data source. The options are:
- None: No type detection is performed. All columns are treated as text.
- Based on first 200 rows: Power BI will analyze the first 200 rows of data to determine the data type of each column.
- Based on entire dataset: Power BI will analyze the entire dataset to determine the data type of each column.
Relationships: This option determines how Power BI creates relationships between tables in your data model. The options are:
- Import relationships from data sources on first load - Checked
- Auto-detect: Power BI will automatically create relationships between tables based on matching column names and data types. - Turn this off when working with structured databases
Time Intelligence: This option enables or disables time intelligence features in Power BI. Time intelligence features allow you to perform calculations based on time periods, such as year-to-date or month-over-month comparisons. - Checked for simple, unchecked for complex.
Background Data: This option allows Power BI to load data in the background while you work on other tasks. This can improve performance when working with large datasets. - Checked
Parallel Loading of Tables: This option allows Power BI to load multiple tables in parallel, which can improve performance when working with large datasets. - Checked
Q&A enabled for AI and Copilot
Connect to SQL Databases
Import Mode - imports into Power BI Direct Query - queries the database directly.
- Click on the Get Data button.
- Select SQL Server database from the list of data sources.
- Enter the server name and database name.
- Select the data connectivity mode (Import or Direct Query).
- Click OK.
- Power BI will connect to the SQL Server database and retrieve the data.
Executing SQL Queries directly in the query
- Hand crafted SQL queries can be executed directly in Power BI to retrieve specific data from a SQL database. This is useful when you want to filter or aggregate data before loading it into Power BI.
- does not limit Power Query
- Used when SQL statement provides better performance TIP: Transform Data > Data Source Settings is helpful
Authorization errors
- If you encounter authorization errors when connecting to a SQL database, ensure that you have the correct permissions to access the database.
- Check with your database administrator to ensure that your user account has the necessary permissions.
- Ensure that you are using the correct authentication method (Windows or SQL Server authentication).
- Make sure you type the server and database names correctly.
- Username and password - or windows permissions
- Database firewall settings may block access - check with your DBA
- Network issues may prevent access to the database server - check with your IT department
All of this stuff is converted to a connection string that is stored in the PBIX file. Make sure this is correct.
Import Data from Excel
- Click on the Get Data button.
- Select Excel from the list of data sources.
- Browse to the location of the Excel file and select it.
- Click Open.
- Power BI will connect to the Excel file and retrieve the data.
- Select the tables or sheets you want to load into Power BI.
- Click Load to load the data into Power BI or Transform Data to open the Power Query Editor.
Note: Copy the direct patch from the web browser if the file is in SharePoint or OneDrive.
Keeping the report up to date
Semantic model - the data model in Power BI that contains the tables, relationships, and calculations used in the report. We need to refresh the data in the semantic model to keep the report up to date.
You can set alerts to email on failures :)
Error occured!
- Transient issues are best to just wait and try again later. If the error persists, check the data source connection and credentials.
- File name change
- File moved or deleted
- Permissions changed
- Data source is offline or unavailable
- Column names or data types changed
- change the column name back or update the query in Power BI to match the new column names or data types.
Web Data Source
- Click on the Get Data button.
- Select Web from the list of data sources.
- Enter the URL of the web page or API endpoint. Wikipedia is a good example.
- Click OK.
- Power BI will connect to the web page or API endpoint and retrieve the data.
- Select the tables or data you want to load into Power BI.
- Click Load to load the data into Power BI or Transform Data to open the Power Query Editor.
API Data Source
- Click on the Get Data button.
- Select Web from the list of data sources.
- Enter the URL of the API endpoint.
- Click OK.
- Power BI will connect to the API endpoint and retrieve the data.
- Select the data you want to load into Power BI.
- Click Load to load the data into Power BI or Transform Data to open the Power Query Editor.
Authentication
API Keys are great for connecting to APIs. You can usually find the API key in your account settings on the website of the service you are connecting to.
Be careful to not share your API key. Use the Secure Credentials option in Power BI to store your API key securely.
JSON Documents
You can use Power BI to connect to JSON documents and extract data from them. JSON (JavaScript Object Notation) is a lightweight data interchange format that is easy for humans to read and write, and easy for machines to parse and generate.
Large Data Sets
When working with large data sets in Power BI, consider the following best practices to optimize performance and ensure a smooth user experience:
- Use Import mode instead of Direct Query when possible, as it provides better performance for large datasets.
- This will be the fastest, but might run into the size limitations of Power BI Desktop (1 GB) and Power BI Service (10 GB Pro, 400 GB Premium)
- Filter data at the source to reduce the amount of data being imported into Power BI.
- Remove unnecessary columns and rows from the dataset to minimize the data size.
Data Query mode: You can use this, but it runs slower than import mode. It needs to query the database each time you interact with the report.
Direct Lake Storage: This is a new feature that allows you to connect to large datasets stored in Azure Data Lake Storage. It provides better performance than Direct Query and allows you to work with larger datasets.
TIP: Refreshing the Semantic Model will update the visuals. in Direct Lake Storage, the data can update much much faster.
You can use Import mode on one report and Direct Query on another report even on the same page. Have some fun with the performance analyzer to see the differents in refresh performance.
TIP: Use Query Reduction options to limit the amount of data being queried. This can improve performance when working with large datasets.
- Click on File > Options and settings > Options.
- Select Query reduction from the left pane.
- Enable the options that suit your needs.
- Add a confirmation dialog when applying slicer changes might be a thing you can do.
- Click OK to save the changes. Reports are set to the default optimization preset of interactivity. You can ghange to query reduction. This will add an "Apply" button to slicers and filters.
A third option, Custom, gives you some addition functionality.
Direct Lake Storage
Load the files into OneLake 2. Connect Power BI to OneLake using Direct Lake Storage 3. Take note of the semantic model in Power BI 4. Build the report in Power BI Desktop 5. Publish the report to the Power BI Service