6: Azure Native Tools
Cost Analysis, Monitor, Advisor
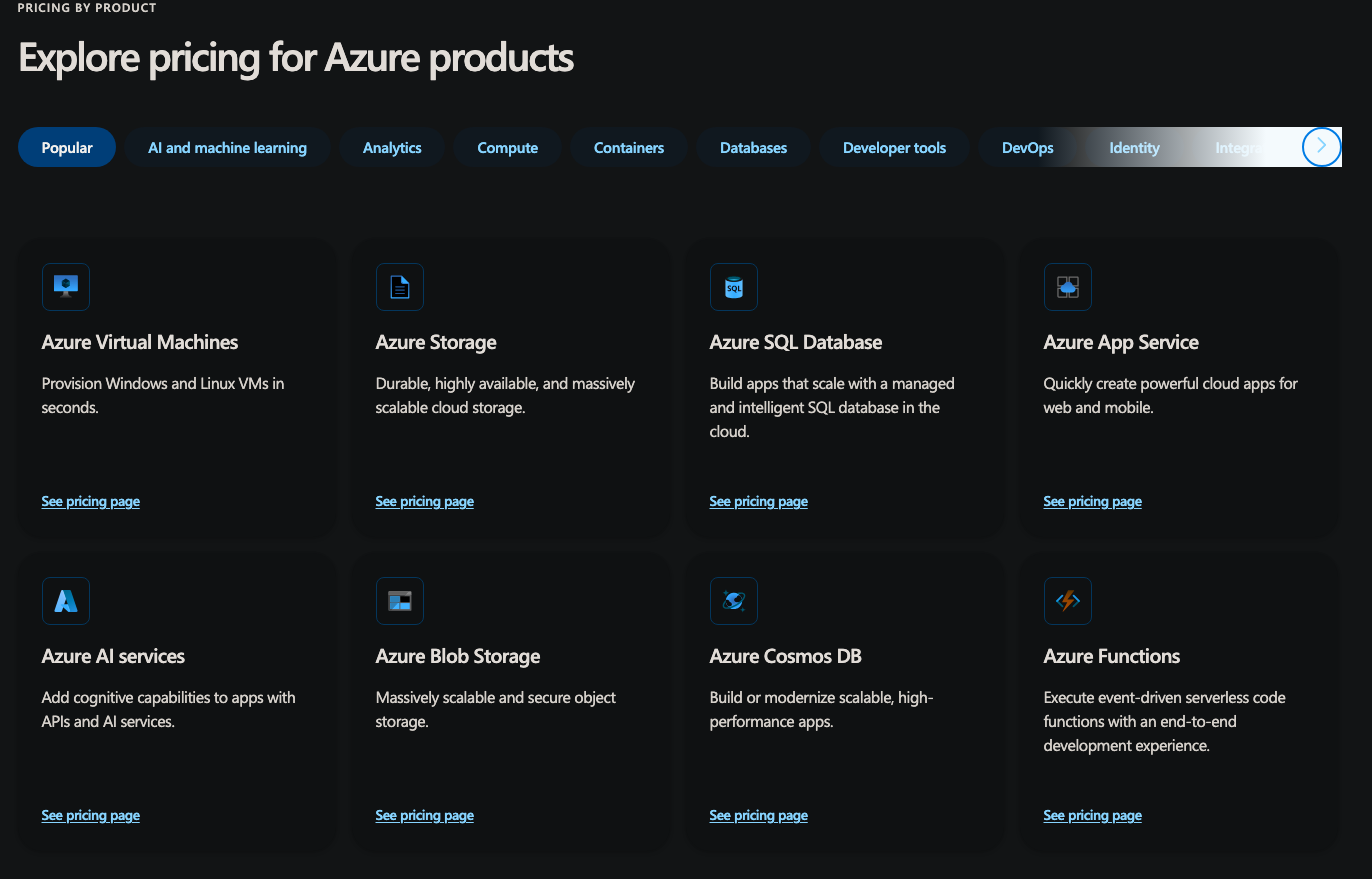
Azure Service Pricing
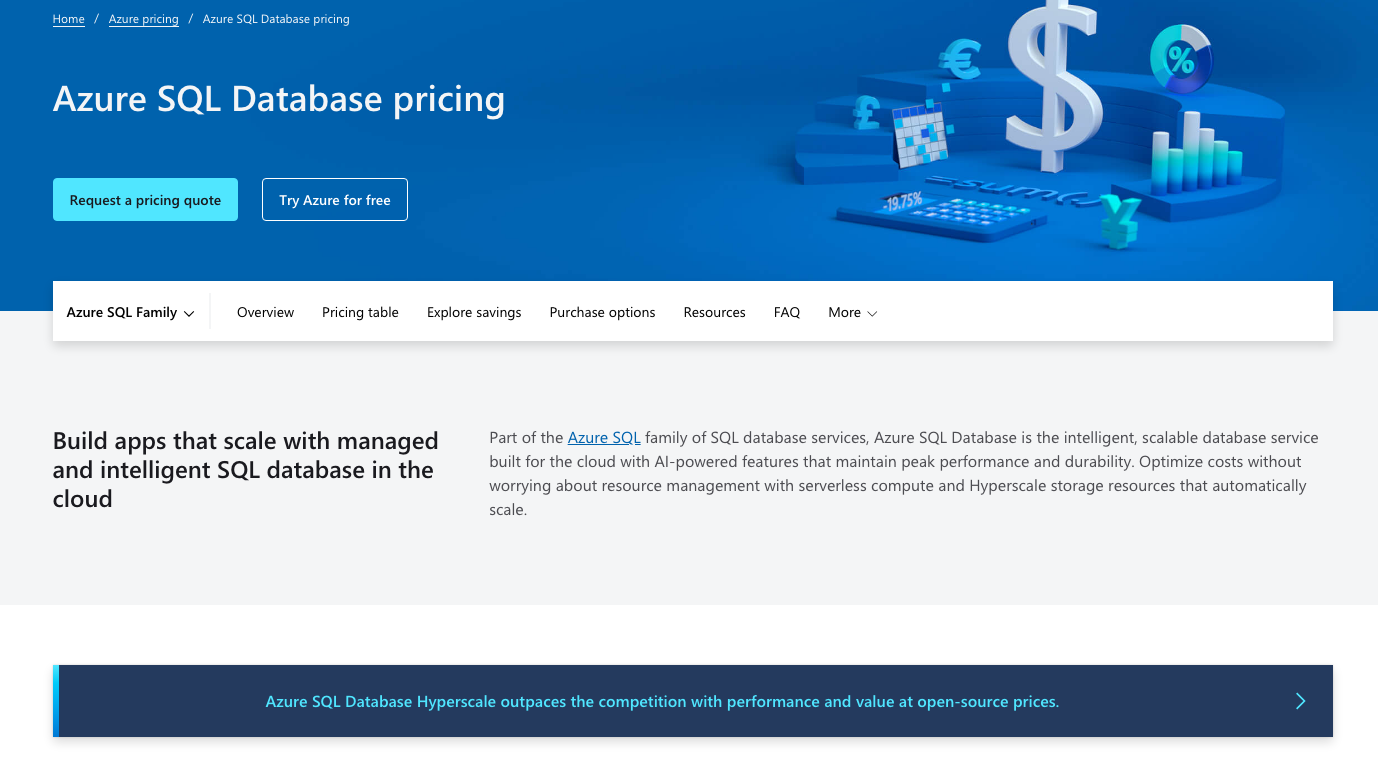
Azure Pricing page - https://azure.microsoft.com/en-us/pricing/
- Pricing details per product
Step-by-Step Guide to Using the Azure Pricing Page
-
Access the Azure Pricing Page: Go to Azure Pricing to get started.
-
Explore Pricing Options:
-
Browse by Category: The page is organized into various categories, such as Compute, Networking, Storage, Databases, etc. Click on a category to view pricing for related services.
-
Search for a Service: Use the search bar at the top of the page to quickly find pricing information for a specific Azure service.
-
-
View Pricing Details:
-
Service-Specific Pricing: Click on a service to see detailed pricing information. This will include options for different configurations, such as region, instance type, and more.
-
Pricing Tiers: Many services offer multiple pricing tiers (e.g., Basic, Standard, Premium). Review the details for each tier to understand the features and costs associated with them.
-
-
Use the Azure Pricing Calculator:
-
Access the Calculator: Click on the "Pricing Calculator" link or go directly to the Azure Pricing Calculator.
-
Add Services: Use the calculator to add the services you plan to use. Adjust the configurations (e.g., region, instance size) to match your needs.
-
Estimate Costs: The calculator will provide a cost estimate based on your selected services and configurations. You can adjust the inputs to see how changes affect the total cost.
-
-
View Additional Pricing Resources:
-
Cost Management Tools: Explore tools and resources for managing and optimizing your Azure costs, such as Azure Cost Management + Billing.
-
Pricing Updates and Offers: Stay informed about the latest pricing updates, special offers, and discounts.
-
Azure Pricing Calculator
Estimating costs before deployment is a huge advantage Use the Azure Pricing Calculator to estimate costs - https://azure.microsoft.com/en-us/pricing/calculator/
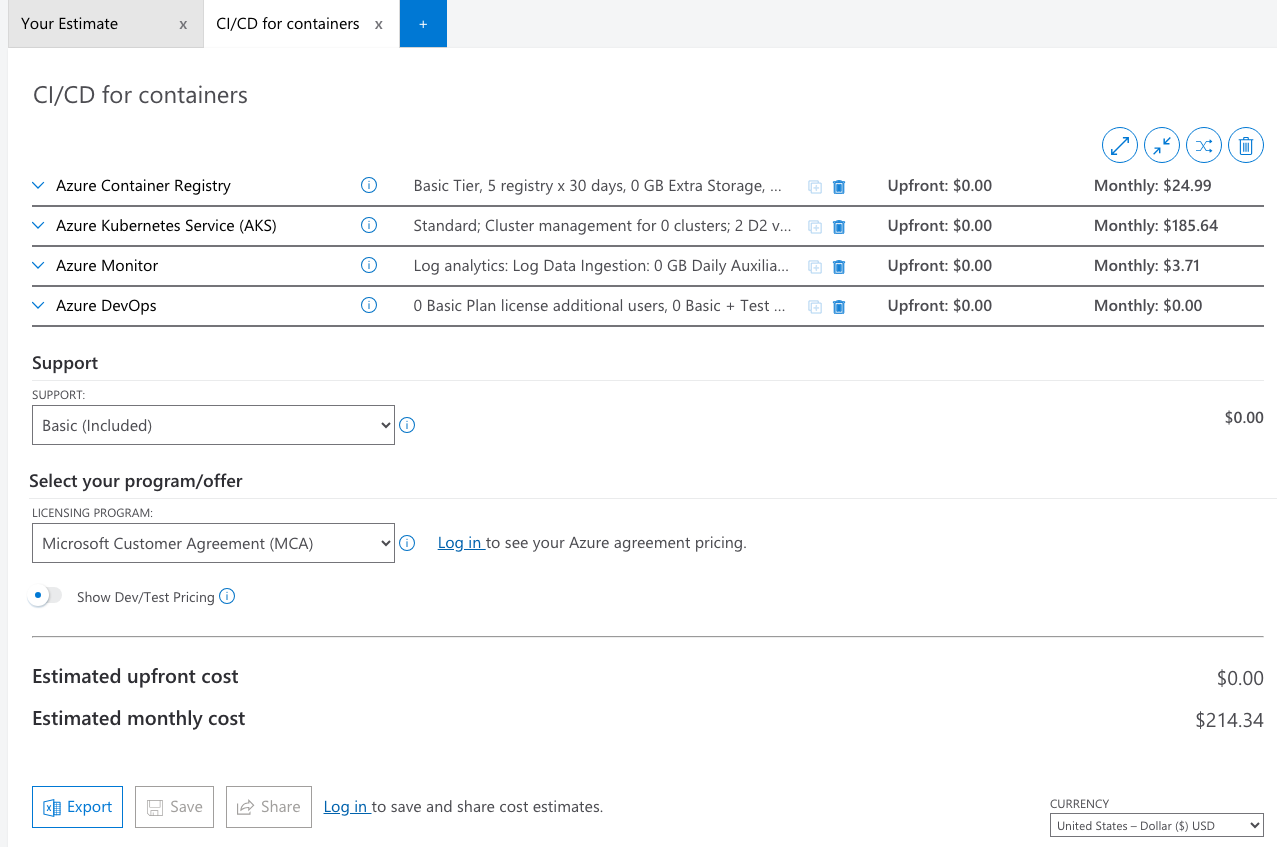
Demo
Price out a VM
- Ubuntu Linux
- D8_v5
- West US region
Gather 3 prices:
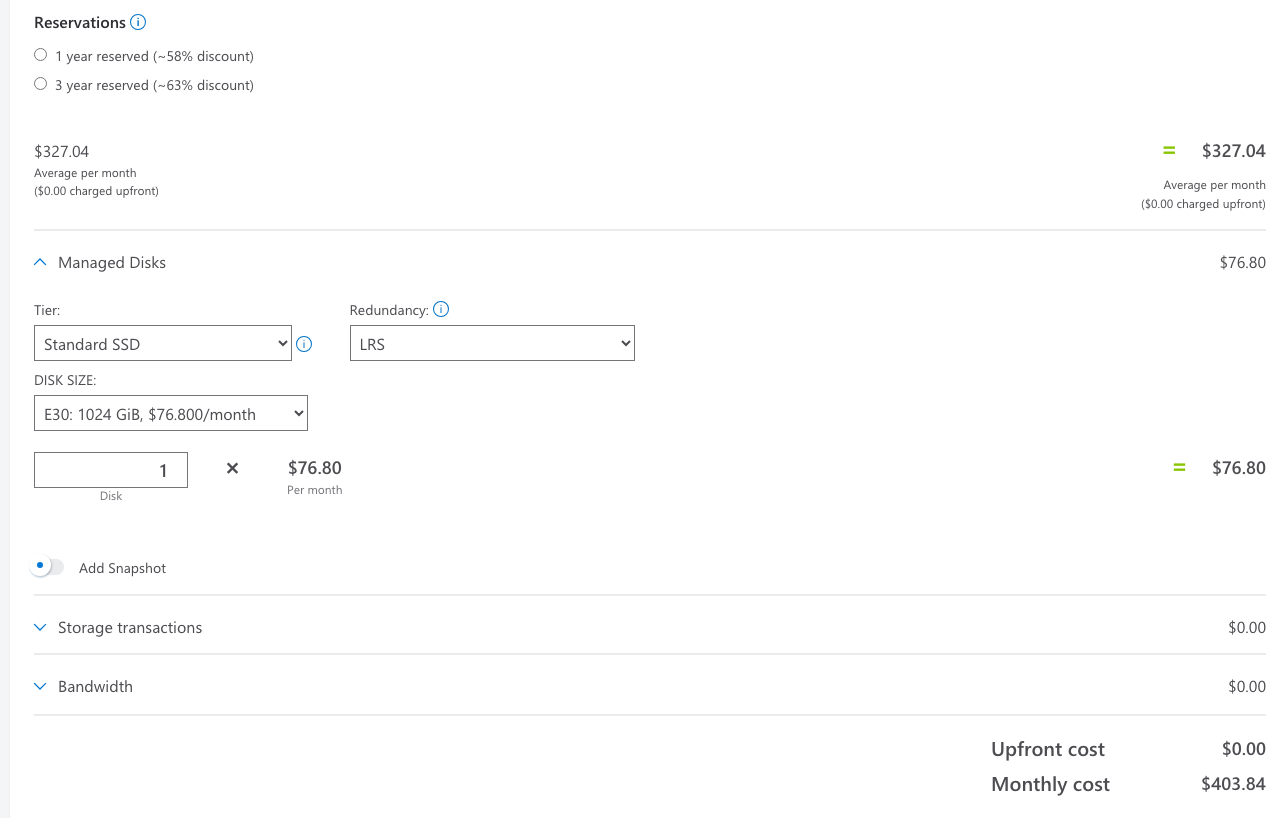
- Pay as you go
- 3 year reserved
- 3 year savings plan
Toggling the 3 cost options as shown at the bottom give you these 3 prices.

Advanced demo
Add in:
- A managed disk
- Standard SSD
- LRS
- 1TB in size
Total Cost of Ownership Calcuator
TCO Calculator - https://azure.microsoft.com/en-us/pricing/tco/calculator/
Cloud Management Data
https://learn.microsoft.com/en-us/azure/cost-management-billing/costs/
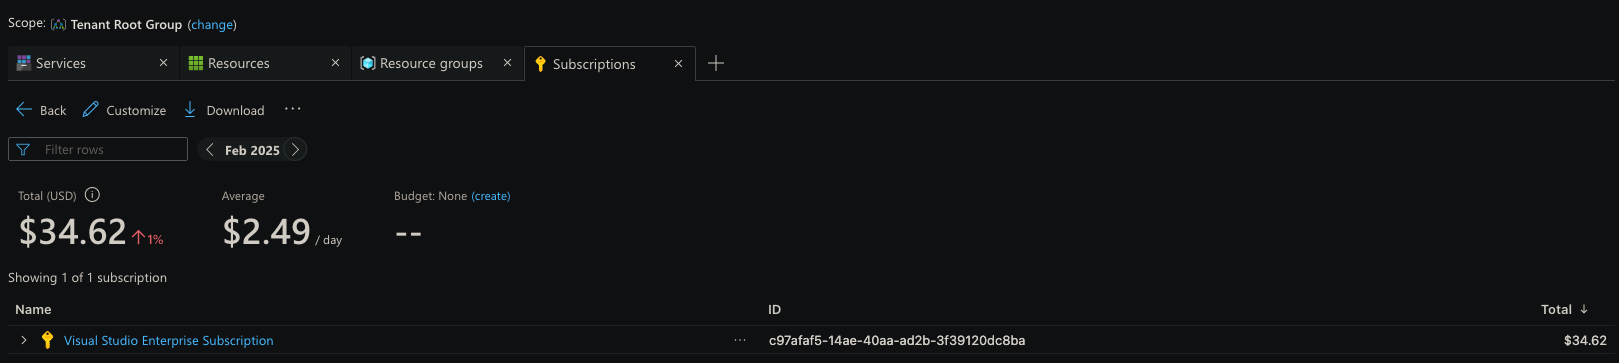
Cost Analysis
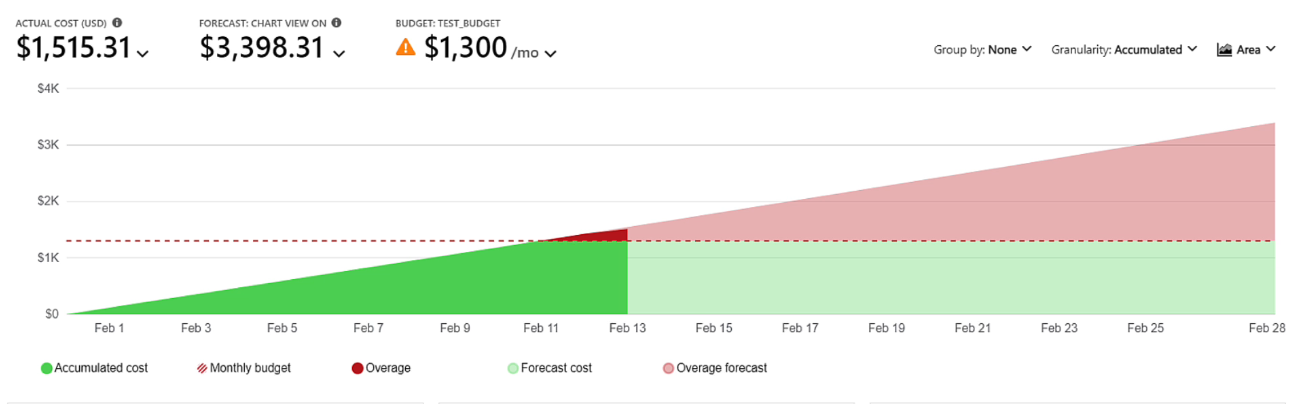
Can be navigated to by Management Group, Subscription, Resource Group. This graph shows the actual, forecast and budget in one image.
Step-by-Step Guide to Using Azure Cost Analysis
- Access Cost Analysis:
-
Go to the Azure portal and navigate to Cost Management + Billing.
-
Select Cost Management and then Cost Analysis.
-
- Select a View:
-
When you first open Cost Analysis, you'll see a list of available views. These views provide different insights into your costs1.
-
Smart Views: These are pre-configured views that offer intelligent insights and details by default.
-
Customizable Views: These views can be edited, saved, and shared to meet your specific needs.
-
- Explore Built-in Views:
-
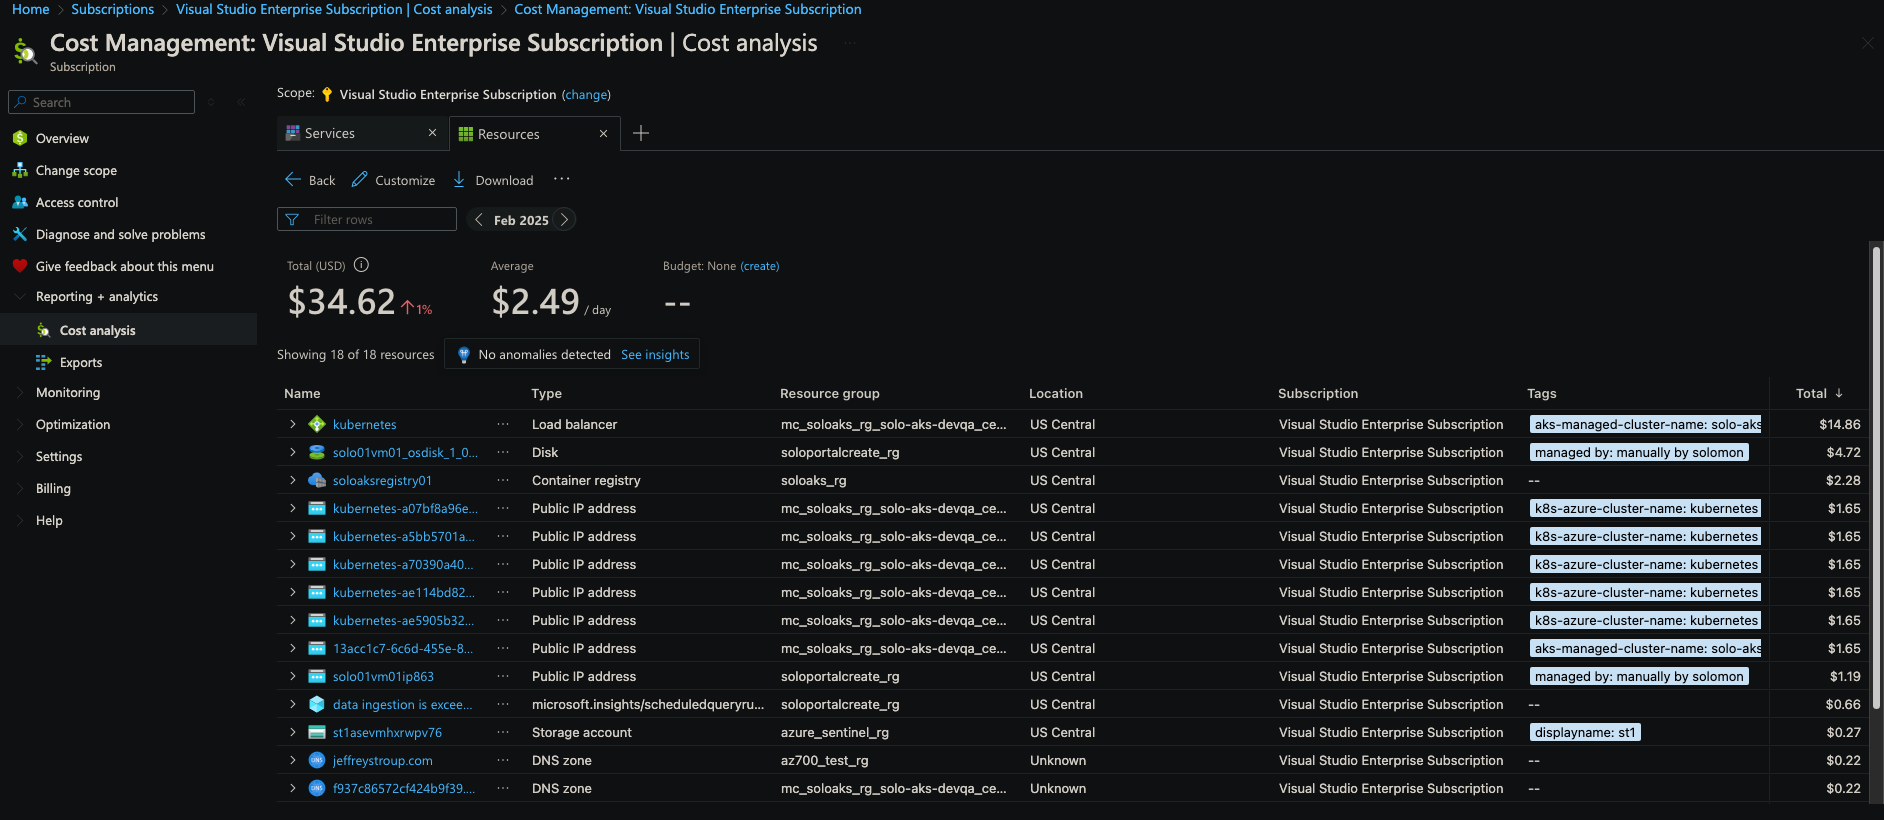
Resources View: Shows costs by individual resources.
-
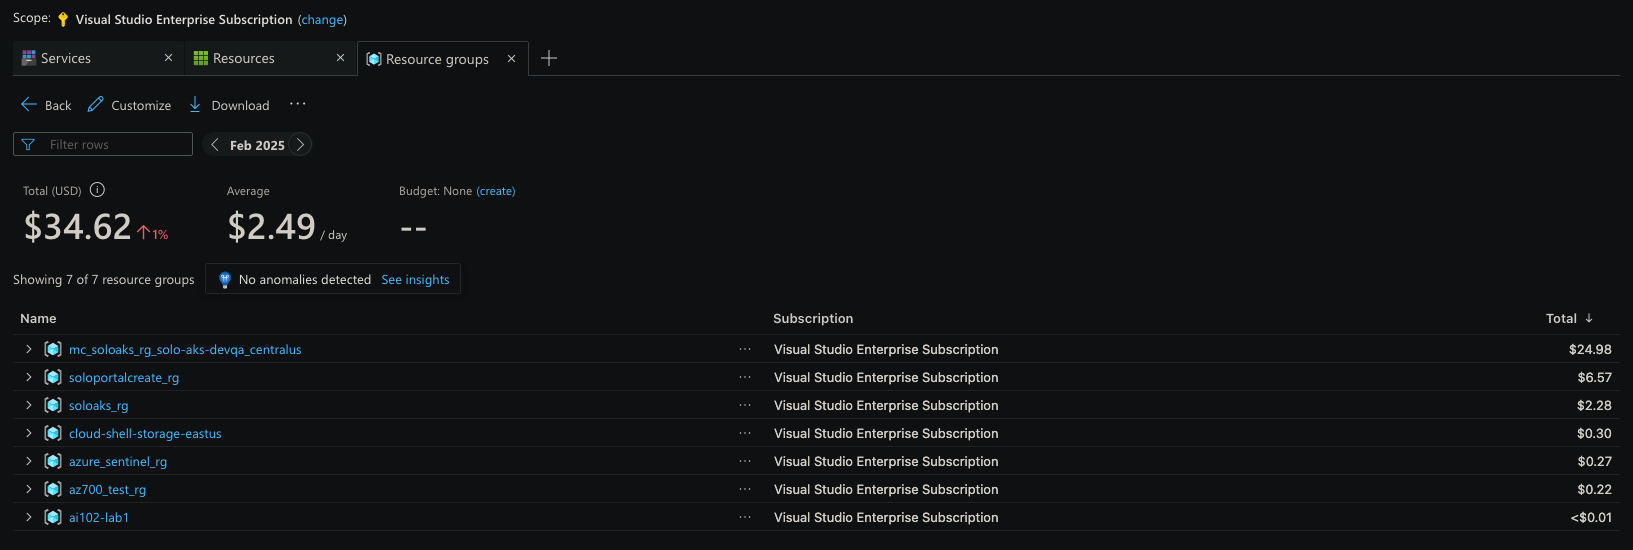
Resource Groups View: Shows costs by resource groups.
-
Subscriptions View: Shows costs by subscriptions and resource groups.
-
- Customize Views:
-
Group Costs: Use the "Group by" option to group costs by common properties like resource tags or resource groups.
-
Apply Filters: Use filters to narrow down the data you want to analyze.
-
Change Display Settings: Customize how data is displayed, such as viewing charts or tables.
-
- Analyze Costs:
-
Identify Top Cost Contributors: Look for the resources or resource groups that are driving the most costs.
-
Understand Charges: Drill down into specific resources to understand how you're being charged.
-
Find Savings Opportunities: Identify areas where you can reduce costs, such as shutting down idle resources or resizing underutilized VMs.
-
- Export Data:
- You can export cost data for further analysis or reporting using tools like Power BI.
- Save and Share Views:
-
Save your customized views for future reference.
-
Share views with team members to collaborate on cost management efforts.
-
Cost Analysis - Prebuilt views
Resources:
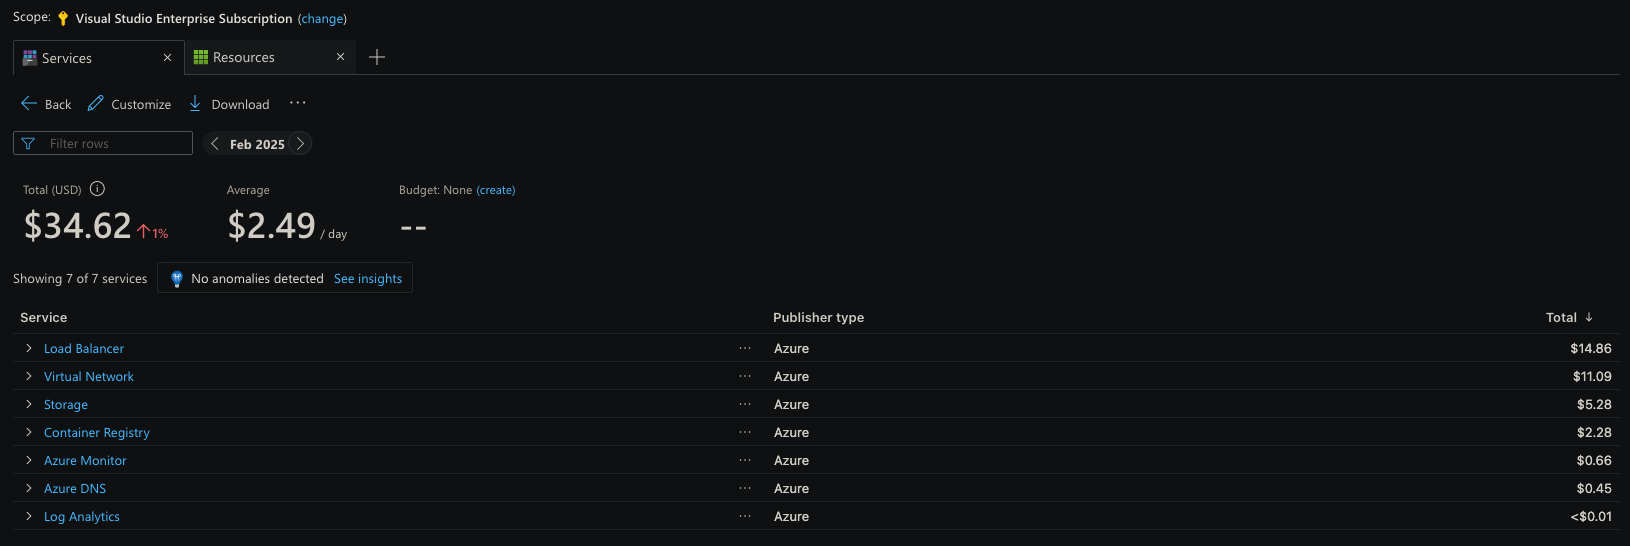
Services:
Resource Groups:
Subscriptions:
Demo: Cost Analysis Data
Show Virtual Machines and Storage costs Segment by RGs
Advanced:
- show all non marketplace charges for US Central region
- segment by subscription.
Answers: Service or Meter category to select VM, Storage Group By: Resource Group
Marketplace = filter on Publisher Type, Location, Group by RG
Budgets and Alerts
Budget documentation - https://learn.microsoft.com/en-us/azure/cost-management-billing/costs/tutorial-acm-create-budgets?tabs=psbudget Monitor and control spending using budgets. Set up alerts on the cost details.
Budgets can alert to an action group
Step-by-Step Guide to Using Azure Budgets
- Access Cost Management:
-
Go to the Azure portal and navigate to Cost Management + Billing.
-
Select Cost Management and then Budgets.
-
- Create a Budget:
-
Click on Create Budget.
-
Choose the Scope for your budget (e.g., Subscription, Resource Group, etc.).
-
Set the Time Period for the budget (e.g., Monthly, Quarterly, Annually).
-
Define the Budget Amount you want to set.
-
- Configure Alerts:
-
Set up Alerts to notify you when your spending reaches certain thresholds (e.g., 80% of the budget).
-
You can configure alerts to be sent via email or other notification methods.
-
- Review Budgets:
-
Regularly review your budgets to monitor your spending and ensure you stay within your limits.
-
Use the Cost Analysis tool to get detailed insights into your spending patterns.
-
- Adjust Budgets as Needed:
-
If your spending needs change, you can adjust your budgets accordingly.
-
You can also create multiple budgets for different scopes or time periods.
-
- Use Budgets for Cost Control:
-
Leverage budgets to drive accountability and manage costs effectively.
-
Compare actual spending against your budget to identify areas where you can optimize costs.
-
Power BI
https://youtu.be/KyHQRCS8_AQ?si=BUWHwZs6uCdZzHW2 https://www.youtube.com/watch?v=MYZjoc8ZXGw https://learn.microsoft.com/en-us/power-bi/connect-data/desktop-connect-azure-cost-management
Step-by-Step Guide to Using Power BI with Azure Cost Analysis
- Install Power BI Pro:
- Ensure you have a Power BI Pro license. This is required to install and use the Cost Management Power BI app1.
- Install the Cost Management Power BI App:
-
Go to the Power BI AppSource page.
-
Search for the Cost Management Power BI App and select Get it now.
-
Follow the prompts to install the app.
-
- Connect to Azure Cost Management Data:
-
Open the Cost Management Power BI App.
-
Select Connect your data.
-
Enter your Enterprise Agreement (EA) enrollment number or Billing Profile ID.
-
Specify the number of months of data you want to retrieve.
-
Follow the prompts to connect to your Azure data.
-
- Explore Pre-built Reports:
-
Once connected, you'll see pre-built reports that provide insights into your Azure costs, usage trends, and cost optimization opportunities.
-
Use these reports to monitor your spending and identify areas for cost savings.
-
- Customize Reports:
-
You can customize the reports to meet your specific needs.
-
Use the Cost Management connector in Power BI Desktop to join other data sources and create customized reports.
-
This allows you to create holistic views of your overall business costs.
-
- Share Reports:
-
Share your customized reports with team members to collaborate on cost management efforts.
-
Use Power BI's sharing features to distribute insights and drive accountability.
-
Power BI Connector
How to Use Power BI Connectors:
-
Open Power BI Desktop: Start by opening Power BI Desktop.
-
Get Data: Go to the Home tab and click on Get Data.
-
Select a Connector: Choose the appropriate connector from the list of available connectors.
-
Connect to the Data Source: Follow the prompts to connect to your data source and import the data into Power BI.
-
Transform Data: Use Power Query Editor to clean, transform, and shape your data as needed.
Azure Advisor
- Create alerts
- Auto fix for findings
-
Identify Idle Resources: Azure Advisor identifies resources that haven't been used for a certain period (e.g., VMs, databases) and recommends shutting them down to save costs.
-
Right-Size Resources: It analyzes your resource usage and suggests resizing underutilized resources to a more cost-effective size.
-
Apply Azure Reservations: Advisor recommends applying Azure Reservations for services like VMs, SQL Databases, and Cosmos DB to get discounted rates.
-
Use Azure Hybrid Benefit: It suggests using your on-premises licenses with Azure to get discounts on Windows Server VMs and SQL Server.
-
Optimize Storage: Advisor provides recommendations to optimize storage costs, such as deleting unneeded snapshots and moving data to more cost-effective storage tiers.
How to Access Cost Recommendations
-
Sign in to the Azure Portal: Go to the Azure portal and search for "Advisor".
-
Navigate to the Cost Tab: On the Advisor dashboard, select the Cost tab to view cost-related recommendations.
-
Implement Recommendations: Follow the provided recommendations to optimize your costs.
Cost Allocation for Cost Financial Management
Distribute network and other shared resources - this doesn't work well in Power BI for now.
- Identify Shared Costs
- Identify who owns the costs - business or subscription
- Distribution Algorithm method - how to calculate how to distribute the costs
Anomaly Detection and Alerting
Add this to the subscriptions
- Monitor network and custom performance metrics
- Log Analytics services
- Hybrid Environments
- Storage IO metrics
Well Architected Framework Assessment Tool
The Well-Architected Framework Assessment Tool is part of the Azure Well-Architected Framework, designed to help you evaluate and improve your workloads across five key pillars: Reliability, Security, Cost Optimization, Operational Excellence, and Performance Efficiency.
Key Features of the Assessment Tool:
-
Self-Assessment: The tool provides a self-assessment that consists of approximately 60 questions based on the key recommendations of the Well-Architected Framework.
-
Personalized Recommendations: After completing the assessment, you receive curated and personalized guidance tailored to your specific scenarios.
-
Integration with Azure Advisor: The tool can pull in recommendations from Azure Advisor for your Azure subscription or resource group.
-
Exportable Results: You can export the recommendations into a CSV file for easy integration into your operational processes.
How to Use the Assessment Tool:
-
Access the Tool: Go to the Azure portal and search for "Well-Architected Framework Assessment Tool" or navigate to the Azure Well-Architected Framework page.
-
Complete the Assessment: Follow the prompts to complete the assessment, answering questions about your workload's design and operational practices.
-
Review Recommendations: After completing the assessment, review the personalized recommendations provided.
-
Implement Recommendations: Prioritize and implement the recommendations to improve your workload's design and operations
Azure Migrate
Azure Migrate is a comprehensive service that simplifies the process of migrating on-premises workloads to Azure. It helps you plan, assess, and execute your migration with minimal downtime and risk1. Here's an overview of what Azure Migrate offers:
Key Features of Azure Migrate:
-
Discovery and Assessment: Azure Migrate helps you discover and assess your on-premises servers, databases, web apps, and virtual desktops. It provides insights into the readiness and cost of hosting these workloads on Azure1.
-
Migration Planning: The service helps you create a detailed migration plan, including right-sizing recommendations and cost estimates.
-
Minimal Downtime: Azure Migrate supports seamless migration with minimal downtime, ensuring your business operations continue smoothly.
-
Support for Various Workloads: It supports a wide range of workloads, including servers, databases, web apps, virtual desktops, and large-scale offline migration using Data Box.
-
Unified Platform: Azure Migrate provides a unified platform for migration and modernization, making it easier to manage and track your migration progress.
How to Use Azure Migrate:
-
Deploy the Azure Migrate Appliance: Deploy a lightweight appliance in your datacenter to collect configuration and performance data for your servers.
-
Assess Workloads: Use Azure Migrate assessments to evaluate the readiness and cost of migrating your workloads to Azure.
-
Create a Business Case: Generate a business case to decide if migrating to Azure is the right choice for your organization.
-
Plan Migration: Develop a detailed migration plan based on the assessment results.
-
Execute Migration: Follow the migration plan to move your workloads to Azure with minimal disruption.