1. Notes
Notes for Networking and Hybrid
Private and Public Services
AWS Services can be categorized as these two type: Public and Private. This is because of networking perspective only.
- Internet vs private networks - VPCs
- Your home network is a private network.
Three zones
- Public Internet - Netflix lives here.
- Public AWS - services such as S3
- Private AWS - services such as EC2

On Premises infra can access VPCs only if they connect via VPN or Direct Connect (DX).
EC2 instances (Private AWS) can have public IPs (AWS Public) to talk to the Public Internet
DHCP in VPC
Dynamic Host Configuration Protocol
- Layer 2 broadcast
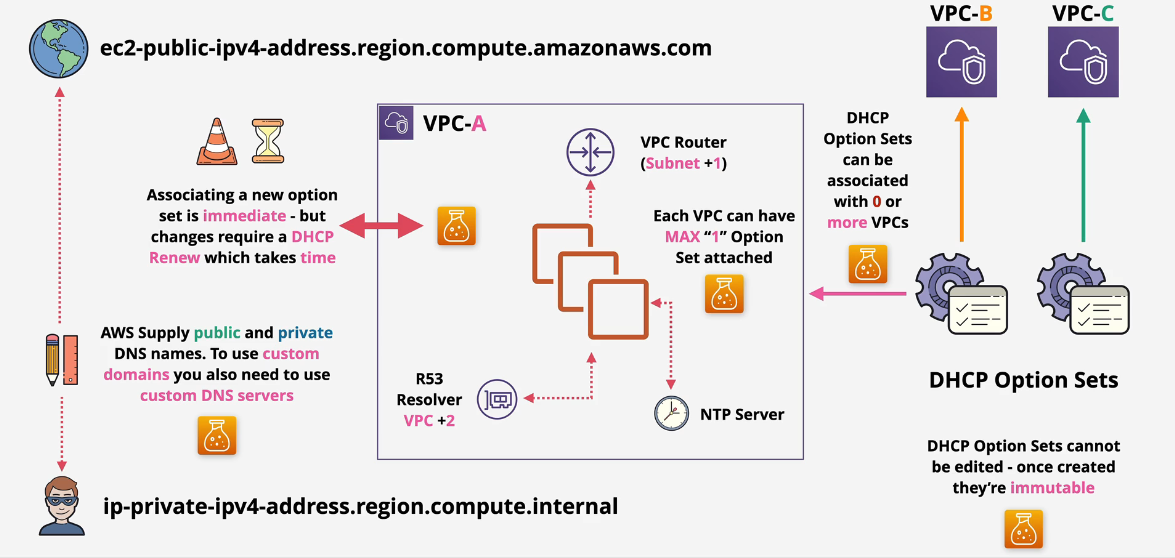
DHCP option sets cannot be edited. They are immutable.
- can be associated with 0 or more VPCs
- associating a new option set is immediate, but changes require a DHCP renew which takes some time. VPC can have maximum "1" option
Subnet + 1 = VPC router VPC + 1 VPC + 2 - Route53 Resolver.
VPC Router Deep Dive
- Virtual router in a VPC
- Highly available across all AZ's in that region
- Scalable - no performance management required.
- Routes traffic between subnets
- Routes from External networks INTO the VPC
- and from the VPC INTO external networks.
- This router is located on the Subnet + 1 address
- Controlled via Route Tables.
Subnets are split up into separate CIDRs and the interface connected to the VPC Router is the Subnet+1 address.
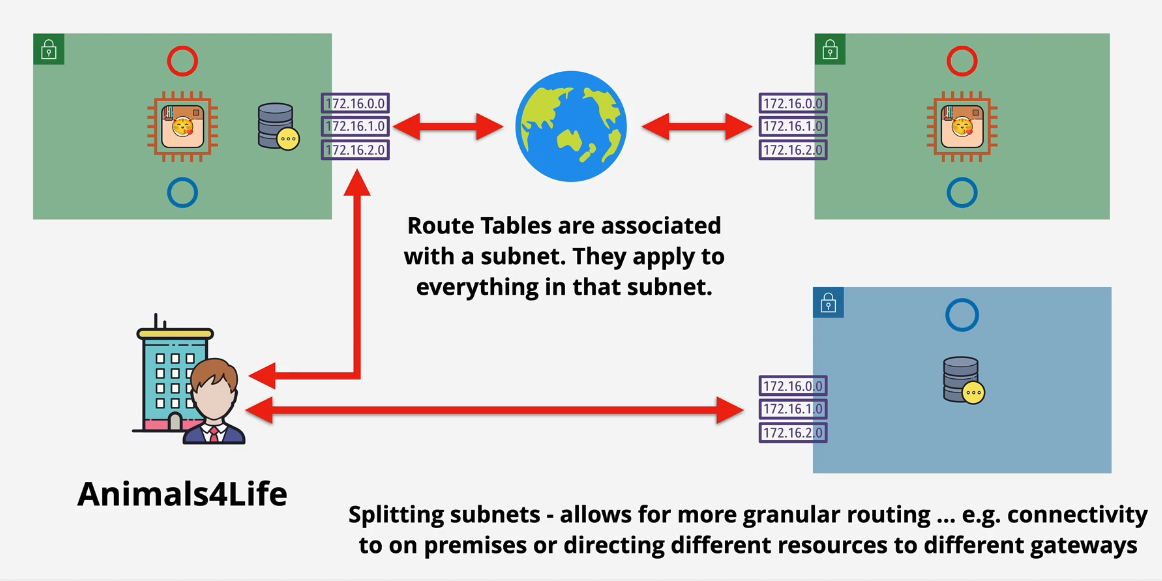
Route Tables
- Every VPC is created with a main Route Table
- Custom route tables can be created an associated with subnets within the VPC, but the main route table is disassociated.
- Subnets are associated with ONE RT (either the main or a custom)
- Most specific route always is used first.
- Higher prefix = more specific = higher priority.
- Route Tables can be associated with one or more Gateways. Edge Association :)
Source and destination IP addresses of traffic leaving the subnet - then it matches on the Route Table and then send the traffic there.
- Higher = More Specific = Higher Priority Local routes always take priority
Default Routes are routes where the traffic goes when it doesn't do anything else.
Stateful vs Stateless Firewalls
You need to understand how TCP/IP works in order to understand how stateful/stateless firewalls work. You run NACLs on the subnets and Security groups on the NICs on the servers.
- Perception is key. Outbound rules and inbound rules are set up in the perspective of the server or client you are looking at. Traffic leaving a server is outbound from that server and that traffic enters another server, inbound to that server.
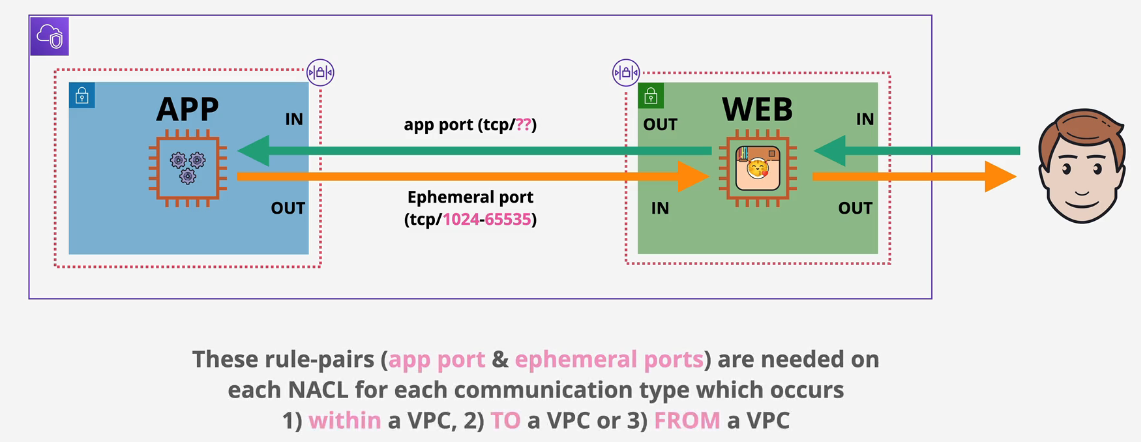
Stateless Firewalls
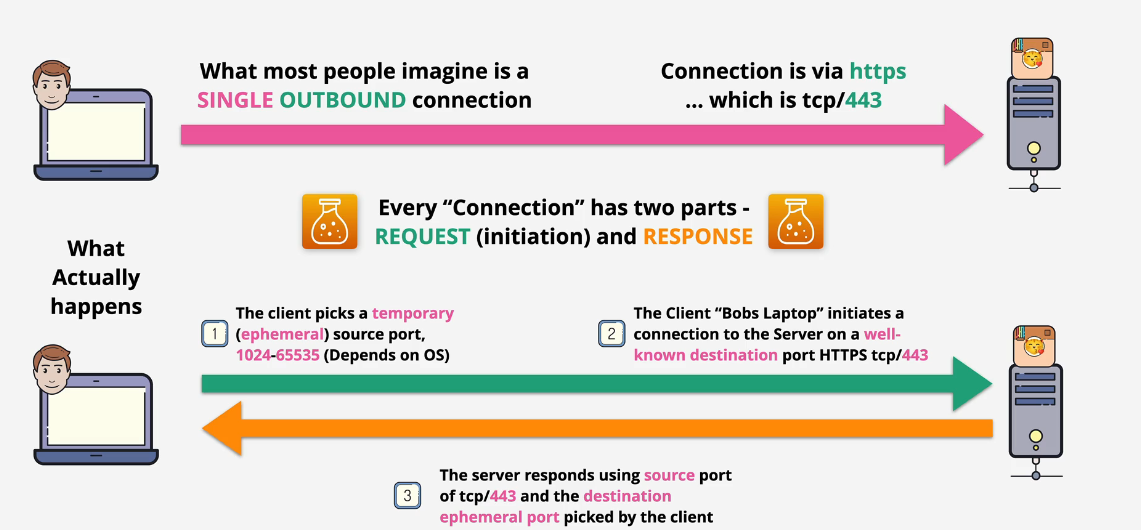
Request is always on a well known port - 3389 for instance.
Response is a random ephemeral port
Something to think about: You need two rules for each piece of traffic on a stateless firewall. One inbound and one outbound.
You need one rule for a stateful firewall as the stateful remembers the traffic going out and lets it back in. You then need the same rules inversely - sometimes 4 rules.
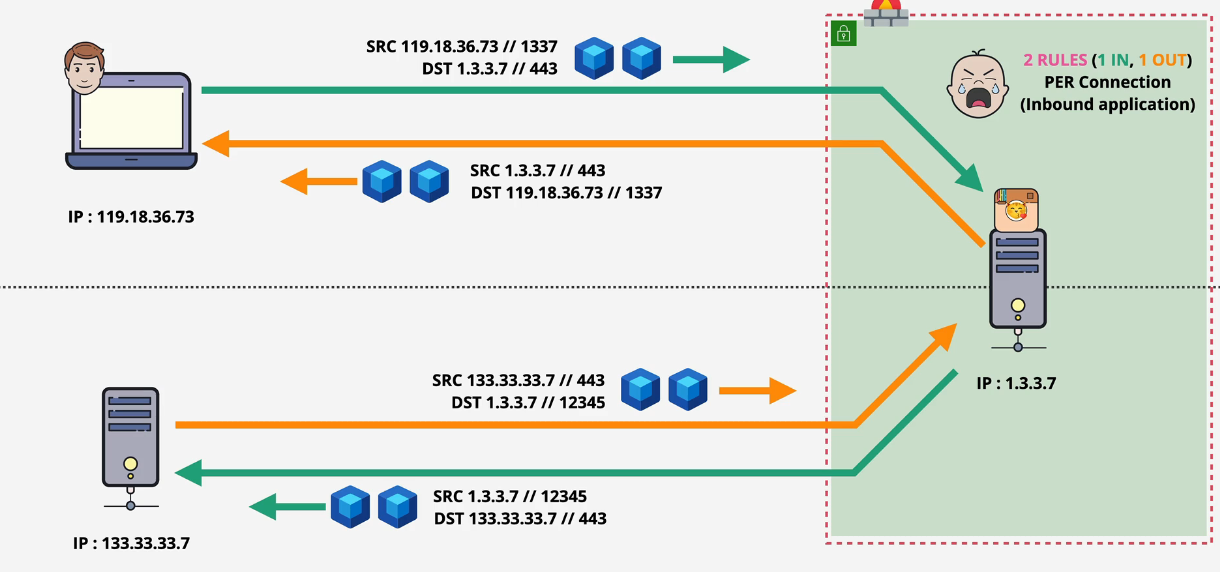
Stateful Firewalls
Request and Response are related, stateful firewalls are intelligent enough to understand that.
Network Access Control Lists (NACLS)
Firewall for controlling traffic in and out of subnets.
- NACLs are stateless.
- Need to add 2 rules, one for the request and one for the response.
- Can Explicitly Allow and Explicitly Deny
- NACLs can be associated with subnets but not resources
- IPs, CIDRs, ports and protocols only
- you can have a NACL on many subnets but one subnet can only have one NACL (Default or Custom)
Traffic within a subnet is not affected by a NACL Traffic in or out of a subnet may be affected by a NACL
- Default NACLs -VPCs are created with a default NACL - everything is allowed - they are created wide open for ease of use.
- Custom NACLs can be created - everything is denied.
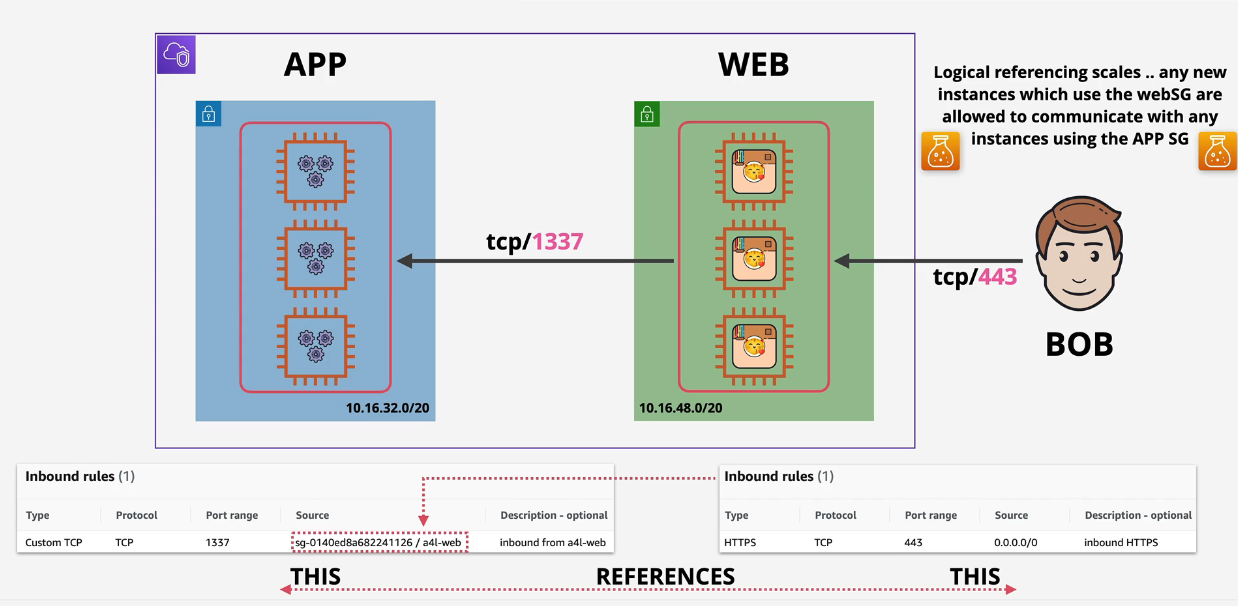
Security Groups (SGs)
Stateful NO Explicit Deny, only allow or implicit deny - cannot block specific bad actors.
- CANNOT EXPLICITLY BLOCK TRAFFIC
- AWS Resources - Elastic Network Interfaces, not Instances
Logical References
Logical references are basically ways of referencing other security groups from other security groups - meaning you can attach whatever to one security group and then all of those everythings are then enabled or disabled via the SG reference.
 Can be used for DCs or App based HA
IP address changes are automatically handled.
Can be used for DCs or App based HA
IP address changes are automatically handled.
AWS Local Zones
Used to help with latency
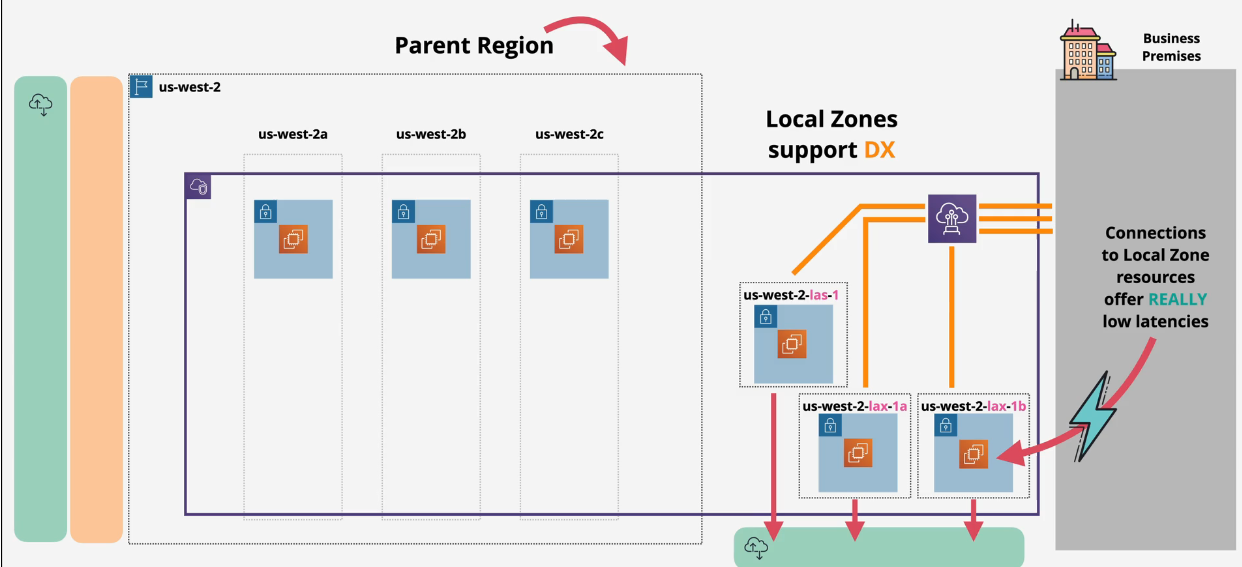
- 1 zone- runs in a facility near your location.
- Direct Connect to a local zone is supported
- Use local zones when you need the highest performance.
- not all products support these - opt in with limitations
Border Gateway Protocol
Routing Protocol
- Autonomous systems are controlled by BGP
- Peering is manually configured
- Runs on TCP 179
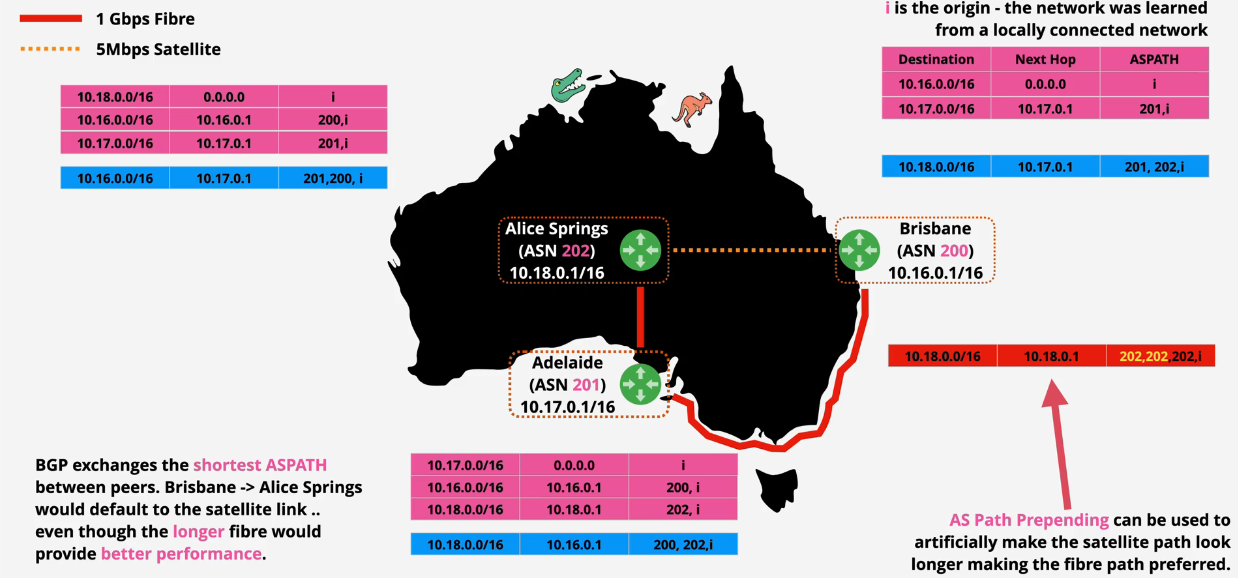
BGP is a path-vector protocol. It exchanges the best path to a destination between peers - this path is called the ASPath. BGP isn't focused on link speed, instead, it's focused on paths.
Two different variations of BGP:
- iBGP for internal within an autonomous system (AS)
- eBGP for External between AS's
There are preferred and non-preferred paths. These are based on the shortest route between two networks.
ASPath prepending is where you add length artificially to a path to make it appear longer, therefore moving the priority down.
AWS Global Accelerator
The problem: You have an application that is super popular in the US. It becomes so popular that it goes global. The global experience vs local US experience is much worse the farther away from the US you get. Hops and latency :)

This is similar to CloudFront, but not the same thing. CloudWatch moves the content closer to their location while AWS leaves the data where it is and provides an AWS backbone for the traffic to travel on.
AWS Global Accelerator introduces Anycast IP's that will resolve to the closest edge location. So, Australia will type in the IP address, it will resolve to the route closest to Australia. These edge locations are connected via AWS's own global network.
Anycast IPs allow a single IP to be in multiple locations. Routing moves traffic to the closest locations via the public Internet.
Basically you connect to a website via the closest AWS edge location, and then the traffic is served to the datacenter via the AWS backbone and not across the public internet. This allows very fast transfer between regions.
Global Accelerator also doesn't cache anything. that's CloudFront.
- Global Accelerator moves the AWS network closer to customers
- Customers enter at the edge using Anycast IPs
- Transit from that edge through the AWS backbone to 1 or more locations
- GA is a network product - can be used for non HTTP/S TCP/UDP - CloudFront doesn't do that.
IPSEC VPN Fundamentals
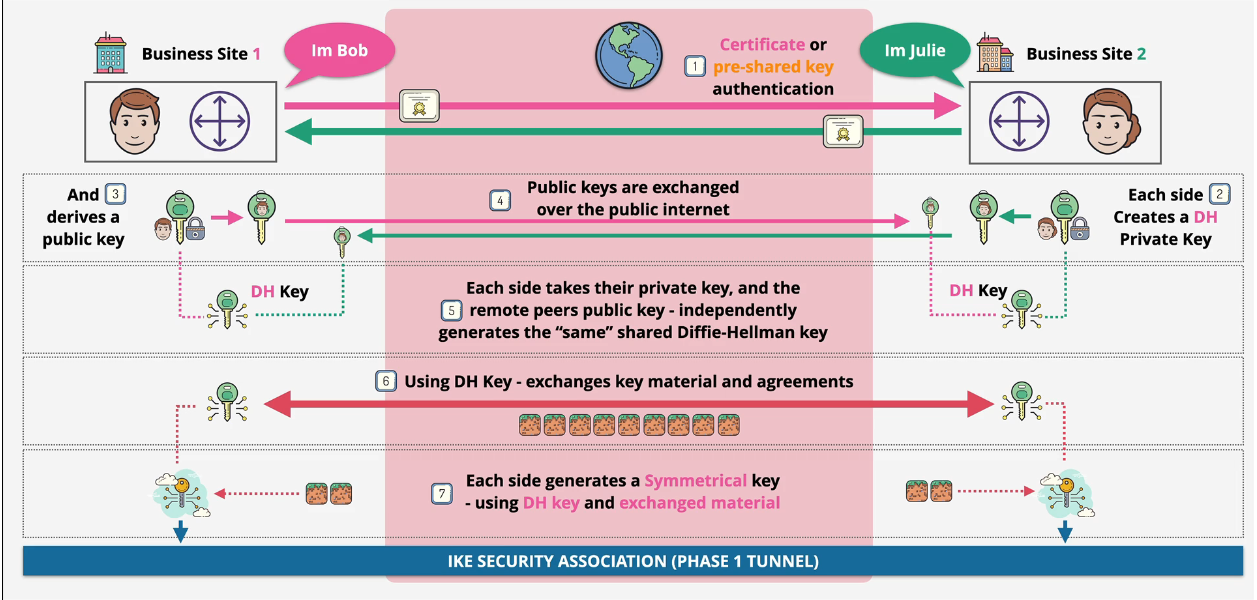
IPSEC is a group of protocols used to set up secure tunnels across insecure networks (like the public internet) Start with asymmetric encryption and the use symmetric encryption.
- IKE Phase 1 - slow and heavy
- Authenticate - preshared key/certificate
- uses Asymmetric encryption to agree on and create a shared symmetric key (Diffie Hellman)
- IKE security association (SA) created (phase 1 tunnel)
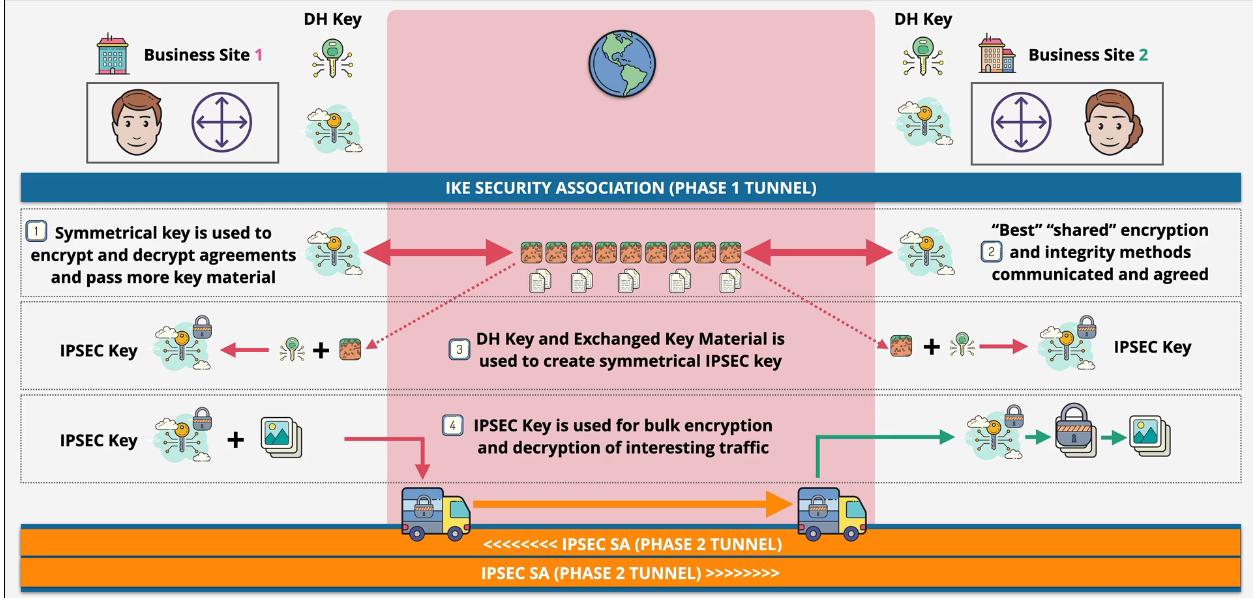
- IKE Phase 2 - fast and agile
- uses the keys from phase 1
- creates IPSEC security association - phase 2 tunnel running over phase 1
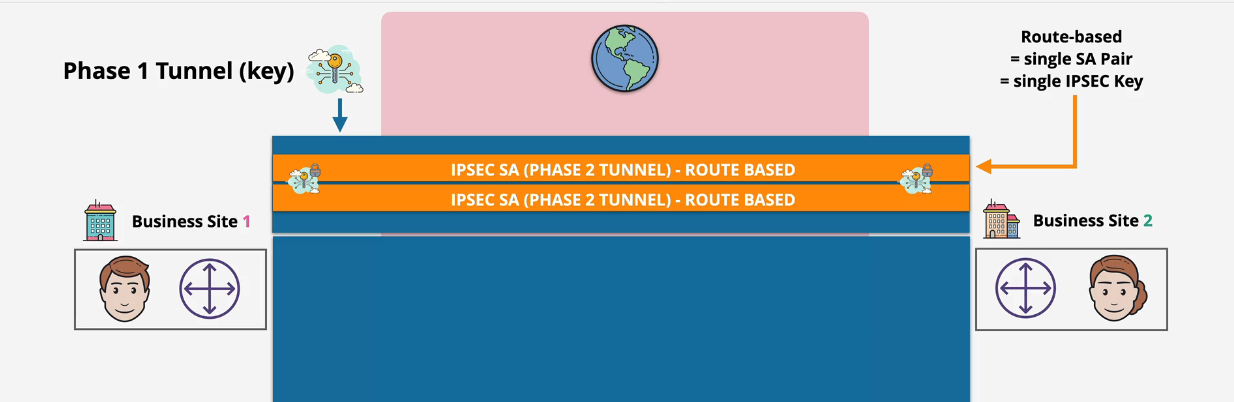
Policy based VPNs Route Based VPNs
- target matching (prefix)
- matches a single pair of security associations.
Site to Site VPN
Quickest way to connect something AWS to something that is not AWS over the public Internet that is encrypted using IPSec.
Used for HA if you design and implement correctly. Quick to provision
Types of Gateways:
- Virtual Private Gateway (VGW)
- Customer Gateway (CGW) The VPN is the connection between those two gateways.
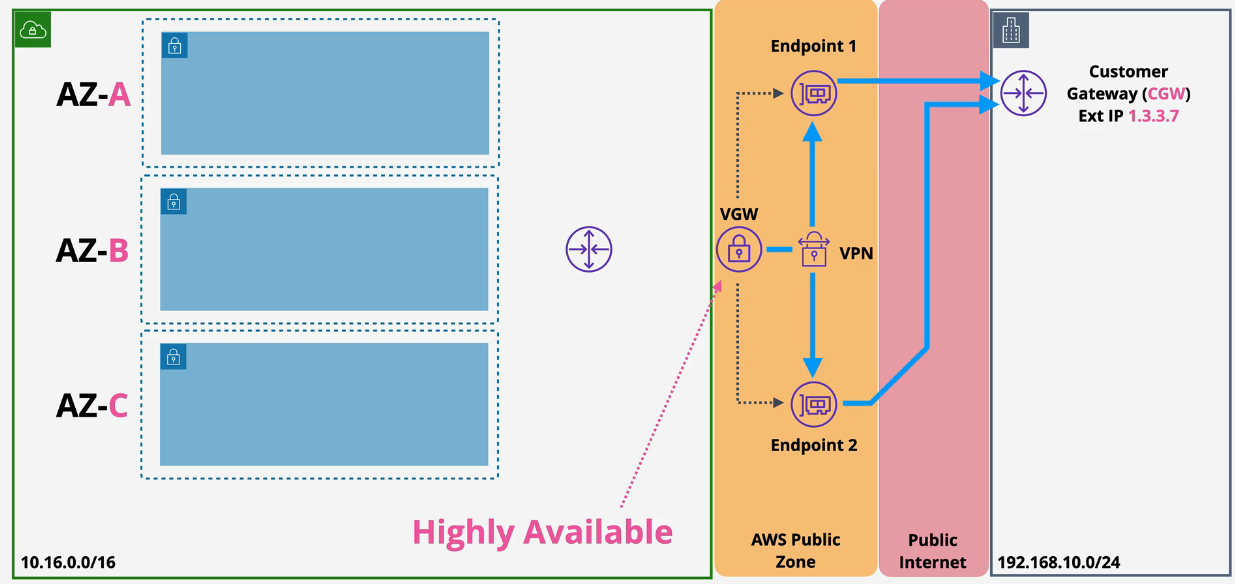
HA configuration:
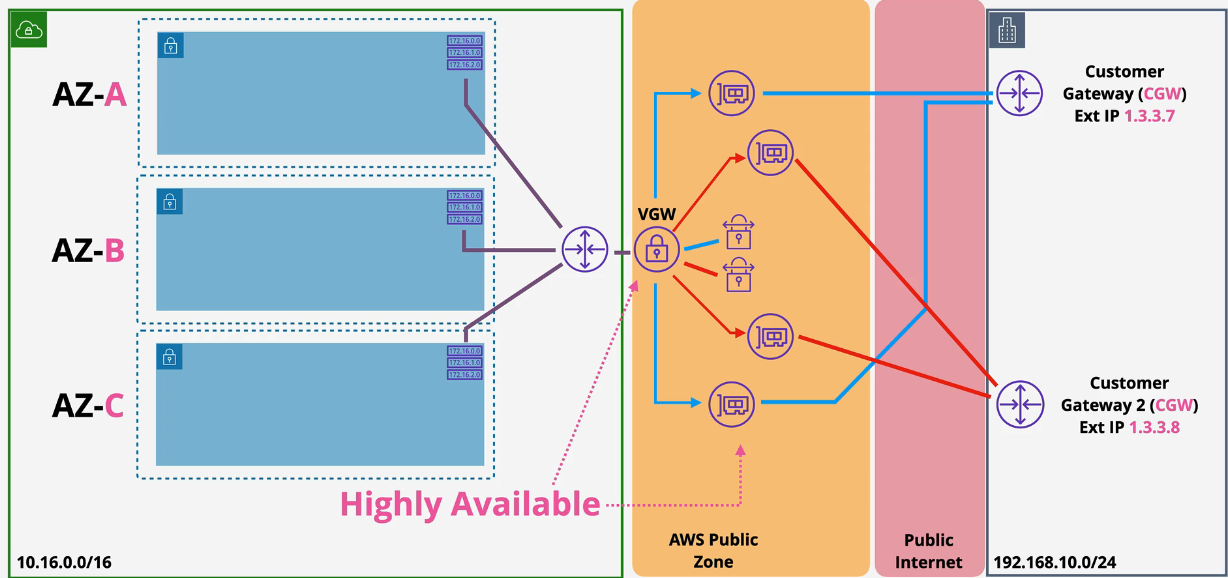
Speed limitations: 1.25Gbps - AWS Limitation Latency: Transfers over the public internet. Quick Setup: all software configuration, no hardware. Backup: used for backup for Direct Connect (DX) DX: Can be used alongside Direct Connect Cost: AWS Hourly cost, GB out cost, data cap maybe on prem
Static vs Dynamic VPN
Static uses static routes on the route table. You don't immediately get load balancing and multi connection failover.
Dynamic VPN creates a relationship via BGP between the customer and AWS using ASN. This allows for Multiple VPN connections which provides HA and traffic distribution. It also uses Route propagation to add routes to the route table automatically.
Transit Gateway
Used to connect VPC's to each other. It's a network object, which makes it HA and very scalable.
- Reduces complexity
- Create attachments to other network types:
- VPC, Site to Site VPN and Direct Connects use Transit Gateways.
Without transit gateways, you need to create individual connections between your VPC's and your on prem and it needs to be highly available, which means redundancy.
With transit gateways, you create VPC Attachments from the VPC to the TGW. You can connect transit gateways between accounts in order to create global architecture.
- Supports Transitive Routing. No mesh required.
- Share between accounts using Resource Access Manager (RAM)
TGW Deep Dive!
TGW has one Route Table by default.
- all attachments use this RT for routing decisions
- all attachements propagate routes to it
- all attachments can route to all attachments.
Also:
-
You can create up to 50 peering attachments per Transit Gateway
-
These can be in different regions and different accounts
-
There is no route learning (propagation across peers) - static routes are required.
-
Choose unique ASNs for the TGWs.
-
Attachments can be associated with one RT
Advanced VPC Routing - Part 1 and Part 2
- Subnets are associated with 1 route table only: either the VPC Main RT or a custom RT.
- RT can be associated with an IGW or VGW
- Routes send traffic based on destination to a target
- Subnet Route Tables determine what the VPC Router does with the IP traffic.
- A subnet cannot be without a route table. If the custom route table is removed, the default route table is reapplied.
- IPv4 and IPv6 are handled differently.
Order:
- Longest prefix wins /32 will beat a /24
- Static routes - 50 max
- Propagated routes - 100 max
3.1 DX
3.2 VPN Static 3.3 VPN BGP 3.4 ASPath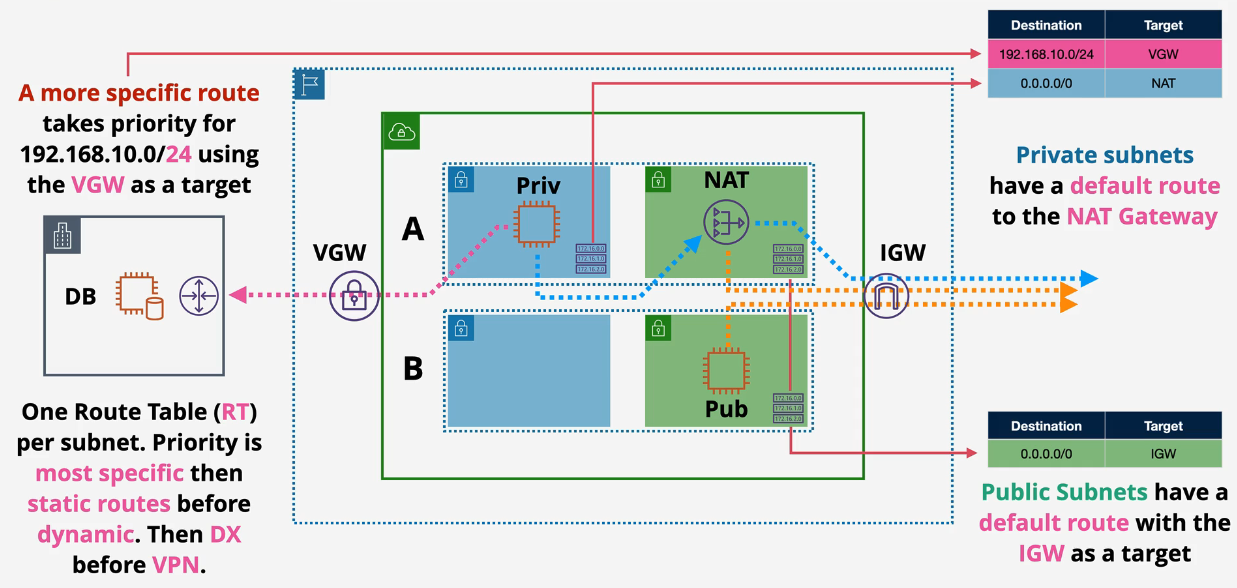
Part 2:
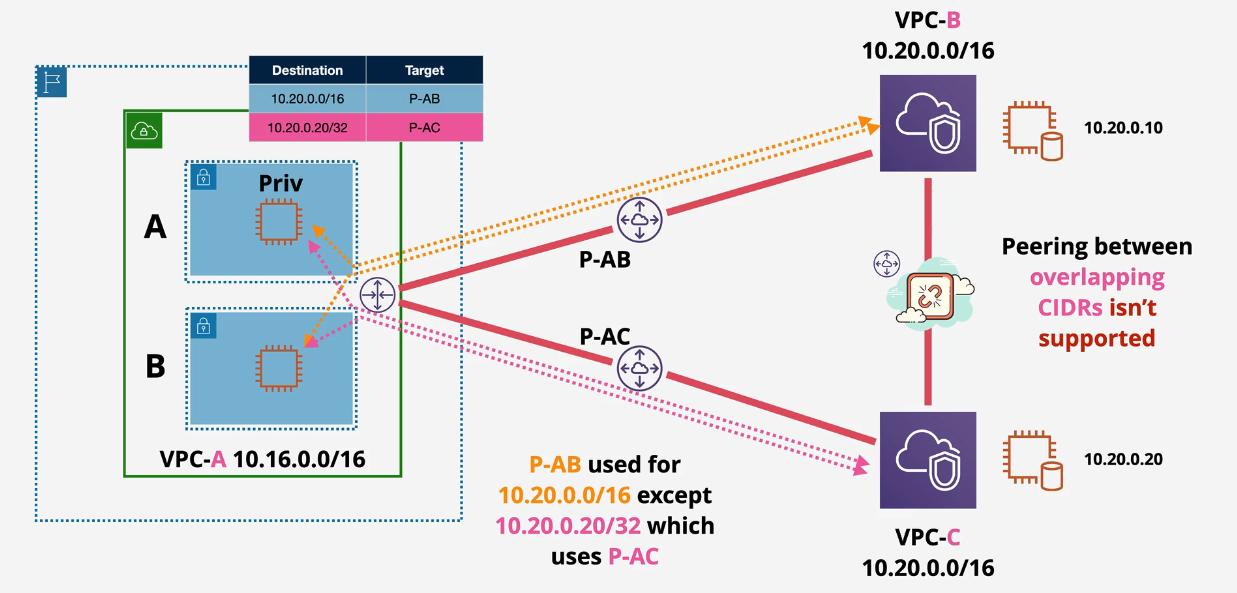
CIDR overlap
Peering between CIDR overlap is not supported. Don't overlap CIDRs.
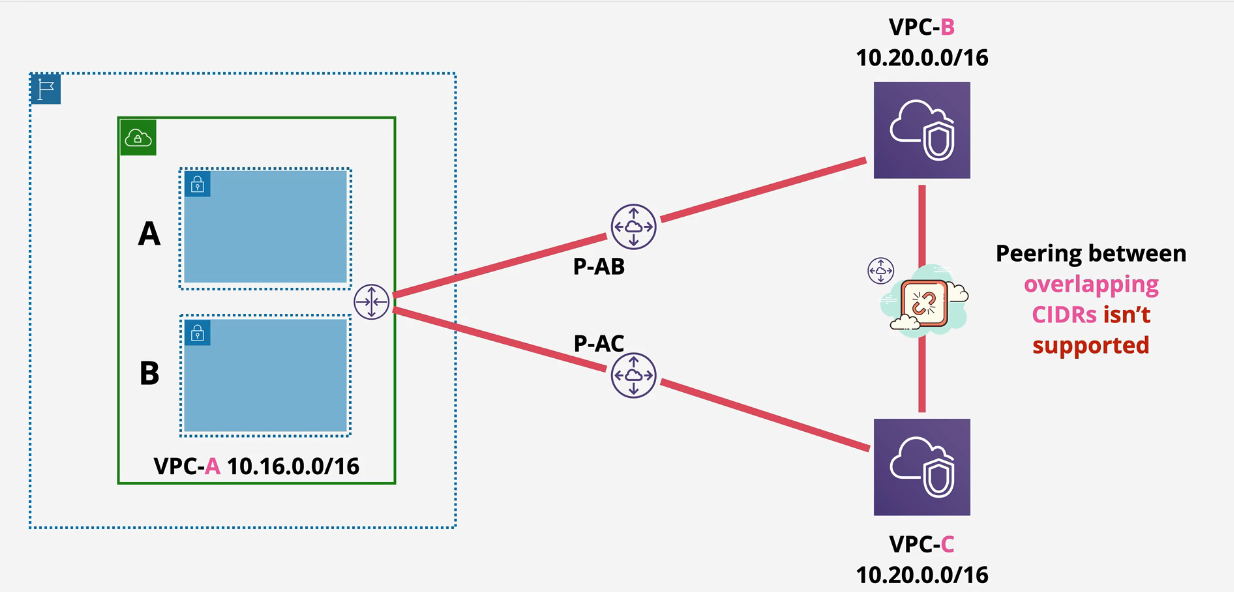
Split routing is created by creating multiple route tables that point traffic to two different places.
A will not be able to reach VPC-C B will not be able to reach VPC-B
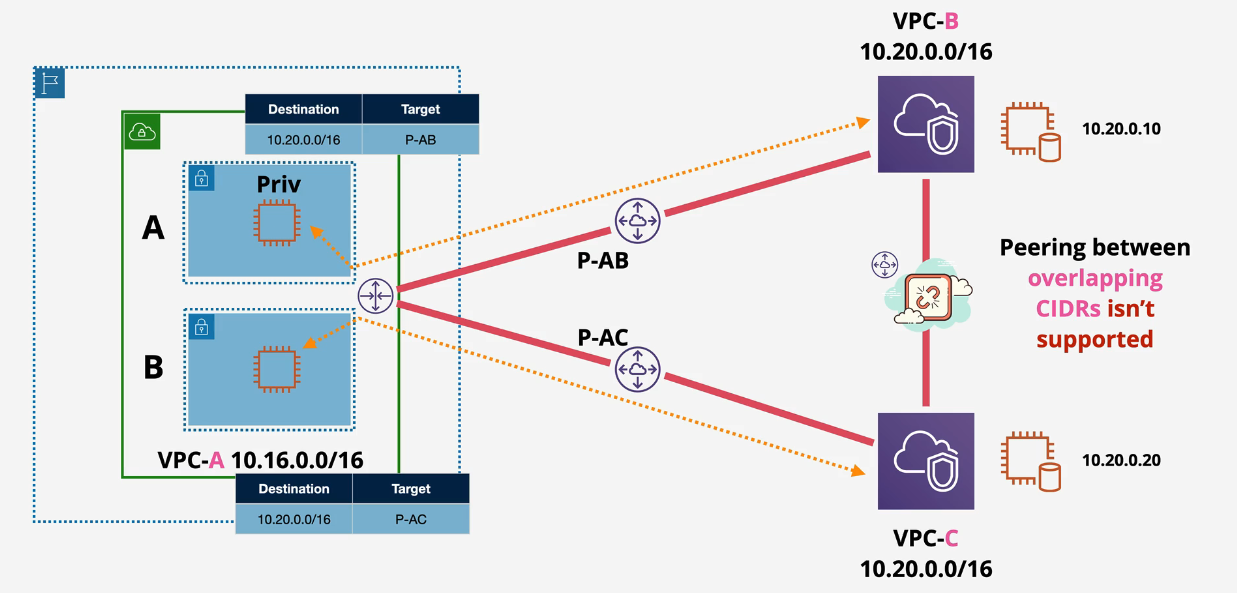
But..you can add VPC-C to the route table - remember highest prefix wins? /32 will win and A will be able to route out to VPC-C
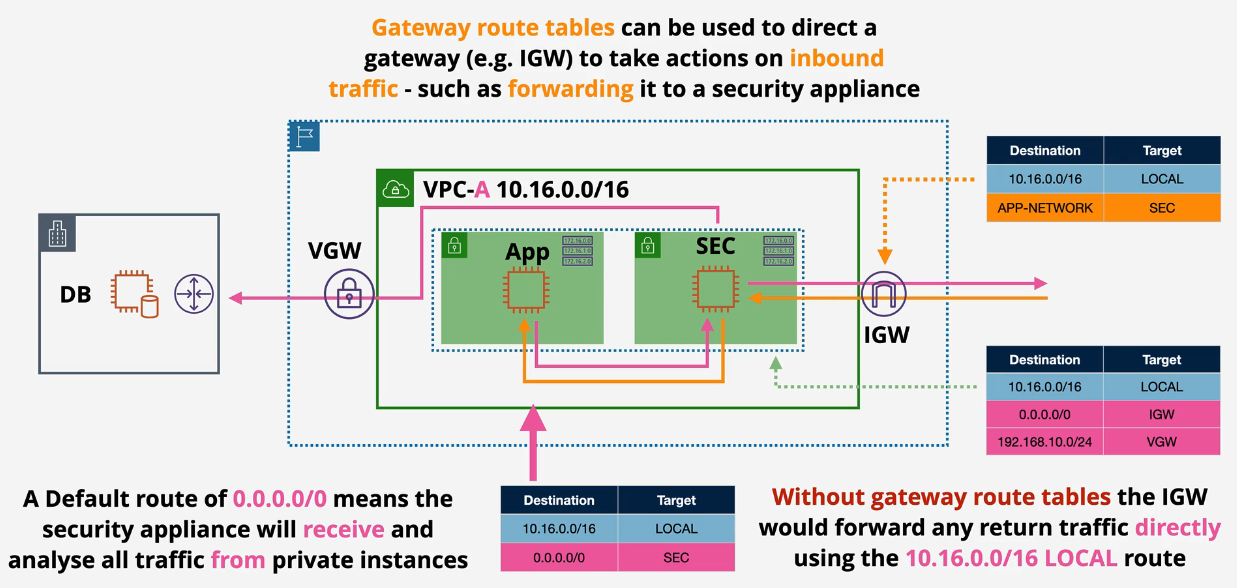
Ingress routing
This is a newer feature
All traffic routed in can be then forwarded through a security appliance.
Attached to an Internet Gateway to handle all incoming traffic.
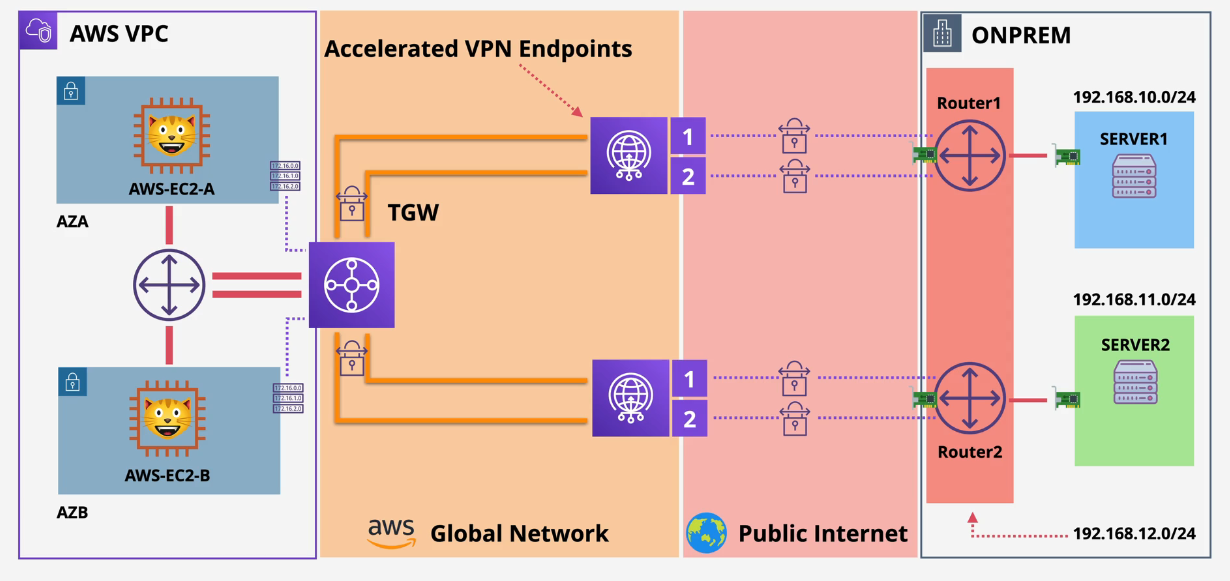
Accelerated Site-to-Site VPN
2 IPSec Tunnels
- traveling over the public internet
- not very consistent performance
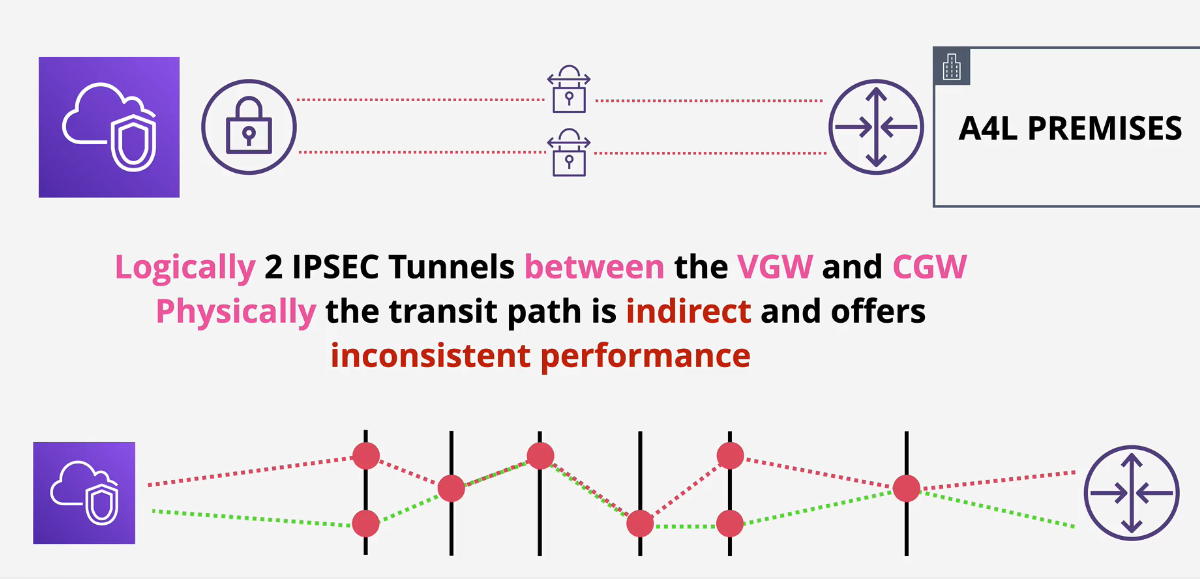
Ideally, you can add a Direct Connect (DX) for this, but with Accelerated Site-To-Site VPN, you basically just use the VPN to connect to the AWS edge location
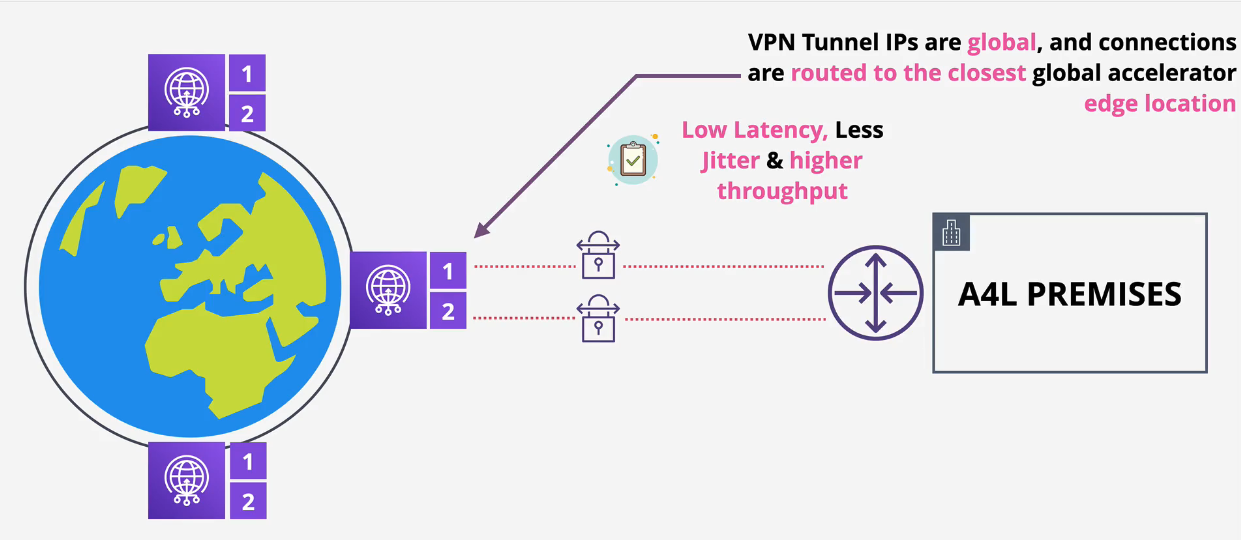
- Acceleration can be enabled using a Transit Gateway VPN attachment
- NOT a Virtual Private Gateway attachment.
Moving from
- VGW -> CGW
- to CGW -> TGW -> VPC (n)
- to CGW -> Global Accelerator -> TGW -> VPC
Accelerated VPN provides performance enhancements by routing traffic over a more direct and efficient path between CGW and AWS, avoiding the public internet as much as possible.
Demo: Advanced Site-To-Site VPN
Stage 1:
- Create the AWS and OnPrem architecture using CloudFormation Stacks
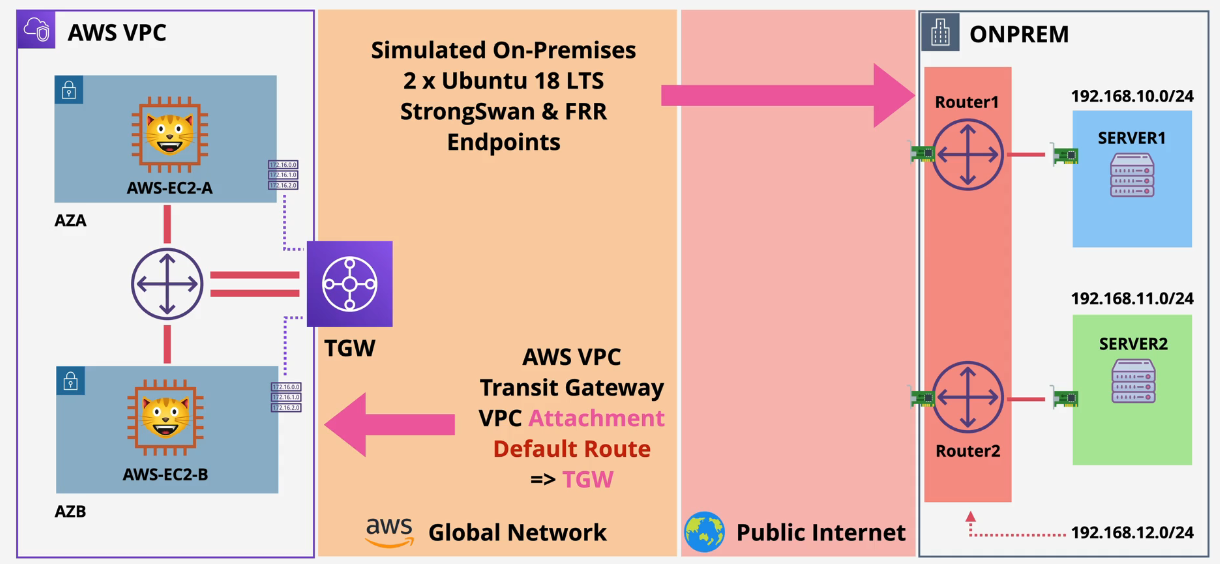
- You should have the IP addresses of the Private and Public routers here in the Outputs tabs
- Navigate to the VPC service in a new tab.
- Click on Customer Gateway and then create a new Customer gateway.
- Name this ONPREM-ROUTER1 to simulate the on prem router.
- Select Dynamic and enter in the BGP of 65016 and the Public IP of Router 1
- Repeat for Router2 but use the Public IP of Router 2
Check Connectivity
- Open up the EC2 console in another tab
- You should have 4 On Prem Instances and 2 AWS instances.
- Click on AWS-EC2-B and copy the private IP
- Select the Onprem-Server2, click Connect and then connect via session manager.
- Ping the IP address you copied and you'll see you cannot reach that host.
Stage 2: AWS Side
Create the Transit Gateway attachments
- Navigate back to the VPC console.
- Open a new browser in the CloudFormation console and set that aside
- On the VPC console, select Transit Gateway Attachments
- You'll have one TGW attachment that connects to Transit Gateway to the existing VPC.
- Click create new Transit Gateway Attachment
- Select the Transit Gateway ID and then select VPN as we're creating a VPN across the AWS to On Prem.
- Select Router1 from the existing Customer Gateway ID list.
- Ensure the Dynamic routing option is selected and the checkbox for Enable Acceleration is checked so we can use the AWS backbone.
- Click Create Attachment.
- Repeat this for On Prem Router2
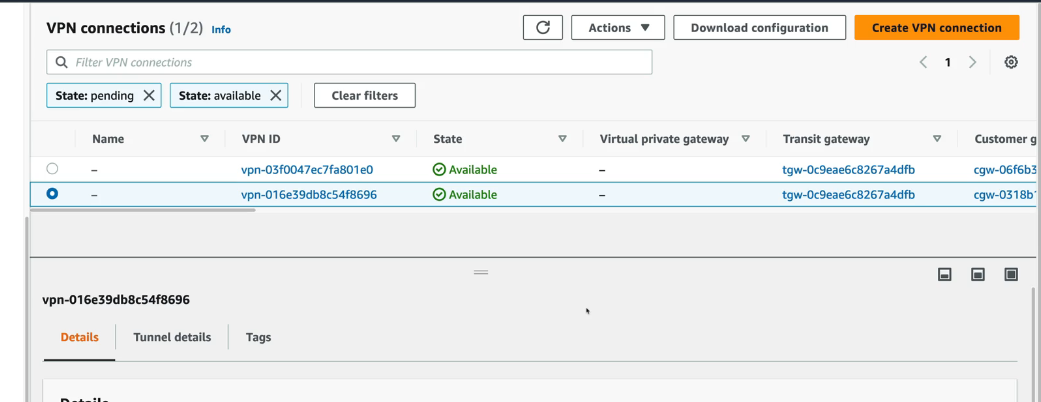
Check the site-to-site VPN
- Click the Site-To-Site VPN Connections on the left and you'll see two VPN connections in the pending state

Download routing configuration
- Click the checkbox to the left of Router1 and then click Download Configuration.
- Rename this txt file to connection1.txt
- Repeat for Router and rename that txt file to connection2.txt.
This is the architecture for what we are trying to create. 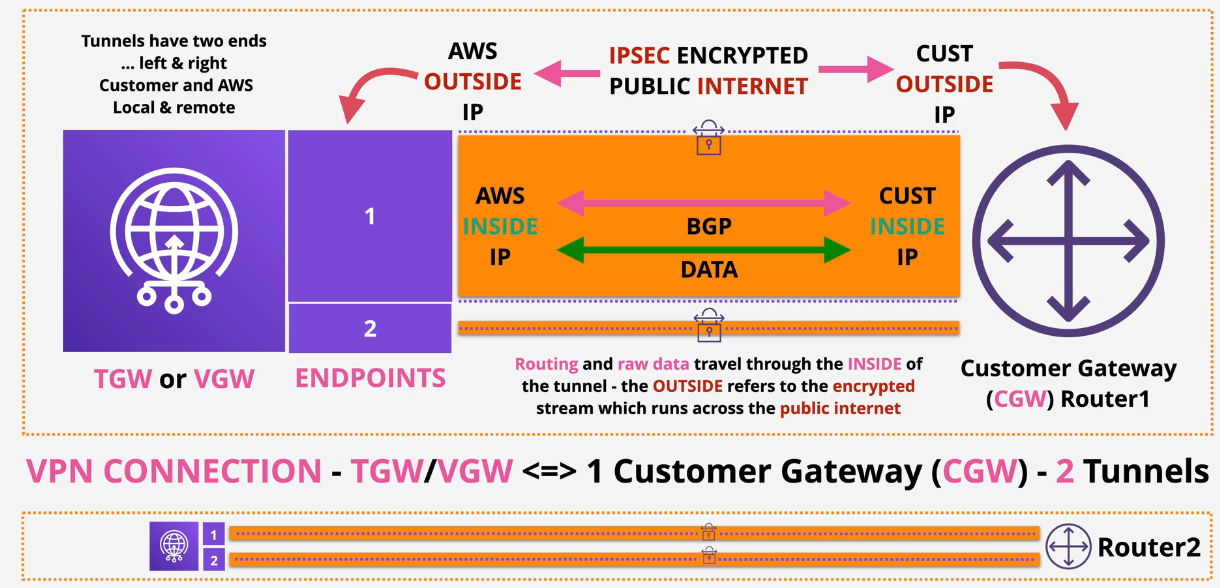
Create template
- Copy the template below into a text editor
To save time later in the DEMO we should populate this before configuring the ONPREM environment.
There are two VPN connections ... one between AWS and ONPREM ROUTER1 and one between AWS and ONPREM ROUTER2
For each of those there are two tunnels ... AWS Endpoint A -> ONPREMROUTER
and AWS endpointB -> ONPREMROUTER
Those are the details we will populate
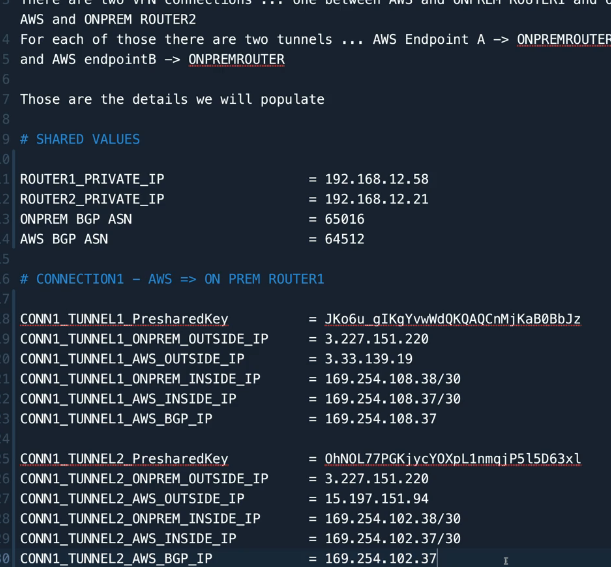
# SHARED VALUES
ROUTER1_PRIVATE_IP =
ROUTER2_PRIVATE_IP =
ONPREM BGP ASN = 65016
AWS BGP ASN = 64512
# CONNECTION1 - AWS => ON PREM ROUTER1
CONN1_TUNNEL1_PresharedKey =
CONN1_TUNNEL1_ONPREM_OUTSIDE_IP =
CONN1_TUNNEL1_AWS_OUTSIDE_IP =
CONN1_TUNNEL1_ONPREM_INSIDE_IP =
CONN1_TUNNEL1_AWS_INSIDE_IP =
CONN1_TUNNEL1_AWS_BGP_IP =
CONN1_TUNNEL2_PresharedKey =
CONN1_TUNNEL2_ONPREM_OUTSIDE_IP =
CONN1_TUNNEL2_AWS_OUTSIDE_IP =
CONN1_TUNNEL2_ONPREM_INSIDE_IP =
CONN1_TUNNEL2_AWS_INSIDE_IP =
CONN1_TUNNEL2_AWS_BGP_IP =
# CONNECTION2 - AWS => ON PREM ROUTER2
CONN2_TUNNEL1_PresharedKey =
CONN2_TUNNEL1_ONPREM_OUTSIDE_IP =
CONN2_TUNNEL1_AWS_OUTSIDE_IP =
CONN2_TUNNEL1_ONPREM_INSIDE_IP =
CONN2_TUNNEL1_AWS_INSIDE_IP =
CONN2_TUNNEL1_AWS_BGP_IP =
CONN2_TUNNEL2_PresharedKey =
CONN2_TUNNEL2_ONPREM_OUTSIDE_IP =
CONN2_TUNNEL2_AWS_OUTSIDE_IP =
CONN2_TUNNEL2_ONPREM_INSIDE_IP =
CONN2_TUNNEL2_AWS_INSIDE_IP =
CONN2_TUNNEL2_AWS_BGP_IP =
# INSTRUCTIONS ON GETTING THE VALUES
We will be locating values for a specific connection `CONN1` or `CONN2` and a specific tunnel .. `TUNNEL1` or `TUNNEL2`
For anything starting with CONN1 .. Look in the `CONNECTION1CONFIG.TXT` file
For anything starting with CONN2 .. Look in the `CONNECTION2CONFIG.TXT` file
In each of the above files, for anything showing TUNNEL1 fine the section `IPSec Tunnel #1` in the above files (THE TOP HALF)
In each of the above files, for anything showing TUNNEL2 fine the section `IPSec Tunnel #2` in the above files (THE BOTTOM HALF)
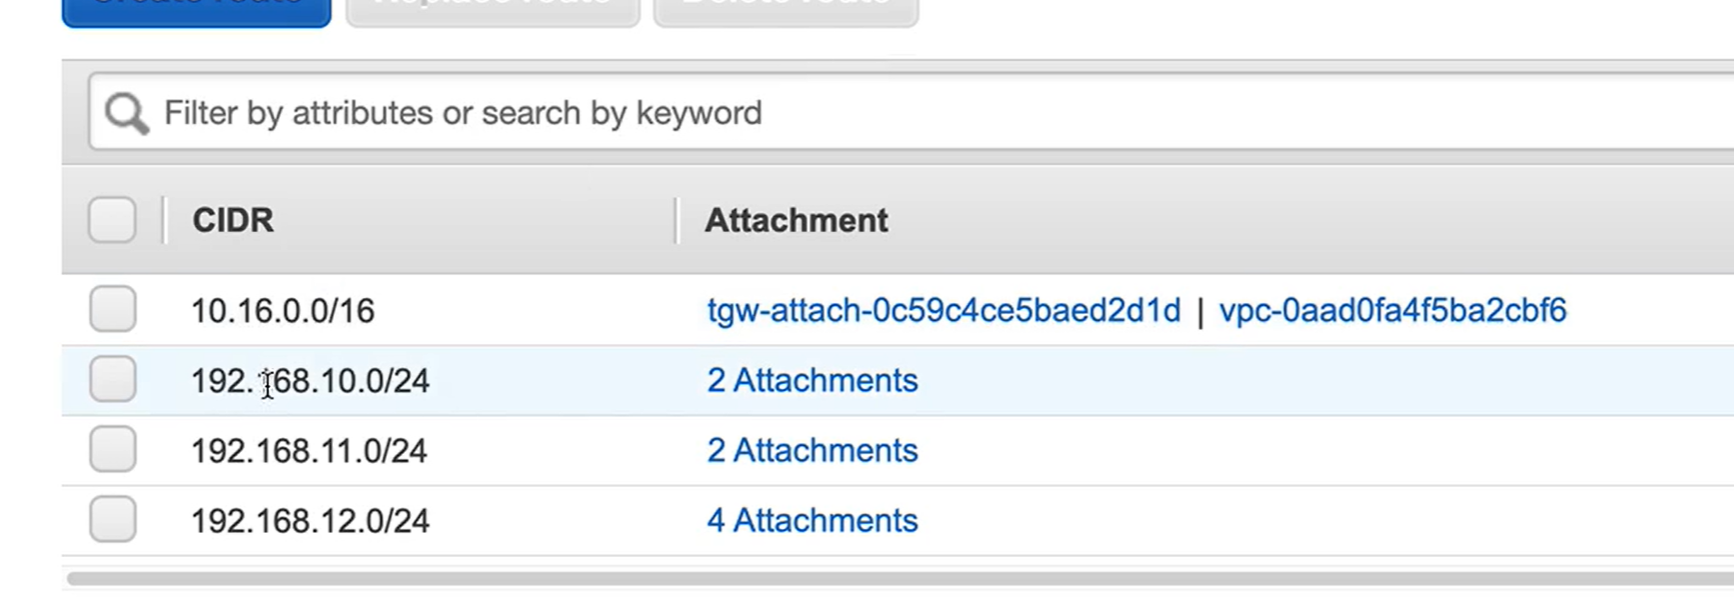
For `ROUTER1_PRIVATE_IP` its the 192.168.12.SOMETHING Private IPv4 Address for `ROUTER1` - Check the `Outputs` of the `ONPREM` CFN Stack for `Private IP of Router1`
For `ROUTER2_PRIVATE_IP` its the 192.168.12.SOMETHING Private IPv4 Address for `ROUTER2` - Check the `Outputs` of the `ONPREM` CFN Stack for `Private IP of Router2`
For `CONN1_TUNNEL1_PresharedKey` open `CONNECTION1CONFIG.TXT`, Locate `IPSec Tunnel #1`, Locate `- Pre-Shared Key` Your key is there
For `CONN1_TUNNEL2_PresharedKey` open `CONNECTION1CONFIG.TXT`, Locate `IPSec Tunnel #2`, Locate `- Pre-Shared Key` Your key is there
For `CONN2_TUNNEL1_PresharedKey` open `CONNECTION2CONFIG.TXT`, Locate `IPSec Tunnel #1`, Locate `- Pre-Shared Key` Your key is there
For `CONN2_TUNNEL2_PresharedKey` open `CONNECTION2CONFIG.TXT`, Locate `IPSec Tunnel #2`, Locate `- Pre-Shared Key` Your key is there
For `CONN1_TUNNEL1_ONPREM_OUTSIDE_IP` its the PublicIPv4 Address of `ROUTER1`
`CONN1_TUNNEL2_ONPREM_OUTSIDE_IP` its the PublicIPv4 Address of `ROUTER1`
`CONN2_TUNNEL1_ONPREM_OUTSIDE_IP` its the PublicIPv4 Address of `ROUTER2`
`CONN2_TUNNEL2_ONPREM_OUTSIDE_IP` its the PublicIPv4 Address of `ROUTER2`
For `CONN1_TUNNEL1_AWS_OUTSIDE_IP` open `CONNECTION1CONFIG.TXT`, locate `IPSec Tunnel #1`, locate `#3: Tunnel Interface Configuration`, locate `Outside IP Addresses:`, locate `- Virtual Private Gateway` the value is there
For `CONN1_TUNNEL2_AWS_OUTSIDE_IP` open `CONNECTION1CONFIG.TXT`, locate `IPSec Tunnel #2`, locate `#3: Tunnel Interface Configuration`, locate `Outside IP Addresses:`, locate `- Virtual Private Gateway` the value is there
For `CONN2_TUNNEL1_AWS_OUTSIDE_IP` open `CONNECTION2CONFIG.TXT`, locate `IPSec Tunnel #1`, locate `#3: Tunnel Interface Configuration`, locate `Outside IP Addresses:`, locate `- Virtual Private Gateway` the value is there
For `CONN2_TUNNEL2_AWS_OUTSIDE_IP` open `CONNECTION2CONFIG.TXT`, locate `IPSec Tunnel #2`, locate `#3: Tunnel Interface Configuration`, locate `Outside IP Addresses:`, locate `- Virtual Private Gateway` the value is there
For `CONN1_TUNNEL1_ONPREM_INSIDE_IP` open `CONNECTION1CONFIG.TXT`, locate `IPSec Tunnel #1`, locate `#3: Tunnel Interface Configuration`, locate `Inside IP Addresses:`, locate `- Customer Gateway` the value is there
For `CONN1_TUNNEL2_ONPREM_INSIDE_IP` open `CONNECTION1CONFIG.TXT`, locate `IPSec Tunnel #2`, locate `#3: Tunnel Interface Configuration`, locate `Inside IP Addresses:`, locate `- Customer Gateway` the value is there
For `CONN2_TUNNEL1_ONPREM_INSIDE_IP` open `CONNECTION2CONFIG.TXT`, locate `IPSec Tunnel #1`, locate `#3: Tunnel Interface Configuration`, locate `Inside IP Addresses:`, locate `- Customer Gateway` the value is there
For `CONN2_TUNNEL2_ONPREM_INSIDE_IP` open `CONNECTION2CONFIG.TXT`, locate `IPSec Tunnel #2`, locate `#3: Tunnel Interface Configuration`, locate `Inside IP Addresses:`, locate `- Customer Gateway` the value is there
For `CONN1_TUNNEL1_AWS_INSIDE_IP` open `CONNECTION1CONFIG.TXT`, locate `IPSec Tunnel #1`, locate `#3: Tunnel Interface Configuration`, locate `Inside IP Addresses:`, locate `- Virtual Private Gateway` the value is there
For `CONN1_TUNNEL2_AWS_INSIDE_IP` open `CONNECTION1CONFIG.TXT`, locate `IPSec Tunnel #2`, locate `#3: Tunnel Interface Configuration`, locate `Inside IP Addresses:`, locate `- Virtual Private Gateway` the value is there
For `CONN2_TUNNEL1_AWS_INSIDE_IP` open `CONNECTION2CONFIG.TXT`, locate `IPSec Tunnel #1`, locate `#3: Tunnel Interface Configuration`, locate `Inside IP Addresses:`, locate `- Virtual Private Gateway` the value is there
For `CONN2_TUNNEL2_AWS_INSIDE_IP` open `CONNECTION2CONFIG.TXT`, locate `IPSec Tunnel #2`, locate `#3: Tunnel Interface Configuration`, locate `Inside IP Addresses:`, locate `- Virtual Private Gateway` the value is there
For `CONN1_TUNNEL1_AWS_BGP_IP` the value is the same as `CONN1_TUNNEL1_AWS_INSIDE_IP` (without the /30)
For `CONN1_TUNNEL2_AWS_BGP_IP` the value is the same as `CONN1_TUNNEL2_AWS_INSIDE_IP` (without the /30)
For `CONN2_TUNNEL1_AWS_BGP_IP` the value is the same as `CONN2_TUNNEL1_AWS_INSIDE_IP` (without the /30)
For `CONN2_TUNNEL2_AWS_BGP_IP` the value is the same as `CONN2_TUNNEL2_AWS_INSIDE_IP` (without the /30)
- Locate the first two values to put into this template, the Router 1 and Router 2 Private IP's
- Open up Connection1.txt and copy the values into the template.
- Copy the values from Connection2.txt into the template.
- Verify that the two VPN connections are now in an available state instead of pending state.
a. this took an hour for this to switch to available, but that was the night of the 12-7-21 AWS Outage the first time I ran this.
Stage 3:
Configure Router1
This is what you will then configure in these steps:
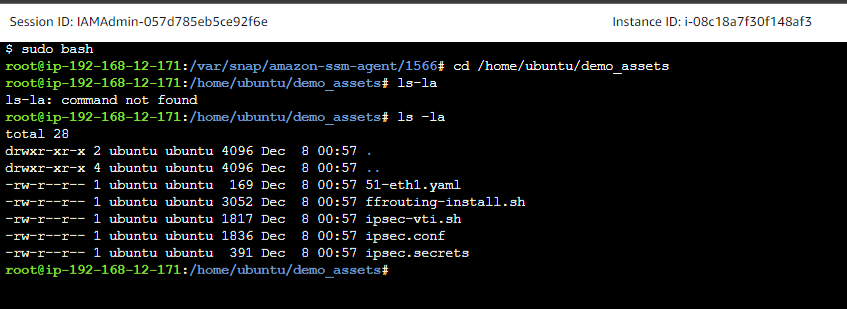
- Connect to the EC2 Instance named Router1 via session manager
- type
sudo bashat the prompt. cd /home/ubuntu/demo_assetsand the list the contents usingls -la(i made a typo)
- Run
nano ipsec.confto edit that file. - Fill in the values from the template file you created
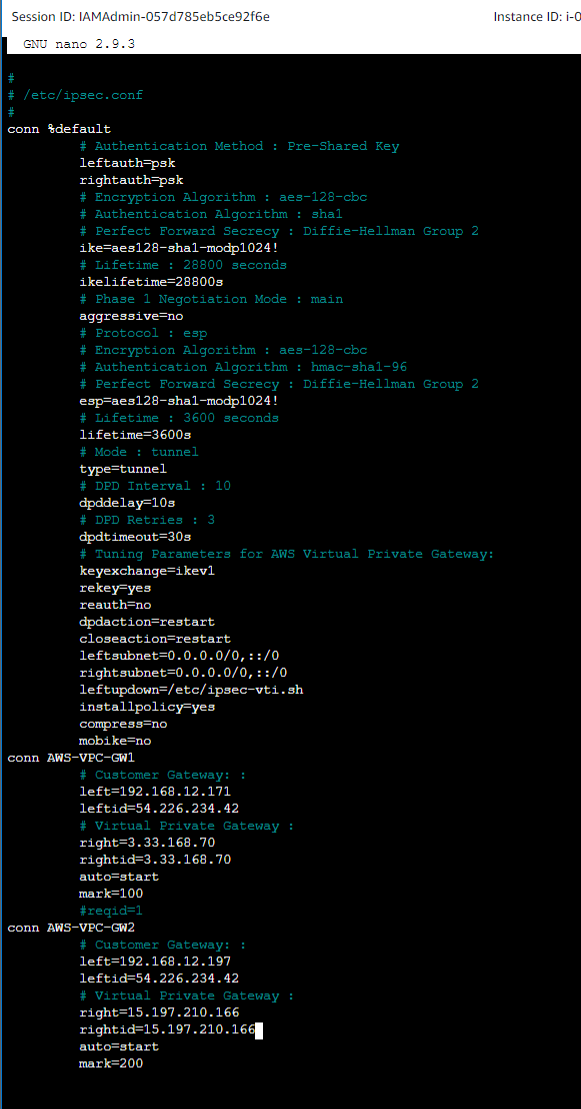
- Ctrl+O, enter, and then ctrl+x to exit back to the prompt.
- Run
nano ipsec.secretsto edit that file. There are 6 placeholders in this file. - Ctrl+O, enter, and then ctrl+x to exit back to the prompt.
- Run
nano ipsec-vti.shto edit that file. There are 4 placeholders in this file. - Ctrl+O, enter, and then ctrl+x to exit back to the prompt.
- Copy those files to the etc directory by running
cp ipsec* /etc - Make the ipsec-vti.sh executable by running
chmod +x /etc/ipsec-vti.sh - Restart the strongswan by running
systemctl restart strongswanNOTE: If this doesn't bring up two vti's, check your config. Also check to see if your site to site vpn's are both showing available.
Configure Router2
- Connect to Router2 via Session Manager
- Repeat steps above and make sure that you fill in the correct values for Router2.
- You should see two vti's on this one as well.
Check VPC
- navigate to the VPC console
- Click in Site-to-Site VPN's
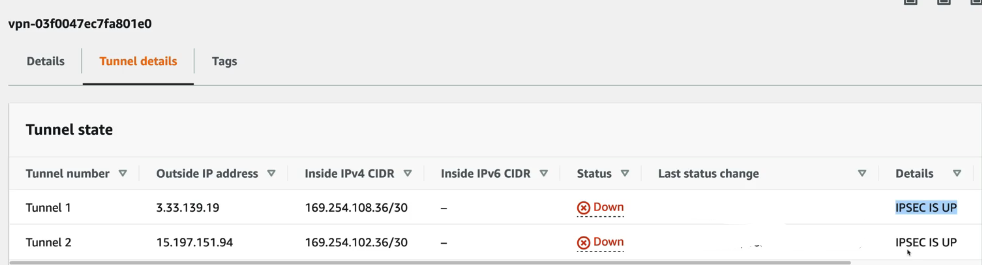
- Click the one associated to Router1 and then click the Tunnel Details tab.
- These will show that the tunnels are down because we haven't set up BGP connectivity.
- Scroll over and you'll notice that IPSEC IS UP.
- Repeat with the site-to-site that is associated with Router2
Stage 4: BGP
Establish BGP Sessions
- Connect to Router1's EC2 instance using Session Manager
- type
sudo bashat the prompt. cd /home/ubuntu/demo_assetsand the list the contents usingls -la- You'll see a ffrouting-install.sh script in this folder
- Make this executable by running the chmod command like we did earlier:
chmod +x ffrouting-install.sh - Run this script by running
./ffrouting-install.sh - Repeat these steps on Router2.
- Wait about a half hour and these scripts will finish
FRRouting info: https://docs.frrouting.org/en/latest/
Check connectivity
- Navigate to the VPC console and select the Transit Gateway Route tables. You should only have one and when you click on that and check the Routes tab at the bottom, you'll see only the one side of the network.
Configure BGP
- Connect to Router1 EC2 instance
- run
sudo bash - run
vtyshto configure ffrouting's BGP. - If you have ever ssh'd into a router before, these commands may look familiar.
- Run
conf t - Run
ffr defaults traditional - type in
router bgp 65016which was the BGP ASN that we set earlier - run
neighbor BGP1_IP_ADDRESS remote-as 64512 - run
neighbor BGP2_IP_ADDRESS remote-as 64512 - run
no bgp ebgp-requires-policy - Change mode to unicast by running `address-family ipv4 unicast
- Then run
redistribute connected - Exit config by typing exit a bunch of times and then reboot that machine -
sudo reboot - Repeat on Router2
Check BGP
- Open VPC console and navigate to site-to-site VPN's and notice that the tunnels are now UP and that there are 2 BGP routes running.
- Check the Transit Gateway Route Tables:
- Log into Router1 and type in
sudo bashand thenroute - The Route table should be up and showing the route to the AWS and On Prem infrastructure.
- You can run
show ip routeand you'll see the BGP routes learned from vti1 and vti2.
Ping machines
- Copy the IP for OnPrem server1
- Log into AWs-EC2-A using the session manager
- Once logged in, ping the IP of the OnPrem Server1 and you should be able to ping that server.
- Copy the AWS server and then try to ping when logged into one of the On Prem servers.
- You should be able to ping both ways.

Stage 5: Clean up
Delete site to site VPN's Delete customer gateways Remove stacks from CloudFormation
IPSec VPN Fundamentals (deprecated i think)
IPSEC s a group of protocols that sets up secure tunnels across insecure networks between two peers, local and remote.
Symmetric encryption is fast, but a challenge to exchange keys securely. Asymmetric Encryption is slow, but you can exchange public keys easily
Two main phases of IPSEC: IKE Phase 1 - slow and heavy. You authenticate with a preshared key or certificate. IKE Phase 2 - faster and agile - uses the keys agreed in phase 1, which creates a phase 2 tunnel running over phase 1
Each side creates a Diffie Hellman key and a public key which are exchanged over the public internet. Using the mutual keys that have been shared, both peers create a shared Diffie-Hellman key. That shared DH key and the exchanged key matterial are used to generate a symmetrical IPSEC key for IKE Phase 2.
Types of VPNs
Policy based VPNs
- rule sets match traffic -> a pair of SA's
- different rules and different security settings
Route based VPNs
- target matching (prefix)
Phase 1 tunnels persist and allow for phase 2 tunnels to be created very quickly.
Accelerated Site-to Site VPN
Site to site VPN's are created when the IPSEC tunnels are formed between two public space endpoints. Normally, these transfer data over the public internet. VPN, private tunnel over the internet, right?
Accelerated site to site VPN's run over the Global Accelerator network (AWS backbone) between public spaces. You'll use a VPN over the public internet to the edge locations.
Client VPN
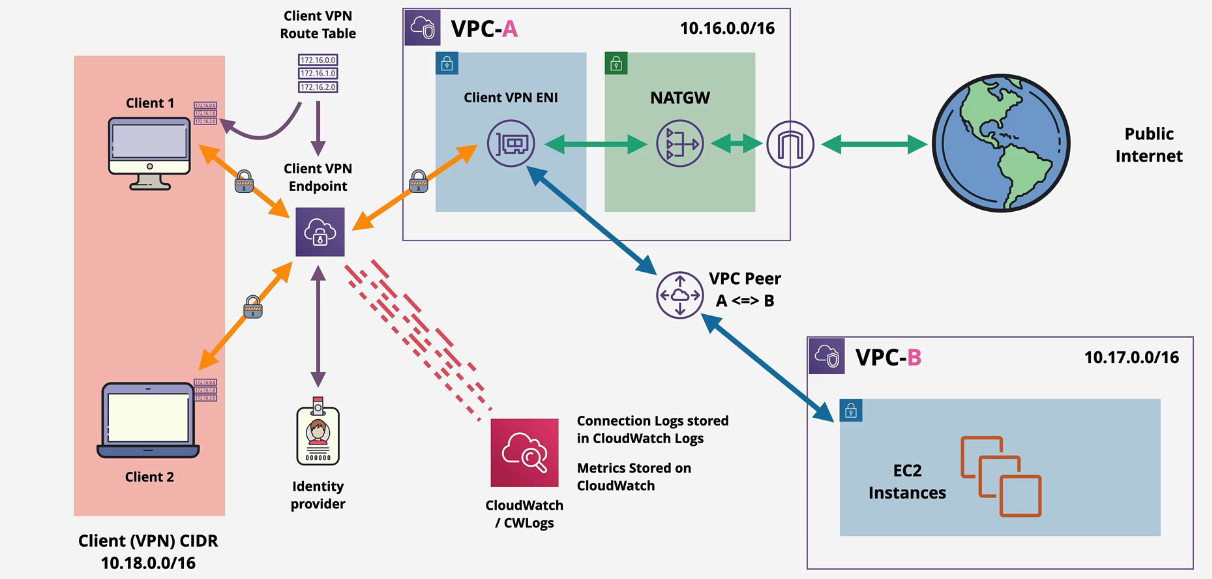
Similar to site-to-site VPN except clients connect to VPN Managed implementation of OpenVPN
- Implemented by OpenVPN so any client that supports OpenVPN will work
- Connect to a Client VPN endpoint that is associated with one VPC +1 target network for high availability
Billing:
- 1+ target networks and
- you're billed based on network associations
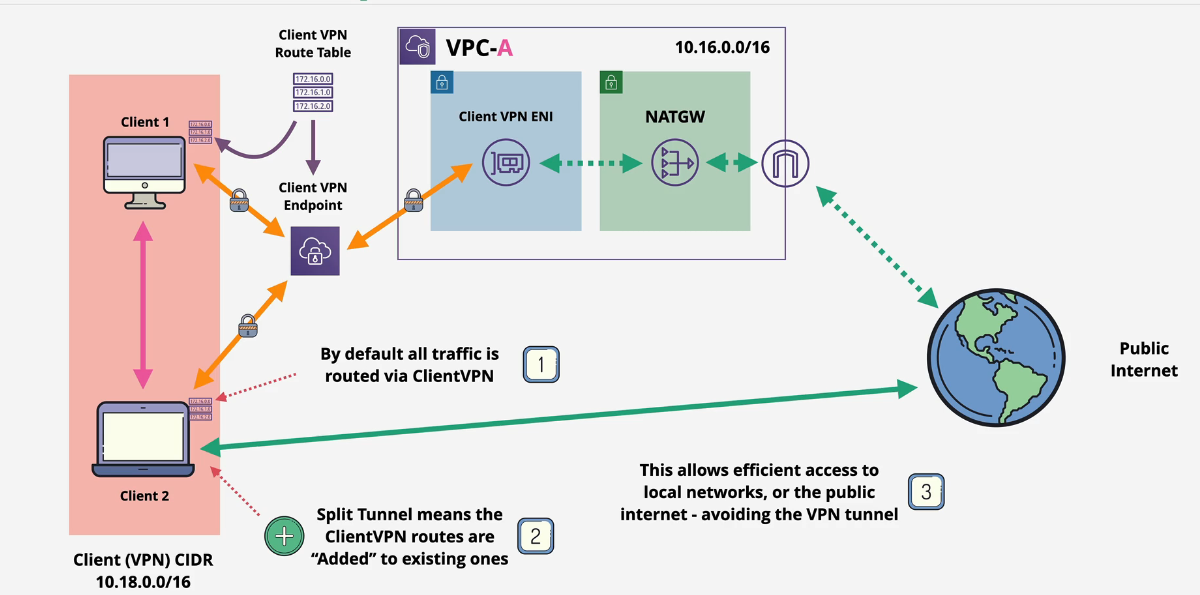
Split tunnel VPN
This means that the public Internet is reached directly without going through the tunnel.
- not default - must be enabled
Client VPN Demo
Part 0: Setup
Log into the AWS Console, switch to the N. Virginia region and deploy this one click link in CloudFormation: https://console.aws.amazon.com/cloudformation/home?region=us-east-1#/stacks/quickcreate?templateURL=https://learn-cantrill-labs.s3.amazonaws.com/aws-client-vpn/A4LVPC.yaml&stackName=A4L
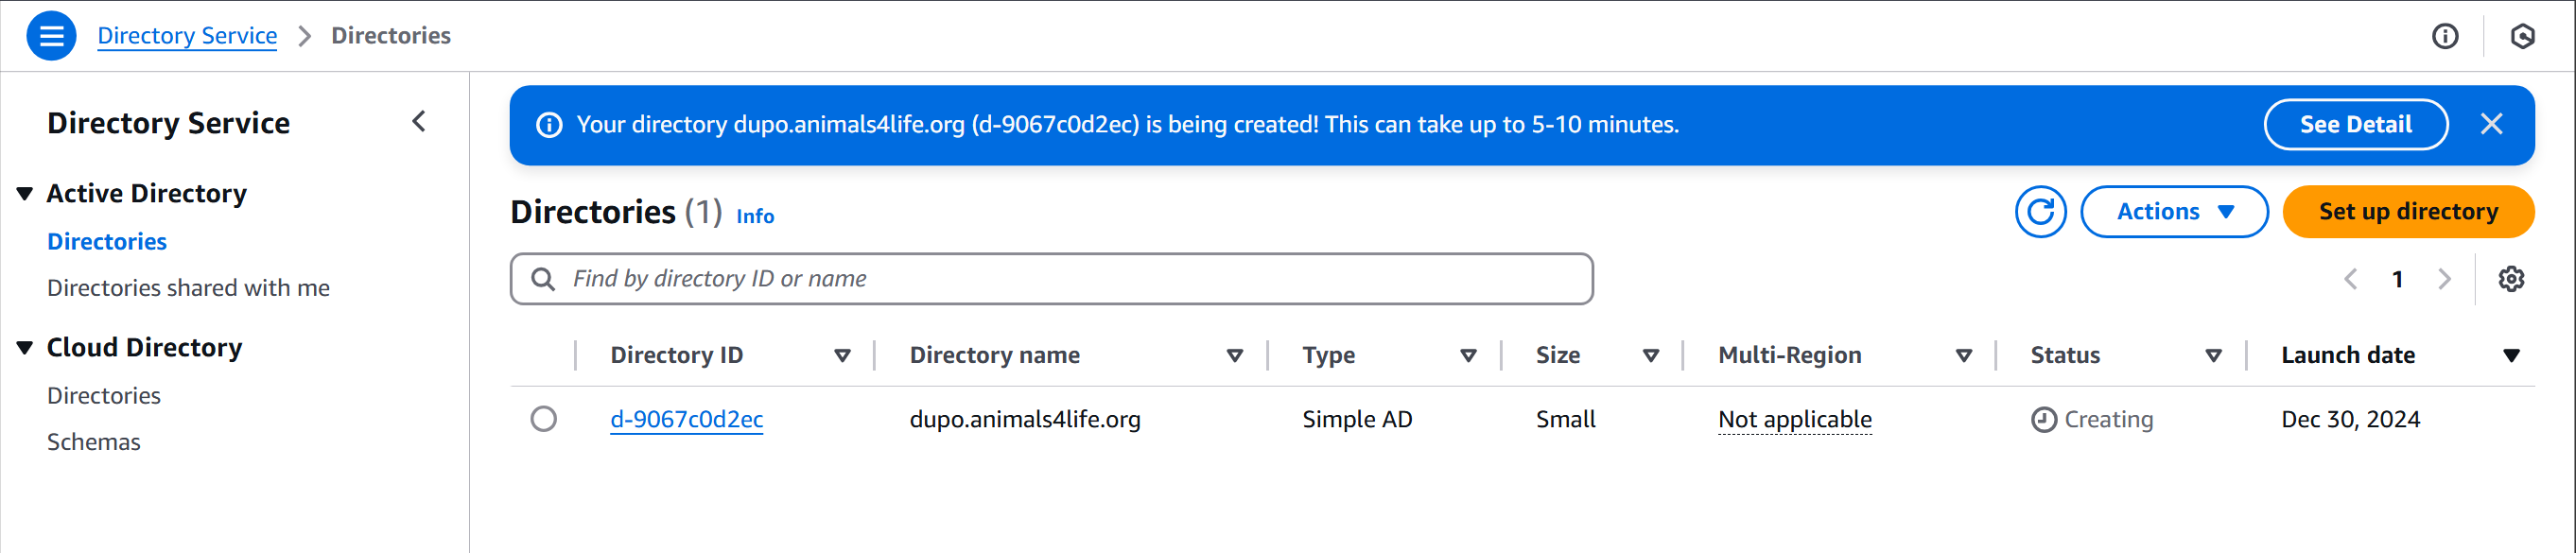
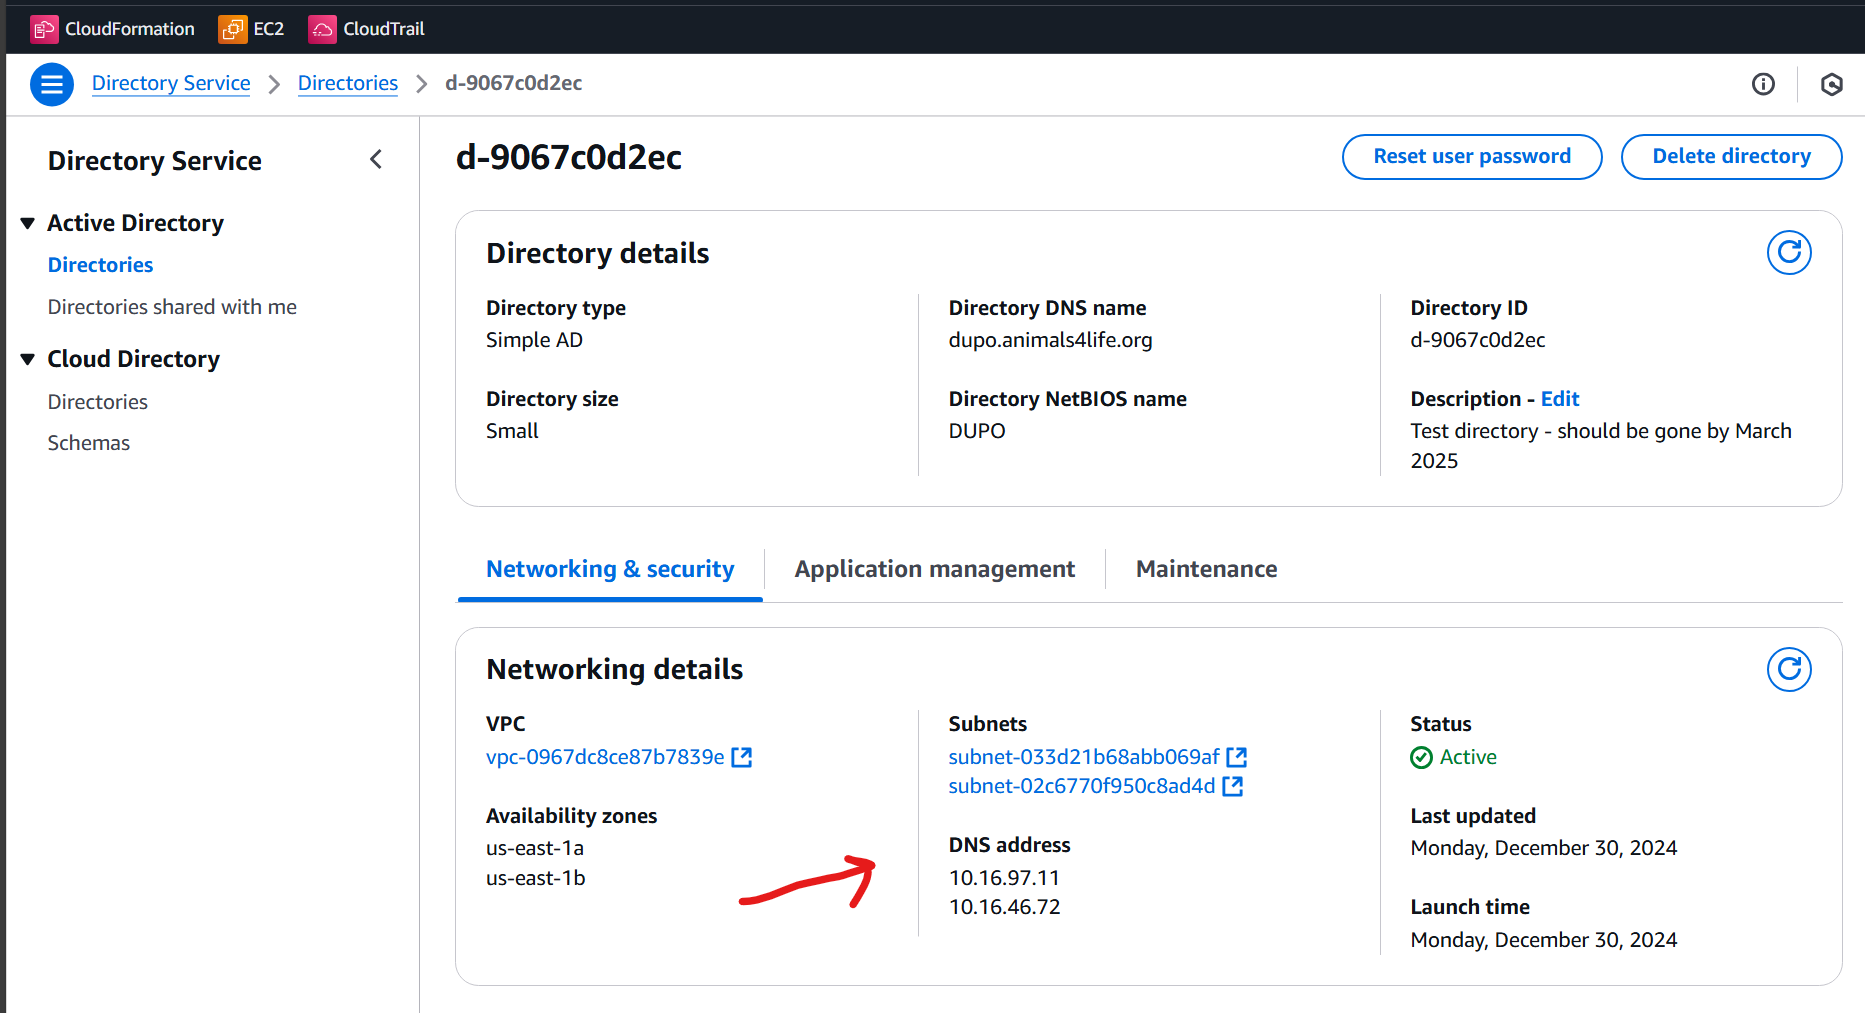
Part 1: Directory
- Navigate to the Directory Service console and deploy a small, Simple AD directory.
- Directory DNS name is dupo.animals4life.org, NetBIOS is dupo, admin password is your own password
- VPC and Subnets should be Private A and B
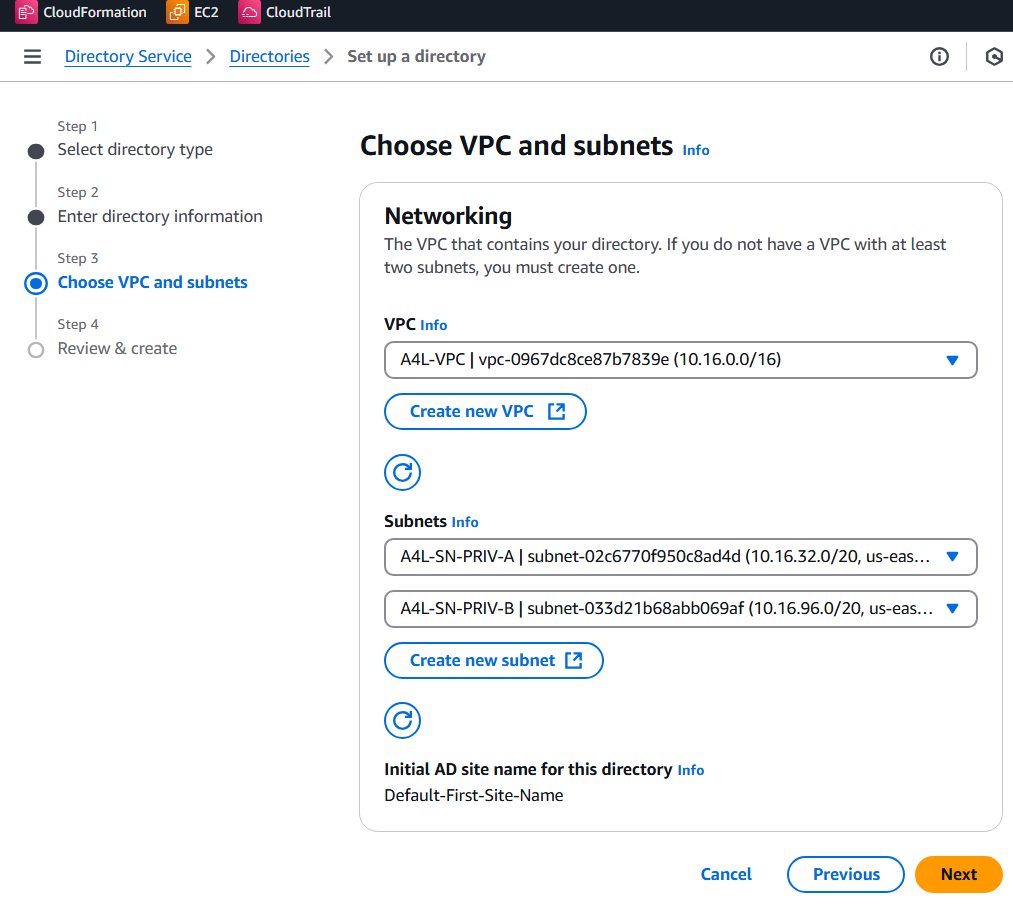
- Create the Directory Service
Part 2: Certificate
- Open the OpenVPN Community Downloads page, download the Windows installer for your version of Windows, and run the installer.
- Open the EasyRSA releases page and download the ZIP file for your version of Windows. Extract the ZIP file and copy the EasyRSA folder to the \Program Files\OpenVPN folder.
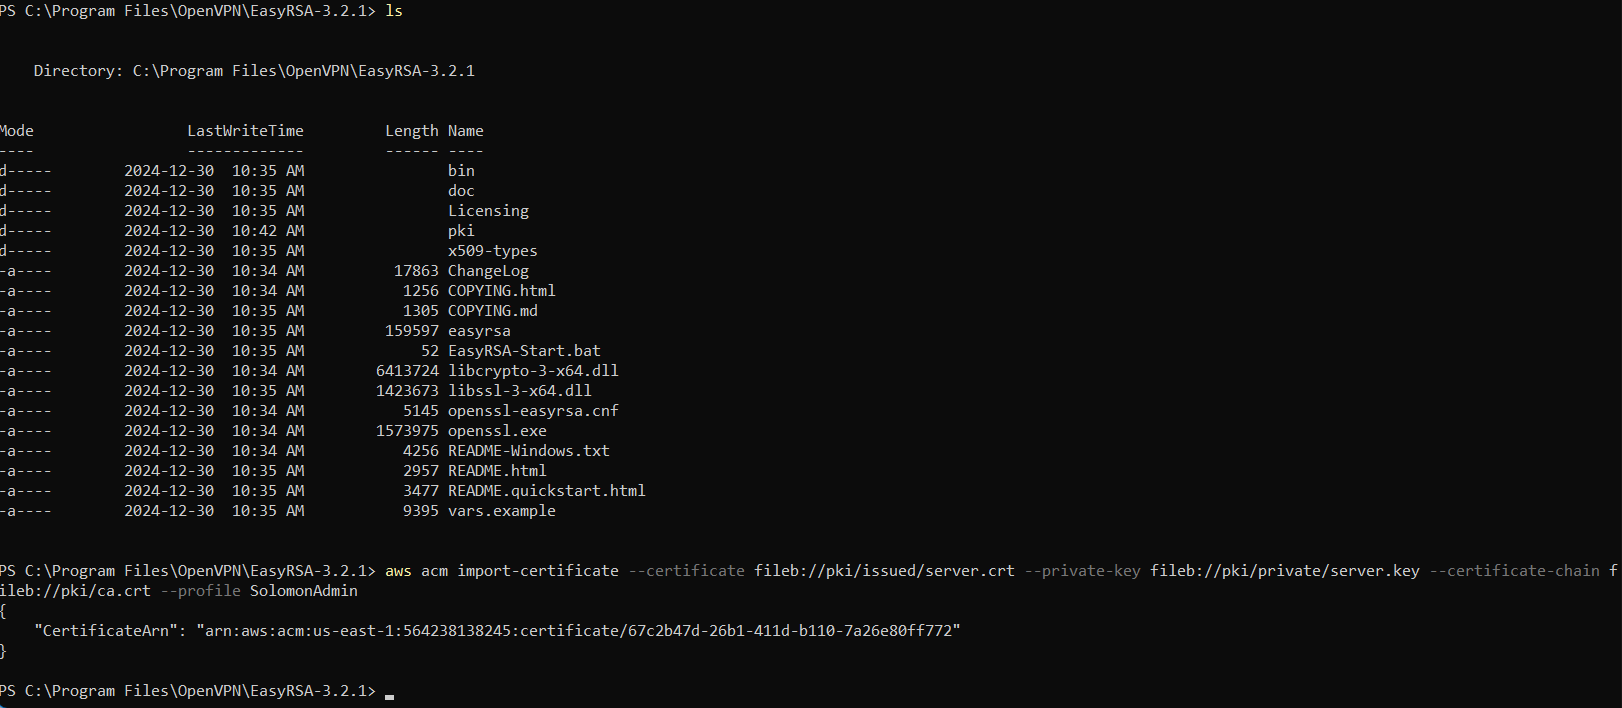
- Open the command prompt as an Administrator, navigate to the \Program Files\OpenVPN\EasyRSA directory, and run the following commands to open the EasyRSA 3 shell.
EasyRSA-Start
./easyrsa init-pki
./easyrsa build-ca nopass
./easyrsa build-server-full server nopass
./easyrsa build-client-full client1.domain.tld nopass
exit

aws acm import-certificate --certificate fileb://pki/issued/server.crt --private-key fileb://pki/private/server.key --certificate-chain fileb://pki/ca.crt --profile iamadmin-general
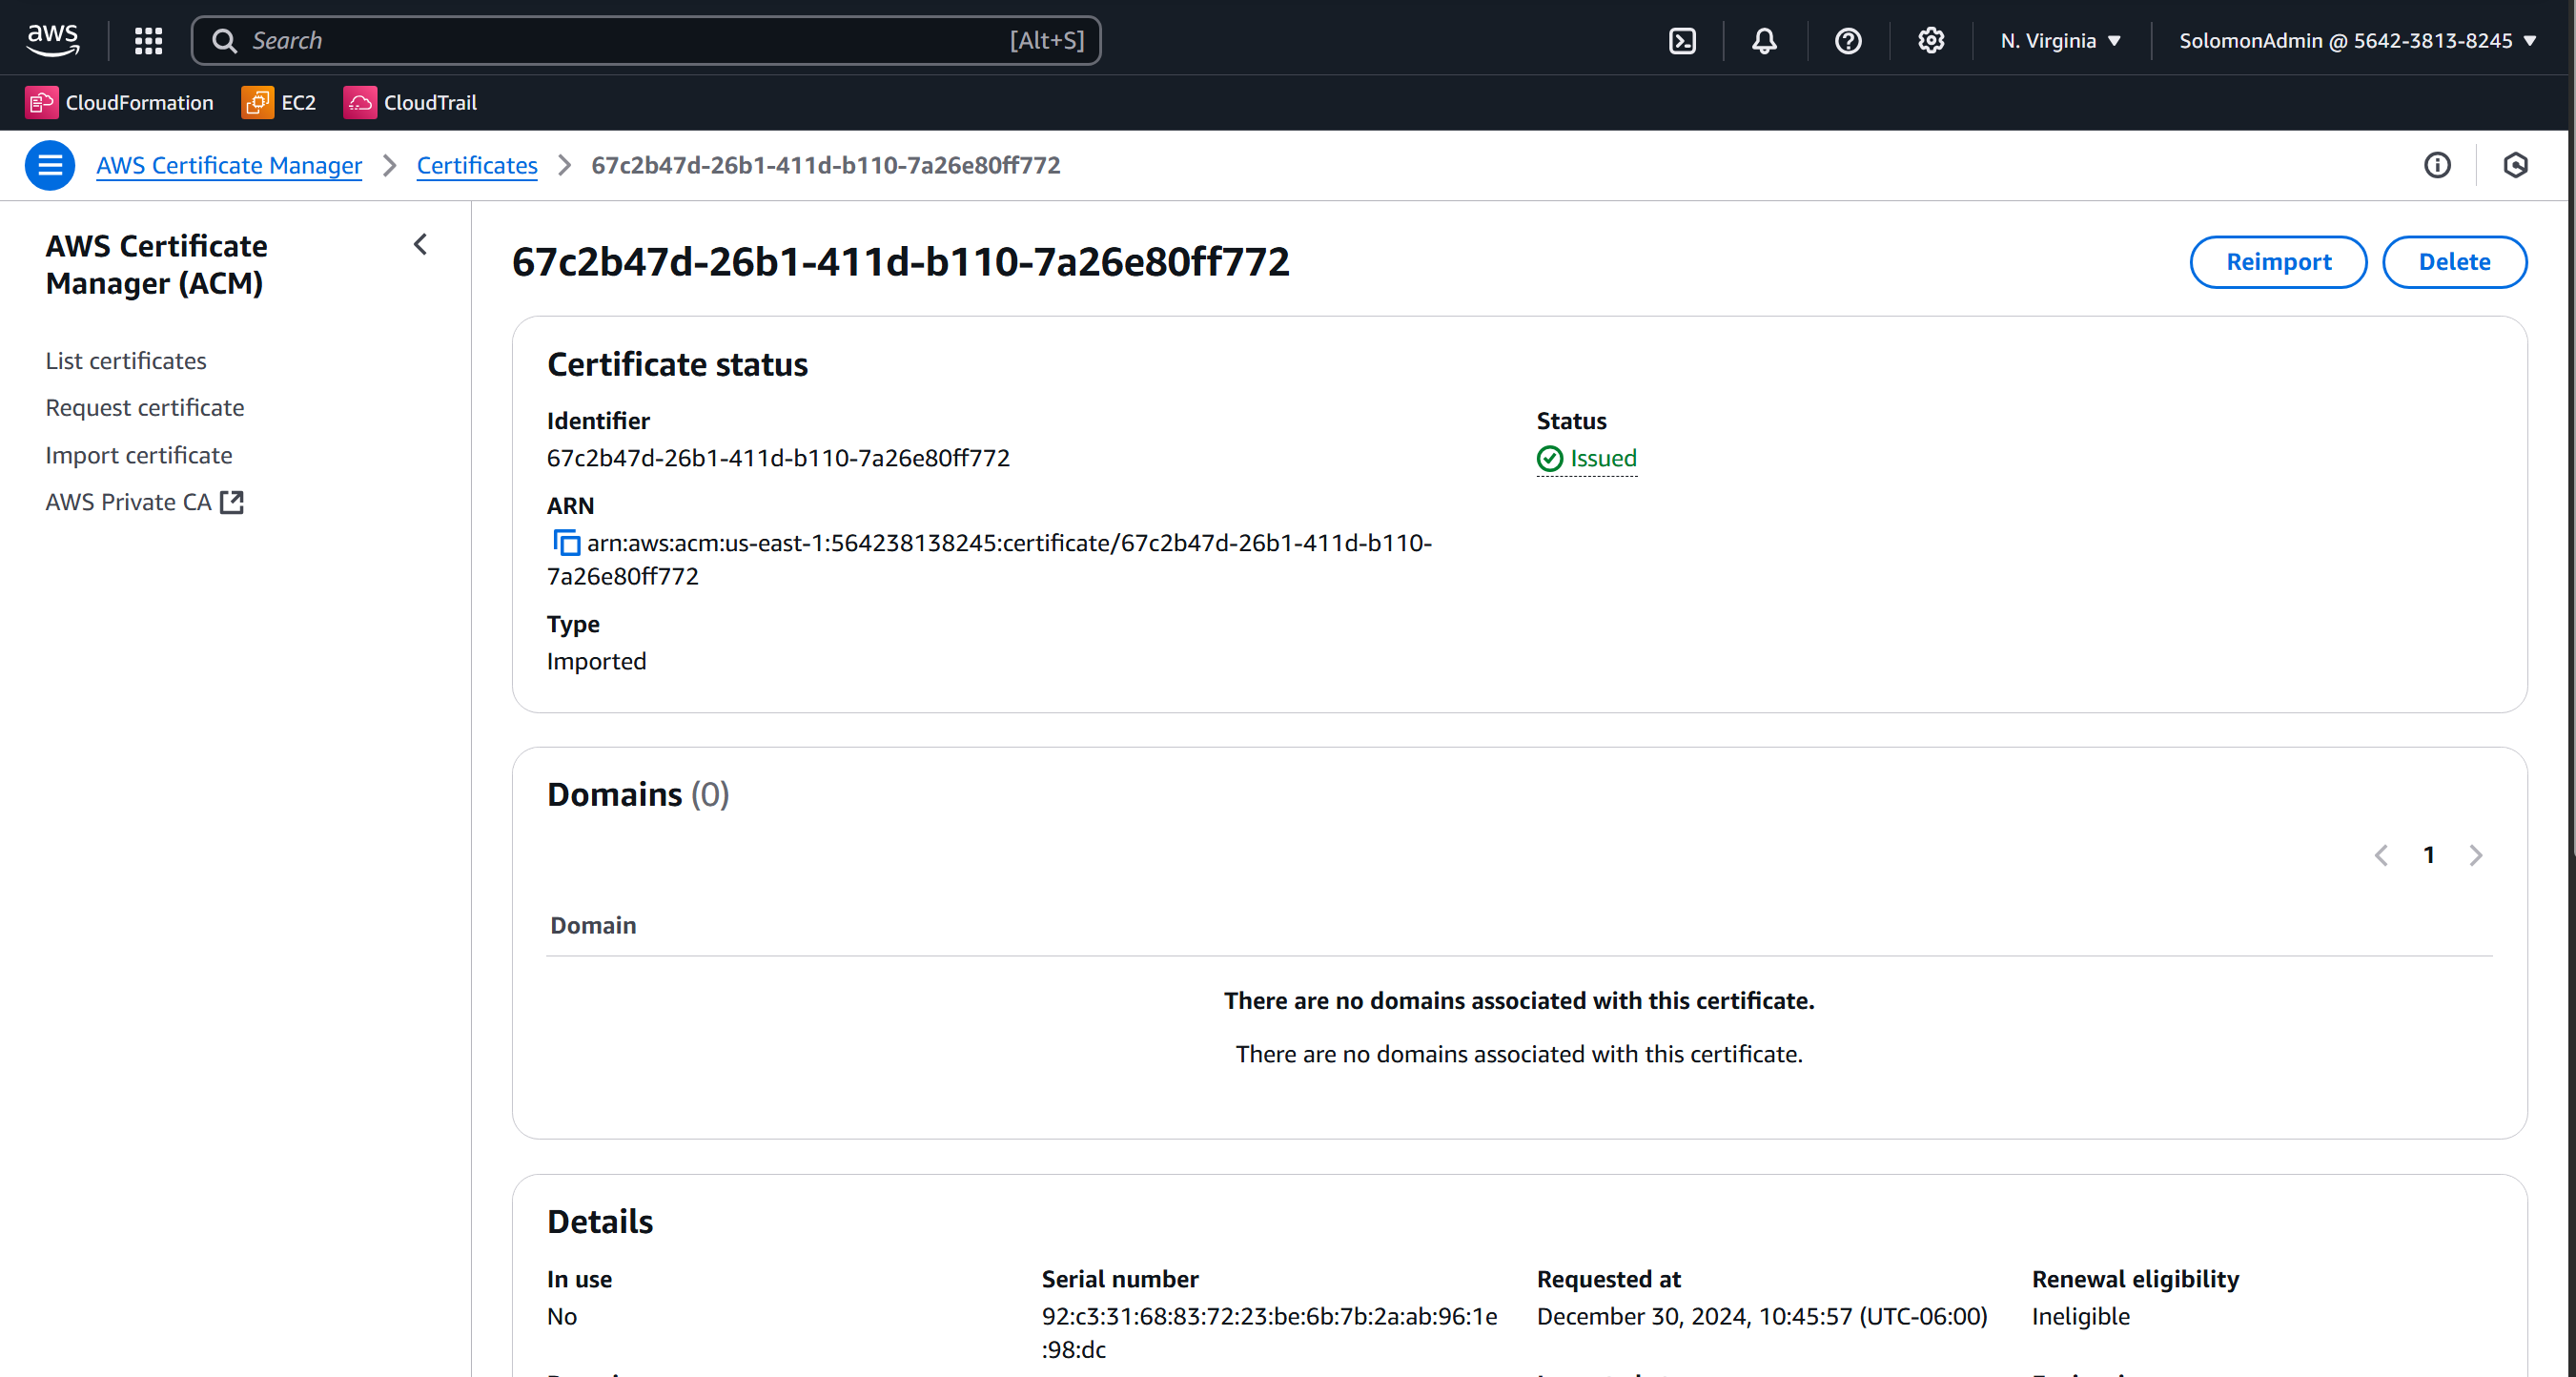
- Type
ACMorCertificate Managerinto the search box at the top of the screen then right click and open in a new tab. - Verify that your certificate exists in the
us-east-1region.
Outputs
Windows PowerShell
Copyright (C) Microsoft Corporation. All rights reserved.

Install the latest PowerShell for new features and improvements! https://aka.ms/PSWindows

PS C:\WINDOWS\system32> cd 'C:\Program Files\OpenVPN'
PS C:\Program Files\OpenVPN> cd .\EasyRSA-3.2.1\
PS C:\Program Files\OpenVPN\EasyRSA-3.2.1> .\easyrsa-start
Easy-RSA starting..

Welcome to the EasyRSA 3 Shell for Windows.
Easy-RSA 3 is available under a GNU GPLv2 license.

Invoke 'easyrsa' to call the program. Without commands, help is displayed.

Using directory: C:/Program Files/OpenVPN/EasyRSA-3.2.1


EasyRSA Shell
# ./easyrsa init-pki

Notice
------
'init-pki' complete; you may now create a CA or requests.

Your newly created PKI dir is:
* C:/Program Files/OpenVPN/EasyRSA-3.2.1/pki

Using Easy-RSA configuration:
* undefined

EasyRSA Shell
# ./easyrsa build-ca nopass
....+...................+++++++++++++++++++++++++++++++++++++++*....+....+...........+++++++++++++++++++++++++++++++++++++++*.........+.......+......+..+...+....+...+...+...+.........+..+..................++++++
.......+....+.....+....+.....+....+...+........+....+..+.........+.+......+..+.......+...+..+.+.....+..................+.......+..+...+....+++++++++++++++++++++++++++++++++++++++*.+.+......+.....+...+......+.......+.........+......+........+++++++++++++++++++++++++++++++++++++++*.+..........+.....+......+....+...+........+.+...+..+.+...+......+.....+......+...+.......+.........+......+.....+..........+..+.+.........+............+...+...........+.+.....+...+......+......+.+........+.........+..........+..+......+...+....+...+..............+....+..+..........+..+.+......+.....+...............+...+...+...................+.....+....+........................+........+.......+...+.....+...+....+..+....+.....+......+......+...+.+...+..+.+...............+............+..+.+..+.......+.........+......+...+...+..+...+...+....+....................+.+......+......+..+...+......................+..+...+...+....+.........+.....+.+.........+..+...+......+................+.....+...+......+...+...+..........+.....+...+....+..+.............+........+....+...+...+.........+...+...+.................+.+..+.........+.+.....+....+.....+....+.....+......+.+..+..........+........+....+...............+...+..+.+..+......+.....................+......+.........+.........+.......+.....+....+...+.....+.+.........+...+...+..+...+..........+.....+......+.+............+..+.+.....+......................+........+....+...+......+......+...+.....+.+..+....+........+.............+........+.........+......+.+........................+.........+...........+.......+..............+....+............+.....+...+.+...+..+......+...+...................+..+.............+.....+.+..+...+.+......+..+...+...+....+...+...+...........+....+.....+......+...+............+.+...+..+...+.......+..+.....................+.........+...+....+...+.....+.+.....+.+.....+......+...+............+.......+........+.........+.+............+..+......+...+.........+.+.....+.+...+...+........+.+......+.........+...+.......................+............+.+..+.......+..+......+..........+........+..........+.....+.......+...+..+...+...................+..+.+..............+.+...+..+.........+......+.......+...+..+.+......+........+............+.+..+.+......++++++
You are about to be asked to enter information that will be incorporated
into your certificate request.
What you are about to enter is what is called a Distinguished Name or a DN.
There are quite a few fields but you can leave some blank
For some fields there will be a default value,
If you enter '.', the field will be left blank.
-----
Common Name (eg: your user, host, or server name) [Easy-RSA CA]:

Notice
------
CA creation complete. Your new CA certificate is at:
* C:/Program Files/OpenVPN/EasyRSA-3.2.1/pki/ca.crt

Create an OpenVPN TLS-AUTH|TLS-CRYPT-V1 key now: See 'help gen-tls'

Build-ca completed successfully.


EasyRSA Shell
# ./easyrsa build-server-full server nopass
..............+......+....+........+.+.....+++++++++++++++++++++++++++++++++++++++*.................+...+....+++++++++++++++++++++++++++++++++++++++*......+........+.............+.....+....+......+...........+...+......+............+..........+..+.+...........+......+...+.++++++
...+.........+..+++++++++++++++++++++++++++++++++++++++*.+....................+++++++++++++++++++++++++++++++++++++++*......+........+....+..+...+.+..+....+...+......+..+....+..............+......+....+..............+.+.....+.....................+......+...............+....+.....+..........+........+.............+..+............+.+..+.+..+.......+..+.+.........+..............+....+............+...+......+.....+............+............+.+......+.....+......+.......+..+...+......+....+...+.................+.+...............+.........+...+...+......+...+...+..+......................+.....+......+....+.........+..+.........+.+..+.+..............+.+............+..+......+.+...+..................+.....+.......+...+..+...+.............+..+.......+.....+...+.......+......+......+......+.....+.........+.+.........+..................+..+......+....+..................+.....+..........+...............+...+...............+...............+..+............+.+........+.+...+........+.........+.+...+..+....+...+..+...+.+......+...+......+..+.......+..+...+.+........................+..................+.....+...+.......+.........+.....+......+...++++++
-----

Notice
------
Private-Key and Public-Certificate-Request files created.
Your files are:
* req: C:/Program Files/OpenVPN/EasyRSA-3.2.1/pki/reqs/server.req
* key: C:/Program Files/OpenVPN/EasyRSA-3.2.1/pki/private/server.key

You are about to sign the following certificate:

  Requested CN:     'server'
  Requested type:   'server'
  Valid for:        '825' days


subject=
    commonName                = server

Type the word 'yes' to continue, or any other input to abort.
  Confirm requested details: yes

Using configuration from C:/Program Files/OpenVPN/EasyRSA-3.2.1/pki/0619807b/temp.6.1
Check that the request matches the signature
Signature ok
The Subject's Distinguished Name is as follows
commonName            :ASN.1 12:'server'
Certificate is to be certified until Apr  4 16:41:12 2027 GMT (825 days)

Write out database with 1 new entries
Database updated
which: no bc in (C:/Program Files/OpenVPN/EasyRSA-3.2.1;C:/Program Files/OpenVPN/EasyRSA-3.2.1/bin;C:\Program Files (x86)\Common Files\Oracle\Java\java8path;C:\Program Files (x86)\Common Files\Oracle\Java\javapath;C:\Program Files\AdoptOpenJDK\jdk-11.0.8.10-hotspot\bin;C:\Program Files (x86)\Microsoft SDKs\Azure\CLI2\wbin;C:\Python39\Scripts\;C:\Python39\;C:\WINDOWS\system32;C:\WINDOWS;C:\WINDOWS\System32\Wbem;C:\WINDOWS\System32\WindowsPowerShell\v1.0\;C:\WINDOWS\System32\OpenSSH\;C:\Program Files\Git\cmd;C:\ProgramData\chocolatey\bin;C:\Program Files\PuTTY\;C:\Users\dupo2\AppData\Roaming\nvm;C:\Program Files\nodejs;C:\Program Files (x86)\Pulumi\;C:\ProgramData\chocolatey\lib\pulumi\tools\Pulumi\bin;C:\Program Files\dotnet\;C:\Program Files\Amazon\AWSCLIV2\;C:\Users\dupo2\AppData\Local\Microsoft\WindowsApps;C:\Users\dupo2\AppData\Local\Programs\Microsoft VS Code\bin;C:\Users\dupo2\AppData\Roaming\npm;C:\Users\dupo2\.dotnet\tools;C:\ProgramData\miniconda3;C:\ProgramData\miniconda3\condabin)

Notice
------
Inline file created:
* C:/Program Files/OpenVPN/EasyRSA-3.2.1/pki/inline/private/server.inline


Notice
------
Certificate created at:
* C:/Program Files/OpenVPN/EasyRSA-3.2.1/pki/issued/server.crt


EasyRSA Shell
# ./easyrsa build-client-full dupo.animals4life.org nopass
...+....................+.......+.........+..+....+.....+.+++++++++++++++++++++++++++++++++++++++*..+++++++++++++++++++++++++++++++++++++++*......+..+...+.........+...+.+..+.......+...+..+.+...............+...........+...+.+...........+......+...+.+...+........+.......+...+...+..+...............+....+...+...+..+...+.........+....+............+..+...+....+...............+.....+......+...................+...+.....+......+.+......+..+......+.......+..+.+...........+....+.....+......+.+.....+...+...............+.........+.......+...+...........+.......++++++
.+.....+......+.+............+..+...+.......+...+........+...+.........+++++++++++++++++++++++++++++++++++++++*.+++++++++++++++++++++++++++++++++++++++*...+...+.....+.+......+.....+.+...+............+..+...+.......+..+...+...+..........+........+....+..+..........+.........+.....+....+...+...+..+.........+.+..............+.+..+............+.+........+.+...+...+.....+...+......+....+..+............+.....................+.+.....+...+......+......+...+......+....+...+..+.......+...+...........................+..............+.......+..+.......+...+.....+.+...........+......+....+...+...+.....+....+...+......+...........+...+............+...+...+....+...+...+...+...........+....+.....+.+.........+.....+.+...+........+.......+...+........+....+......+...........................+..+.+..............+.+......+........+.+.....+....+........+...+...................+...+...+..+.............+..+...+.......+............+...+..+.+......+......+........+.++++++
-----

Notice
------
Private-Key and Public-Certificate-Request files created.
Your files are:
* req: C:/Program Files/OpenVPN/EasyRSA-3.2.1/pki/reqs/dupo.animals4life.org.req
* key: C:/Program Files/OpenVPN/EasyRSA-3.2.1/pki/private/dupo.animals4life.org.key

You are about to sign the following certificate:

  Requested CN:     'dupo.animals4life.org'
  Requested type:   'client'
  Valid for:        '825' days


subject=
    commonName                = dupo.animals4life.org

Type the word 'yes' to continue, or any other input to abort.
  Confirm requested details: yes

Using configuration from C:/Program Files/OpenVPN/EasyRSA-3.2.1/pki/9eb95ea2/temp.6.1
Check that the request matches the signature
Signature ok
The Subject's Distinguished Name is as follows
commonName            :ASN.1 12:'dupo.animals4life.org'
Certificate is to be certified until Apr  4 16:42:15 2027 GMT (825 days)

Write out database with 1 new entries
Database updated
which: no bc in (C:/Program Files/OpenVPN/EasyRSA-3.2.1;C:/Program Files/OpenVPN/EasyRSA-3.2.1/bin;C:\Program Files (x86)\Common Files\Oracle\Java\java8path;C:\Program Files (x86)\Common Files\Oracle\Java\javapath;C:\Program Files\AdoptOpenJDK\jdk-11.0.8.10-hotspot\bin;C:\Program Files (x86)\Microsoft SDKs\Azure\CLI2\wbin;C:\Python39\Scripts\;C:\Python39\;C:\WINDOWS\system32;C:\WINDOWS;C:\WINDOWS\System32\Wbem;C:\WINDOWS\System32\WindowsPowerShell\v1.0\;C:\WINDOWS\System32\OpenSSH\;C:\Program Files\Git\cmd;C:\ProgramData\chocolatey\bin;C:\Program Files\PuTTY\;C:\Users\dupo2\AppData\Roaming\nvm;C:\Program Files\nodejs;C:\Program Files (x86)\Pulumi\;C:\ProgramData\chocolatey\lib\pulumi\tools\Pulumi\bin;C:\Program Files\dotnet\;C:\Program Files\Amazon\AWSCLIV2\;C:\Users\dupo2\AppData\Local\Microsoft\WindowsApps;C:\Users\dupo2\AppData\Local\Programs\Microsoft VS Code\bin;C:\Users\dupo2\AppData\Roaming\npm;C:\Users\dupo2\.dotnet\tools;C:\ProgramData\miniconda3;C:\ProgramData\miniconda3\condabin)

Notice
------
Inline file created:
* C:/Program Files/OpenVPN/EasyRSA-3.2.1/pki/inline/private/dupo.animals4life.org.inline


Notice
------
Certificate created at:
* C:/Program Files/OpenVPN/EasyRSA-3.2.1/pki/issued/dupo.animals4life.org.crt


EasyRSA Shell
# exit
Troubleshooting
I did get these errors when starting EasyRSA. Need to be in admin mode.

Part 3: Client VPN Endpoint
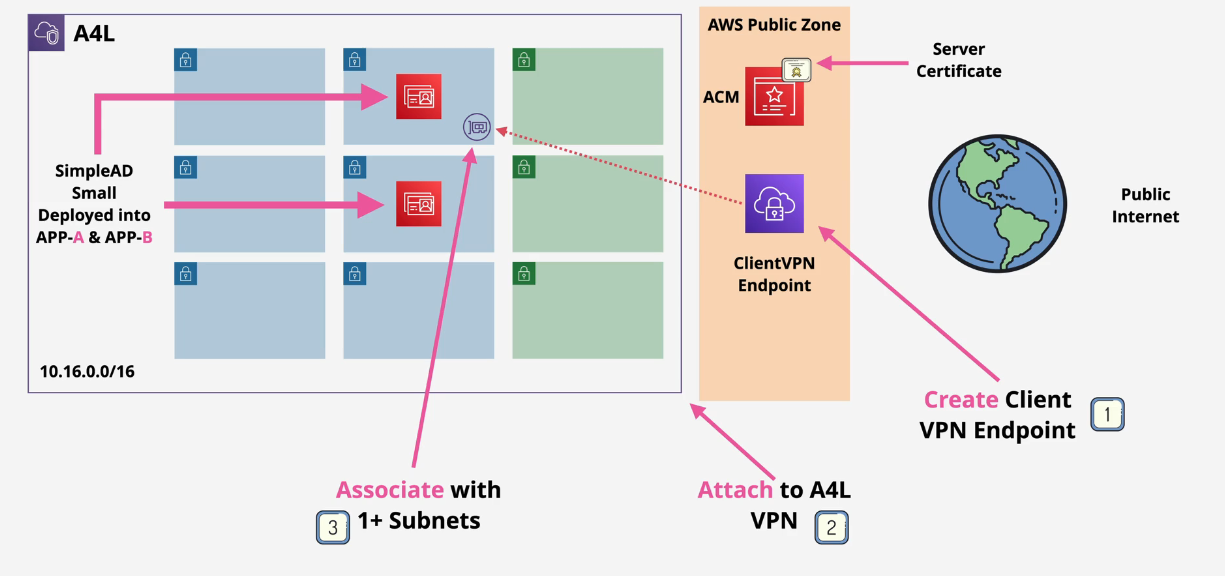
- Navigate to the VPC console
- Click on Client VPN Endpoints
- Click Create new Client VPN Endpoint
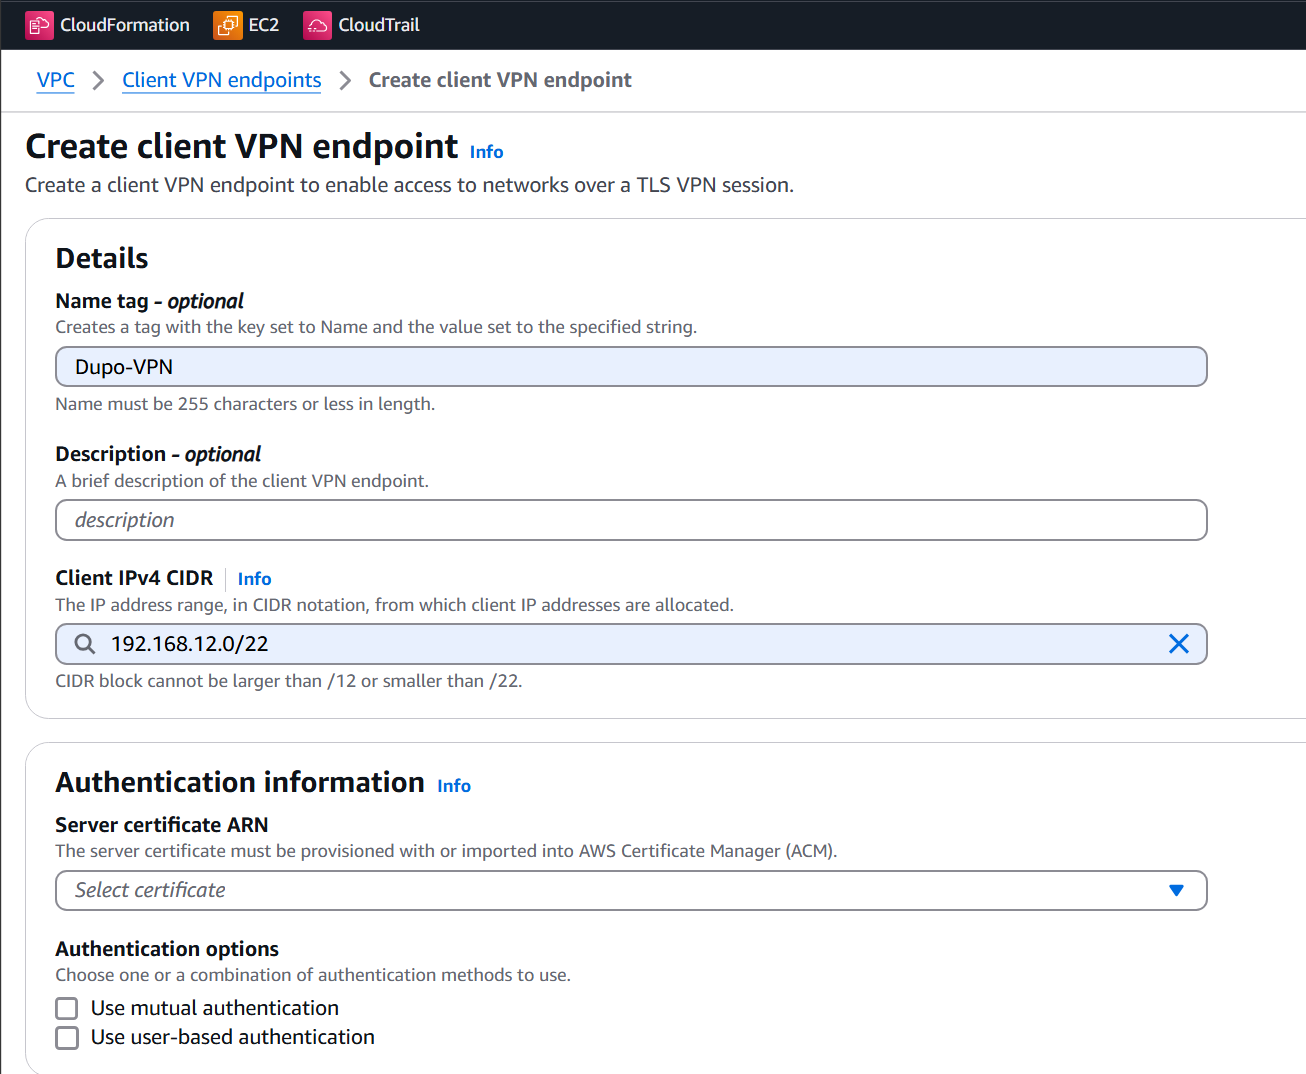 4. Enter in the DNS Server information - directory service IPs
- Copy and paste in the two IPs.
-
Enable split tunnel
-
Select the VPC and the default and the A4L SGs (should be two of them)
-
Wait for this endpoint to be created.
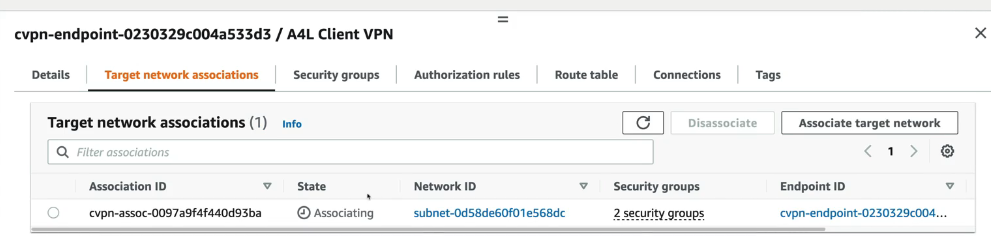
Part 4: Configure Client VPN
- Click on the ClientVPC Endpoint and click associate Target Network
- Select one of the Private subnets, start with A
- Click Associate
Part 5: Install and test client
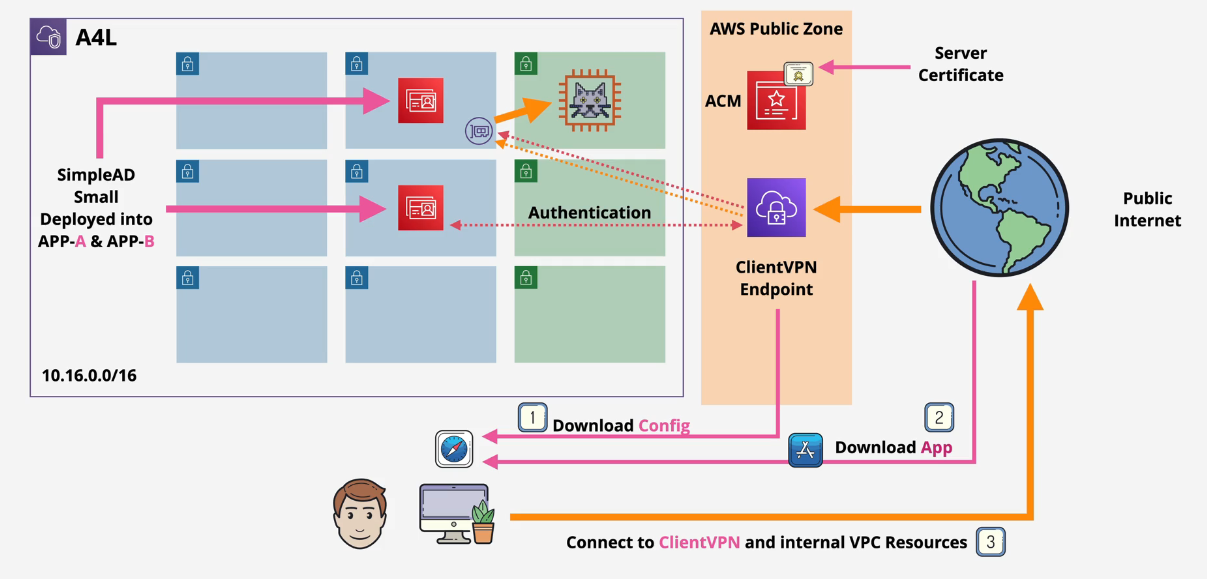
- Configure the VPN connection
- Admin password is the directory Administrator username and password
- Copy one of the IP Address from the directory service ping this IP, and it will fail
- Add an authorization rule for the CIDR for the A4L VPC - authorize all users
- Reconnect and then ping the IP again.
- Find the IP address for the CATWEB EC2 instance and open in a browser
Part 6: Cleanup
Remove the Target Network Association Delete the client VPN endpoint Delete the Certificates Delete the directory service Delete the Stack
Direct Connect Concepts
- Physical connection to the datacenter at 1, 10, or 100Gbps
- Connects between the business:
- On prem -> DX location -> AWS Region
- Hourly cost and Outbound data transfer costs.
- Needs some provisioning time because this is physical cabling.
- DX provides low and consistent latency and high speeds. Cannot be used to access the Public Internet
Direct Connect Physical Architecture
Memorize this about Direct Connect:
- DX connection is a 1, 10, 100 Gbps connection.
- single mode fibre - no copper
- 1000BASE-LX on a 1Gbps connection
- 10GBASE-LR on a 10Gbps connection
- 100GBASE-LR4 on a 100Gbps connection
- Auto-negotiation is disabled
- Port speed and full duplex is manually set
- BGP and BGP MD5 Authentication
- optional MACset and Bidirectional Forwarding Detection (BFD)
Direct Connect MACsec
MAC Security (MACsec) is an IEEE standard that provides data confidentiality, data integrity, and data origin authenticity. You can use AWS Direct Connect connections that support MACsec to encrypt your data from your corporate data center to the AWS Direct Connect location.
- Solves lack of built in encryption for DX
- Hop by Hop - Layer 2 adjacency - IEEE 802.1AE
- Confidentiality
- Data integrity
- Data origin authenticity
- not end to end encryption
- replay protection
Key components:
- Secure channel - unidirectional.
- .... has a Secure Channel Identifier
- Secure Associations - sessions on SC exist usually only 1 at a time - except when they are being replaced
- encapsulated by MACsec
- MACset Key Agreement - MKA - discovery, authentication and key generation
- Cypher suite - how data is encrypted
MACsec frames are authenticated and integrity protected and the original frame components themselves are encapsulated and encrypted.
No MACSec:
Not encrypted:

Encrypted:

MACSec Architecture

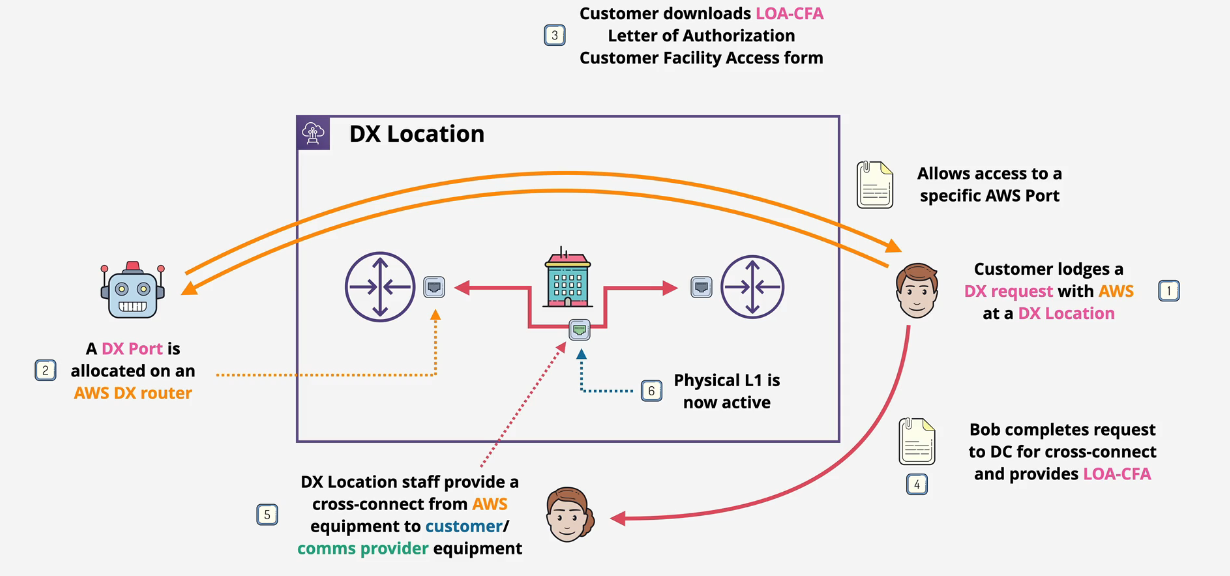
Direct Connect Process
- AWS doesn't own the DX connection location (Some companies use Equinix) and neither do you.
- Only the Data Center staff can connect things together when authorized from all parties
- LOA-CFA - Letter of Authorization Customer Facility Access
- Customer requests a DX request with AWS
- Port is allocated on the AWS DX router
- Downloads LOA-CFA
- Customer completes the LOA-CFA and gives to datacenter
- Datacenter creates a connection to AWS via the 3rd party from the datacenter.
- Layer 1, physical connection is now active.
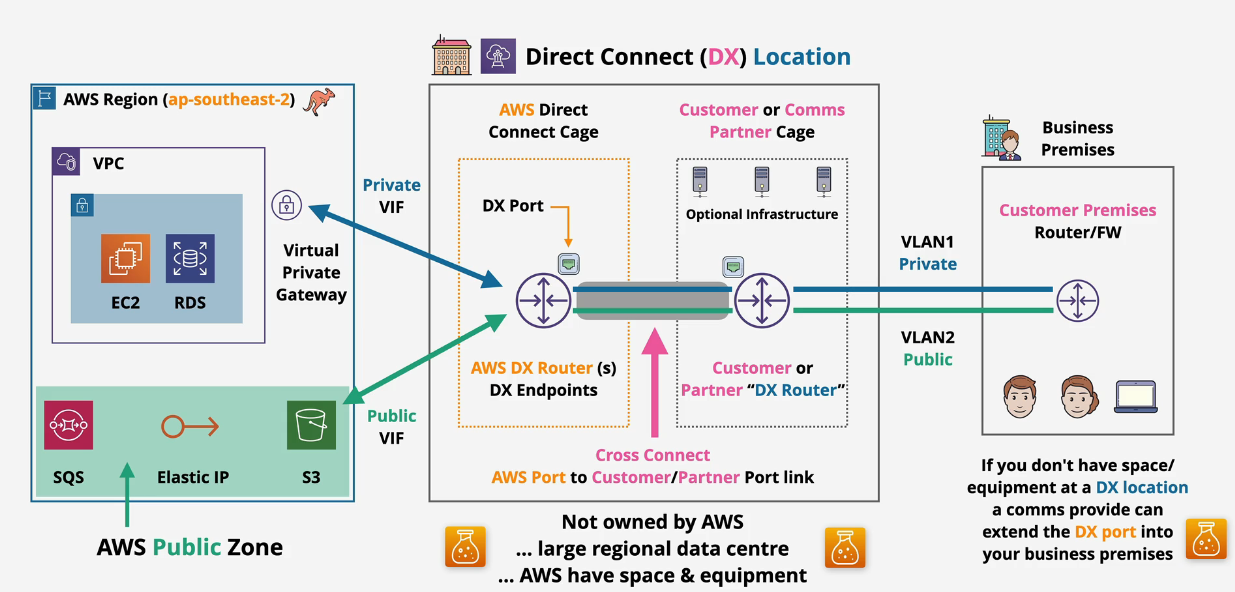
DX Virtual Interfaces - BGP Session + VLAN
Physical connection (Layer 1) is the physical cabling We need a Layer 2 connection - Data Link
- Virtual Interfaces (VIFs) allow you to run multiple L3 networks over the L2 DX
- Interfaces - BGP peering + VLAN
3 types of VIFs:
- Public, Private, Transit
A VIF an have 50 + 1 Virtual interfaces on a Direct Connect - Dedicated
- 1 on each hosted connection.
BGP is then setup between the customer DX router and the AWS DX Router
- can be extended through to the customer premises.
- exchanges the BGP prefixes
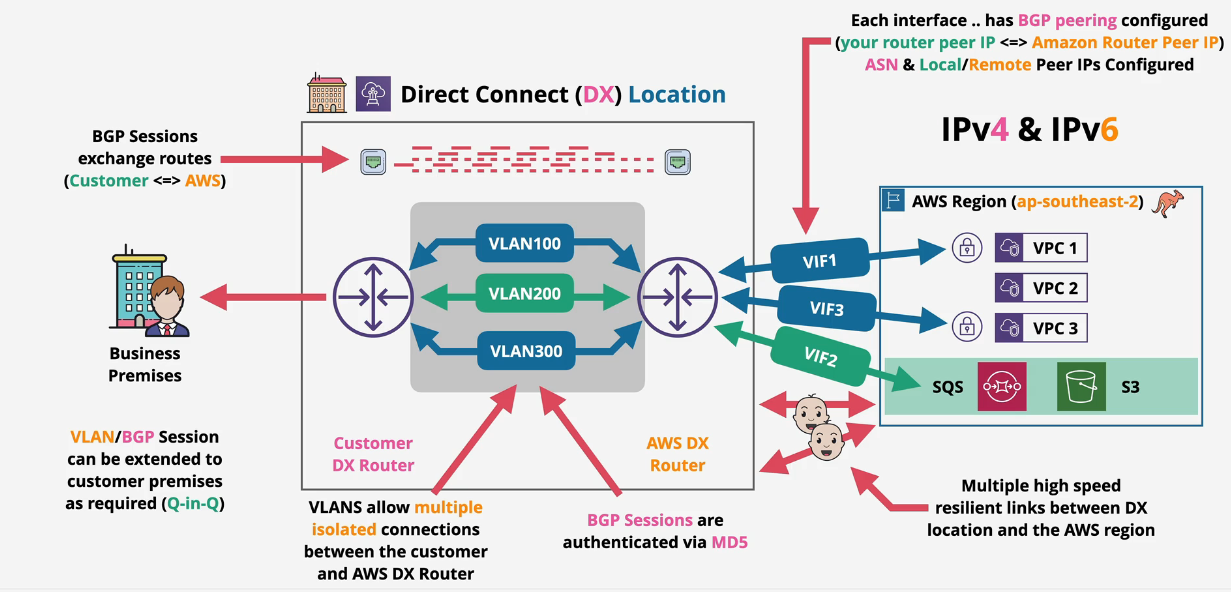
VLANs between the customer DX router and the AWS DX Router allow for isolated, segregated connections. Private and public VIFs then attach to the AWS regions from the AWS DX router.
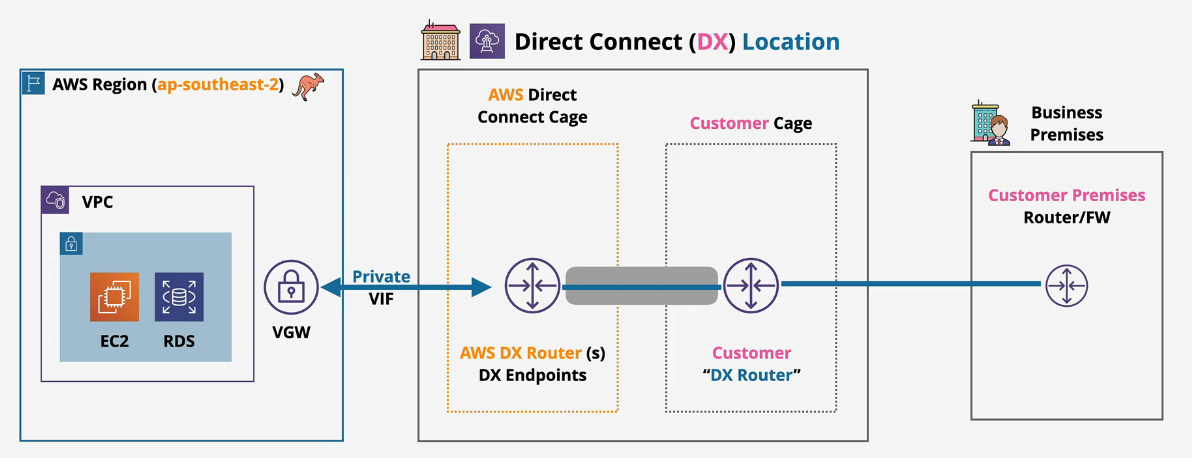
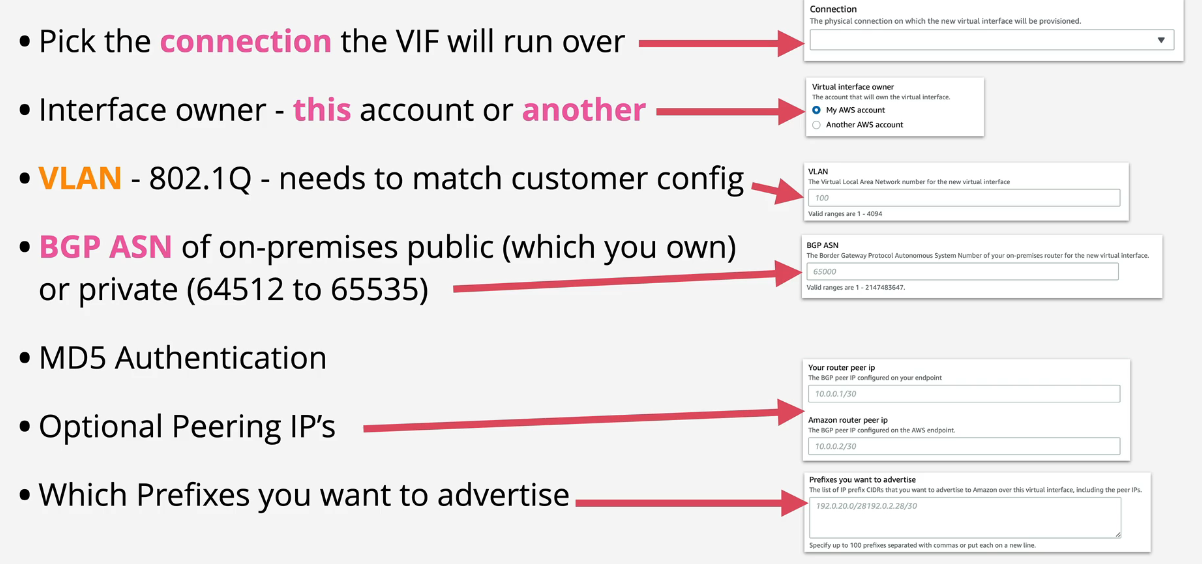
Private VIF's (Virtual Interfaces)
Used to access 1 VPC(ish) resource using a private IP.
- Attach to Virtual Private Gateway in the same region that your DX terminates in.
Basically think 1 private VIF and 1 VPC and 1 VGW in a region...for now.
- No encryption on private VIFs.
- MTU of 1500 or 9000 (Jumbo Frames)
- Choose the VGW or Direct connect gateway and the interface owner
- VLAN needs to be 802.1Q and needs to match the customer configuration
- AWS will advertise the VPC CIDR and the BGP Peer IP's (/30's)
- NOTE: Max specific corp prefixes is 100
- You cannot use Private VIFs to access Public AWS Services - only used for Private AWS Services - Private IPs
- VPC Must be in the same region that the DX Location terminates in.
- You're creating a BGP peering on the VIF using your ASN (public or private ASN using (64512-65535)
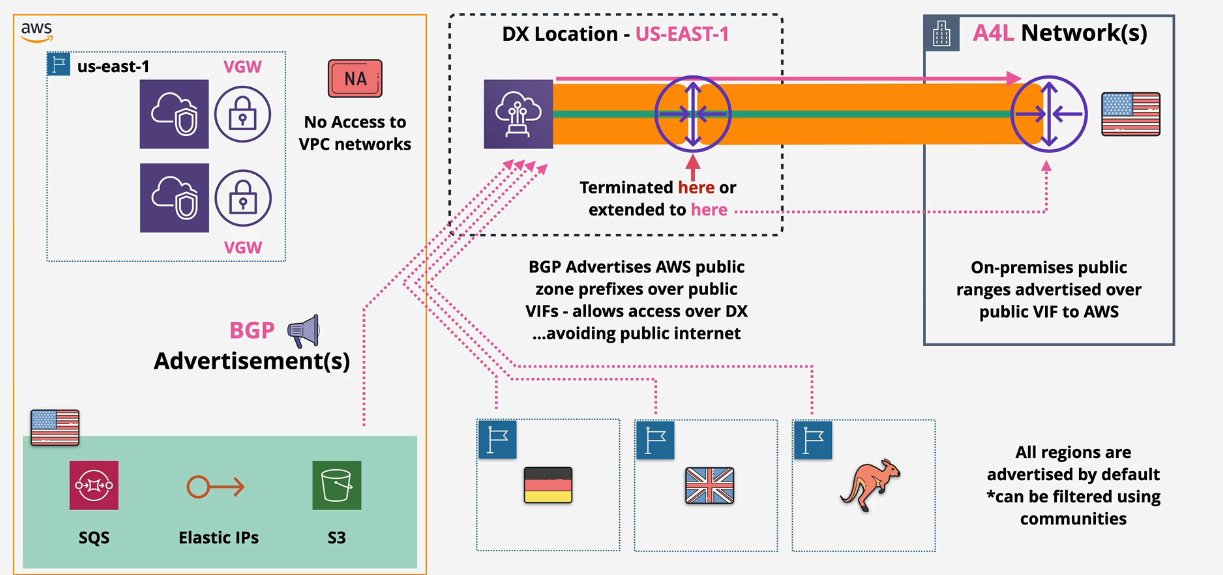
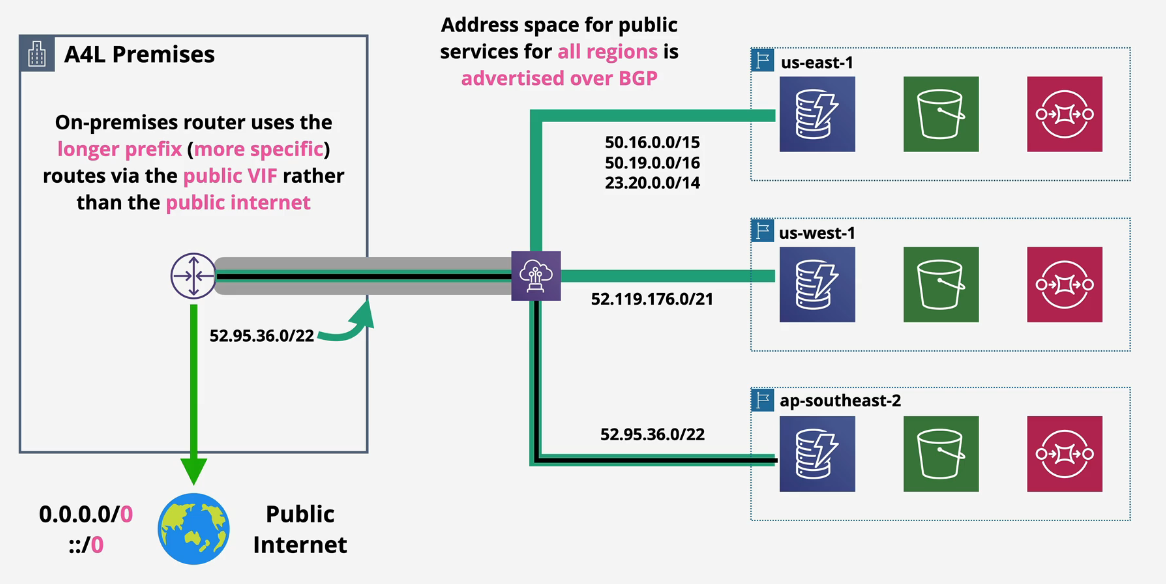
Public VIF's
Used to access AWS Public Zone services, cannot access anything within a private VPC.
- AWS advertises all AWS Public IP Ranges to you
- you can advertise any Public IP's you own over BGP
- you can only contact other public AWS IP addresses over the AWS network with a public VIF.
- your prefixes don't leave AWS - no other customers outside of AWS
- Provides Encryption over DX
NOTE: China is excluded as it is built differently.
Public VIF + VPN
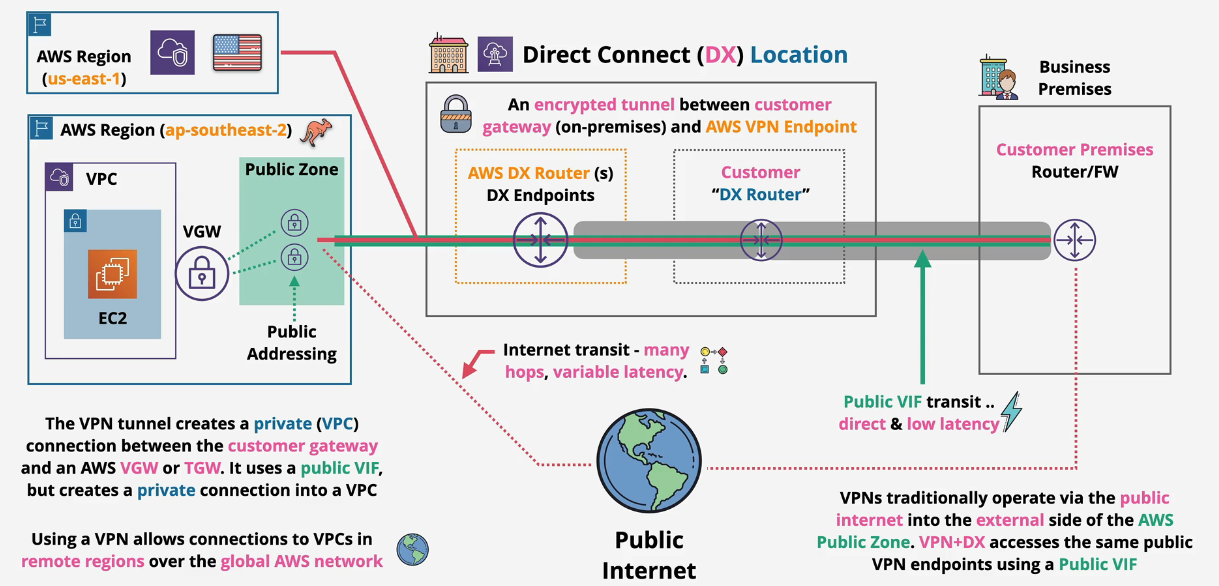 This gives us an encrypted and authenticated tunnel.
VPNs are more cryptographic vs MACSec which means they are slower
This gives us an encrypted and authenticated tunnel.
VPNs are more cryptographic vs MACSec which means they are slower
- can use this while Direct Connect is being provisioned.
- or as a backup
When trying to determine whether to use a Private VIF or a Public VIF, think about what you want to connect to - Private or Public AWS Services.
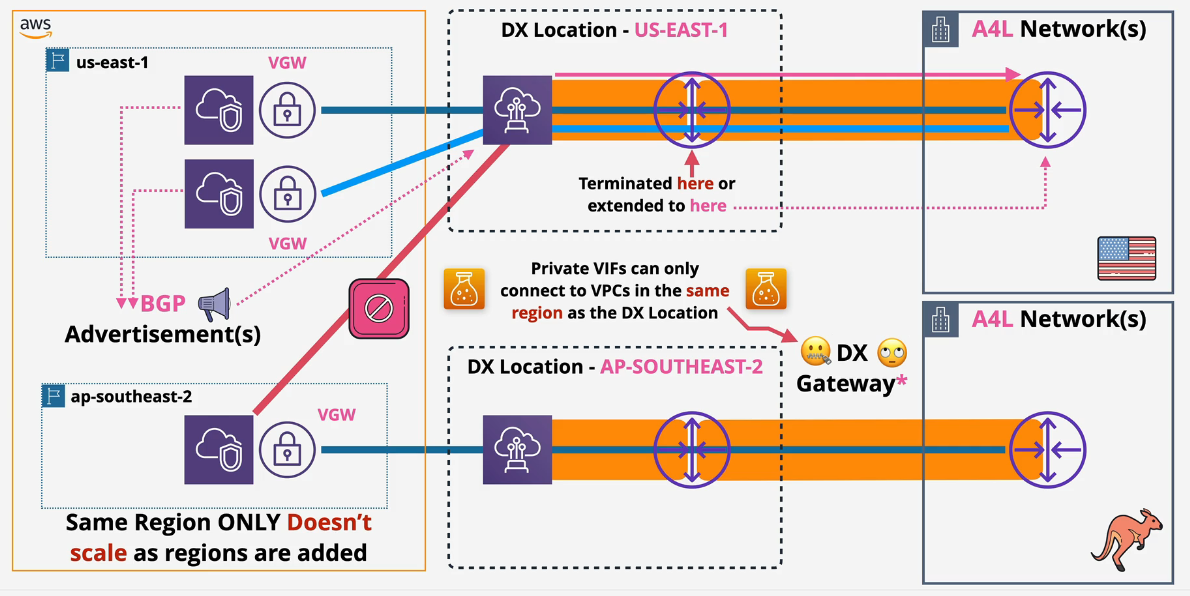
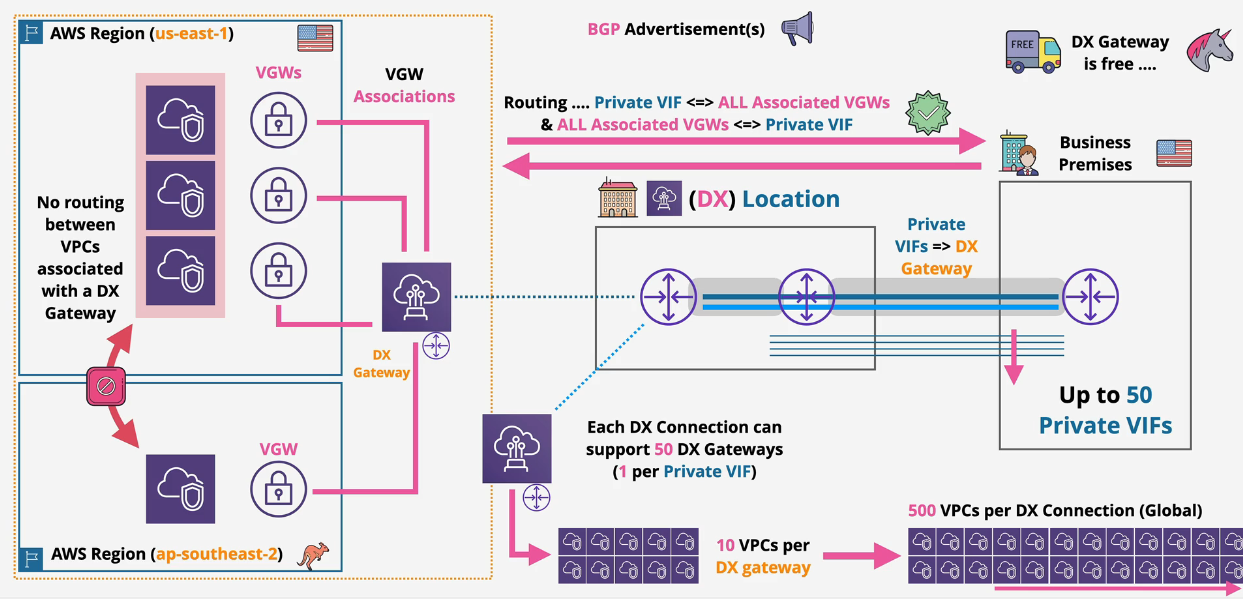
Direct Connect Gateways
Public VIFs:
Direct Connect is a regional service from the customer to 1 or more DX locations
- Public VIF can access all AWS public regions from this.
- Private VIFs can only access VPCs in the same regions as the Virtual Gateways.
DX points are global network devices. Meaning if you connect your on prem to AWS via DX, you can connect ANY region to it.
VPCs are then allowed to communicate to on prem but this does not allow other VPCs to communicate to other VPCs (Transit gateways are needed)
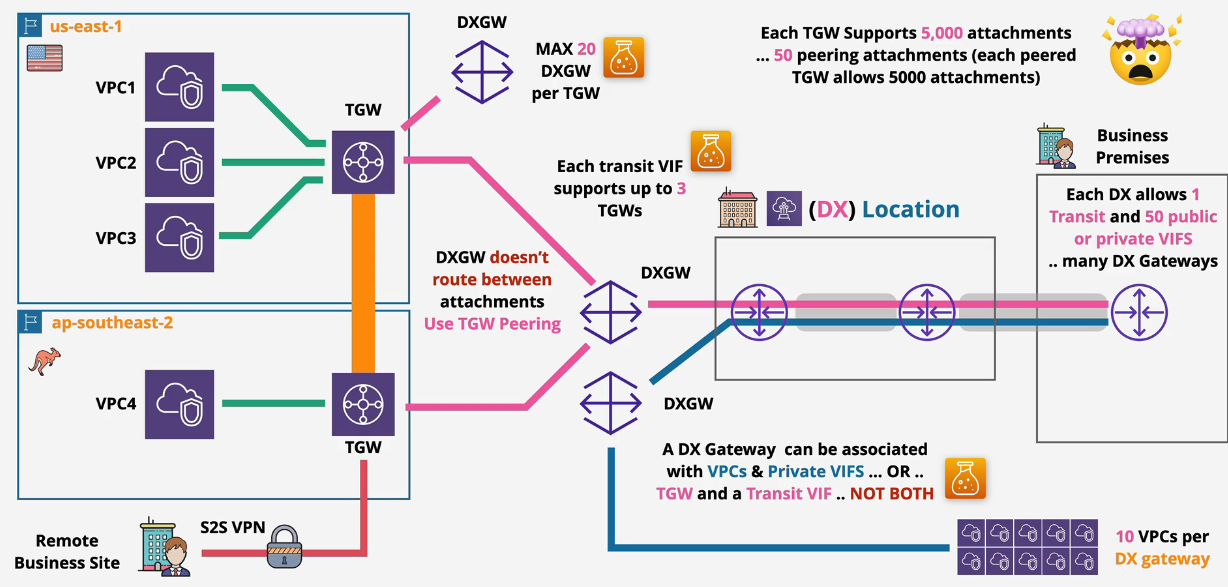
- 1 Private VIF = 1 DX Gateway & 10 VGW per DX Gateways
- 1 DX can have 50 Private VIFs == 50 DX Gateways == 500 VPCs
You can support 500 VPCs using one DX connection
Direct Connect, Transit VIFs and Transit Gateways
DX Architecture: 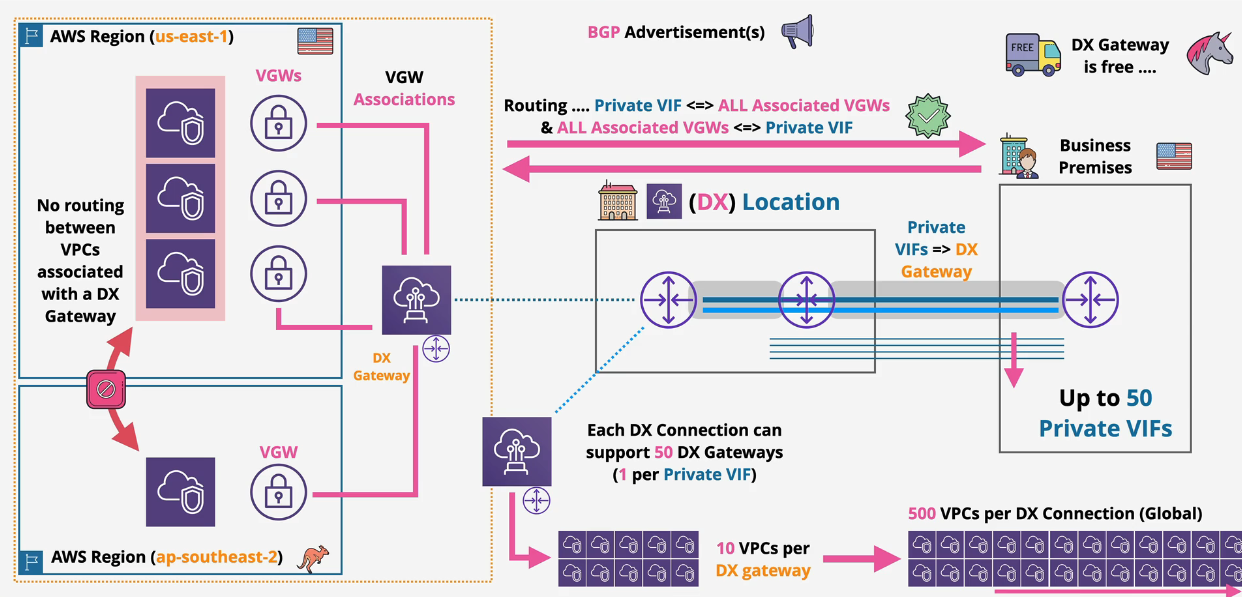
Transit Gateway Architecture: 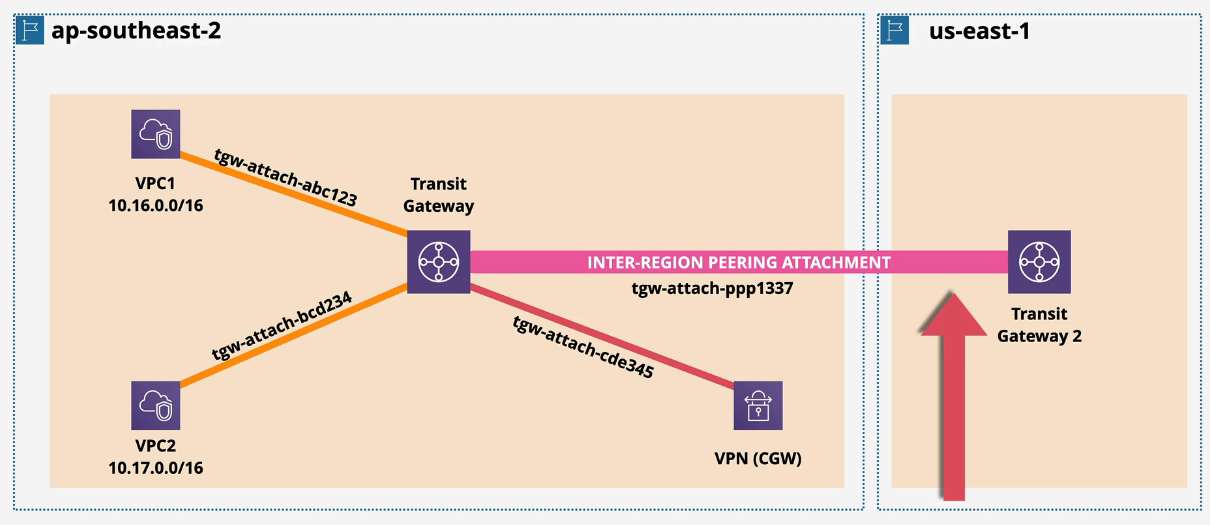
You can connect exactly 1 Transit VIF to the DX and 50 public or private VIFs.
- NOTE: Each Transit VIF supports up to 3 Transit Gateways.
- NOTE: Max 20 DX Gateways per Transit Gateway
The DX Gateway does not route between attachments. You need to use TGW peering for that.
The red line here is not allowed:
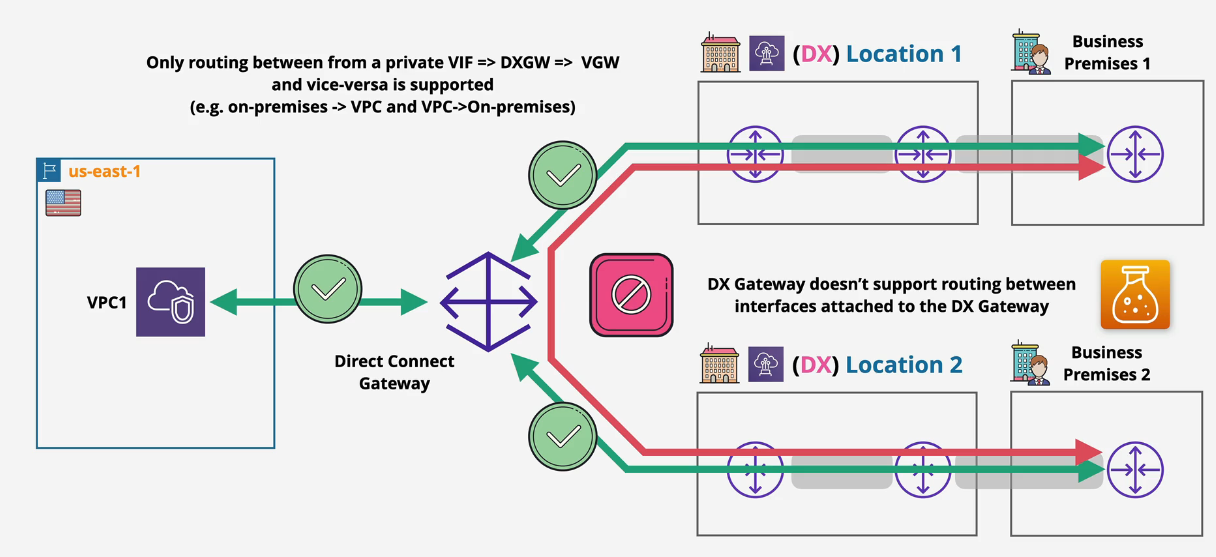
Solution: Route through a TGW:
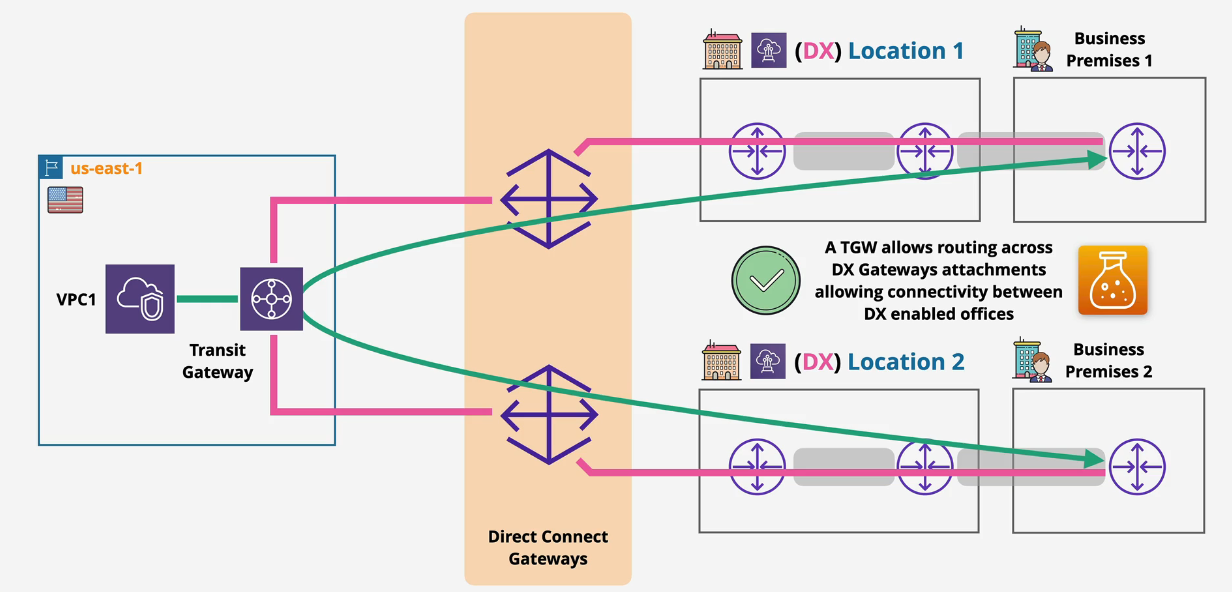 Multi-Region Solution:
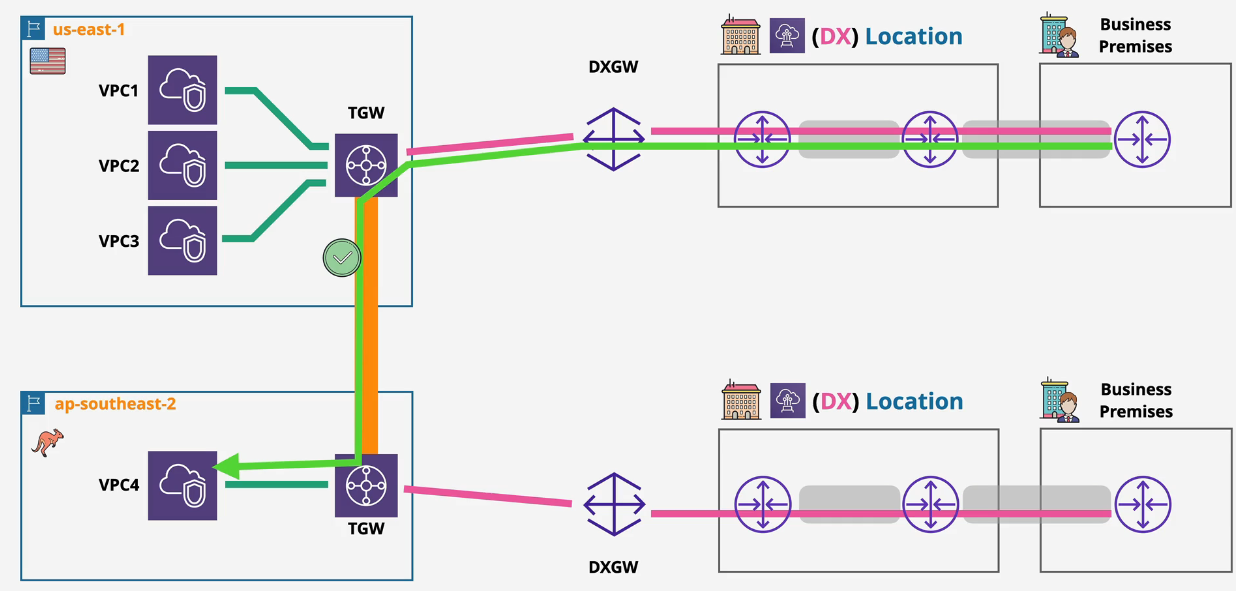
Anything connected to a transit gateway or peered to that TGW can communicate with each other.
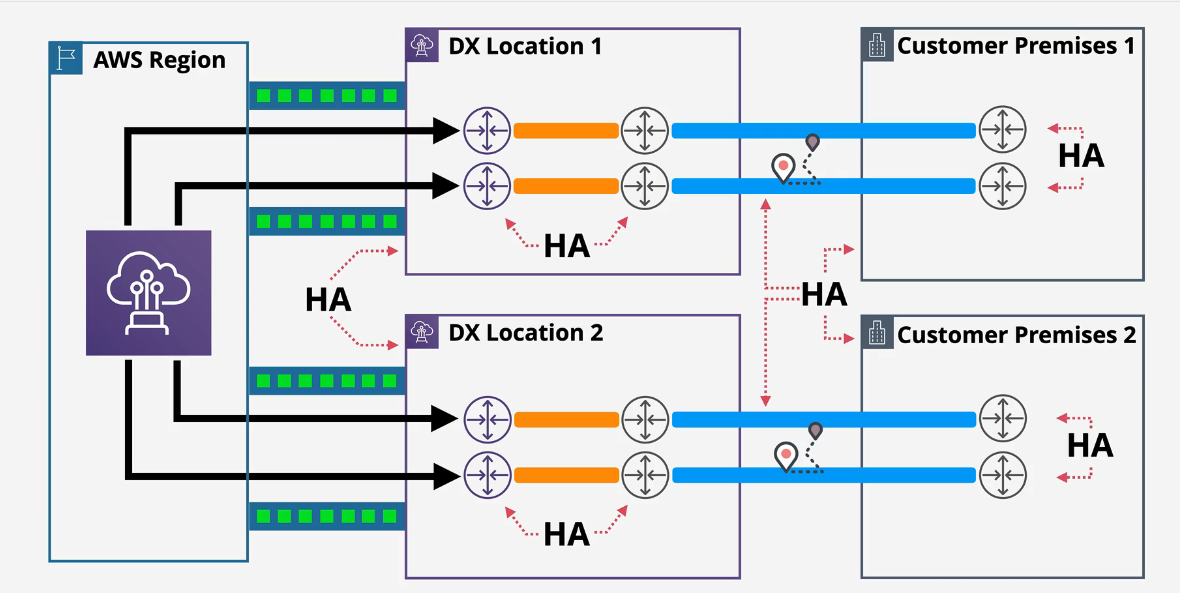
Direct Connect Resilience
Not Resilient:

Little better:
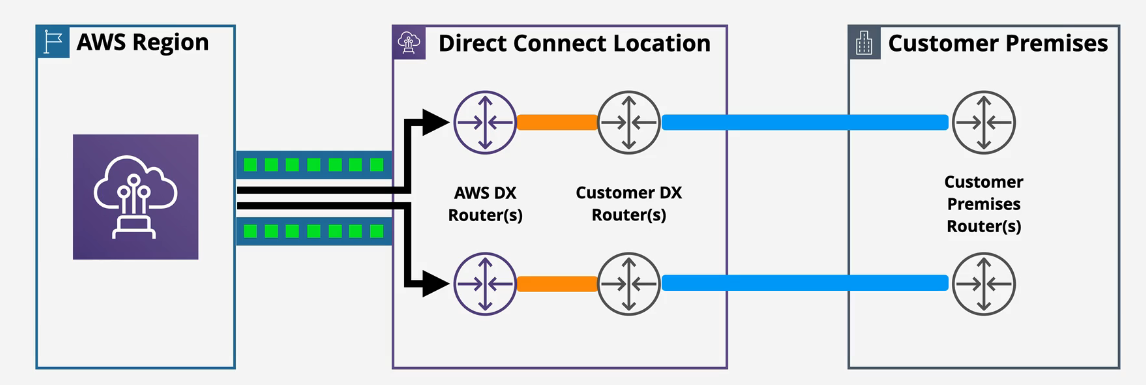
There are typically 3 parts to a DX architecture
- AWS
- DX provider
- Your on prem environment
The connections between AWS and your DX provider are HA. They have redundant connections and failover. Your on prem to the DX provider is usually one connection and is not HA.
There are multiple places of single points of failure or even multiple points of failure.
- Power could go out pretty much anywhere
- Cables are cables and they fail
One solution is to add another DX router at the DX provider's location and connect 2 connections to your on prem environments.
Even better would be to have two locations and two DX connections:
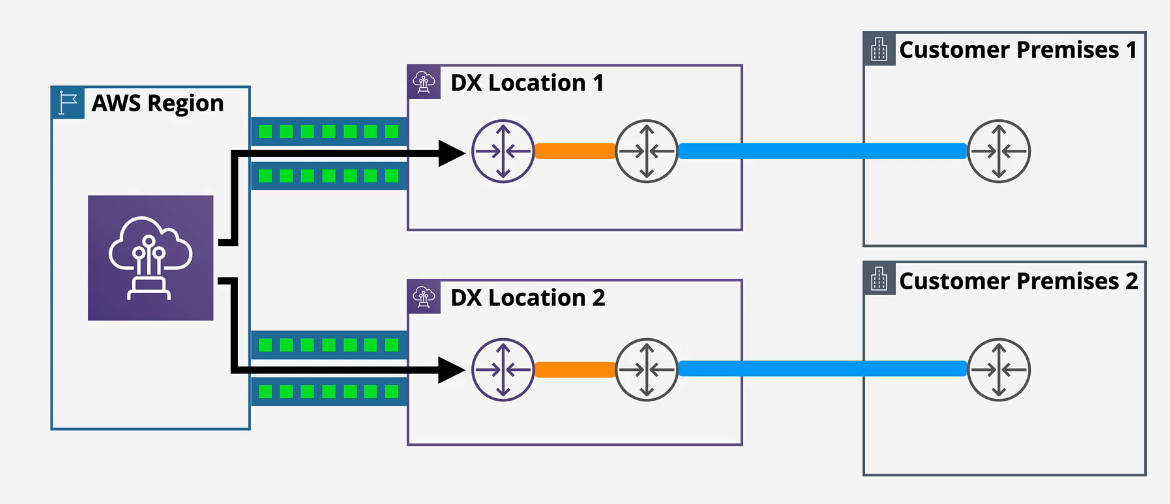
Best:
DX Link Aggregation Groups (Lags)
- Multiple physical connections act as one connection -Speed and Admin overhead
- Active/Active architecture
- Max 4 connections and need be the same speed and terminated at the same location
- LAGs are connections between the DX router and the customer premises.
- Max performance 200Gbps.
- minimumLinks attribute - the LAG is active as long as this value or MORE connections are active.
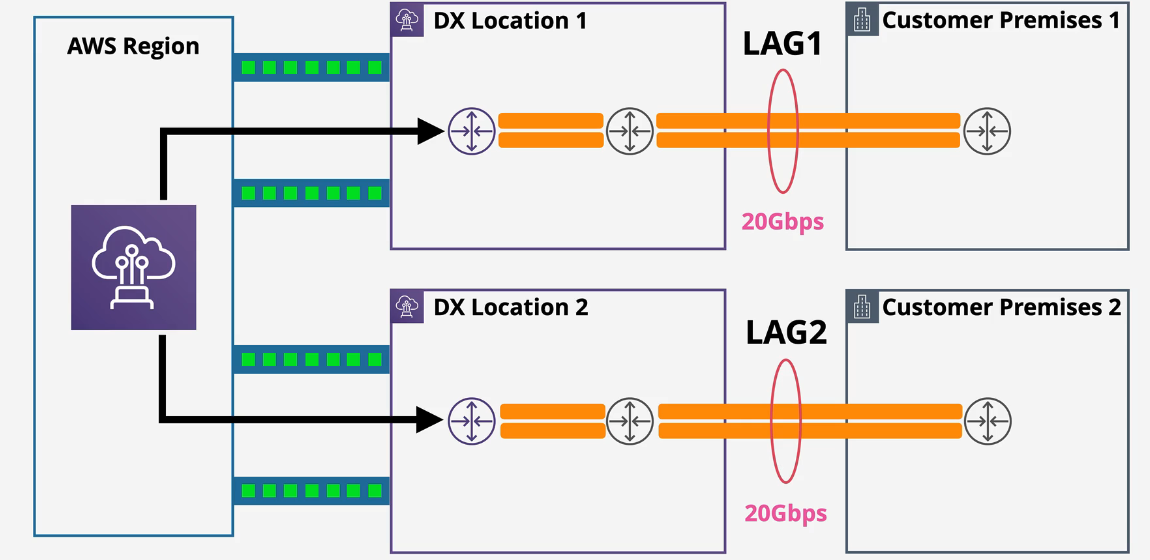
You can use multiple connections for redundancy. A link aggregation group (LAG) is a logical interface that uses the Link Aggregation Control Protocol (LACP) to aggregate multiple connections at a single AWS Direct Connect endpoint, allowing you to treat them as a single, managed connection.
LAGs streamline configuration because the LAG configuration applies to all connections in the group.
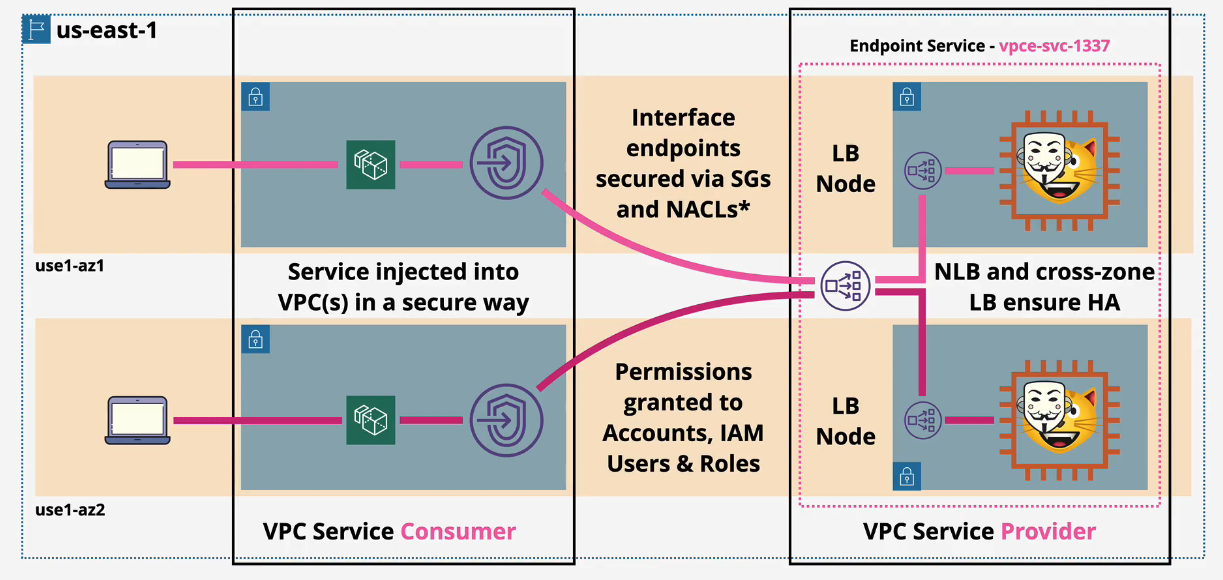
AWS Private Link
Allow cross account app access on private endpoints
- For HA, you want to create many multiple endpoints.
- IPV4 and TCP only. IPV6 is not supported as those links are already private.
- Private DNS is already supported.
- Direct Connect, Site-To-Site and VPC Peering connections are supported.
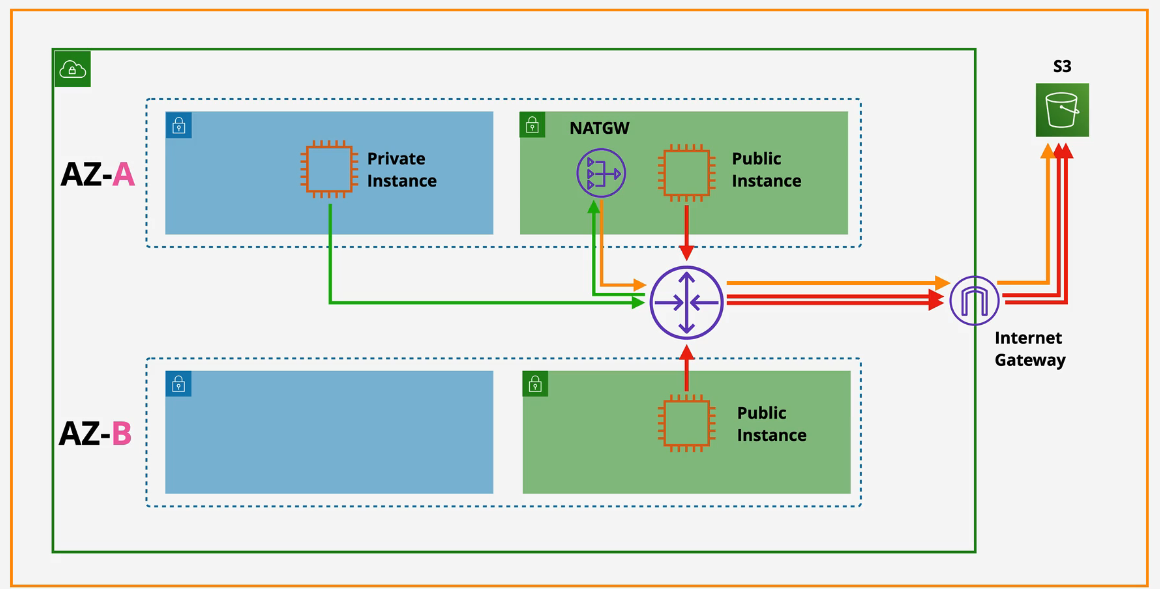
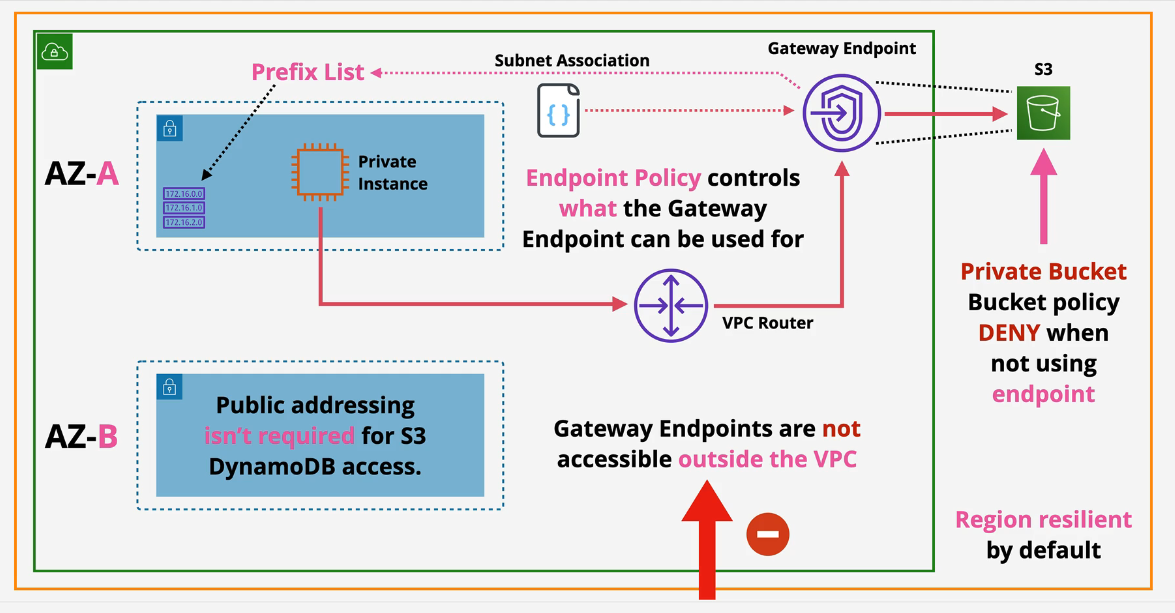
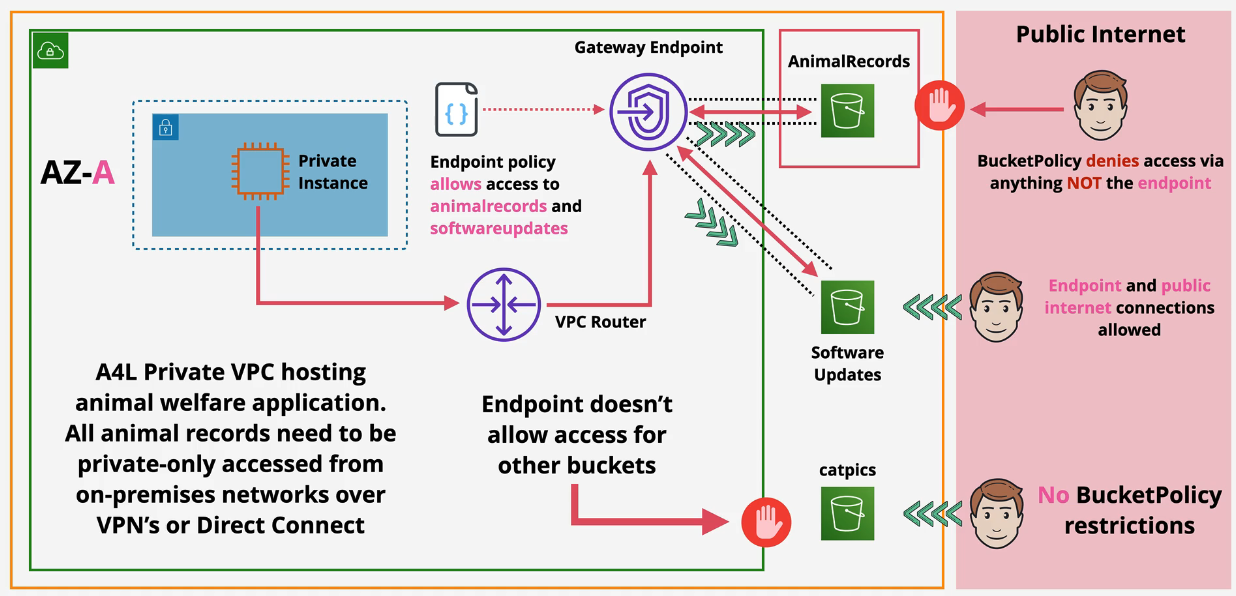
VPC Gateway Endpoints
Provide private access to S3 and DynamoDB.
- A prefix list is created, added to the route table and is attached to the gateway endpoint. Traffic leaving the subnet via this service leaves via the Gateway Endpoint.
- Highly available across all AZs in a region by default.
- Endpoint Policy is created to control access to certain services.
- Regional - cannot use across regions.
- Used to prevent leaky buckets - S3 buckets can be set to private only allowing access ONLY from a gateway endpoint.
- only accessed from within private VPCs.
Without Gateway Endpoints:
With Gateway Endpoints:
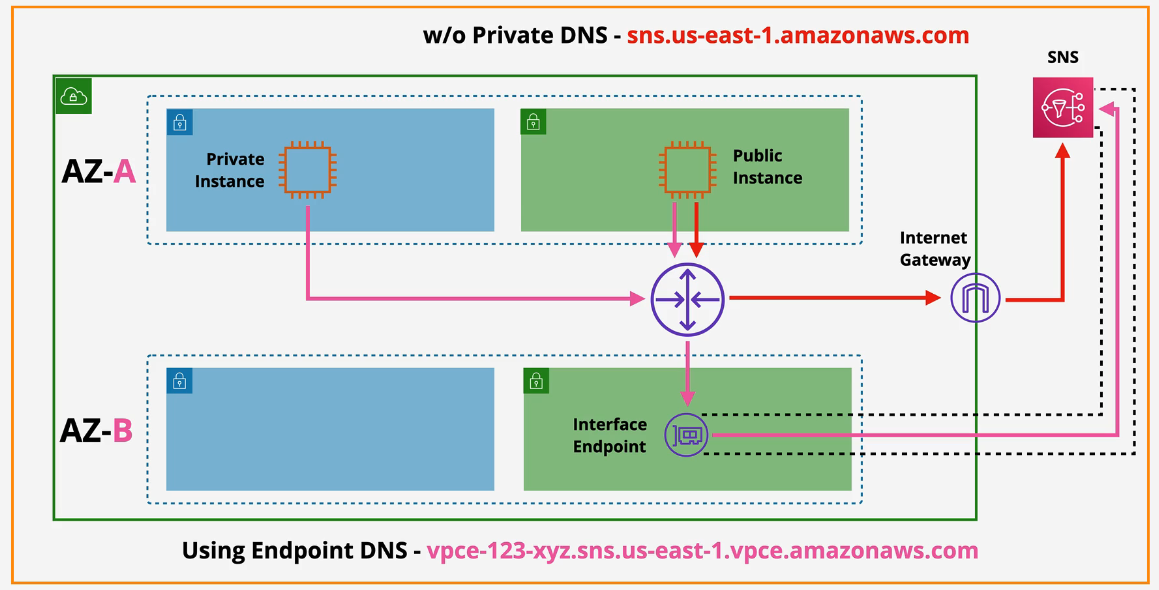
Interface Endpoints (VPC)
- provide private access to AWS public services
- now supports S3! Only DynamoDB is only available via gateway endpoint
Difference between interface endpoints and gateway endpoints is that Interface Endpoints are not HA by default.
- For HA, you'll need one endpoint per subnet per AZ used in a VPC
- Network access controlled via SGs
- Endpoint policies can be used to restrict what can be done with this endpoint
- Uses PrivateLink behind the scenes
- TCP and IPv4 only.
Differences between Gateway endpoints and Interface Endpoints
- Gateway endpoints use a prefix
- New service endpoint endpoint DNS - vpce-123-xyz.sns.us-east-1.vpce.amazonaws.com
- Interface endpoints use DNS, not routing
- Endpoint Regional DNS
- Endpoint Zonal DNS
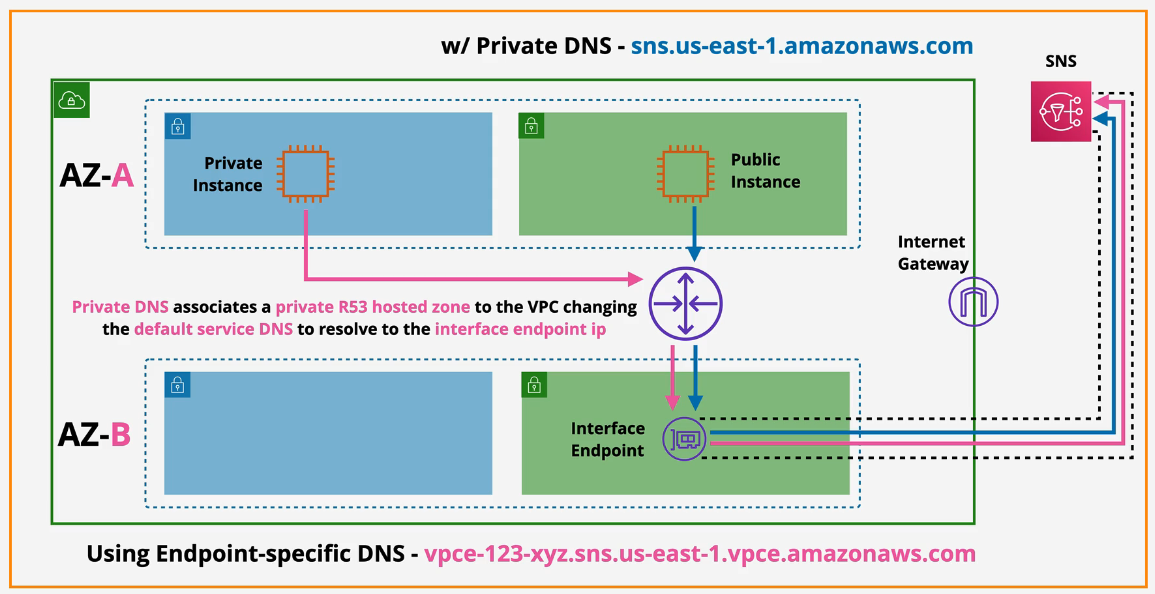
- Can use these or PrivateDNS in a private hosted zone
- you'll get a private endpoint specific DNS address
- Interface endpoints are not readily HA
Without PrivateDNS:
With PrivateDNS:
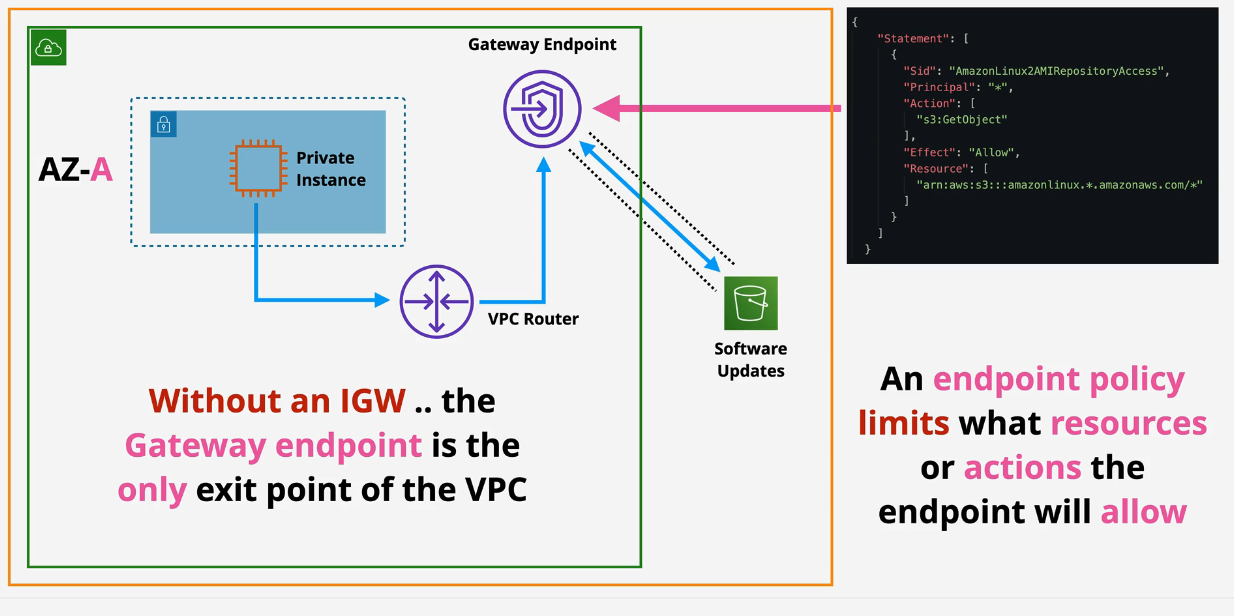
VPC Endpoint Policies
Endpoints have endpoint policies (that are similar to any other AWS Policy)
- some services support endpoint policies
- policies limit access via that endpoint only.
- contains a Principal
- can contain a Condition
- commonly used to limit what private VPCs can access.
Example would be to send all traffic out of a VPC via a gateway endpoint and then the gateway endpoint has an endpoint policy that only allows traffic to hit 3/10 S3 buckets you have. Adding bucket policies themselves prevent the public Internet from accessing S3 Buckets.
You can also explicitly deny from the S3 bucket using condition that restricts certain VPCE IDs.
Private VPC access:
SourceVPCE:
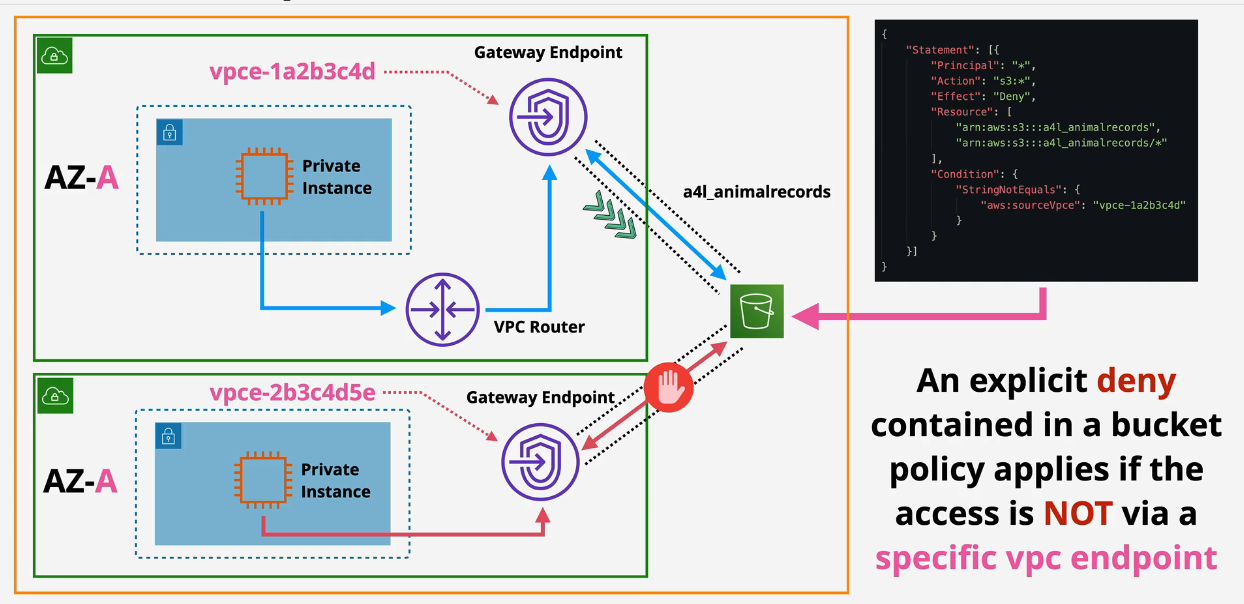
You can also use external IPs - but not internal IPs
Demo: Private S3 Buckets
- Apply the CF template
- Once in complete status, navigate to the S3 console.
- You should see the 3 new buckets and you should be able to open all of the pics in each of the buckets.
- Navigate to the EC2 console.
- Connect to the private instance using the session manager.
- run
aws s3 lsto list the buckets in this account.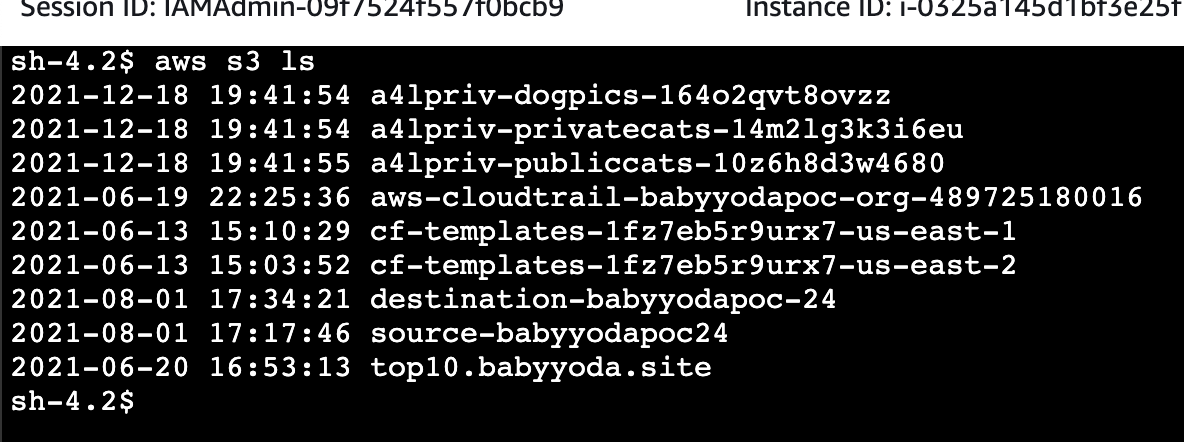
- Run
aws s3 ls s3://nameofthebucket -profile IAMADMINto list the contents of the buckets, repeating through all 3 buckets.
Configure Private Endpoint Policy
- Navigate to the VPC console in the master account.
- Click on Endpoints
- Notice one is a gateway and is targeting the amazonaws.us-east-1.s3 service.
- Select that one and then scroll down and select the policy tab.
- Click edit and the click custom.
- Paste this policy into the box:
{
    "Version":"2012-10-17",
    "Statement":[
    {
        "Effect":"Allow",
        "Principal": "*",
        "Action": "s3:*",
        "Resource":[
        "arn:aws:s3:::a4lpriv-privatecats-14m2lg3k3i6eu/*",
        "arn:aws:s3:::a4lpriv-publiccats-10z6h8d3w4680/*"
        ]
    },
    {
        "Effect" : "Allow",
        "Principal" : "*",
        "Action" : "s3:ListBucket",
        "Resource" : [
        "arn:aws:s3:::a4lpriv-privatecats-14m2lg3k3i6eu",
        "arn:aws:s3:::a4lpriv-publiccats-10z6h8d3w4680"
        ]
    },
    {
        "Effect" : "Allow",
        "Principal": "*",
        "Action":[
        "s3:ListAllMyBuckets",
        "s3:GetBucketLocation"
        ],
        "Resource" : "*"
    }
    ]
}
- Replace the names of the buckets here and click Save.
- Navigate back to the terminal and try to list the contents of all the buckets again
- You'll notice that now you'll have an issue accessing the private dog pics bucket from inside the VPC. You will however be able to access it from outside the VPC because you're only restricting via the gateway endpoint.

Restricting S3 buckets even more
- Navigate to the S3 console and then click on the privatecats S3 bucket.
- Click on the bucket policy and then edit.
- Paste in this policy here:
{
   "Version": "2012-10-17",
   "Id": "Policy1415115909152",
   "Statement": [
     {
       "Sid": "Access-to-specific-VPCE-only",
       "Principal": "*",
       "Action": "s3:*",
       "Effect": "Deny",
       "Resource": [
	     "arn:aws:s3:::a4lpriv-privatecats-14m2lg3k3i6eu",
         "arn:aws:s3:::a4lpriv-privatecats-14m2lg3k3i6eu/*"],
       "Condition": {
         "StringNotEquals": {
           "aws:sourceVpce": "vpce-07a433e22da10e63d"
         }
       }
     }
   ]
}
-
And Save Changes.
-
Go back to the bucket and then refresh and you'll notice that you've locked yourself out of that S3 bucket. This is expected because we only want access from that VPC endpoint and your AWS console session has been created on your local laptop and not from that VPC.
-
Go back to the EC2 instance and you should still be able to run
aws s3 ls s3://a4lpriv-privatecats-14m2lg3k3i6eu.
Cleanup
You're probably wondering how you can clean this up after you've locked yourself out of that bucket.
- Navigate to the VPC Console and select the gateway Endpoint and then click the policy tab.
- Click on Edit Policy and then select Full Access and Save.
- Inside of the EC2 instance that has access to the S3 bucket AND policy, you can run the AWS CLI cmds to remove the policy on that bucket.
- Run
aws s3api delete-bucket-policy --bucket a4lpriv-privatecats-14m2lg3k3i6eufrom within that EC2 instance - Delete the stack.
Advanced VPC and DNS Endpoints
Remember the VPC DNS address which is always the .2 address within every subnet in the VPC. This is called the Route53 Resolver. This provides Route53 and Associated Private zones and is only accessible from within the VPC.
Before Route53 Endpoints
Problem: The Route53 resolver lies inside the VPC and is only accessible inside the VPC, how does the Route53 resolver resolve anything on an on prem network without going out to the public DNS? This creates a wall between AWS and on prem infrastructure that cannot resolve as well as it needs to.
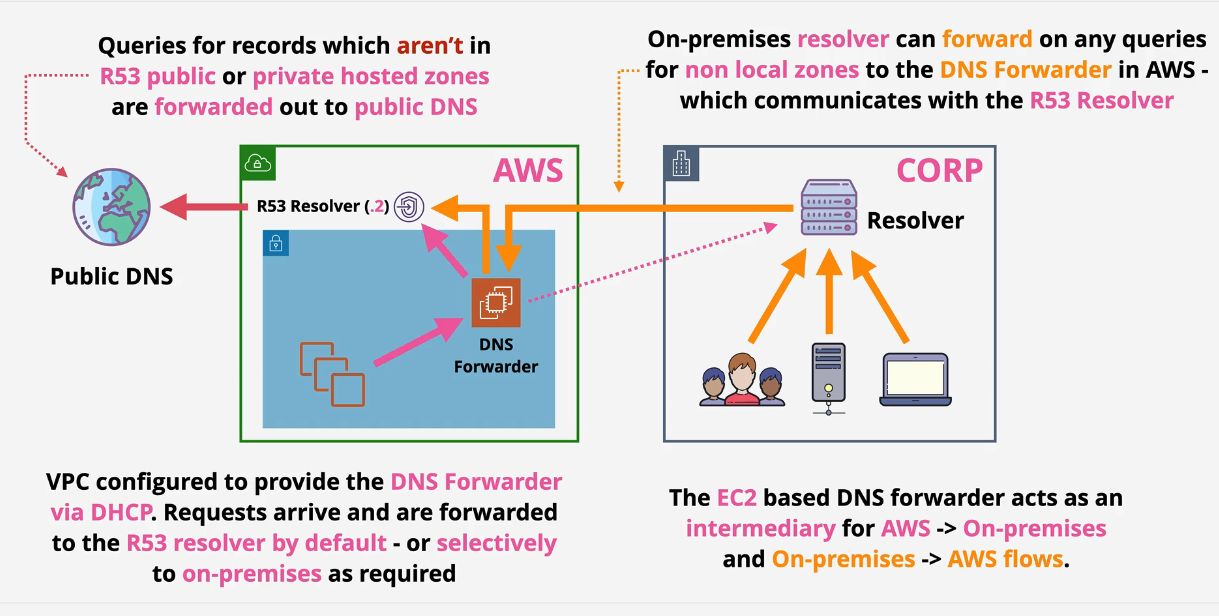
After Route53 Endpoints:
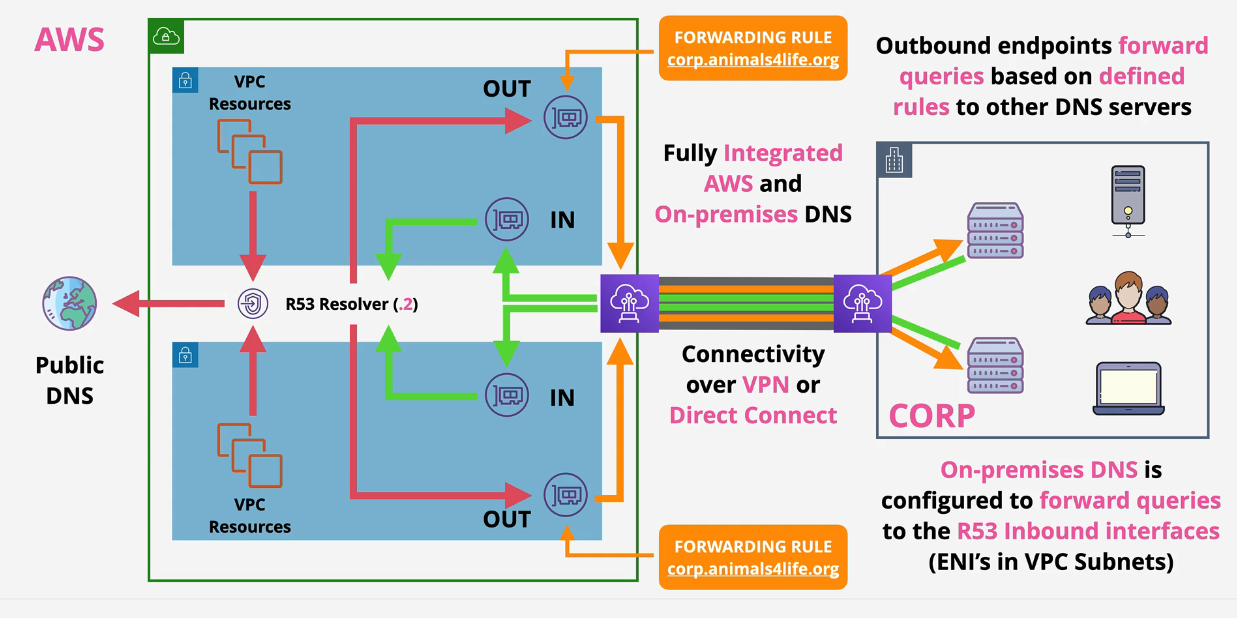
There is an ENI that is accessible over VPN or Direct Connect that allows inbound and outbound traffic between the on prem and the VPCs.
- Inbound: On-prem can forward to the Route53 resolver.
- Outbound: Conditional forwarders that forward to your on prem DNS servers
Anything that is looking for corp.duposdomain.com -> forwarded -> on prem DNS nameservers. You'll need to whitelist these on any onprem firewall.
 Reference: https://docs.aws.amazon.com/Route53/latest/DeveloperGuide/resolver.html
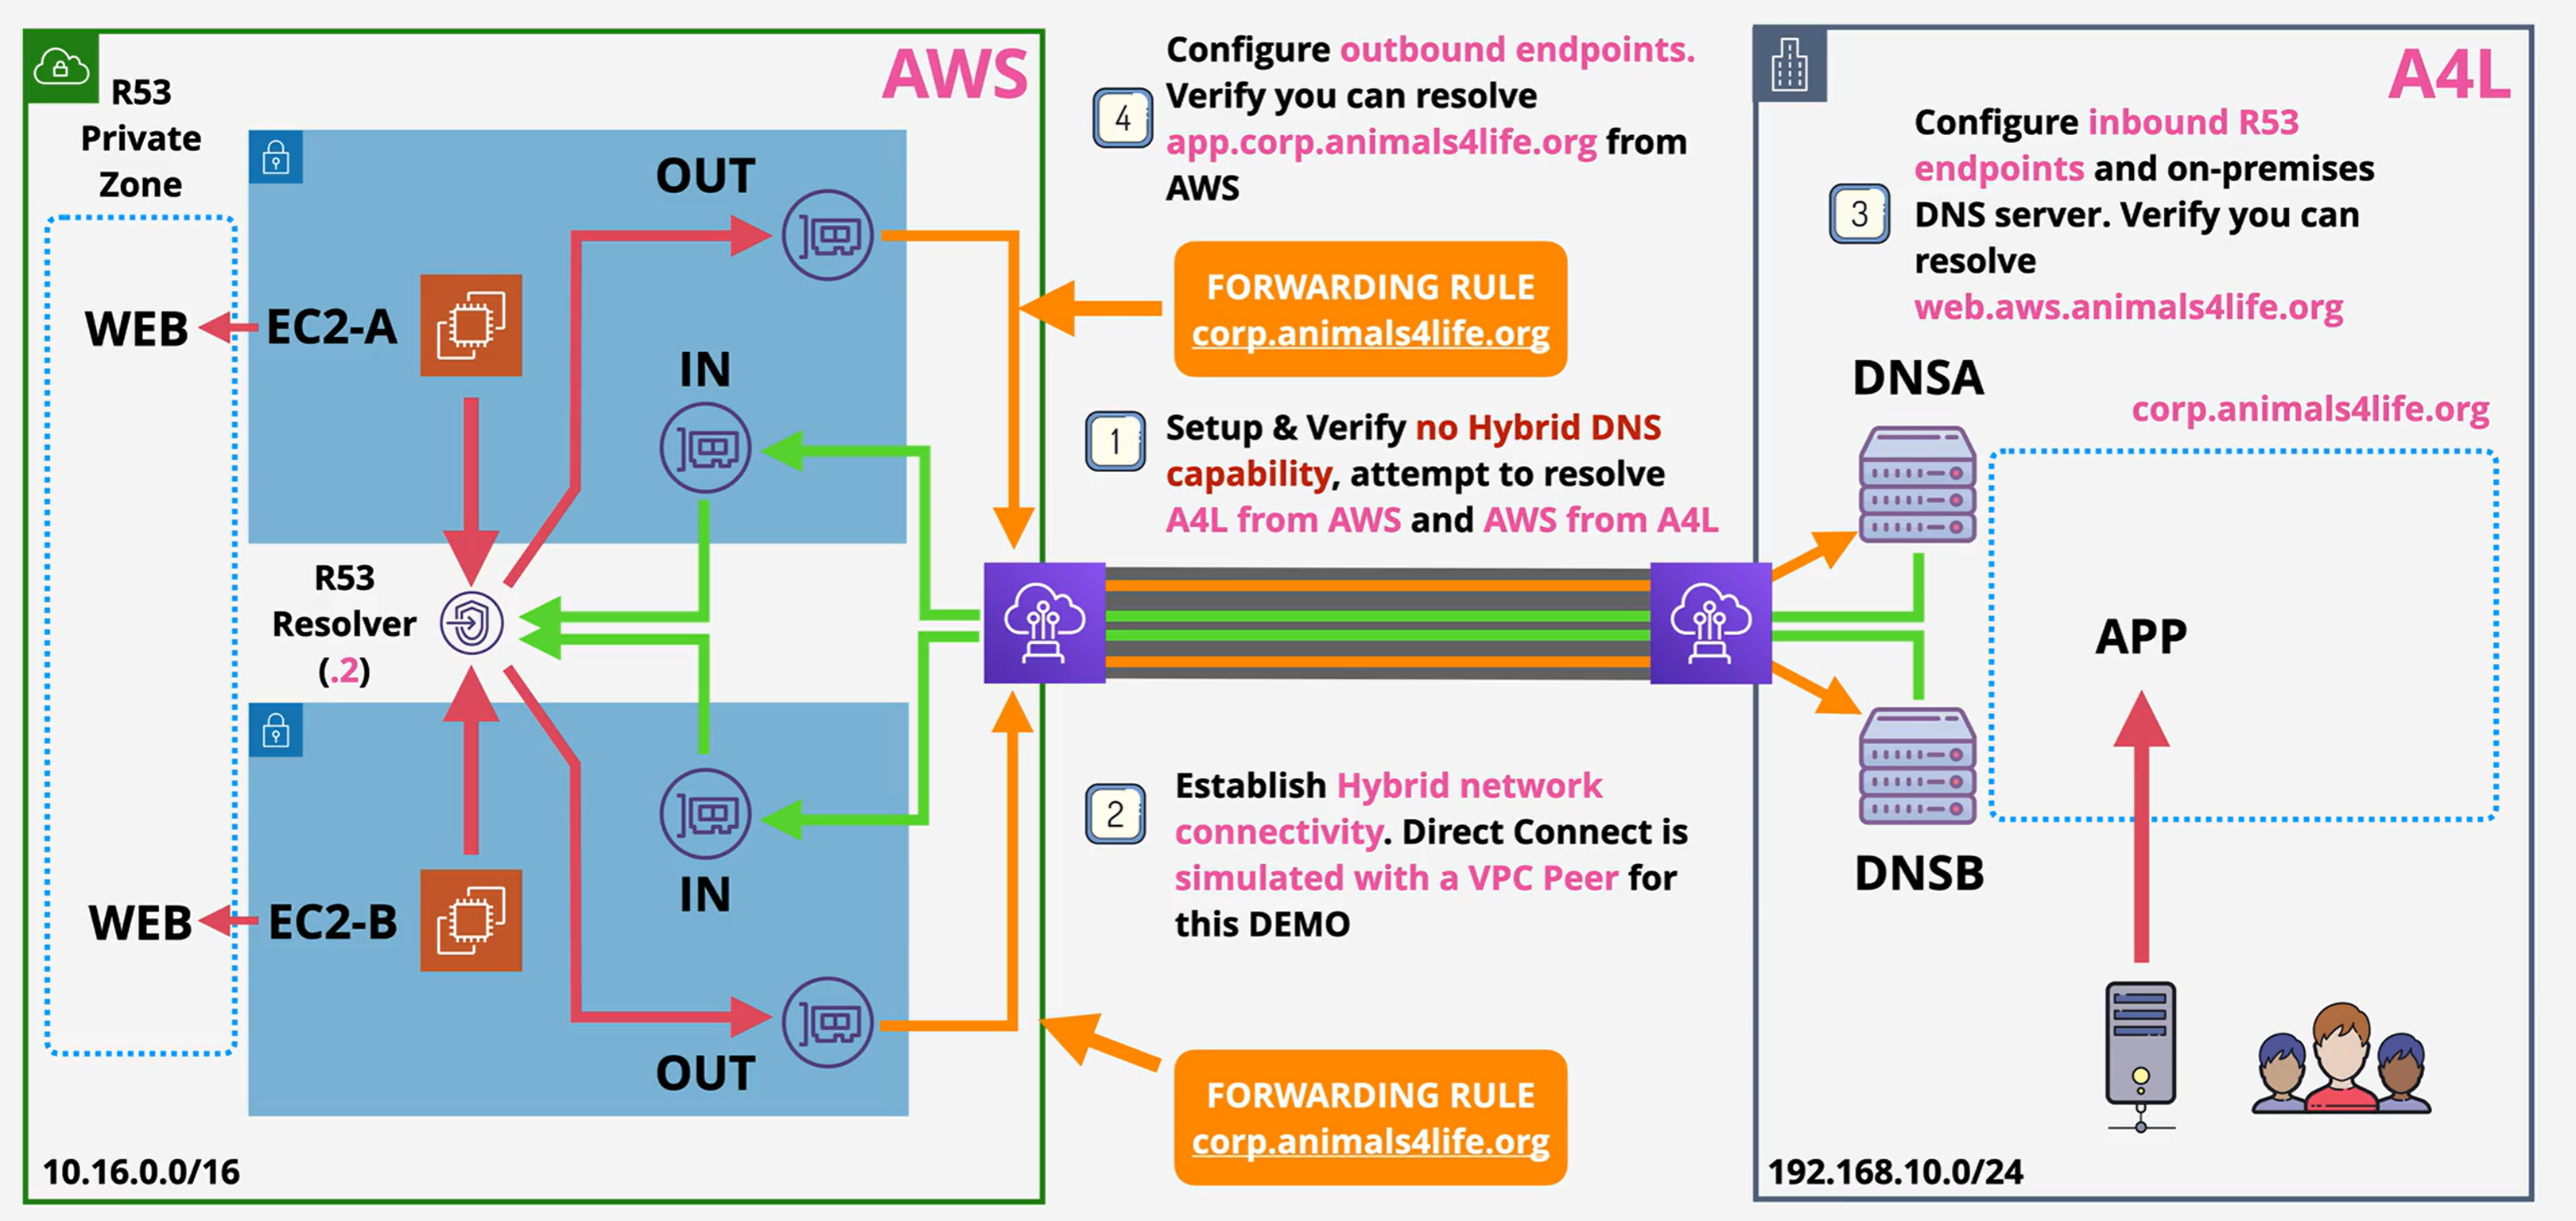
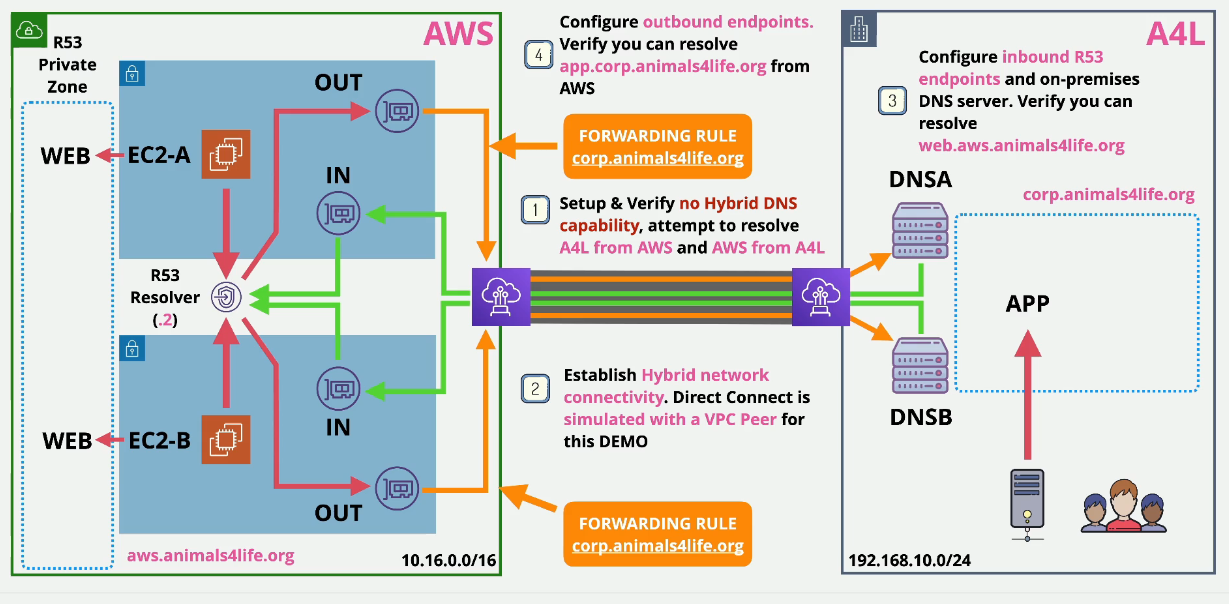
Demo: Implementing AWS and On Prem Hybrid DNS
Stage 1: Provision and Verify
- Deploy this stack in CloudFormation.
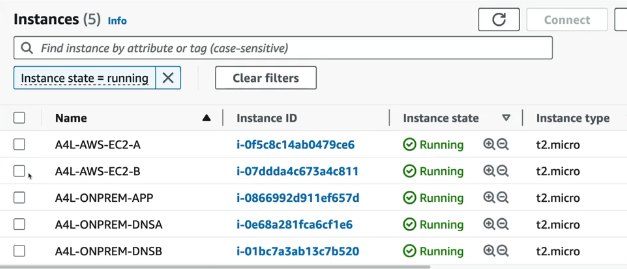
- Navigate to the EC2 console and log into the AWS EC2 A instance via Session Manager.
- Run
ping app.corp.animals4life.organd then ping the on prem app server IP - These will both fail.
- Log into the On Prem App server
- Ping the opposite, meaning
ping web.aws.animals4life.organd the IP of the EC2-A instance - You won't get any responses from either of those.
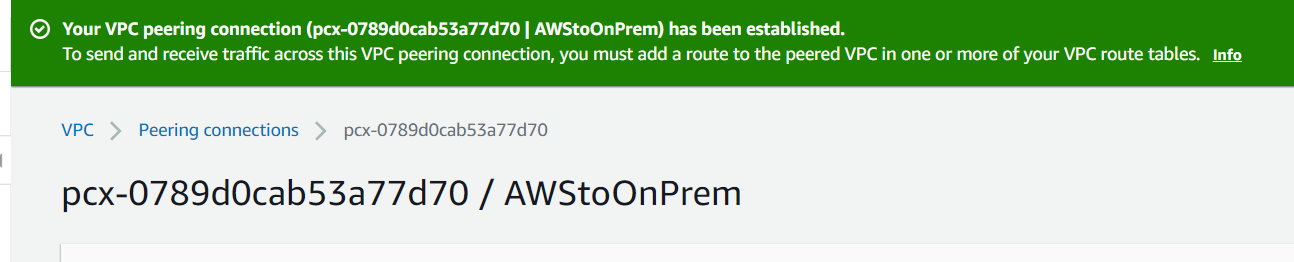
Stage 2: Set up Simulated Direct Connect
This simulates a Direct Connect connection between the onprem and AWS environments.
- Navigate to the VPC console.
- Click on Peering Connections and then click Create Peering Connection
- Name this AWStoOnPrem
- Select the AWS VPC and then select the onprem VPC
- Click Create and then Accept the peering connection.
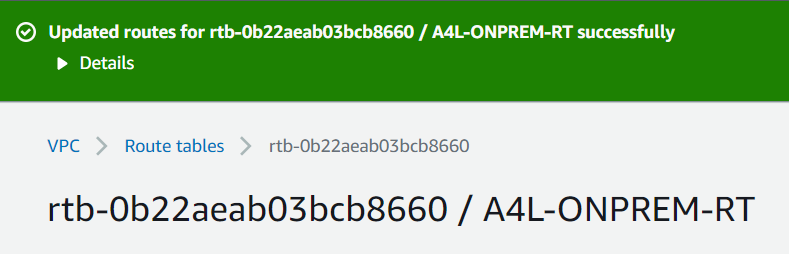
Set up Routing
- Navigate back to the VPC console and select Route Tables
- Select the AWS-RT and then Click on the Routes tab.
- Click Add route and Edit route
- Add 192.168.10.0/24 and the peering connection you just created above and Save.
- Repeat for the onprem-RT
a. 10.16.0.0/16 and then the peering connection.
b. Save routes.
Test connections again
- Log into the AWS-EC2-A instance
- ping the IP of the on prem app server again
- You should get a ping here

- Try to ping
ping app.corp.animals4life.orgagain. This should fail
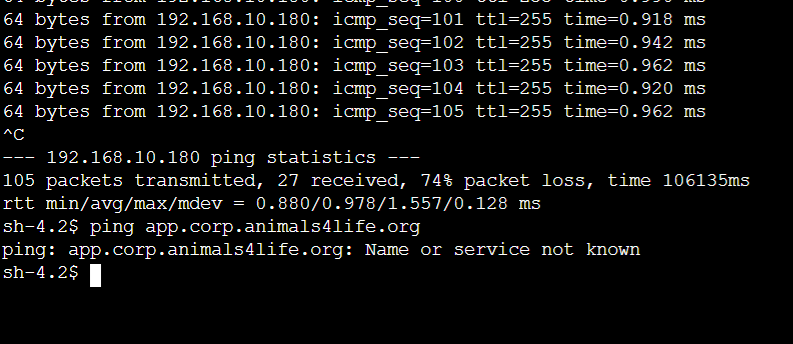
- Repeat from the On Prem App Server
- Notice that the DNS is not working but the IP pings are.
Stage 3: Configure DNS AWS side
- Navigate to the Route53 console
- Click on Inbound Endpoints under Resolver on the left
- Click Configure Endpoints.
- Select Inbound Only and then click Next.
- Name this one BYInbound and select the -aws VPC
- Select the AWSSecurityGroup.
- Select the us-east-1a AZ and then the single subnet
- Allow AWS to select the IP automatically
- Select us-east-1b and then the single subnet and then click Submit at the bottom to create the inbound endpoints.
- This should move into an Operational state.
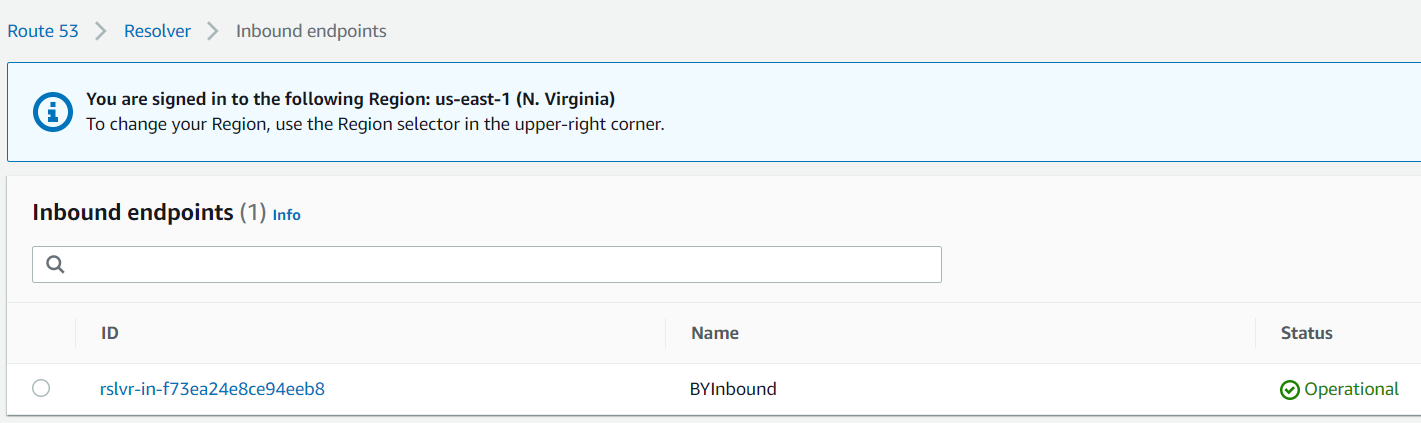
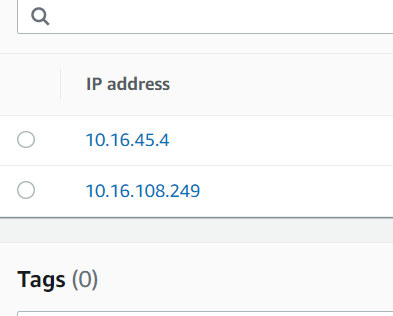
- Click on that endpoint and note the two IP addresses that were created.
Configure On Prem DNSA
- Navigate to the EC2 console
- Connect to OnPrem DNSA
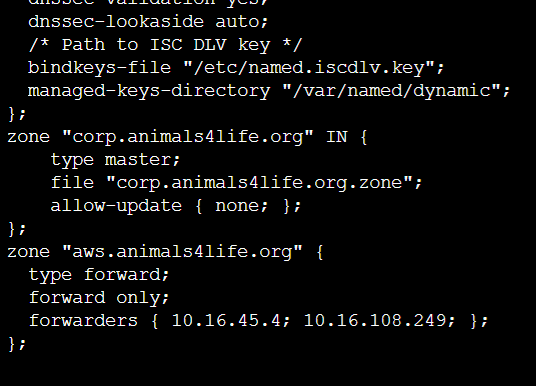
- Replace the IP addresses in the text below.
zone "aws.animals4life.org" {
  type forward;
  forward only;
  forwarders { 10.16.45.4; 10.16.108.249; };
};
- On DNSA, type
cd /etc - Run
sudo nano /etc/named.conf - Copy the above text to the very bottom of this and then format correctly if need be.
- Ctrl+O and Ctrl+X to exit Nano.
- Restart the named service:
sudo service named restart
NSlookup on DNSA
- Run nslookup at the prompt.
- Type
server 127.0.0.1which sets it to itself (the localhost) - Type
web.aws.animals4life.organd hit enter.
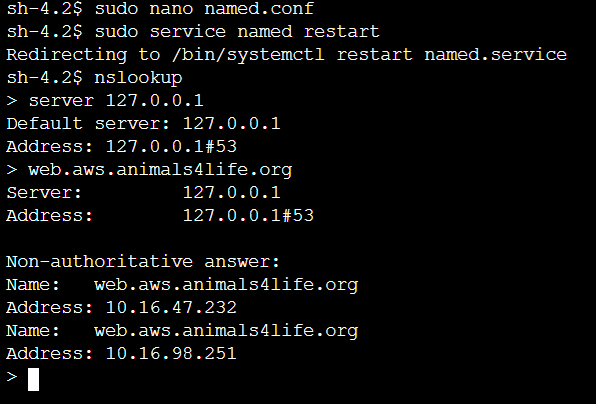
Configure On Prem DNSB
- Repeat steps for DNSB
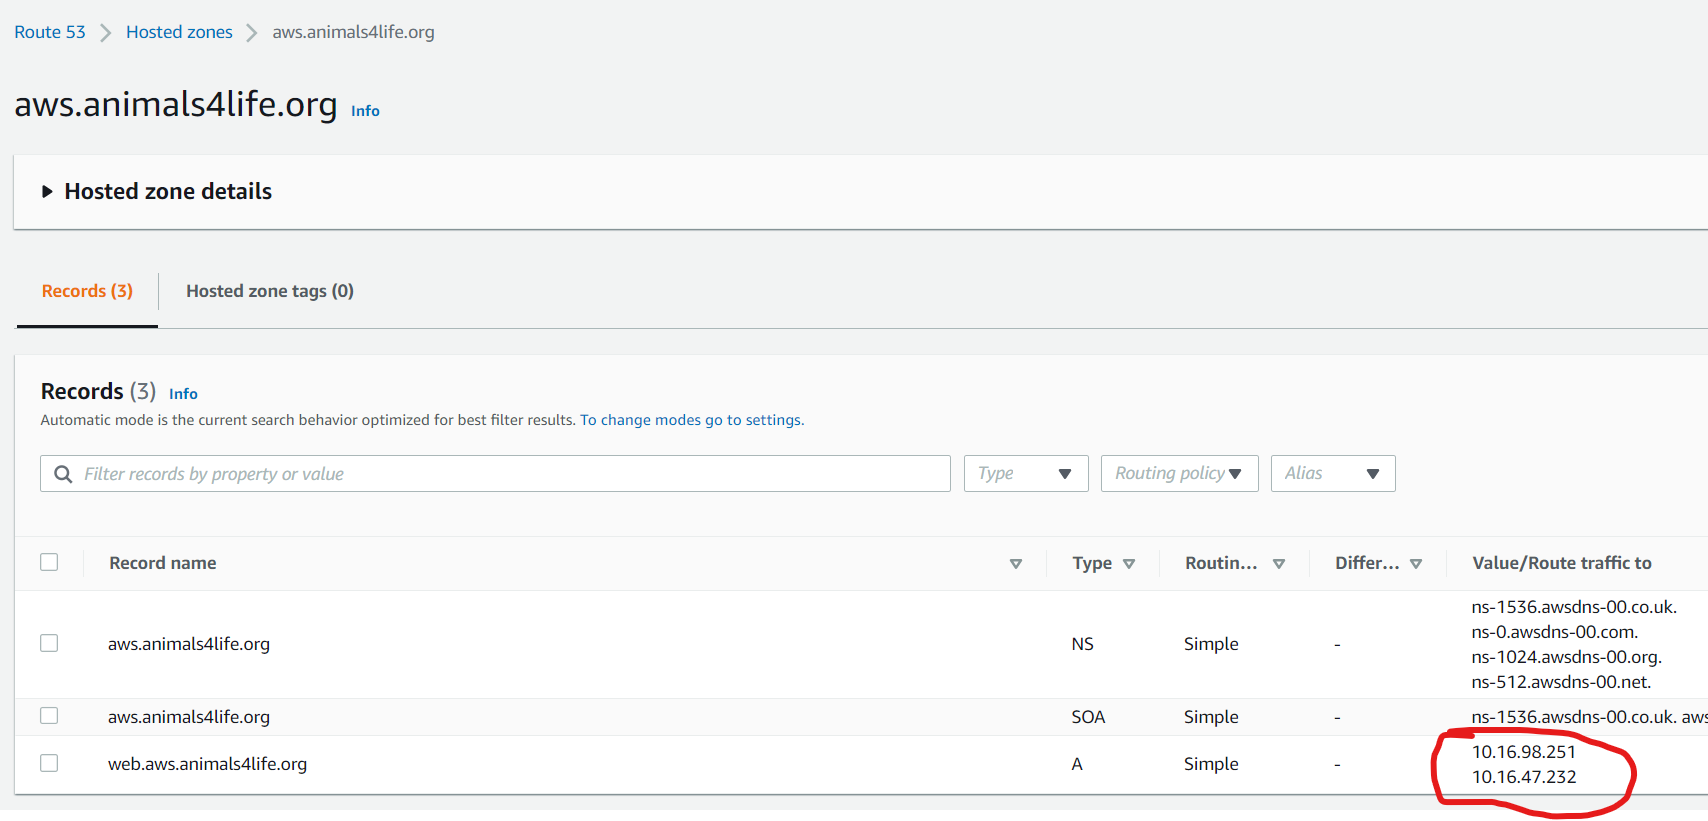
Check Hosted Zone
- Navigate back to the Route53 console and select Hosted Zones.
- You should see the two IP addresses listed under the hosted zones for web.aws.animals4life.org.
Set DNS on the App server
- Connect to the App server
sudo nano /etc/sysconfig/network-scripts/ifcfg-eth0- At the bottom of this file, type
DNS1=DNSAIPandDNS2=DNSBIPreplacing the text with the IP Addresses.
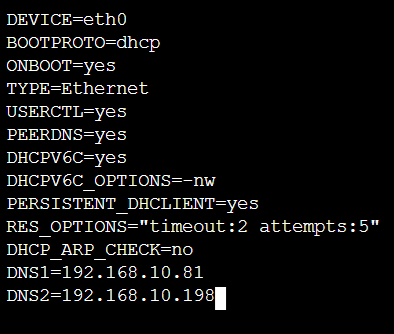
- Ctrl+O and Ctrl+X to exit Nano.
- Restart the instance
sudo reboot - Wait for this server to boot and connect using session manager.
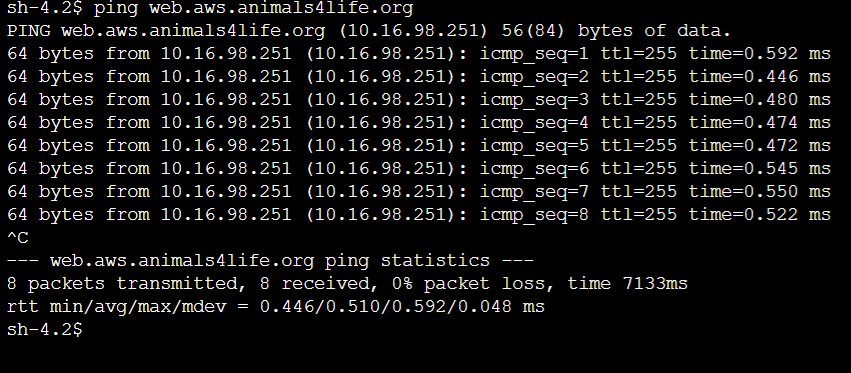
- Run
ping web.aws.animals4life.orgnow.
Stage 4: Configure Outbound
- Navigate to the Route53 console and select Outbound Endpoints and create outbound endpoint
- Name this BYOutbound and then select the -aws VPC.
- Choose the AWSSecurityGroup
- Select the us-east-1a AZ adn then the single subnet
- Allow AWS to select the IP automatically
- Select us-east-1b and then the single subnet and then click Submit at the bottom to create the outbound endpoint.
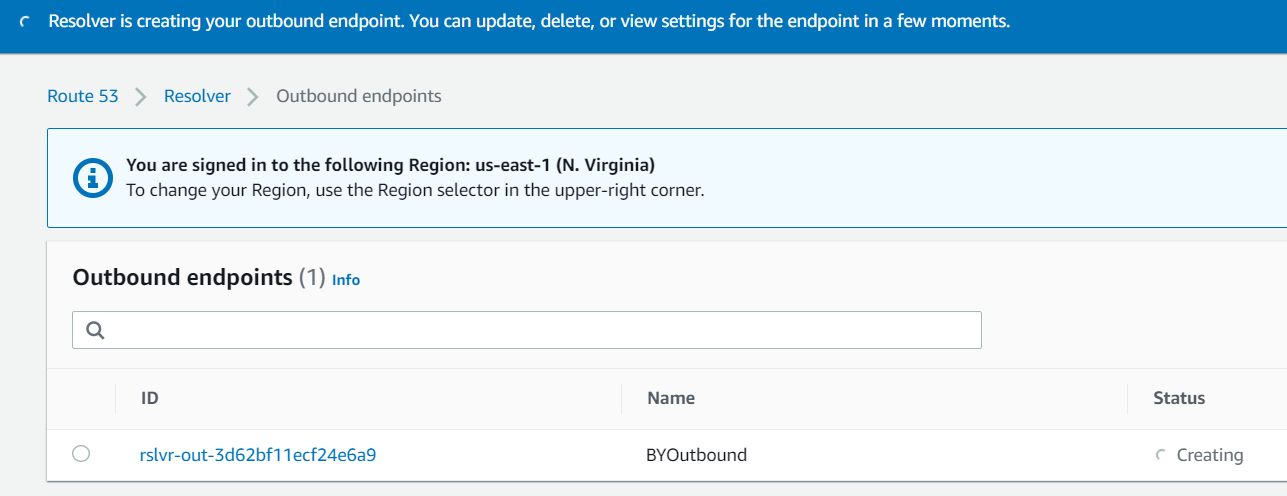
- This should move into an Operational state.

- Click on Rules under Resolver on the left to create an outbound rule.
- Click Create rule
- Name this BYONPREM-CORPZONE
- Domain name should be
corp.animals4life.org - Choose the -aws VPC
- Select the BYOutbound - Outbound Endpoint
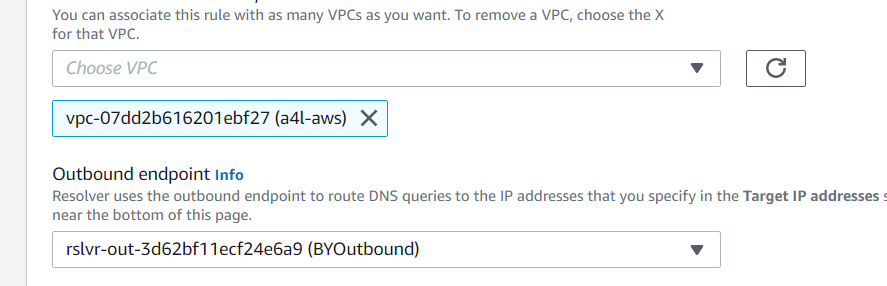
- Click Add Target under IP addresses and add in the two IP addresses for the DNSA and DNSB servers.
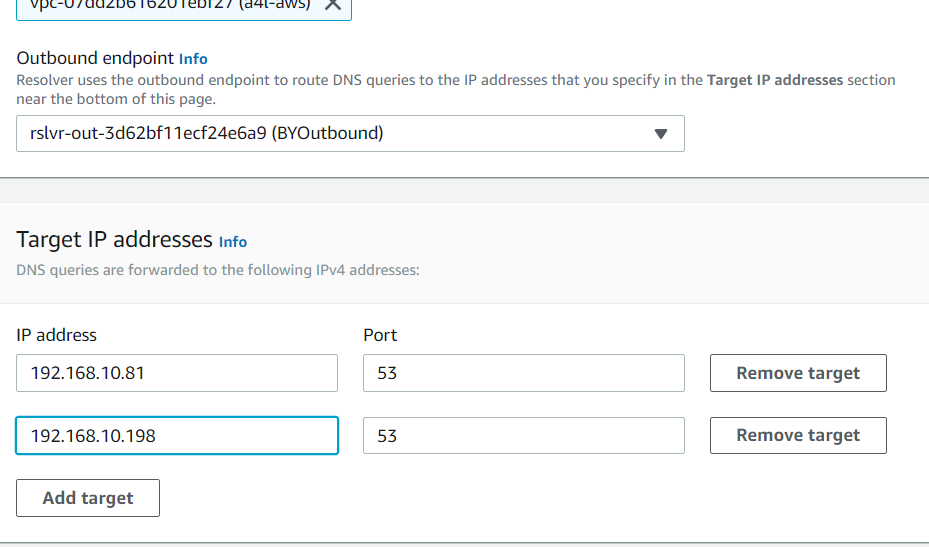
- Click Submit at the bottom.
Test DNS
- Connect to EC2-A
- Ping
ping app.corp.animals4life.organd it should ping successfully.
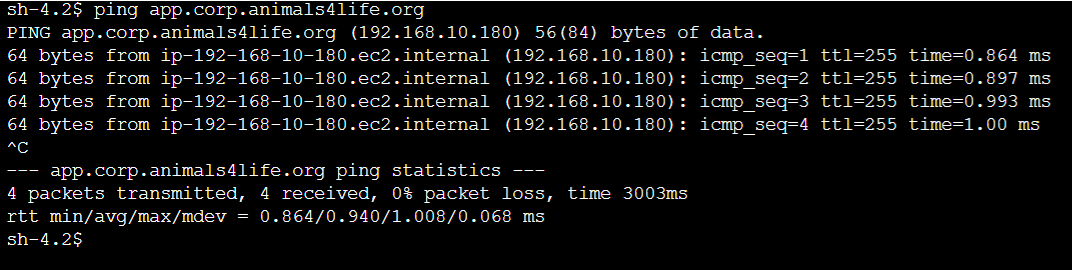 You can now Ping back and forth on the DNS queries.
You've built this:
Stage 5: Cleanup
Disassociate and delete the rule you created
Delete the outbound endpoint
Delete the inbound endpoint
Delete the VPC peer
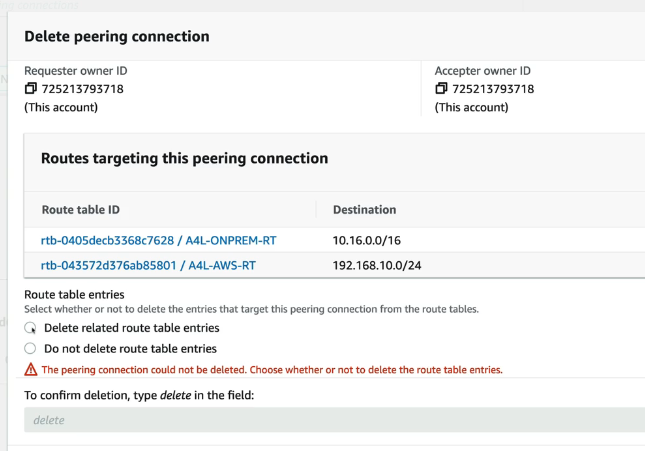 Delete the blackhole routes from the route tables
Delete Stack
Delete the blackhole routes from the route tables
Delete Stack
IPv6 Capability in VPCs
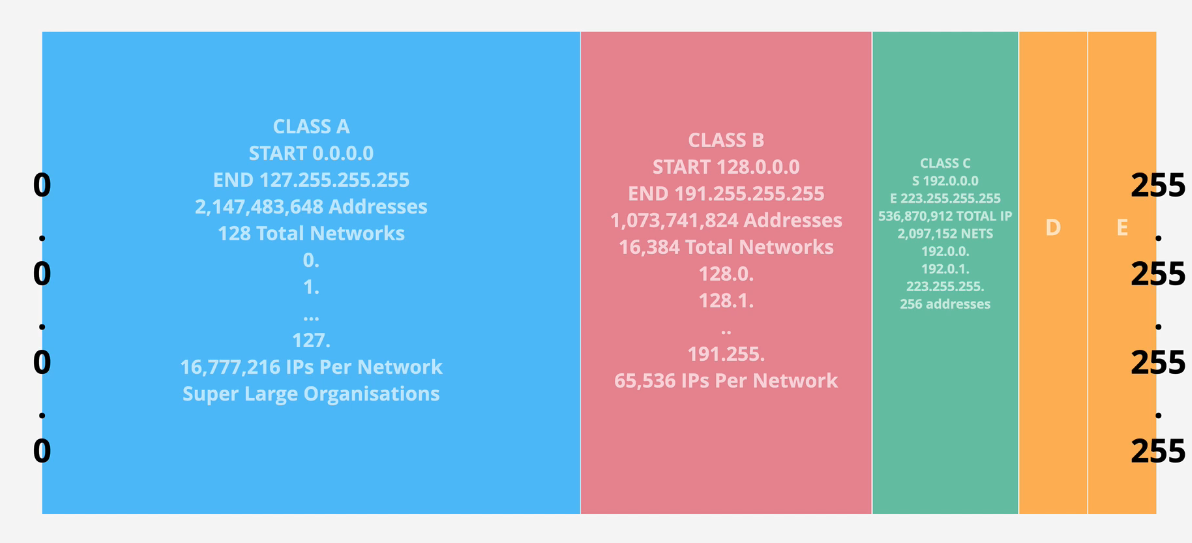
There's like 4.3 billion IPv4 addresses.
IP Address Space:
 There's like 79 sextillion IPv6 addresses - that's a lot, lol
 Only public IPv4 addresses are routed over the internet. Your 192.168.1.45 isn't going to route over the network without...NAT
- Private IPv4 are translated into Public IPv4 using Network Address Translation (NAT)
- Private and public IPs and subnets are architecturally distinct in AWS.
- Important - You'll never configure a public IP within the operating system on any system in AWS.

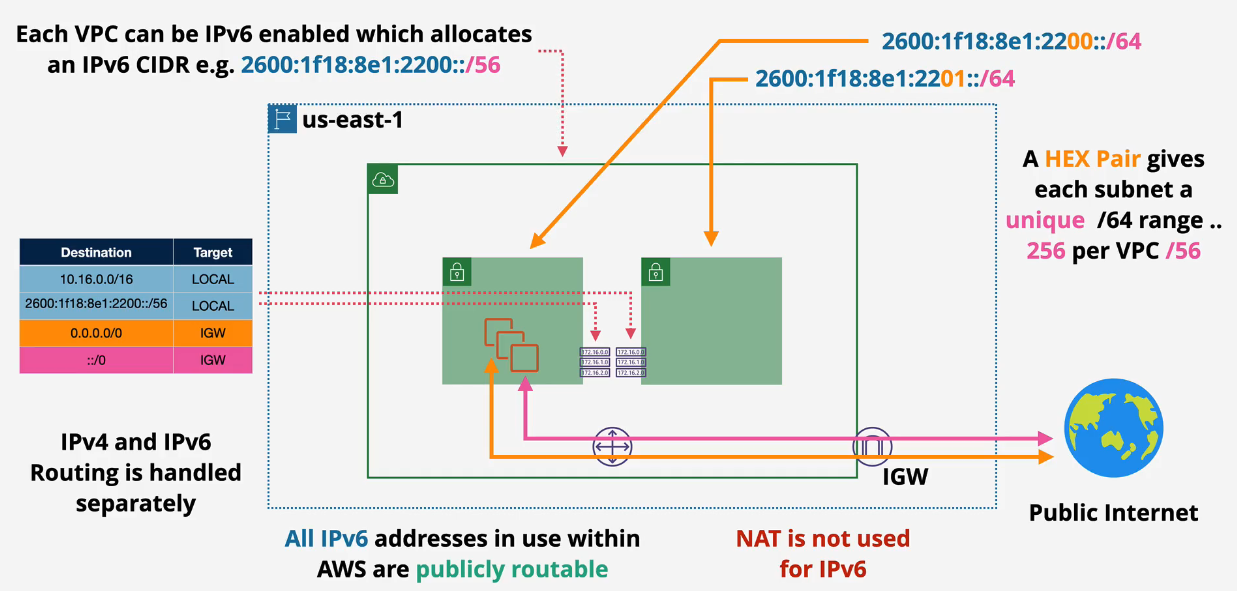
IPv6
- NAT is not used for IPv6.
- AWS will give you a /56 IPv6 range which gives you 18 quintillion publicly routable IP addresses.
- All IPv6 are publicly routable
- IPv4 and IPv6 routes are handled differently - watch out for that.
- Can create an "egress only gateway" to block outward IPv6.
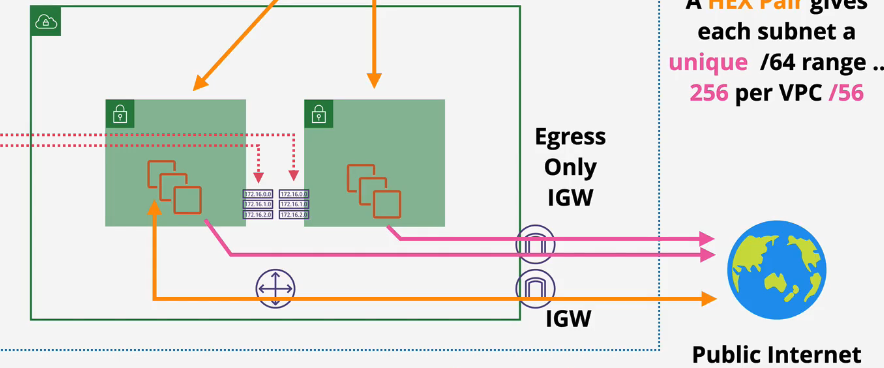
- You can have an IGW and an egress only IGW attached to a VPC.
- IPv6 can be added while creating VPC or can be migrated to IPv6.
How to implement:
- Add VPC range, add a Subnet range
- Add routes and appropriate gateways Configure IPv6 on the services
Note: learn which services handle IPv4 and IPv6 and memorize. 3 options:
- Both IPv4 and IPv6
- IPv4
- IPv6
Advanced VPC Structure - How many AZ's?
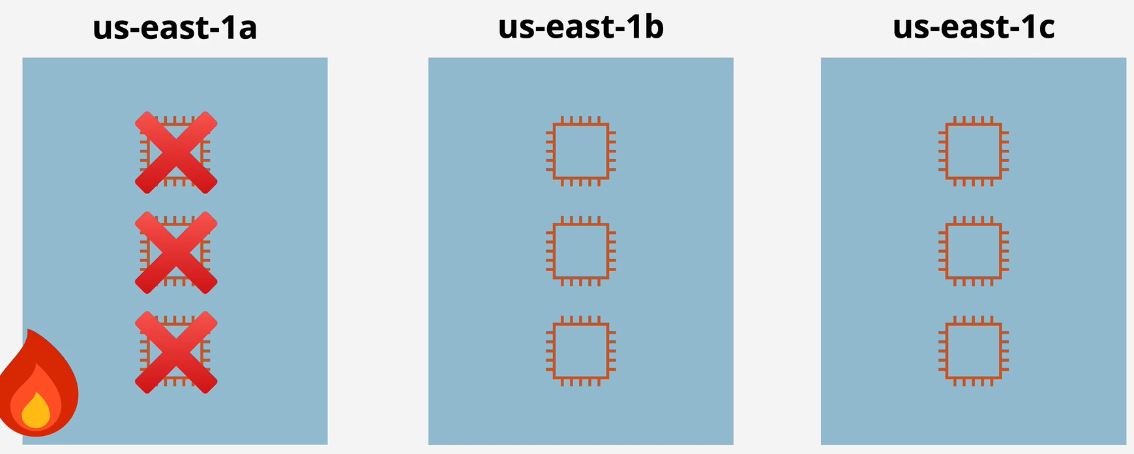
So...How many Availability Zones should you need?
-
Lets say you have 6 EC2 instances and you put them in one AZ. That AZ fails and then all 6 instances are unavailable and your app is down
-
You decide to split these across 2 AZs and put 3 EC2 instances in each, so that one AZ fails and you'll have half of the EC2 instances running.
-
Now, the traffic from the 6 EC2s overloads the 3 EC2s and slows and crashes the site anyways because of load based failure. Fixes: You could overprovision instances. You can put 6 instances in 2 AZs, which is 12 total which doubles the cost. It's not very cost effective though.
-
You instead create 3 AZs with 3 EC2s and if one goes down, you can still have 6 EC2 instances. This is more cost effective.
-
Or 4 AZs with 2 instances each - even more cost efficient.
Figure out what your minimum app requirements are.
- You can split your app across 6 AZs +1 with 7 EC2 instances for a more higher available app.
- You can lose two AZs and still have 5 EC2 instances running while only having 7 EC2 instances running.
Nominal Instances / Nominal Azs = Optimal 1 Per AZ
Advanced VPC Structure - Subnets and Tiers
There are 3 traditional tiers of infrastructure.
- Presentation Tier
- Logic Tier
- Data Tier
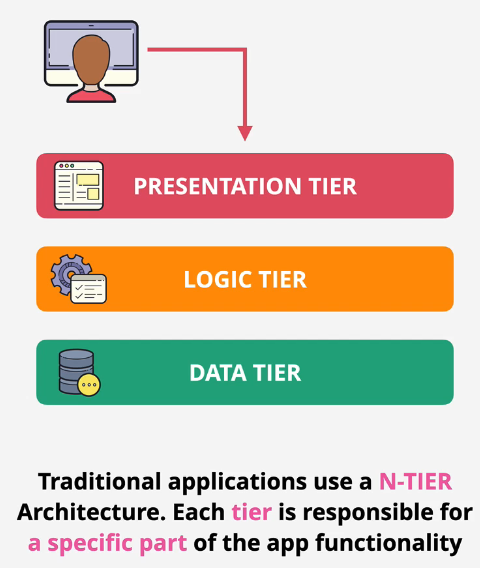
DON'T COPY THIS INFRASTRUCTURE INTO AWS. AWS has a better way to do this.
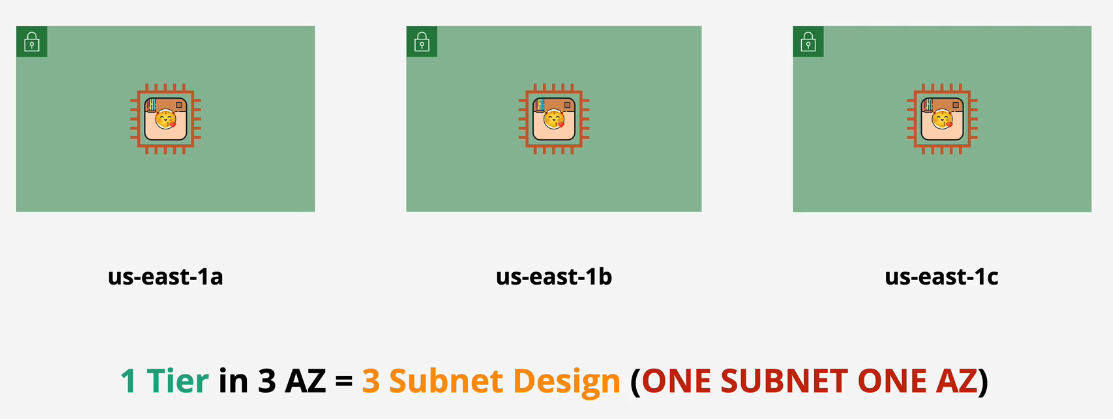
If you're using one subnet, you're using one AZ and this is not HA.
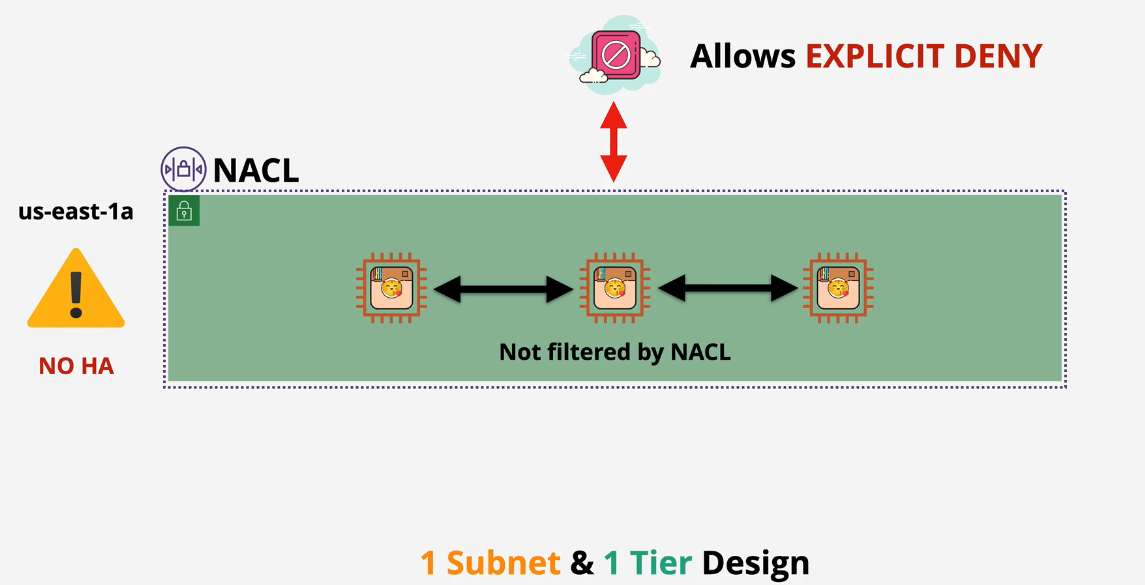
You can divide 3 EC2 instances into 3 subnets into 3 AZs. The default VPC will have a single subnet in each of the existing availability zones. You want to create your custom VPCs the same way. You're still using this one tier, though.
Part 2
How do we move from the one tier to something more protected? Good:
- Don't give public IPs to certain resources in public subnets.
- Security Groups on the ENI/Resources can help mitigate access control.
Better: Create another tier.
- Move databases to a separate tier and then put those in different subnets. 3 EC2 instances + 3 Database instances = 6 Subnets across 3 AZs.
- You'll need to create route tables to and from the public internet and then across the database and web tiers.

Best - With Route Tables:
NOTE: A good indicator for this is the involvement of Databases.
Tips:
- Ignore HA to start with - how many subnets does your app need?
- can mix and match Public and Private Addressing in one subnet - security controlled by one subnet?
- Different routing = multiple subnets
- Internet facing ALBs can communicate with Private instances :)
- number of App subnets x AZs = Subnets needed
Summary
At this point in the course:
- You are at 23 hours and 9 minutes of 67 hours and 6 minutes.
- 34% of the way through. Keep going Dupo!