[[TOC]]
Create a Static Website with S3
Create the bucket
- Navigate to the S3 console in the management account
- Click on Create Bucket.
- Name the bucket.
a. If you registered a domain name, the domain name must be the same as the bucket name - Select the us-east-1 region.
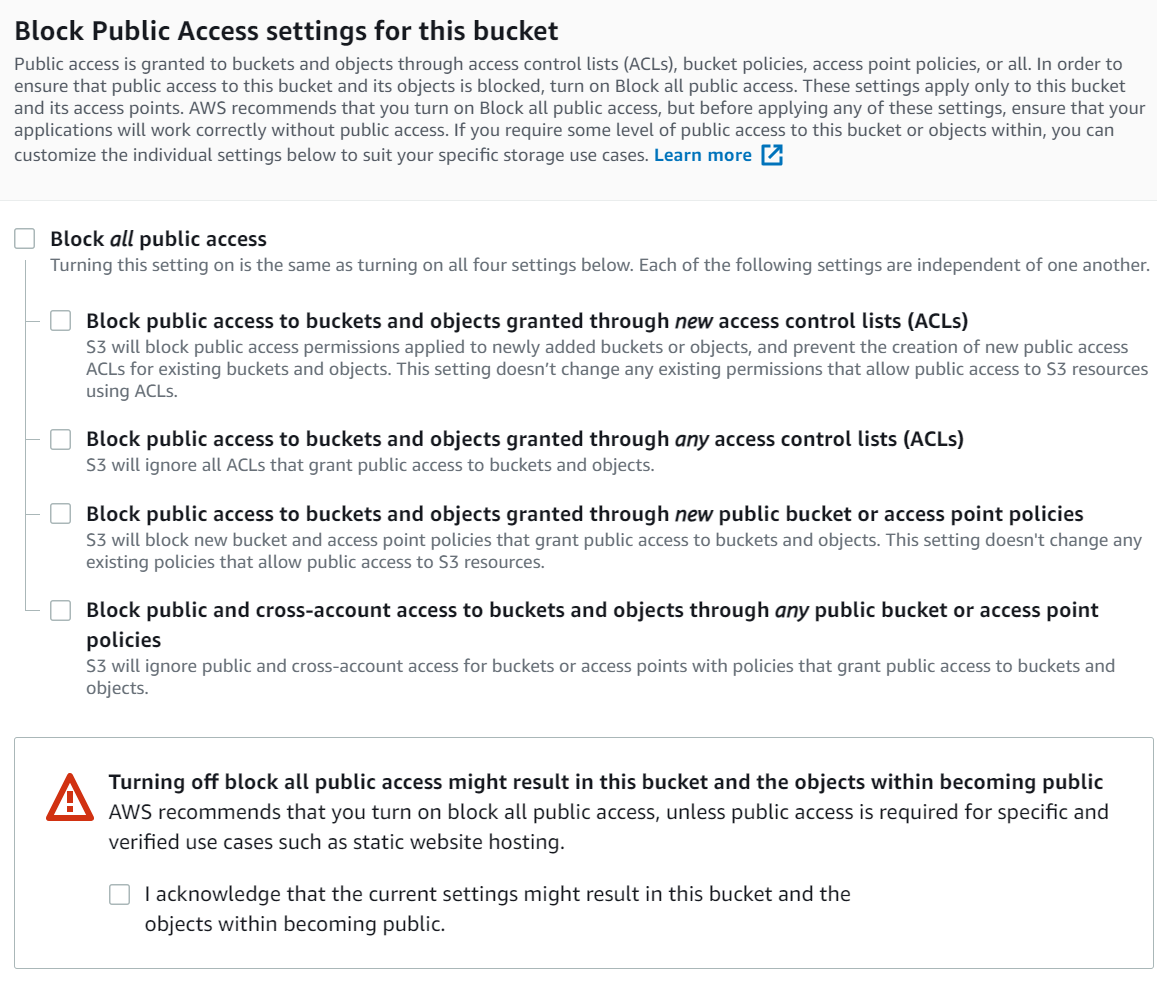
- Uncheck Block all public access to open up the block to the S3 buckets
- Click the I acknowledge box to ensure that you understand what you're doing.
- Click the create bucket button
Enable Static Website Hosting on the Bucket
- Navigate to the S3 bucket and click the Properties tab
- Click Edit and enable static website hosting
- Select your Index document name. This will be a basic html file that is your landing page for your content.
a. You'll need to create these two files and you will upload them to the bucket later in this demo. - Select your Error document. This one will typically just be a generic "website can't be found" or 404 error page.
- Copy the URL at the bottom that you can use to access the website.
- Navigate to the S3 bucket and click Upload
- Upload the error.html and the index.html to this folder along with any other parts of the website that you want to upload.
- Navigate to the URL and notice that you will get a 403 error on the bucket.
Give permissions to anonymous or unauthenticated users
Why do you have a 403 error when you've turned off the block all public access and have seemingly created the access to the content? We need to make the objects public via bucket policy.
- Click the permissions tab and specify the bucket policy.
- Copy and paste the below blanket policy into this box and save.
{
    "Version": "2012-10-17",
    "Statement": [
        {
            "Sid": "PublicRead",
            "Effect": "Allow",
            "Principal": "*",
            "Action": [
                "s3:GetObject",
                "s3:GetObjectVersion"
            ],
            "Resource": "arn:aws:s3:::top10.babyyoda.site/*"
        }
    ]
}
- What this does is Allows the GetObject Action to ANY principal to the Resource top10.babyyoda.site and all of the files (/*) inside of that resource.
a. You're learning how to read policy as we go, aren't you? - Refresh the URL and you should be able to access your website.
Custom Domain
If you want to add a custom domain to this static website, you'll need to have the domain name either registered with AWS or its nameservers pointed to AWS.
- Navigate to the Route53 console.
- Click on Hosted Zones - you should have this, if not, you'll need to create it.
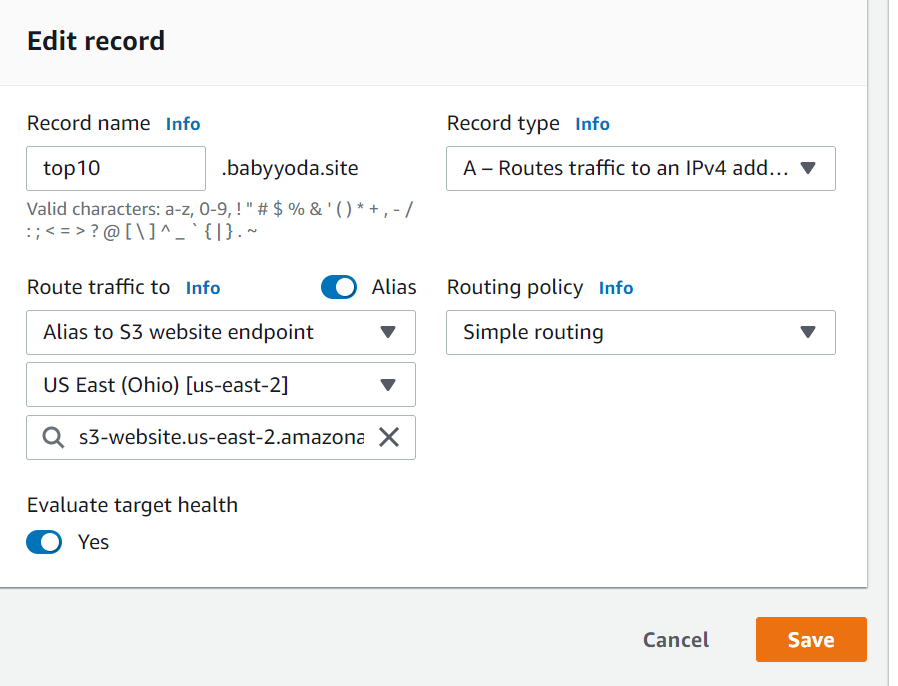
- Create a simple record.
- Name it the same as your S3 bucket name
- Choose the endpoint which should be your S3 bucket
- Select Alias to S3 website endpoint.
- Choose the region us-east-1 8 Select the S3 bucket
- Click define simple record and then create the record.
- you might need to wait for the DNS to refresh, but you will now be able to use that custom domain name to access your static website in the S3 bucket.
Clean Up
Empty the S3 bucket first
Delete the bucket
Delete the A record in the DNS hosted zone, if applicable.
S3 Versioning
Create S3 Bucket and Static Website
- Navigate to the S3 console of the Management account.
- Create a new bucket, name it whatever you'd like
- Uncheck the block all public access box, click the acknowledge button
- Save and enable static website hosting
- Set the index and error documents
- Save the changes
- Apply the bucket policy to allow public Read access
- Upload the error and index html documents that you've created in the previous demo.
- Upload a few small images into this folder
- Test that you can access the images and the index.html through the browser to confirm the static website has been configured correctly.
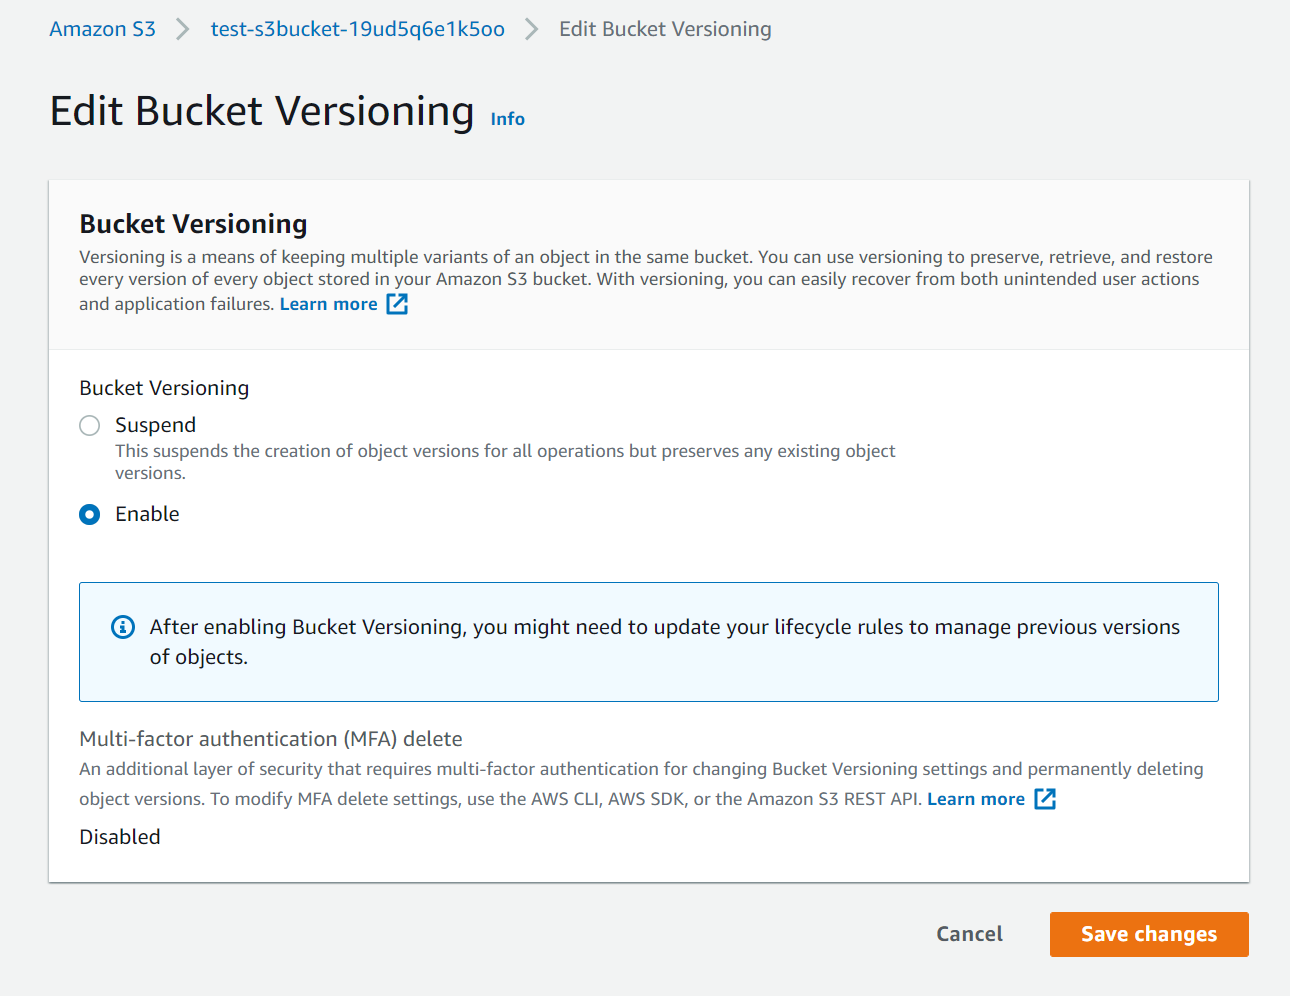
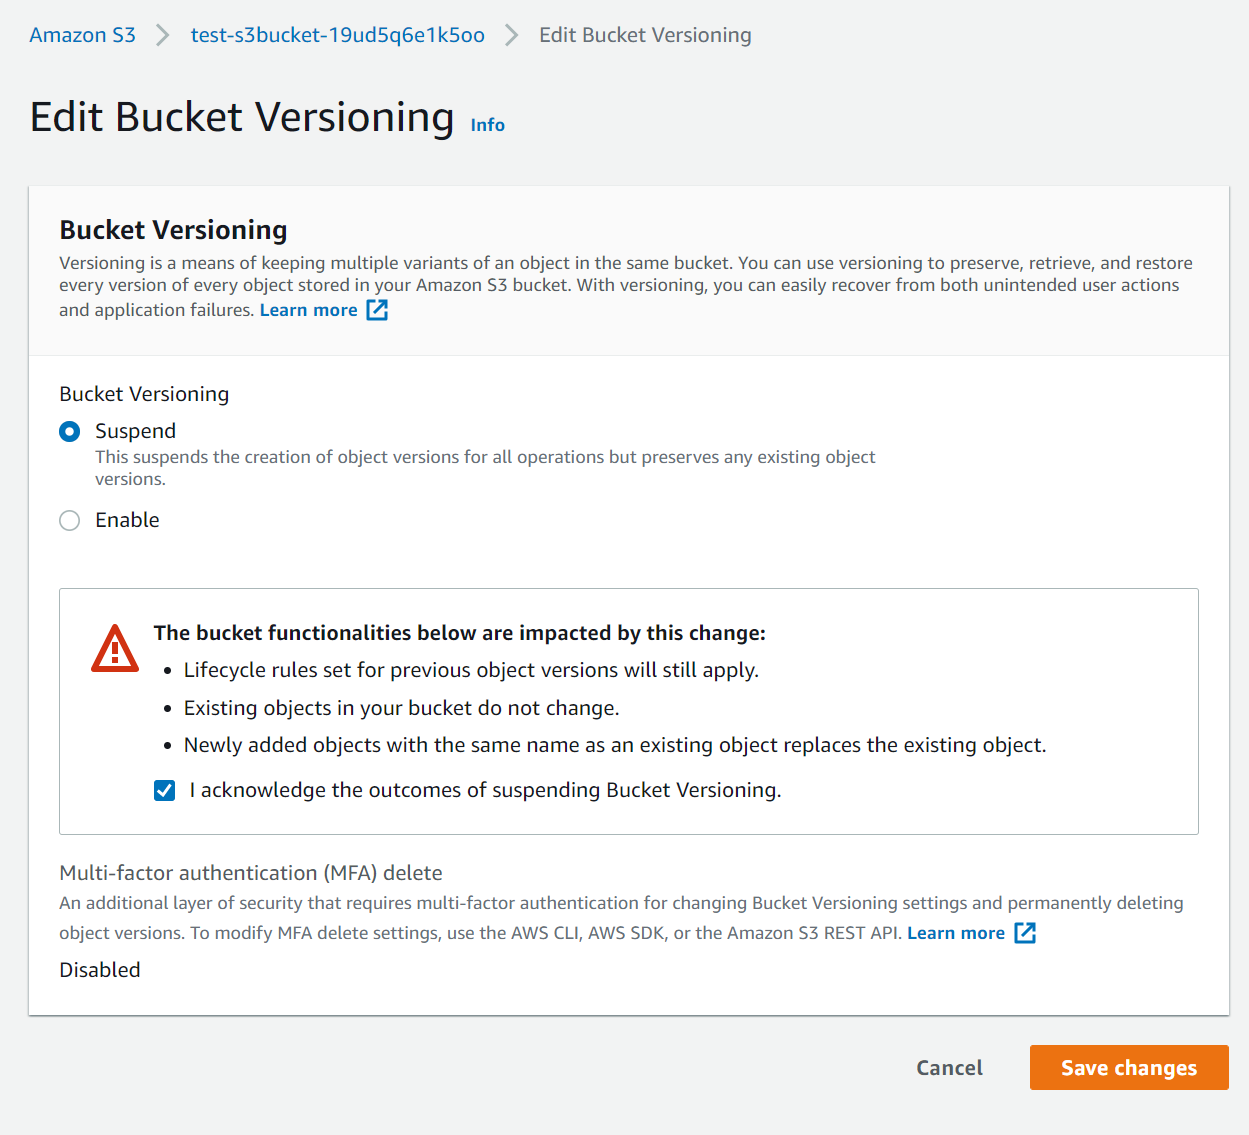
Enable S3 Versioning
- Click on the bucket and go to properties
- Edit the versioning and enable
- Navigate back to the bucket and select the "Show Versions" button to see that the versions are all the original, first version you have uploaded
- Upload a new file with the same name
- Notice that the versions change
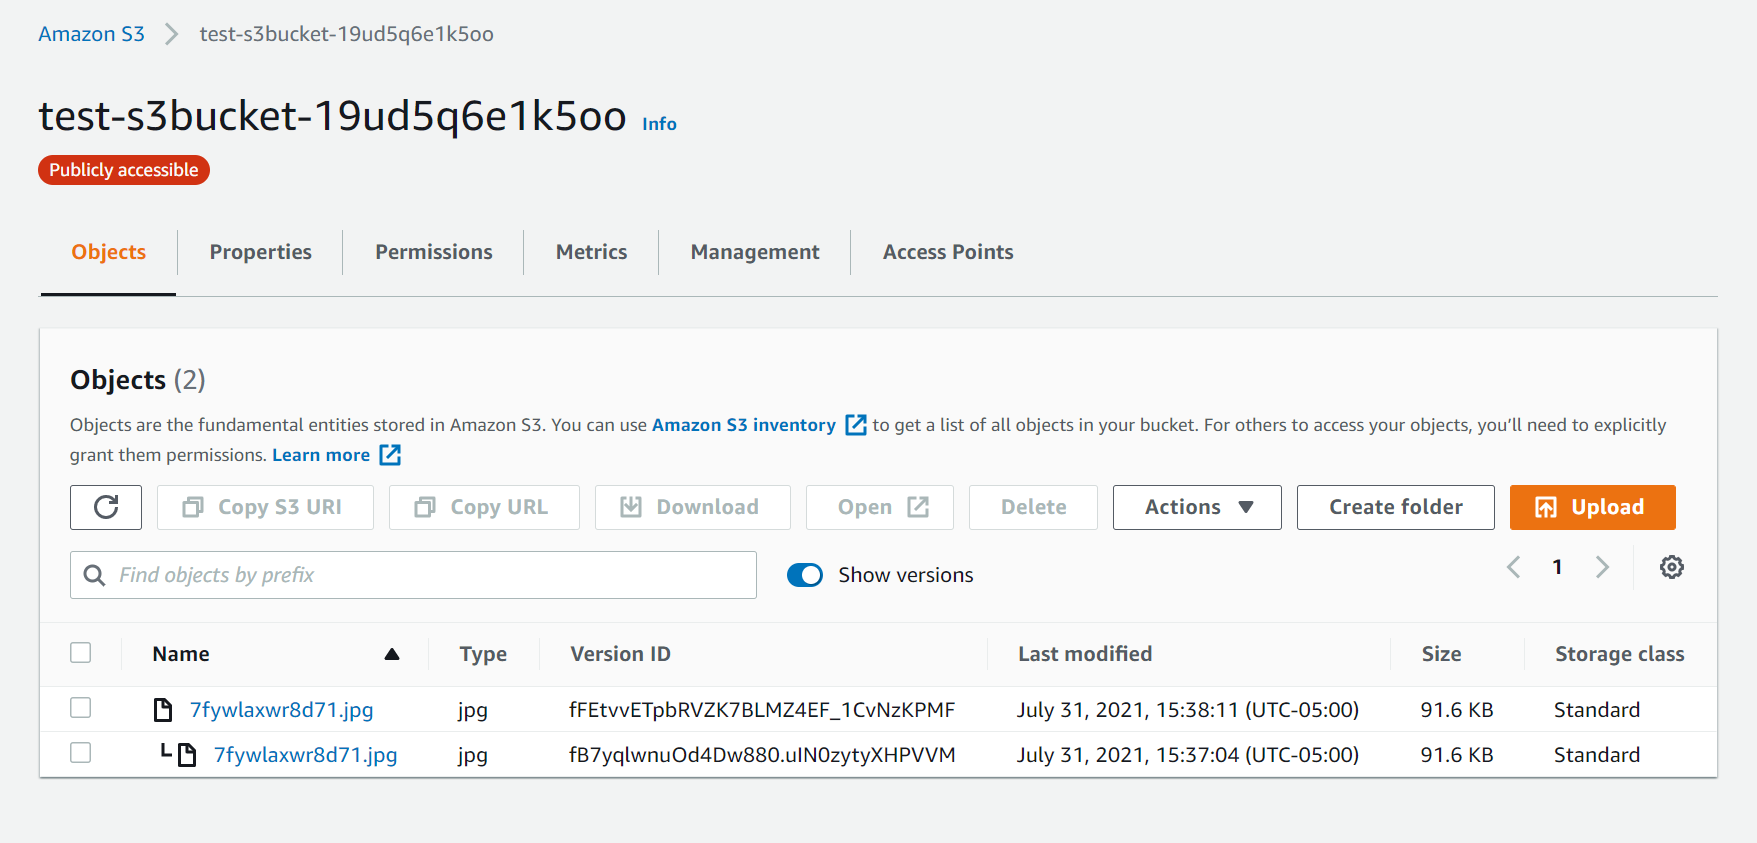
- Refresh the URL and notice that after the cache clears, the new image shows.
- Repeat this a few more times and notice that you have uploaded multiple versions and those versions have specific version IDs.
- Delete one of these files.
- You'll notice that when you click on the object and show versions now, you'll see the delete marker
- You can delete the delete marker and delete permanently the files if you do permanently delete them.
- Notice under the permissions that you cannot switch versioning off.
Clean Up
- Empty the bucket
- Delete the bucket
S3 Performance
- Create a new bucket
- Go to properties and enable Transfer Acceleration.
- Take a note of the endmoint link. 4 That's it, but to really test this, lets use a tool provided by Amazon.
Use the Acceleration tool.
- Open up the AWS transfer acceleration tool. Link
- Leave this running to see the differences between regions.
Object Encryption
Prerequisites:
4 random images each named something like this:
- default-image.jpg
- none-encryption-image.jpg
- sse-kms-encryption-image.jpg
- sse-s3-encryption-image.jpg
Create S3 bucket
In this demo, we're going to upload 3 objects to S3 using the 3 different forms of encryption.
- Navigate to the S3 console inside of the Management account.
- Click Create bucket
- Name the bucket whatever you'd like, select us-east-1 and scroll all the way down to the bottom and click Create bucket a. Don't worry about the block public access section.
Create KMS Key
- Navigate to the Key Management Service (KMS) Console
- Click Create Key
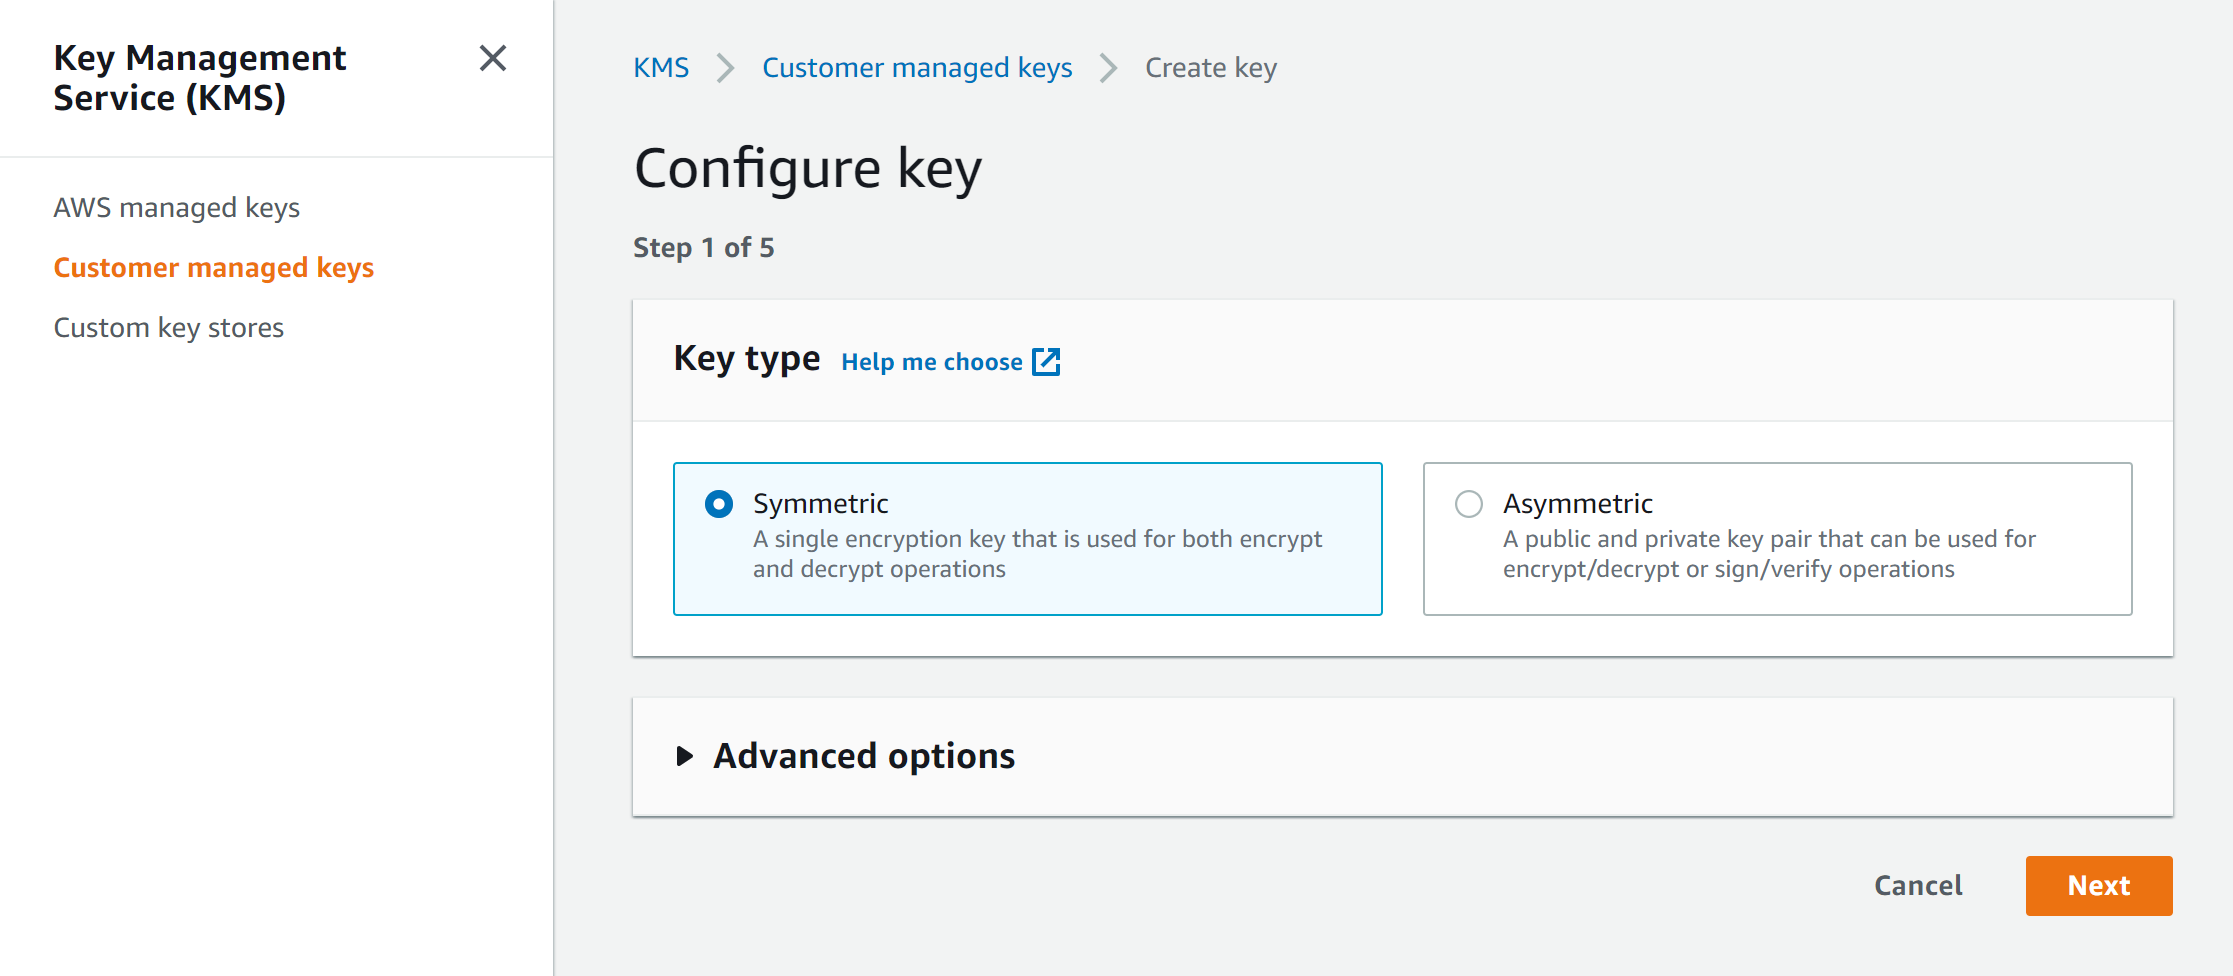
- Select Symmetric Key and ensure KMS is selected in the dropdown. Click Next
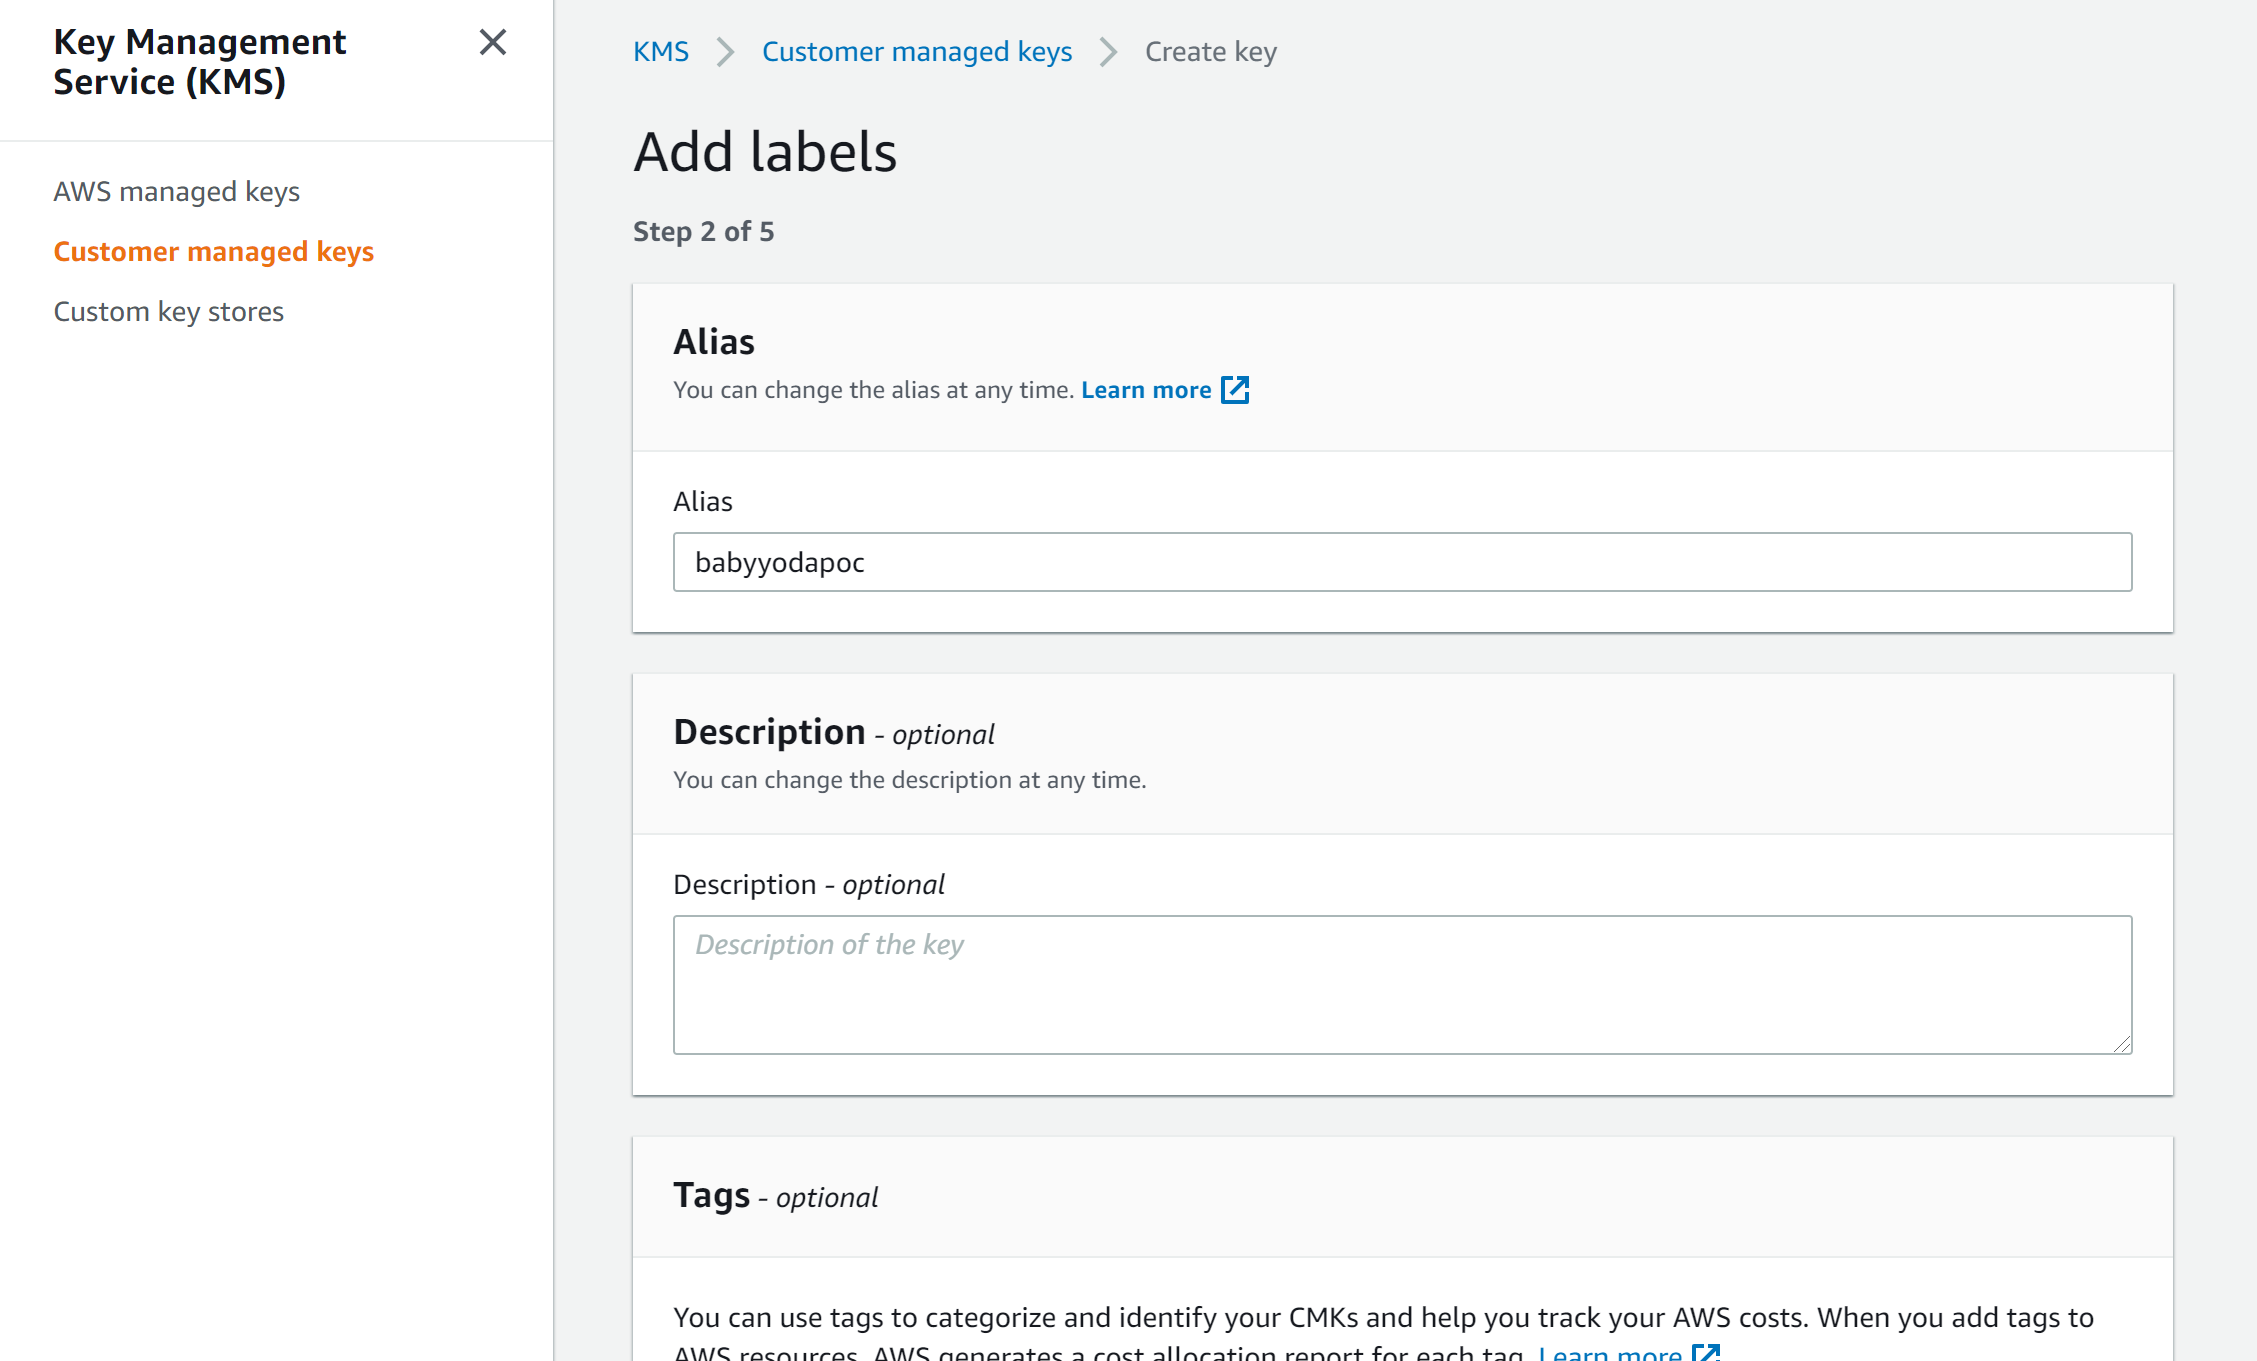
- Name the alias - I called mine babyyodakey1. Click next
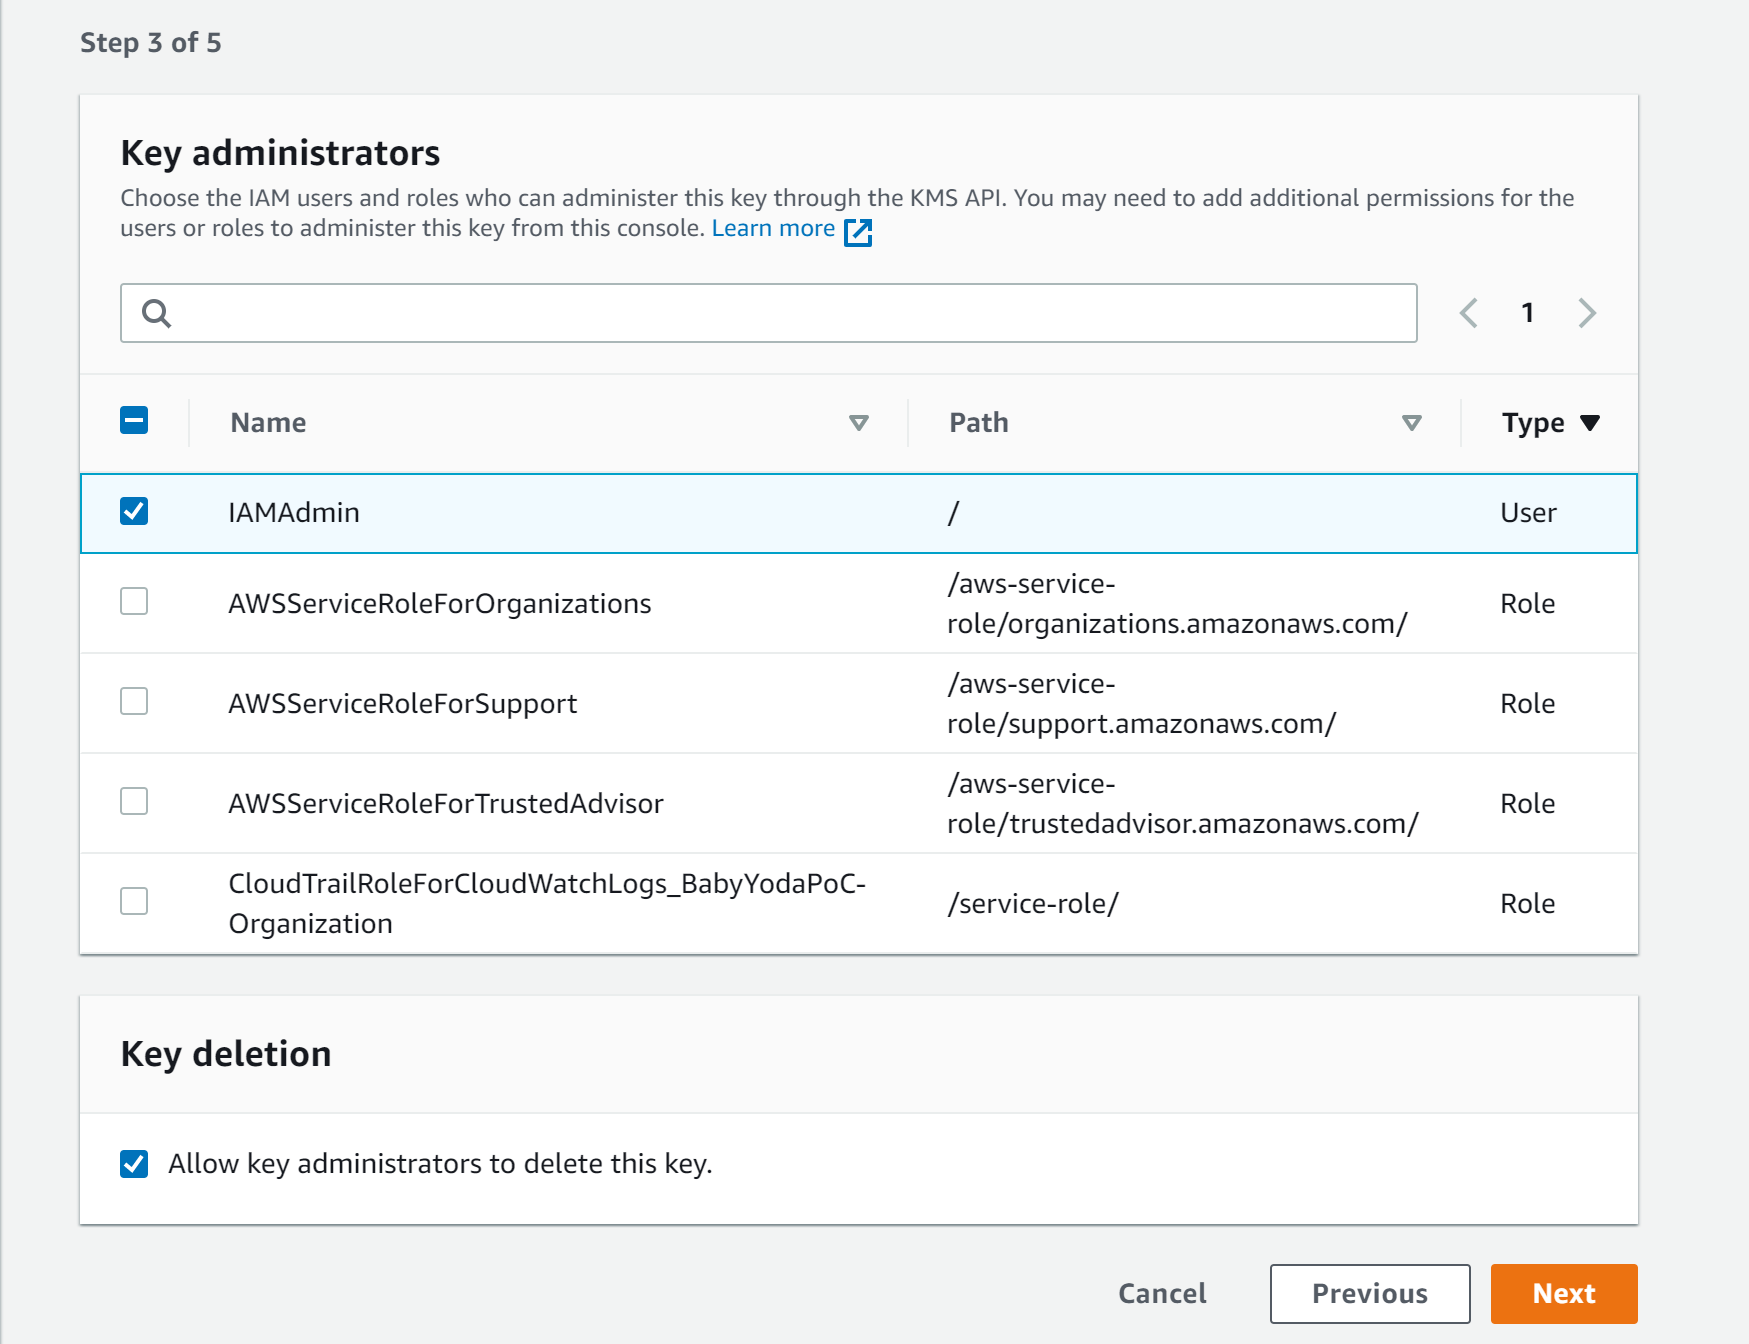
- Click next on the Key administrator page - outside the scope of this demo
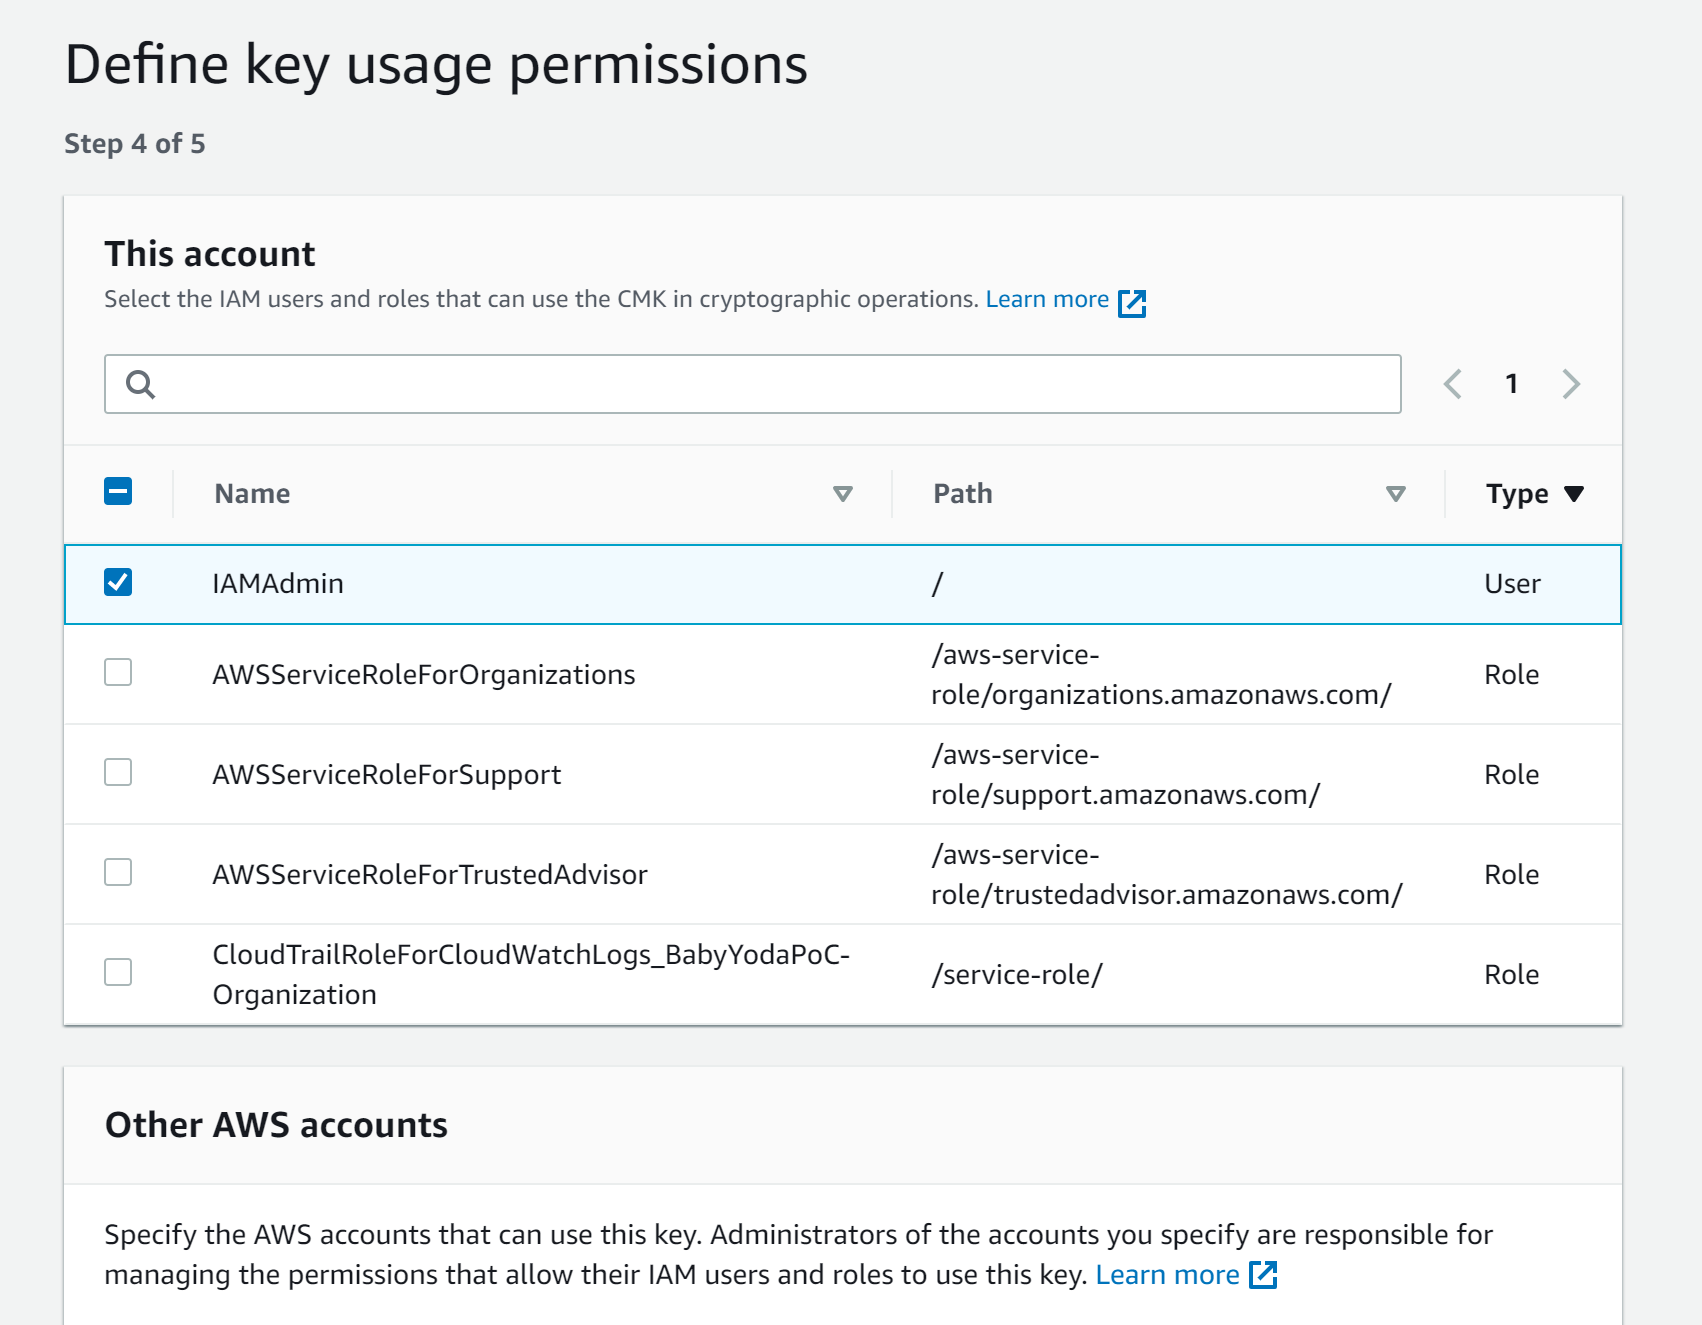
- Click next on the key usage permissions page - also outside the scope of this demo
- Make a quick note of the policy that is created.
{
    "Id": "key-consolepolicy-3",
    "Version": "2012-10-17",
    "Statement": [
        {
            "Sid": "Enable IAM User Permissions",
            "Effect": "Allow",
            "Principal": {
                "AWS": "arn:aws:iam::12345678910101:root"
            },
            "Action": "kms:*",
            "Resource": "*"
        }
    ]
}

Uploading the Objects into S3
- Switch back to the S3 console.
- Click on the bucket that you just created
- Upload an object
- Select the none-encryption-image.jpg here
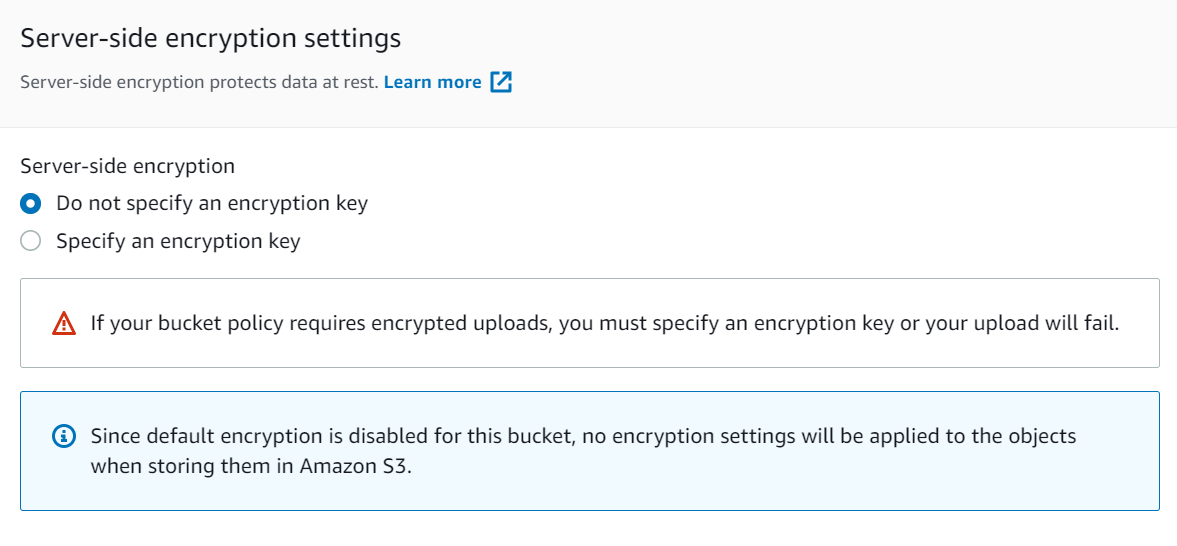
- Scroll down and select Properties and scroll to the Server-side encryption settings
- Take a look at these settings, but ultimately for this one, leave it on do not specify.
- Scroll down and click Upload.
- Wait for this to upload and then go back to the bucket and upload the 2nd image, sse-s3-image.jpg
- Scroll back down to the server side encryption settings and click Enable and Select SSE-S3 and then upload
- Go back to the bucket and then upload the 3rd image, sse-kms-image.jpg. 11 Scroll back down to the server side encryption settings and click Enable and select SSE-KMS
- Select
Choose from your KMS Master keysand then select your KMS master key and then click upload.
Testing
- You should be able to open each one of these images in the S3 console just fine.
- The reason why you can open all 3 of these images is because you are an administrator for all of AWS.
Denying access to KMS
We're going to block our IAMAdmin access to the entirety of KMS as an example of how we can separate roles
- Navigate to the IAM console, click on Users, then click on the IAMAdmin user.
- Click on +Add Inline Policy
- Add this policy:
{
    "Version": "2012-10-17",
    "Statement": [
        {
            "Sid": "DenyKMS",
            "Effect": "Deny",
            "Action": "kms:*",
            "Resource": "*"
        }
    ]
}
- Name the policy and click save.
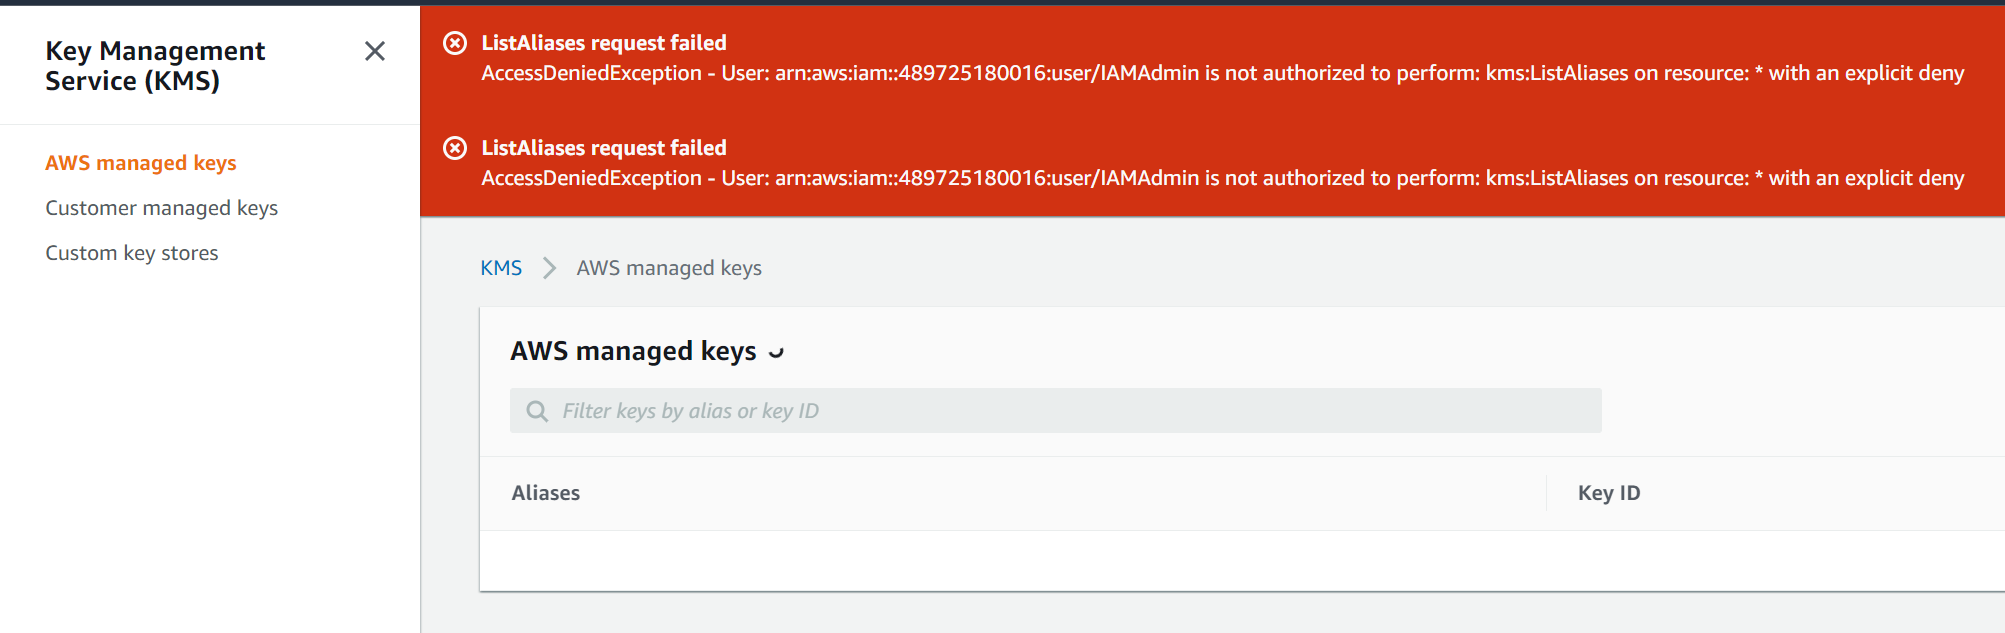
- Try to open up all 3 of the files again.
- You won't be able to access the sse-kms.jpg file:

- We don't have the permissions any longer to access KMS so that handshake fails on the backend of the SSE KMS decryption process.
- Remove the inline policy from the IAMAdmin user before continuing.
Checking the AWS Managed Keys
Navigate to the KMS console 2. Select Customer Managed keys 3. Click on the key we created 4. Click on Key rotation and notice that we can rotate the keys once per year.
Default Encryption Settings
- Navigate back to the S3 Console.
- Click on the S3 bucket we created
- Click on the Properties tab
- Scroll down to the Default Encryption section
- Here's where we can set the default encryption on the bucket.
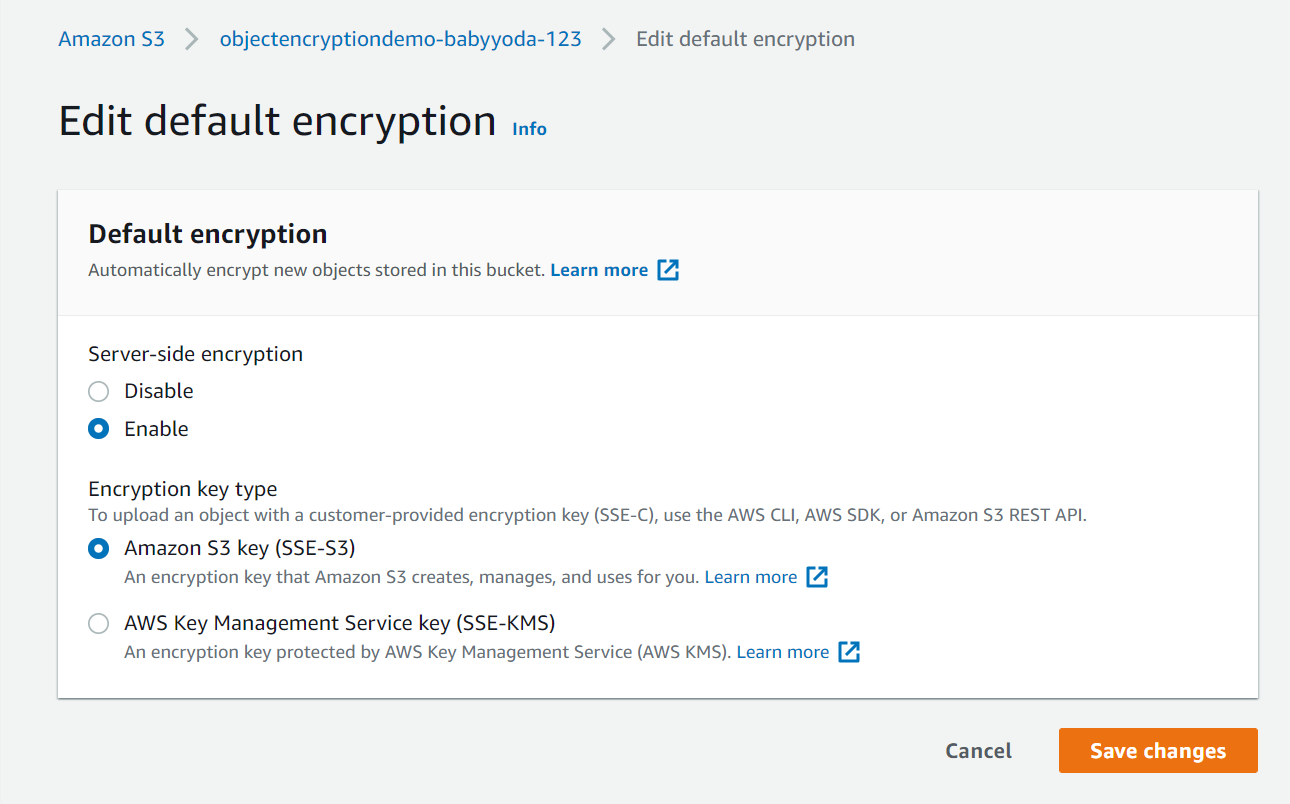
- Set this now, clicking the SSE-KMS option and selecting the key as before
- Upload the default-image.jpg
- Click on the properties of that object and notice that the default encryption has been enabled.
- If you would like to test this, you can then re-enable the DenyKMS policy as above and then upload other images to the S3 bucket and you unfortunately won't be able to open any of them as you lack the permissions now to access KMS.
- Remove the inline policy again to clean up.
Clean Up
Make sure you've removed the inline policy from the IAMAdmin user Empty the bucket Delete the bucket Delete the Key - schedule for 7 days and then it will delete.
S3 Cross Region Replication of an S3 Static Website
Theory:
- Create source bucket in region A
- Create destination bucket in region B
- Enable replication between buckets.
1. Create source bucket in region A
- Log into the management account and navigate to the S3 console.
- Click on create bucket to create source bucket a. name should be source-bucketname-numbers b. region should be us-east-1 c. ignore the block public access settings
- Create bucket
- Click on the bucket and go to properties
- Enable Static Website Hosting a. set the index.html and error.html
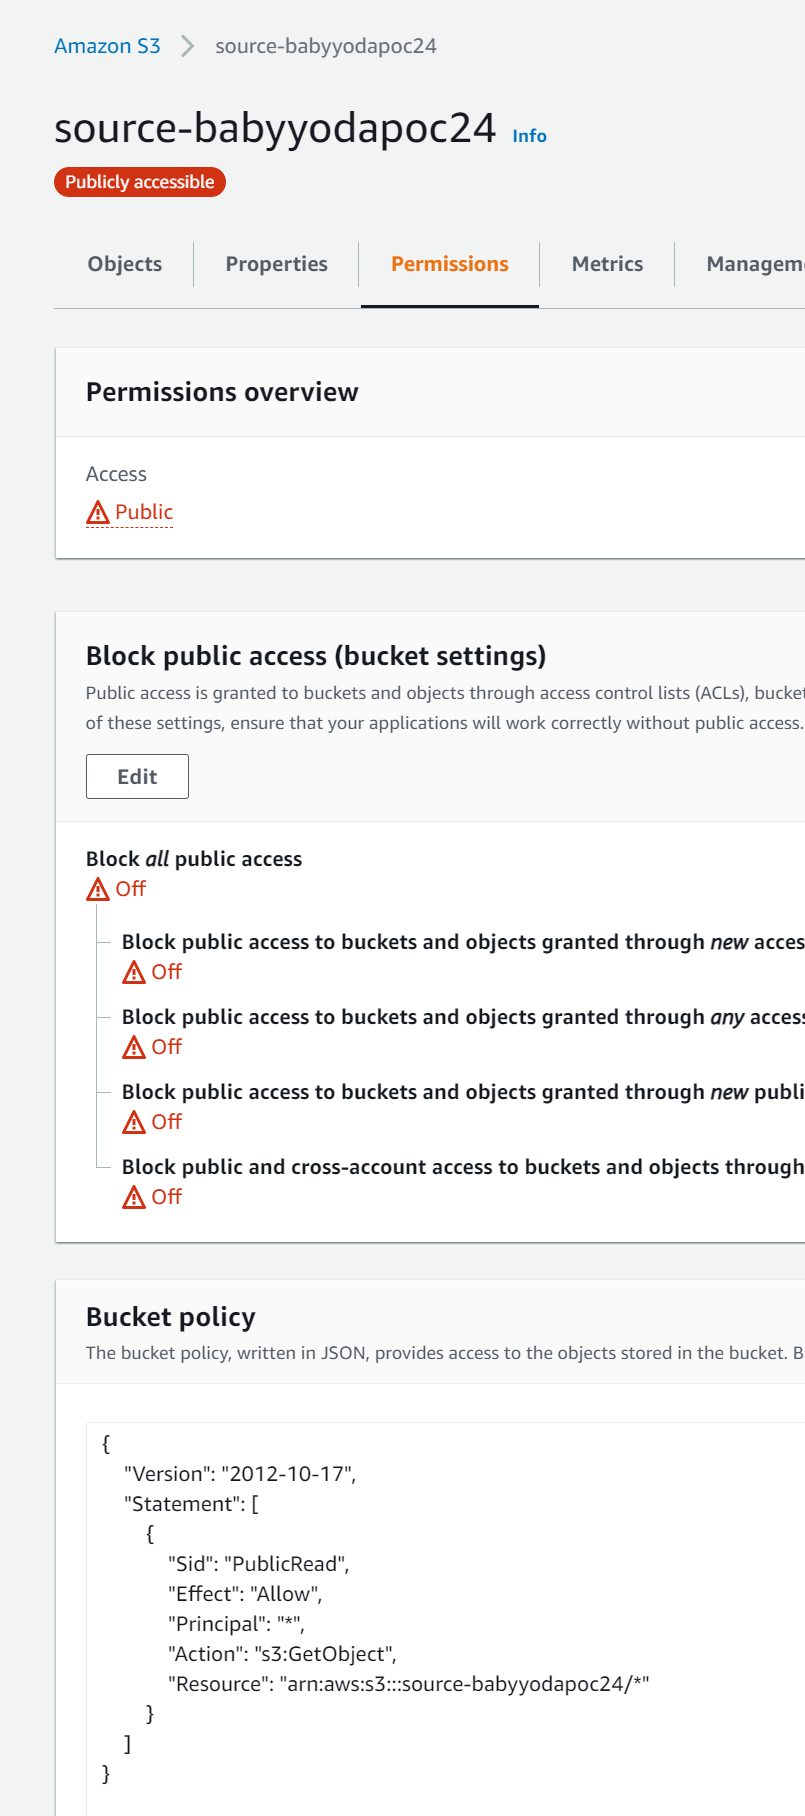
- Navigate to the permission tab
- Edit and uncheck the block public access settings and type in confirm to confirm those settings changes
- Navigate to the bucket policy section
- Copy and paste the bucket policy below and edit to fit your bucket - bonus points if you can write this policy without looking at the code. Should be similar to another demo.
{
    "Version":"2012-10-17",
    "Statement":[
      {
        "Sid":"PublicRead",
        "Effect":"Allow",
        "Principal": "*",
        "Action":["s3:GetObject"],
        "Resource":["arn:aws:s3:::source-babyyodapoc24/*"]
      }
    ]
  }
2. Create destination bucket in region B
- Navigate back to the S3 console and click create bucket
- Name this bucket destination-bucketname-numbers and select a DIFFERENT region, such as us-west-1.
- Uncheck the block public access policy section and click the I acknowledge box - we did this a bit differently this time
- Click on the properties tab and enable static website hosting. a. set the index and error documents
- Go into the permissions tab and set the bucket policy
{
    "Version":"2012-10-17",
    "Statement":[
      {
        "Sid":"PublicRead",
        "Effect":"Allow",
        "Principal": "*",
        "Action":["s3:GetObject"],
        "Resource":["arn:aws:s3:::destination-babyyodapoc-24/*"]
      }
    ]
}
- You should now have both buckets set to public with static website hosting.

3. Enable Replication between buckets
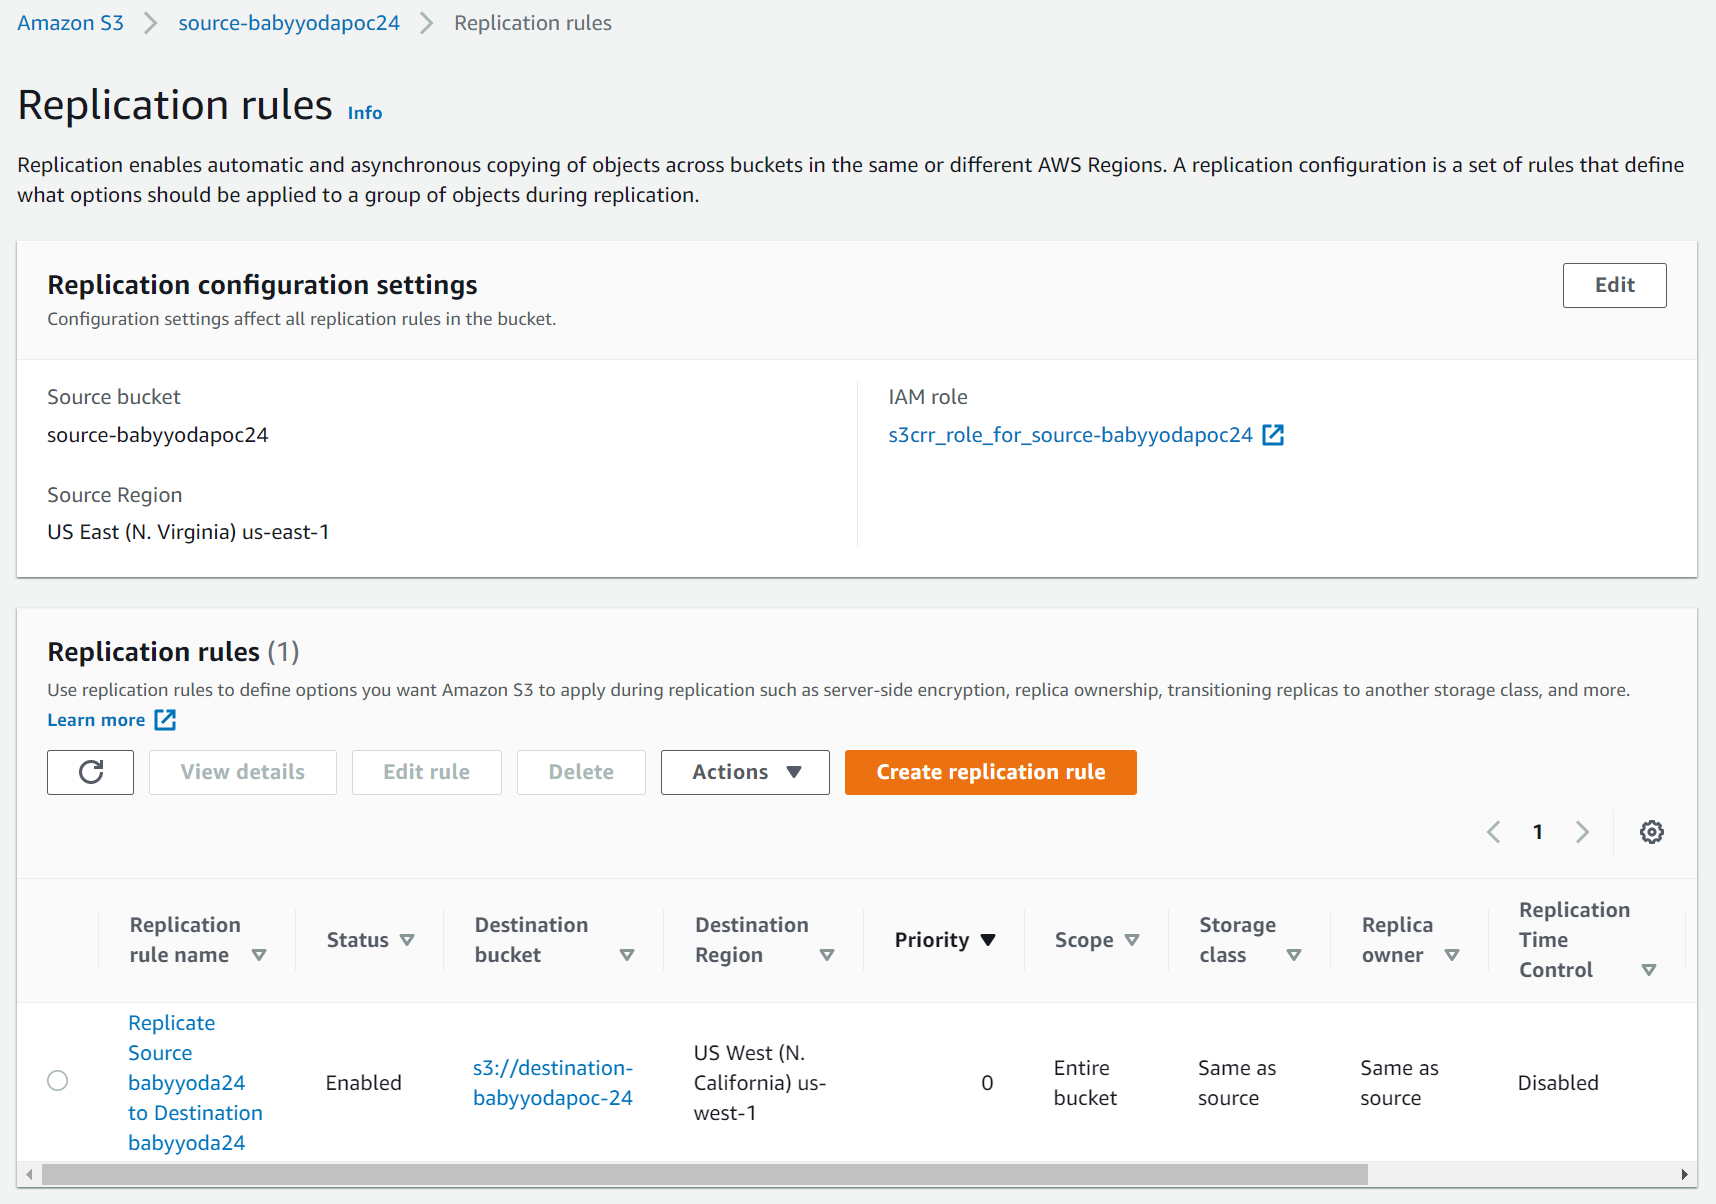
- Navigate to the source bucket
- On the management tab, scroll down to the replication rules section.
- Click Create Replication
- Notice that bucket versioning needs to be enabled. Click this to enable the bucket versioning.
- Under the source bucket section, notice you can limit the scope of this rule to prefixes or certain parts of the bucket
- Check
This rule applies to all objects - Under destination, note that you can select a bucket in this account or another account
a. if you select another account, you need to manage the object ownership.
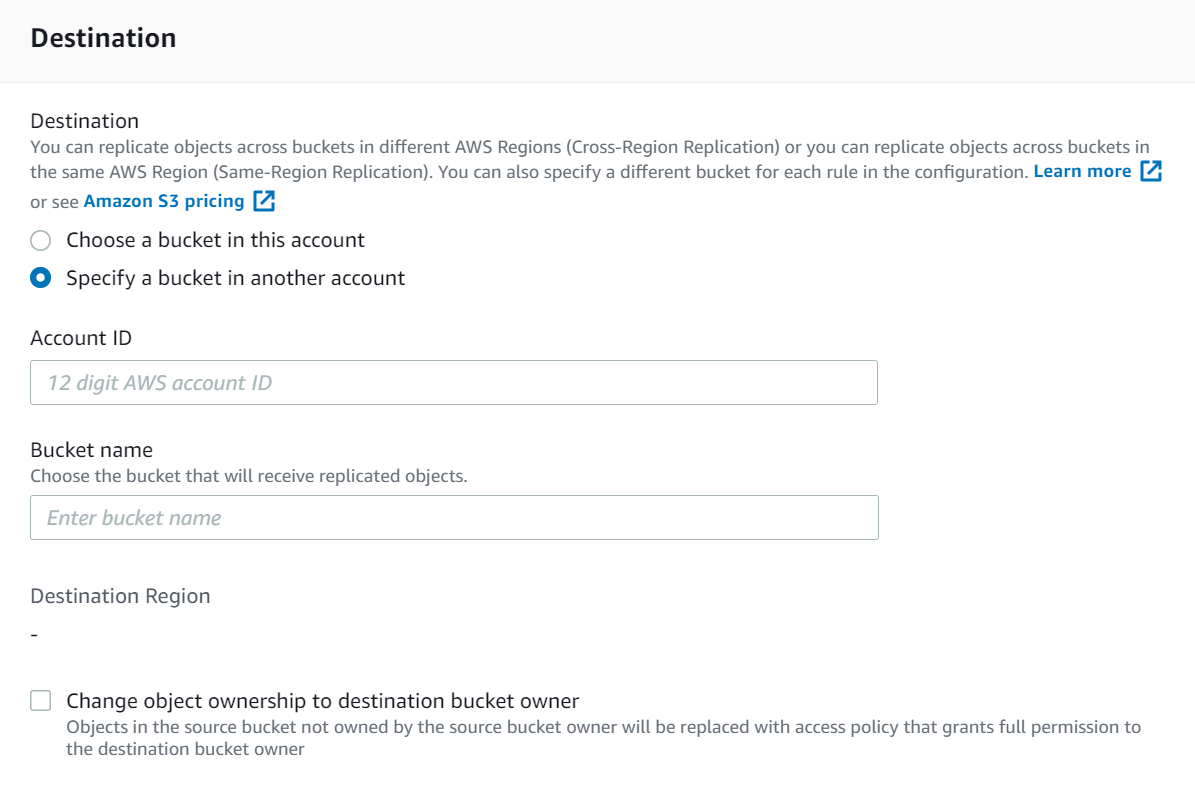
- Set this to
Choose a bucket in this accountand select the Browse S3 button. - Select the destination bucket you created and enable versioning on that bucket as well to match the configuration of the source.
- Under IAM role, we will need to create a new role so that these S3 buckets can communicate to each other.
- Under the encryption section, note that we can set up encryption on this if needed. We are going to leave this unchecked
- Under the destination storage class, note that we can change the storage class on the destination. leave this unchecked. a. this is helpful if we are replicating a normal S3 into a cheaper option rather than just replicating the S3 bucket to another.
- Note the additional replication options a. RTC b. delete marker replication c. replication metadata sync
- Click Save Changes.
4. Testing the replication
- Navigate to the source bucket
- Upload your index.html to this bucket
- Upload a few images here. I used the images from the S3 encryption demo just for funsies.
- You should be able to view the static website from the url on the source bucket.
- You should also be able to see the destination website from the url on the destination bucket
- You can then update the website in one location, wait for the replication to occur and then view the changes in the destination bucket.
- If you couple this with a load balancer and a few more buckets, you can build yourself a pretty large static website.
Clean Up
Empty the buckets Delete the buckets Delete the role that was created
Creating and using Pre-Signed URLs
Setup
- Navigate to the S3 console in the management account
- Create bucket and call it babyyodamedia with some random numbers a. leave the block public access box checked.
- Upload one random image.
Interact with the object
- Click on the object and select Open. You should be able to open this image in a new tab.
- Note the URL of the new tab.
- This is considerably different than the Object URL in the properties section of the object as it contains a security token.
- Try to access the image using the Object URL and notice you get an access denied error. You're now trying to access this using an unauthenticated identity.
Grant temporary access using a presigned URL.
- Open the Cloud Shell and wait for it to be created
- At the prompt, run
aws s3 lsto test that you can view the buckets that you have created. - Run this command to generate a presigned URL:
# aws s3 presign <S3 URL> --expires-in 180
aws s3 presign s3://destination-babyyodapoc-24/none-encryption.jpg --expires-in 180
- Copy this URL to the clipboard and then paste it into a new browser session.
- This will be valid for exactly 180 seconds, so if you wait and try to use this URL again, you will get an access denied error.
Change perms with existing presigned URL
- Generate a new presigned URL with like 65000 seconds.
- Go into your IAM console and change your access to deny all s3.
- Create an inline policy and add the following JSON:
{
    "Version": "2012-10-17",
    "Statement": [
        {
            "Sid": "VisualEditor0",
            "Effect": "Deny",
            "Action": "s3:*",
            "Resource": "*"
        }
    ]
}
- Back in the Cloud Shell, try running
aws s3 lsagain and notice you get an access denied error. What do you think will happen now that we have a presigned URL out there that was created BEFORE we changed the permissions? - Try to use the presigned URL again - boom! denied. Your permissions are matched to that URL and you don't have permissions any longer.
- Back in the AWS console, generate another presigned URL and try to access that in the browser. Boom! denied again, but you were able to generate a presigned URL to an object that you have NO access to.
- Go delete the inline policy that you created
- Go back to the Cloud Shell and run
aws s3 lsand your permissions should be back - Refresh the URL that you created while your permissions were gone and notice that you can now access the object in the browser.
Really messing around now
- Back in the Cloud Shell, generate a presigned key to an object that does not exist.
aws s3 presign s3://destination-babyyodapoc-24/justmakethisupandbeok.jpg --expires-in 180- Try to access this and you'll quickly get an error that says that it doesn't exist.
- You can upload a file to this bucket with this name and then it will work.
Create KMS Key
Prerequisites
- Install CLI V2
- Set up Profile for master account called general or whatever you have it set to.
Create Key
- Navigate to the KMS console and select Create key
- Create an alias, description and tags
- Select administrators or roles
- Define the users of the key
- Review the key and it's associated policy
{
    "Id": "key-consolepolicy-3",
    "Version": "2012-10-17",
    "Statement": [
        {
            "Sid": "Enable IAM User Permissions",
            "Effect": "Allow",
            "Principal": {
                "AWS": "arn:aws:iam::1234567891011:root"
            },
            "Action": "kms:*",
            "Resource": "*"
        },
        {
            "Sid": "Allow access for Key Administrators",
            "Effect": "Allow",
            "Principal": {
                "AWS": "arn:aws:iam::1234567891011:user/IAMAdmin"
            },
            "Action": [
                "kms:Create*",
                "kms:Describe*",
                "kms:Enable*",
                "kms:List*",
                "kms:Put*",
                "kms:Update*",
                "kms:Revoke*",
                "kms:Disable*",
                "kms:Get*",
                "kms:Delete*",
                "kms:TagResource",
                "kms:UntagResource",
                "kms:ScheduleKeyDeletion",
                "kms:CancelKeyDeletion"
            ],
            "Resource": "*"
        },
        {
            "Sid": "Allow use of the key",
            "Effect": "Allow",
            "Principal": {
                "AWS": "arn:aws:iam::1234567891011:user/IAMAdmin"
            },
            "Action": [
                "kms:Encrypt",
                "kms:Decrypt",
                "kms:ReEncrypt*",
                "kms:GenerateDataKey*",
                "kms:DescribeKey"
            ],
            "Resource": "*"
        },
        {
            "Sid": "Allow attachment of persistent resources",
            "Effect": "Allow",
            "Principal": {
                "AWS": "arn:aws:iam::1234567891011:user/IAMAdmin"
            },
            "Action": [
                "kms:CreateGrant",
                "kms:ListGrants",
                "kms:RevokeGrant"
            ],
            "Resource": "*",
            "Condition": {
                "Bool": {
                    "kms:GrantIsForAWSResource": "true"
                }
            }
        }
    ]
}
- Click Finish to create the key
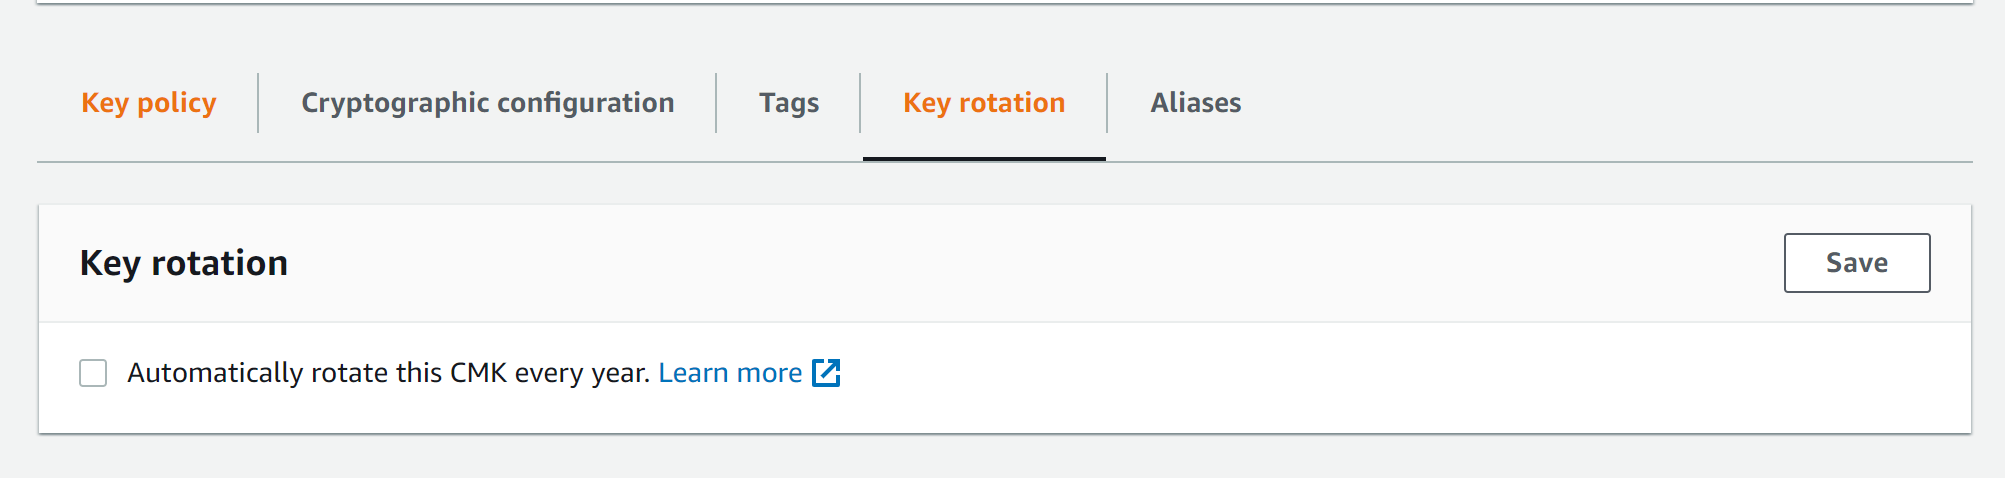
Key Rotation
- Select the key and go to the Key Rotation tab
AWS CLI Commands
- Navigate to a specific folder that you choose to run these commands
# Create sample txt file
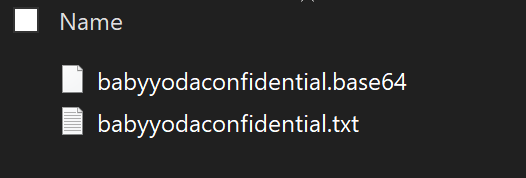
echo "This is Baby Yoda's secret file. Stay out." > babyyodaconfidential.txt
# Encrypt file using the key.
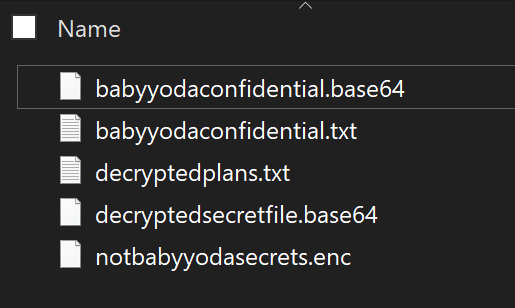
aws kms encrypt --key-id alias/babyyodapoc --plaintext fileb://babyyodaconfidential.txt --output text --profile general --query CiphertextBlob > babyyodaconfidential.base64
-
This will create a .base64 encrypted file
-
Run this to decode this base64 into an encrypted file. This will create an .enc file in your folder.
certutil -decode babyyodaconfidential.base64 notbabyyodasecrets.enc
- This file you can send across to whomever and if they want to decode it, they'd need to log in as admin just like you did here and then run the decrypt command.
- To decrypt:
aws kms decrypt --ciphertext-blob fileb://notbabyyodasecrets.enc --output text --profile general --query Plaintext > decryptedsecretfile.base64
- and then to convert that to txt
certutil -decode decryptedplans.base64 decryptedplans.txt
Clean UP
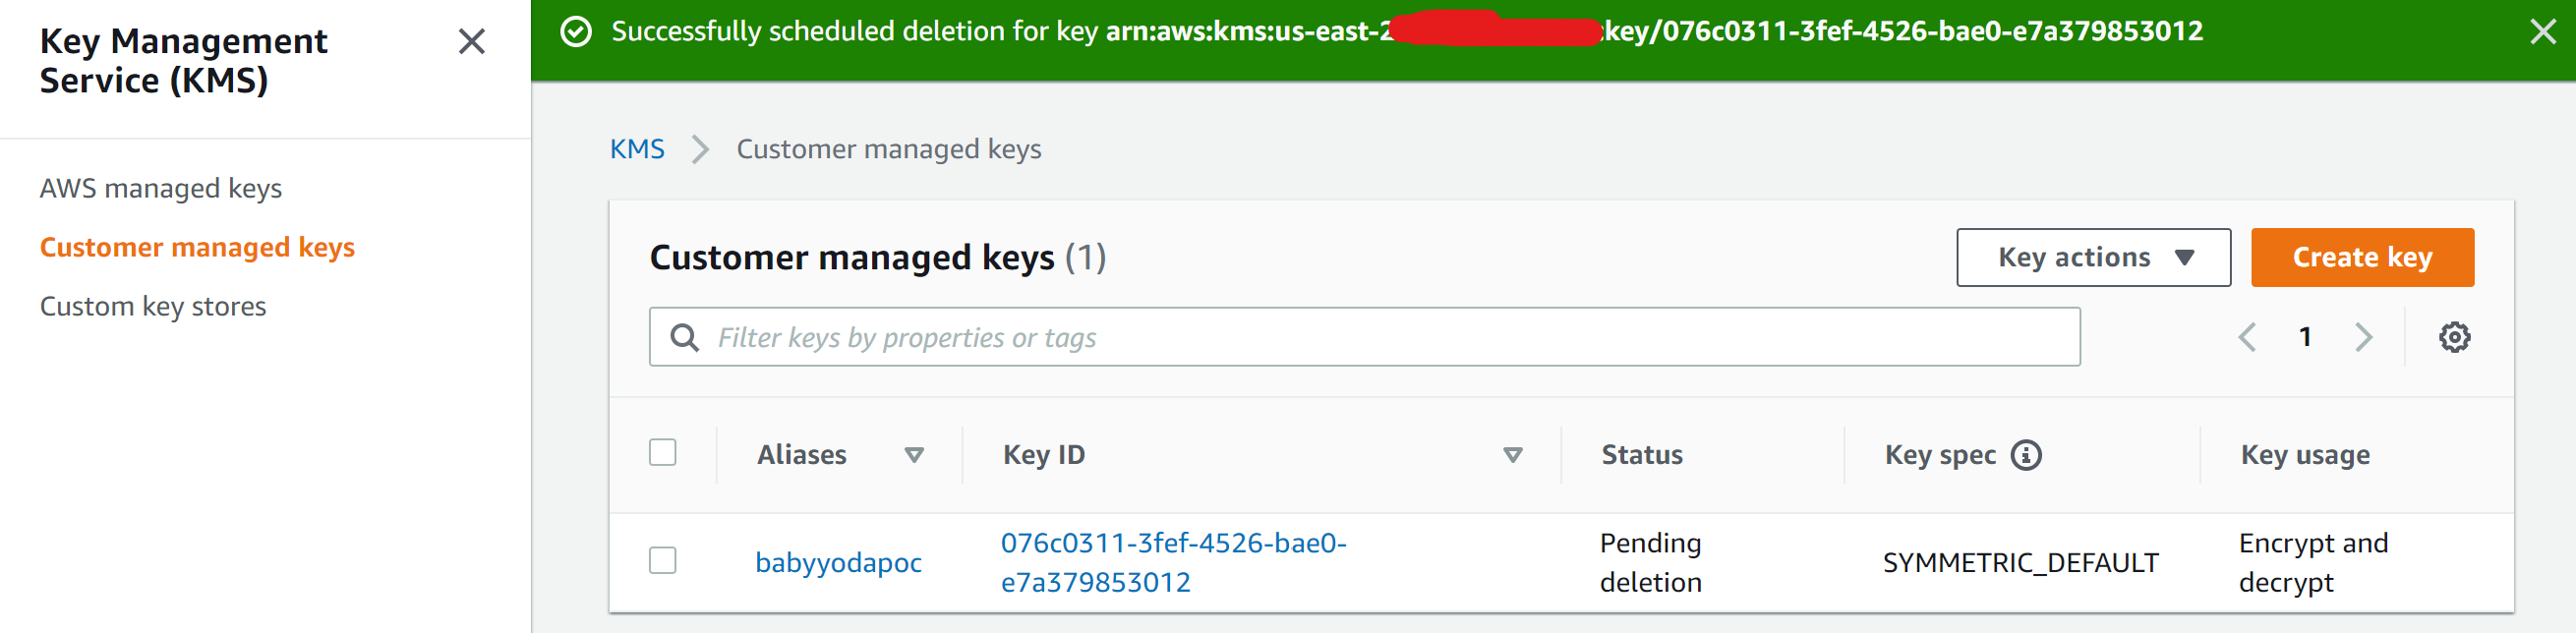
- Navigate to KMS Console
- Select Key
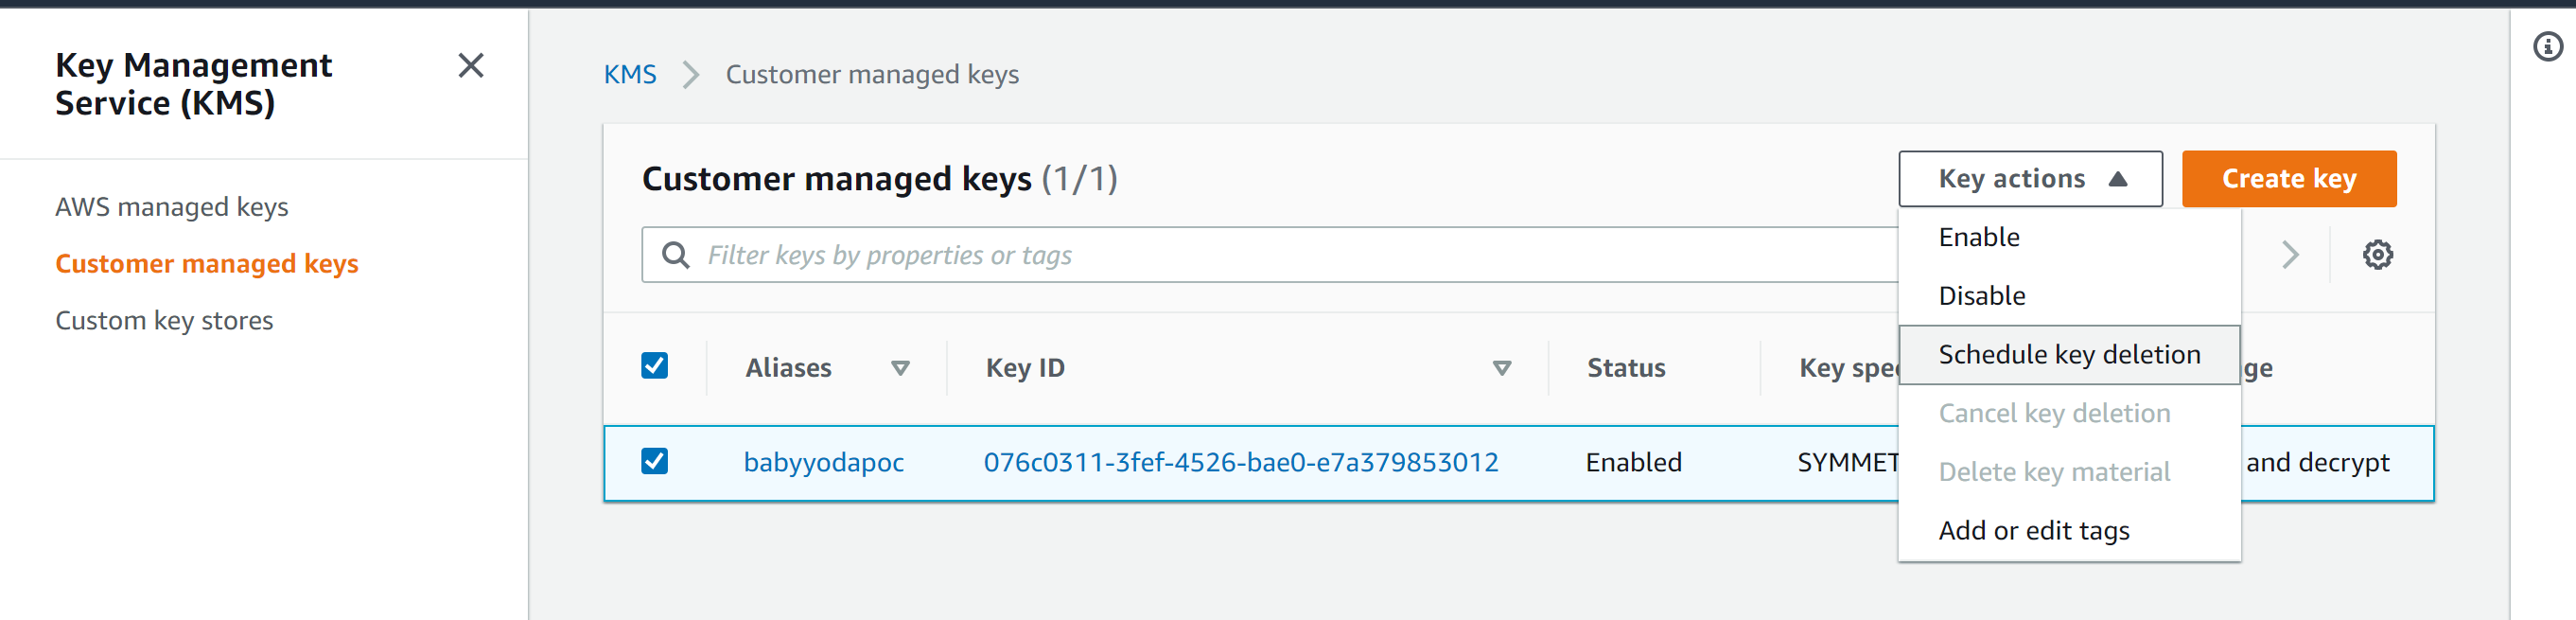
- Schedule Deletion
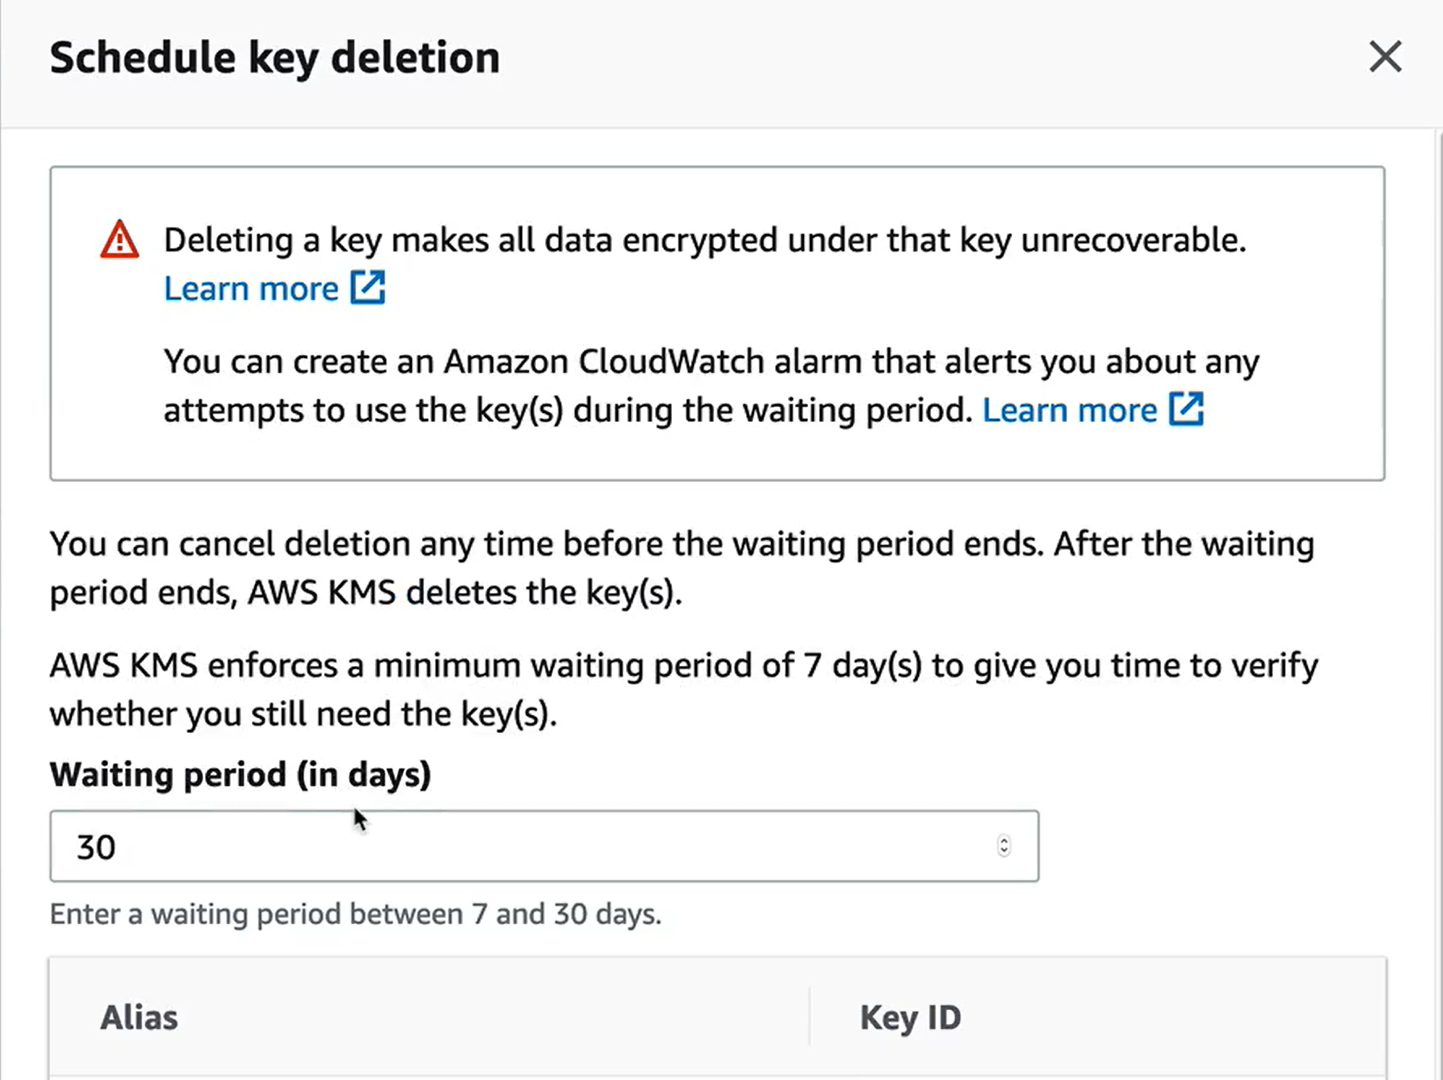
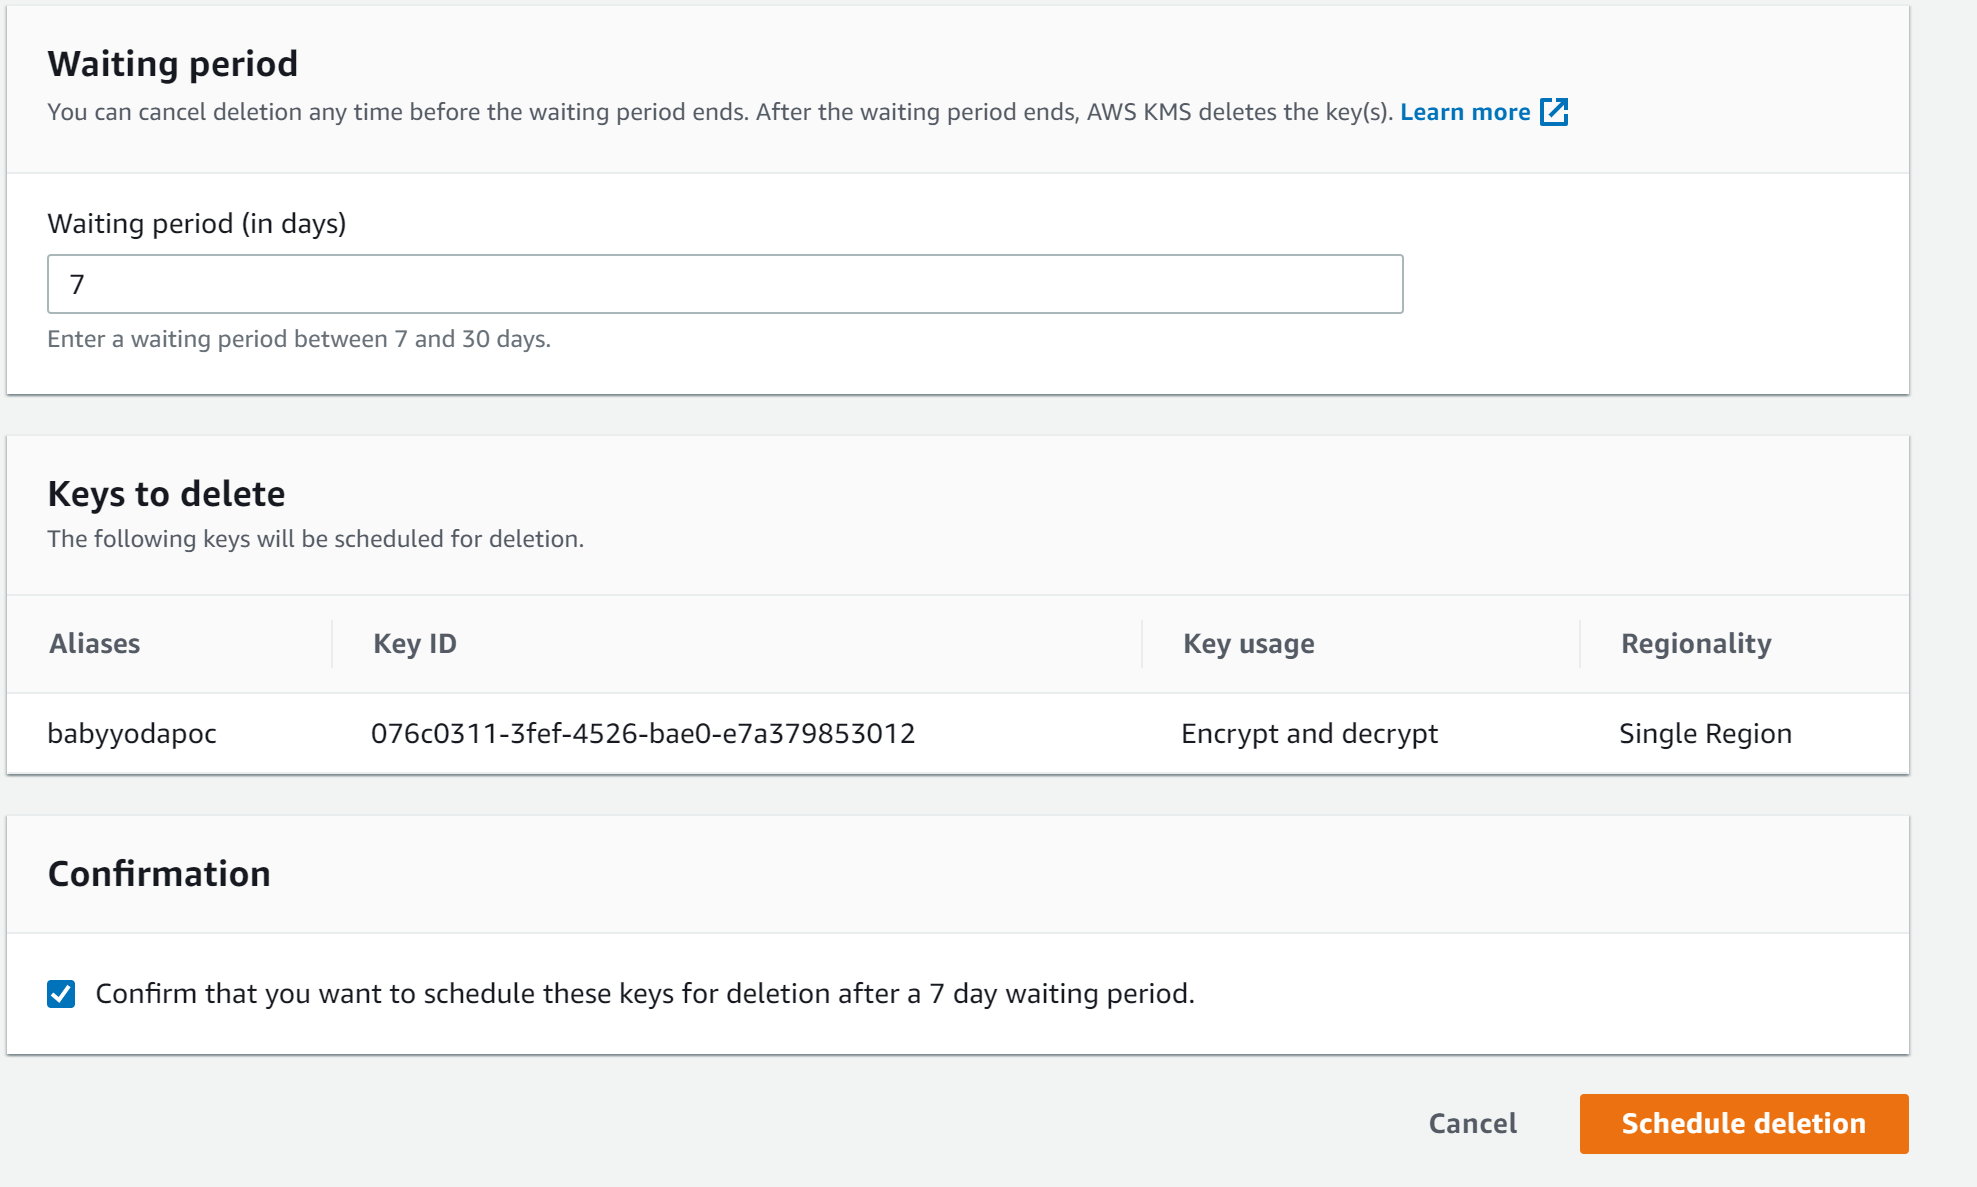
- Confirm that is scheduled to delete.