[[TOC]]
Simple Identity Permissions in AWS
- Open CloudWatch Console and create the stack with this yaml:
AWSTemplateFormatVersion: "2010-09-09"
Description: >
  This template implements an IAM user 'Sally'
  An S3 bucket for cat pictues
  An S3 bucket for dog pictures
  An S3 bucket for other animals
  And permissions appropriate for Sally.
Parameters:
  sallypassword:
    NoEcho: true
    Description: IAM User Sallys Password
    Type: String
Resources:
  catpics:
    Type:  AWS::S3::Bucket
  animalpics:
    Type:  AWS::S3::Bucket
  sally:
    Type: AWS::IAM::User
    Properties:
      ManagedPolicyArns:
        - arn:aws:iam::aws:policy/IAMUserChangePassword
      LoginProfile:
        Password: !Ref sallypassword
        PasswordResetRequired: "true"
  policy:
    Type: AWS::IAM::ManagedPolicy
    Properties:
      Description: Allow access to all S3 buckets, except catpics
      ManagedPolicyName: AllowAllS3ExceptCats
      PolicyDocument:
        Version: 2012-10-17
        Statement:
          - Effect: Allow
            Action: 's3:*'
            Resource: '*'
          - Effect: Deny
            Action: 's3:*'
            Resource: [ !GetAtt catpics.Arn, !Join ['', [!GetAtt catpics.Arn, '/*']]]
Outputs:
  catpicsbucketname:
    Description: Bucketname for catpictures (the best animal!)
    Value: !Ref catpics
  animalpicsbucketname:
    Description: Bucketname for animalpics (the almost best animals!)
    Value: !Ref animalpics
  sallyusername:
    Description: IAM Username for Sally
    Value: !Ref sally
- Wait for this to complete and then in a new browser session, sign in as the user you just created using the password that you set.
- Navigate to the S3 buckets and notice that you don't have the permissions to access any buckets. The reason for this is that in the template above, you've attached one policy, the IAMUserChangePassword policy and not the AllowAllS3ExceptCats policy that you created.
Inline Policy
- You'll need to add in an inline policy to grant the access as needed.
- Navigate to the user and then select + Add Inline Policy and then add in the JSON below.
{
   "Version":"2012-10-17",
   "Statement":[
      {
         "Sid":"statement1",
         "Effect":"Allow",
         "Action":[
            "s3:*"
         ],
         "Resource":[
            "arn:aws:s3:::*"
         ]
       }
    ]
}
- Refresh the User's account and they should be able to see the S3 buckets now. a. the user should also be able to upload files to the bucket as well.
- Play around a bit in here and when you're ready, go back and delete the inline policy that you added.
Managed Policy
- Click on the User and then select Permissions.
- Select Attach Existing Policies Directly and then select the policy that was created by the CloudFormation stack
- Verify the JSON of the managed policy and add that policy to the user
Cleanup
- Delete managed policy
- Empty the buckets
- Delete the stack.
Permissions Control using IAM Groups.
- Add the CloudFormation stack from the previous demo to create the S3 buckets and user.
- Upload a couple images into each one of the S3 buckets
- Log in as the user that you created in another browser session (Leave the admin session open)
- In the admin group, select the user that you created and remove the S3admin policy
- Go back to IAM and create a new group called Developers and then attach the AllowAllS3Except policy.
- Add the user to this group
- Go to the session with the user and then try to access the buckets. You should see that the policy now affects the group rather than directly on the user.
Cleanup
- Detach managed policy from management group
- Empty the buckets
- Delete the stack.
AWS Organizations Part 1
- Log into the account that you will end up creating the management account in
- Search for AWS Organizations and enter that console a. You may be prompted to verify your email, do that now.
- Open a new browser session and log into your production account. Make sure you have sessions to the management AND production account
- Gather the account ID from the dropdown of your production account and copy it.
- Back in the management account, click Add Account and then click on Invite an existing AWS account. a. You might be prompted again to verify the email address of this account, do this now.
- Enter in the account number that you copied OR the email address of that account. a. you can include a custom invitation email here, but if you own the other account, now is not a good time to talk to yourself.
- Click on Send Invitation. a. there is a limit of accounts that an organization might have, a support ticket should clear that up.
- Back in the production account, you should see 1 invitation in the AWS Organizations console. Click that and Accept Invitation to join that account as a member to your AWS Organization.
AWS Organizations Part 2
Switching Accounts
- Log into the production account and navigate to the IAM console.
- Click on Roles
- Click Create Role
- Click Another AWS Account
- Enter in the Account ID of the Management account.
- Click Next: Permissions
- Add the Administrator Access Role and call it OrganizationAccountAccessRole (used by Amazon)
- Click Create Role
- Look at the role and then look at the trust relationships and notice that it trusts the management account.
- Copy the Account ID of the production account
- On the management account, click the account dropdown and select Switch Roles and then Switch Role
- Paste the account number in and then for the Role, type in the name of the role (OrganizationAccountAccessRole) and then Give it a display name and a color if you want.
- Click Switch Role.
- You will find yourself in the production account.
- In the upper right, you'll see the color and the name of the account.
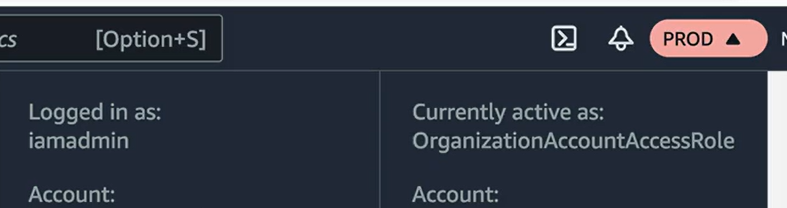
- Under the Role History in the account dropdown, you'll see a quick link to switch the roles.
Create Development Account
This time, we will take a shortcut and show you the other way to create an account.
Using Service Control Policies
Create AWS Organizations Organizational Units
- Log into your AWS Management account as the IAMAdmin user
- Navigate to the AWS Organization console
- Check the box next to the root container, then click on Actions -> Create New
- Create a Development and a Production OU
- Click on the development account and then click Actions -> Move and then click on the development OU.
- Click on the production account and then click Actions -> Move and then click on the Production OU.
Note: I also created a QA, but this is unnecessary.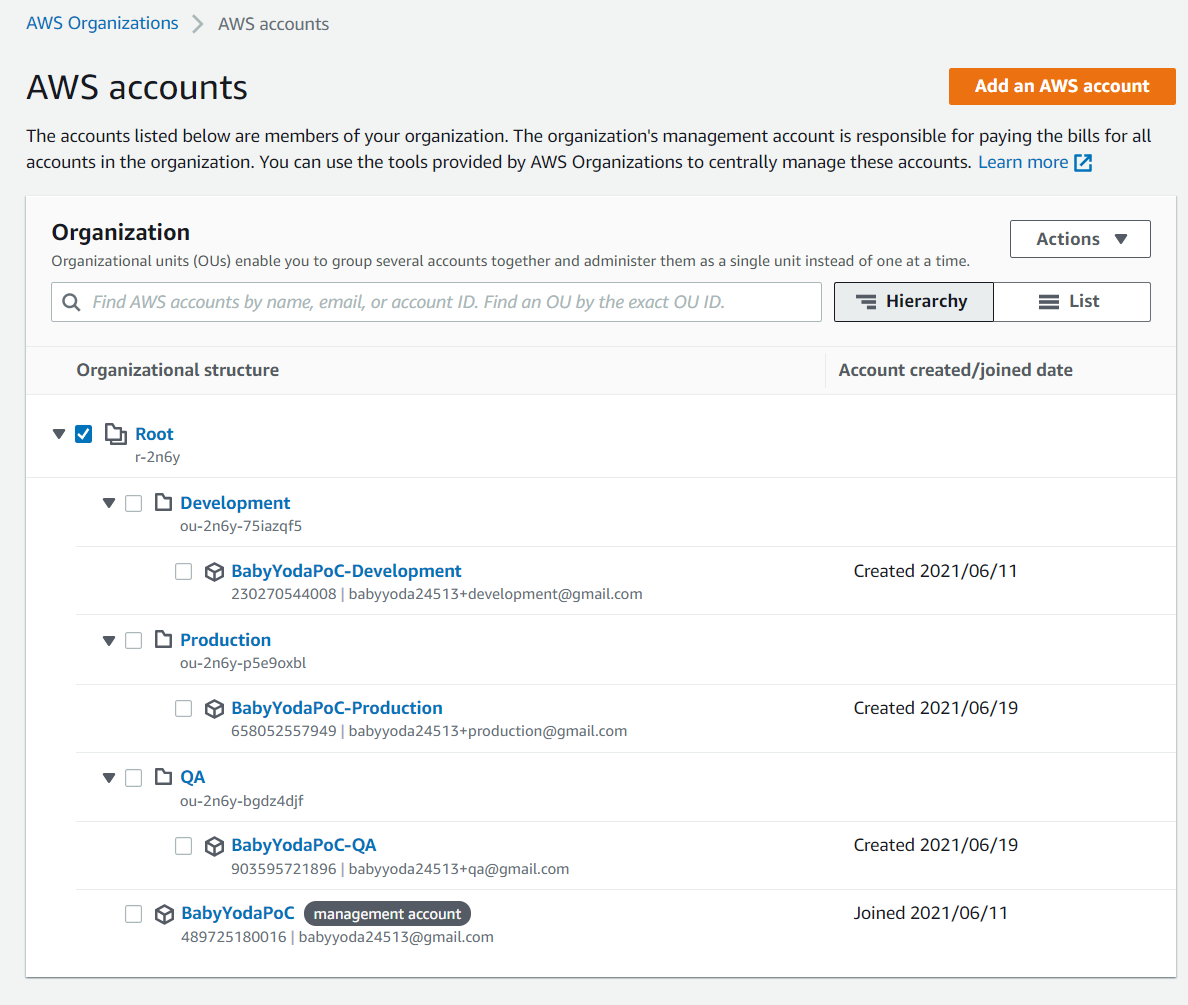
Create S3 Bucket in Production Account
- Switch over to the production role (remember to click the dropdown and select production)
- Navigate to the S3 console and create a bucket
- Name the bucket scptest1234567, select US-East-1 and scroll all the way to the bottom and click Create.
- Upload a picture of your choice to the bucket.
- You should be able to open this picture after it has been uploaded to the S3 bucket
Enable Service Control Policy
- Switch back to the management account by clicking on the dropdown and selecting Back to IAMAdmin.
- Navigate to AWS Organizations and select Policies from the left.
- Click on Service Control Policies and then click Enable Service Control Policies.
- What this did was create a FullAWSAccess policy across the entire organization.
- View the policy and it should have this JSON:
{
  "Version": "2012-10-17",
  "Statement": [
    {
      "Effect": "Allow",
      "Action": "*",
      "Resource": "*"
    }
  ]
}
- This enables a global policy with global allow across the entire company.
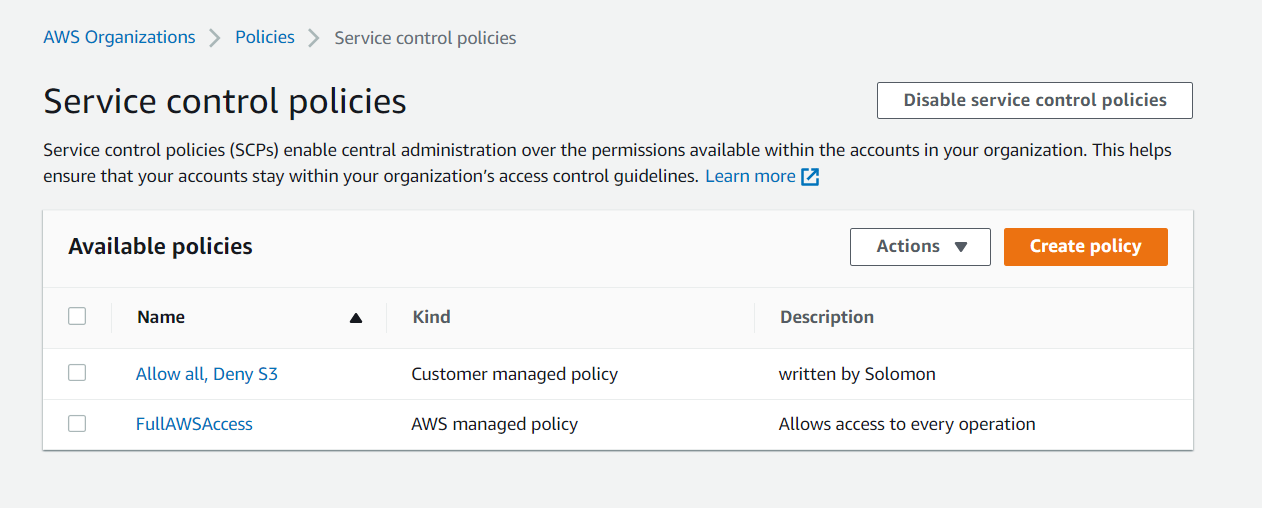
Create Allow all, Deny S3 Service Control Policy
- Navigate back to service Control Policies and select Create Policy.
- Name the policy "Allow all except S3"
- Copy this JSON in, noting that we're adding an explicit deny on all of the S3 for the entire organization.
{
  "Version": "2012-10-17",
  "Statement": [
    {
      "Effect": "Allow",
      "Action": "*",
      "Resource": "*"
    },
    {
      "Effect": "Deny",
      "Action": "s3:*",
      "Resource": "*"
    }
  ]
}
Apply Service Control Policy
- Navigate back to the AWS Organizations console in the management account.
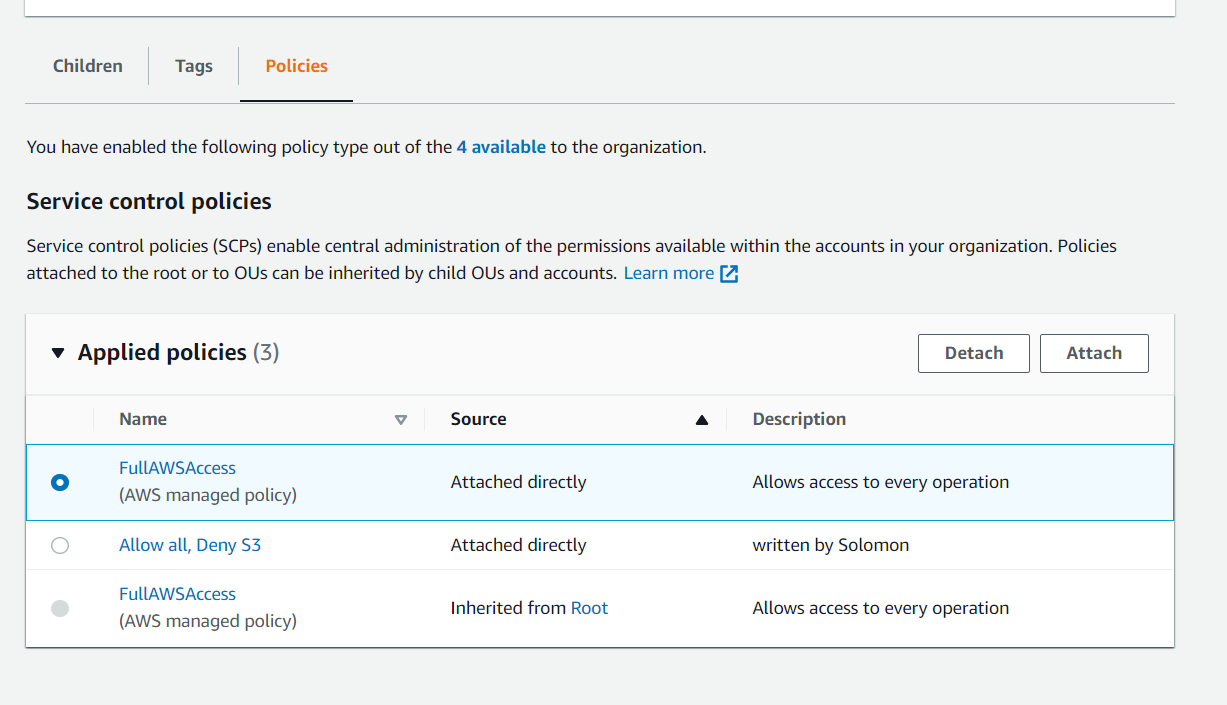
- Click on the Production OU and then click the Policies tab.
- Click attach and then select the Allow all, Deny S3 policy
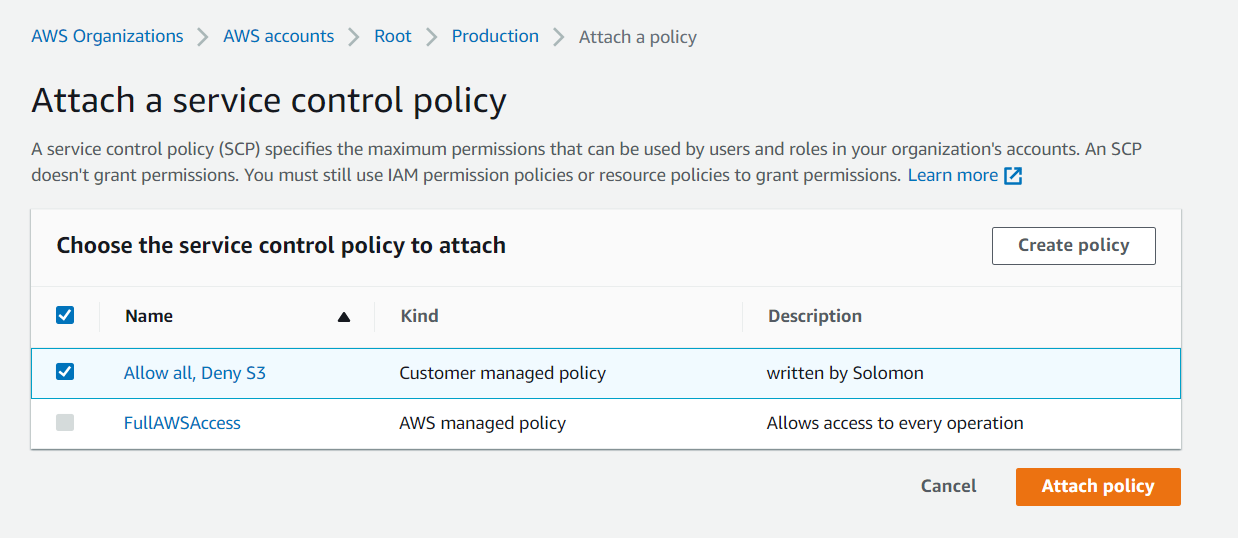
- Detach the FullAWSAccess policy that is attached directly to the Production OU.
- Navigate back into the production account and go to the S3 console
- Notice you now don't have the permissions to interact with S3
- Click on EC2 and notice you can go to EC2 and do whatever you need to do.
Detach the Service Control policy
- Go back into the management console, detach the custom service control policy
- Navigate back to the Production account and verify that you can access S3.
- Notice that you didn't attach the FullAWSAccess policy and the permissions are handled inherited by the OU and the root.
Clean up
- Empty the S3 bucket
- Delete the S3 bucket
- Delete the Policy you created in AWS Organizations
Creating an Organizational Trail
- Log into the management account
- Navigate to the CloudTrail Console
- Click on Trails
- Click on Create Trail
- Check the box that says Enable for all accounts in my organization
- Create a new S3 bucket and name it cloudtrail-organizationname-random number if needed because it needs to be unique
- Enable Log file encryption
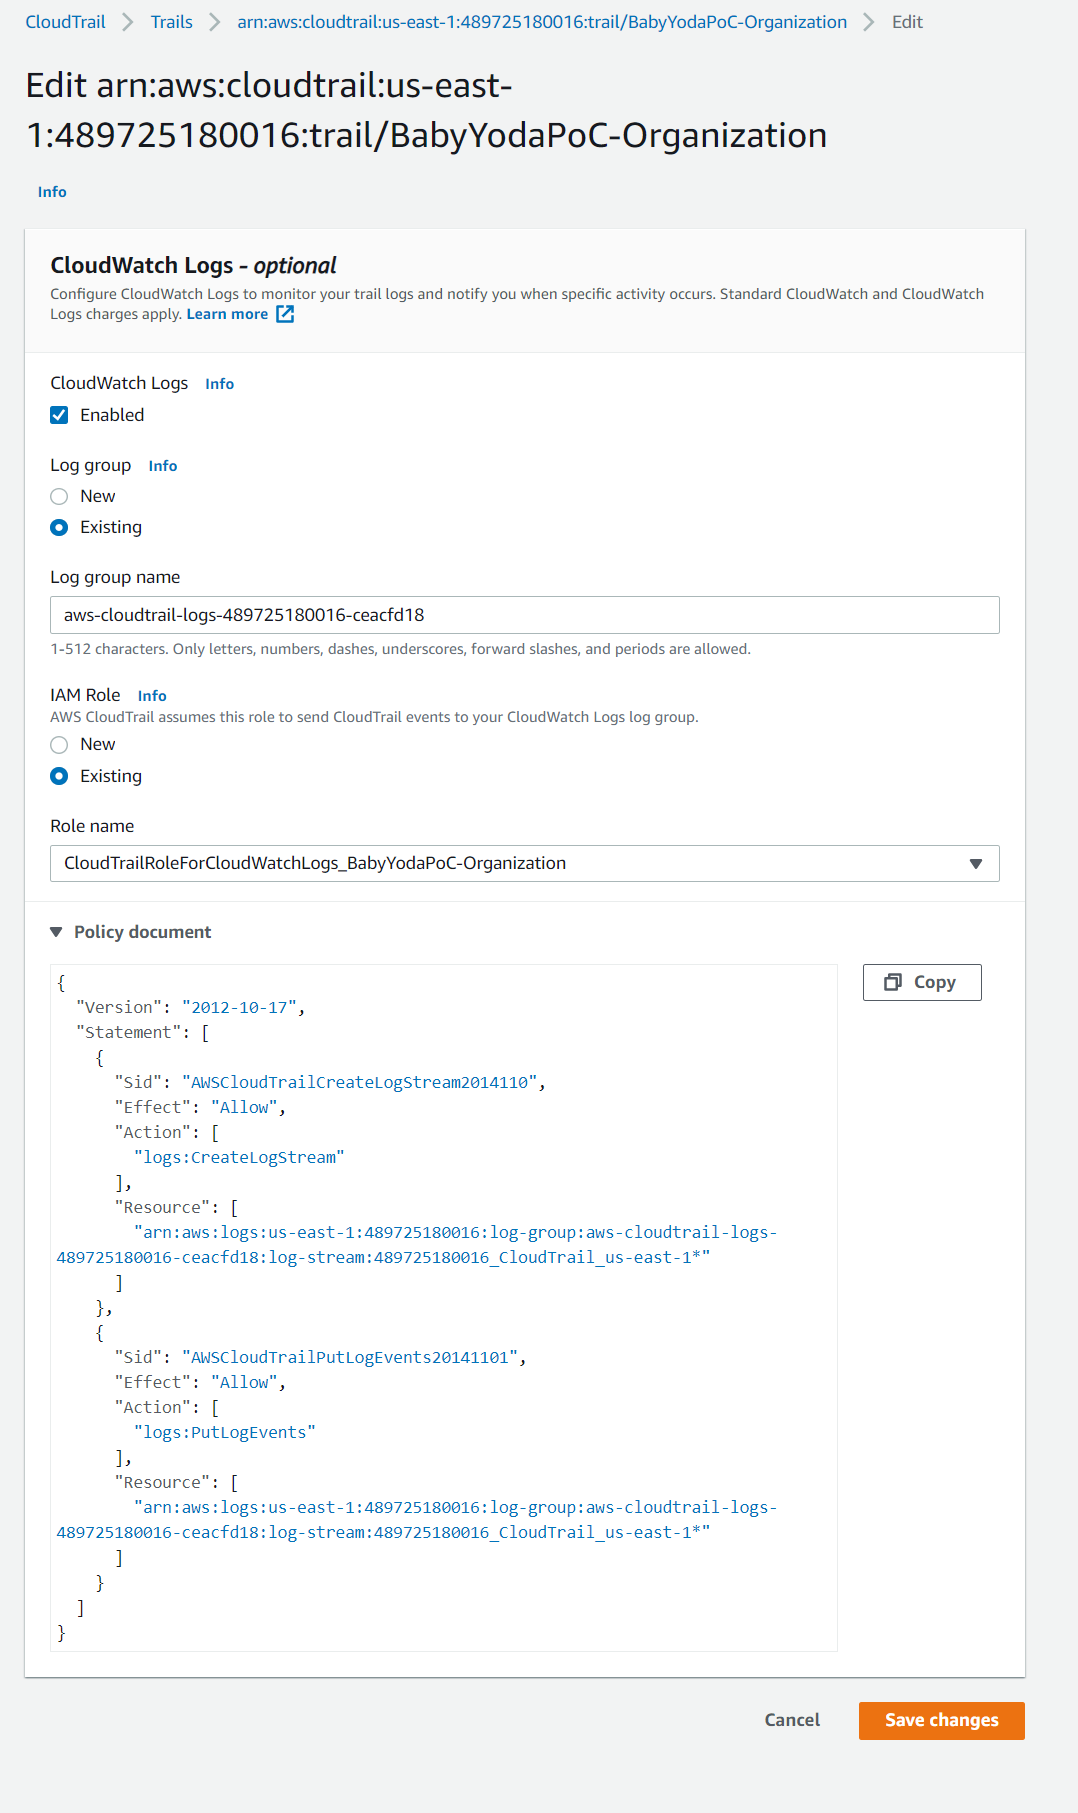
- Check the Enable CloudWatch Logs box
- Leave the default name or name it what you'd like, you will use this when viewing the logs via Cloudwatch. I named mine
aws-cloudtrail-logs-489725180016-ceacfd18or left the default, I can't remember. - Create a new IAM role
- Name this role. I named mine
CloudTrailRoleForCloudWatchLogs_BabyYodaPoC-Organization - View the policy document
- Click next
- Select the type of events that the Trail logs. Management is default, Data costs extra.
- Make sure Read and Write are checked under Management events and click Next.
Viewing the Logs in S3
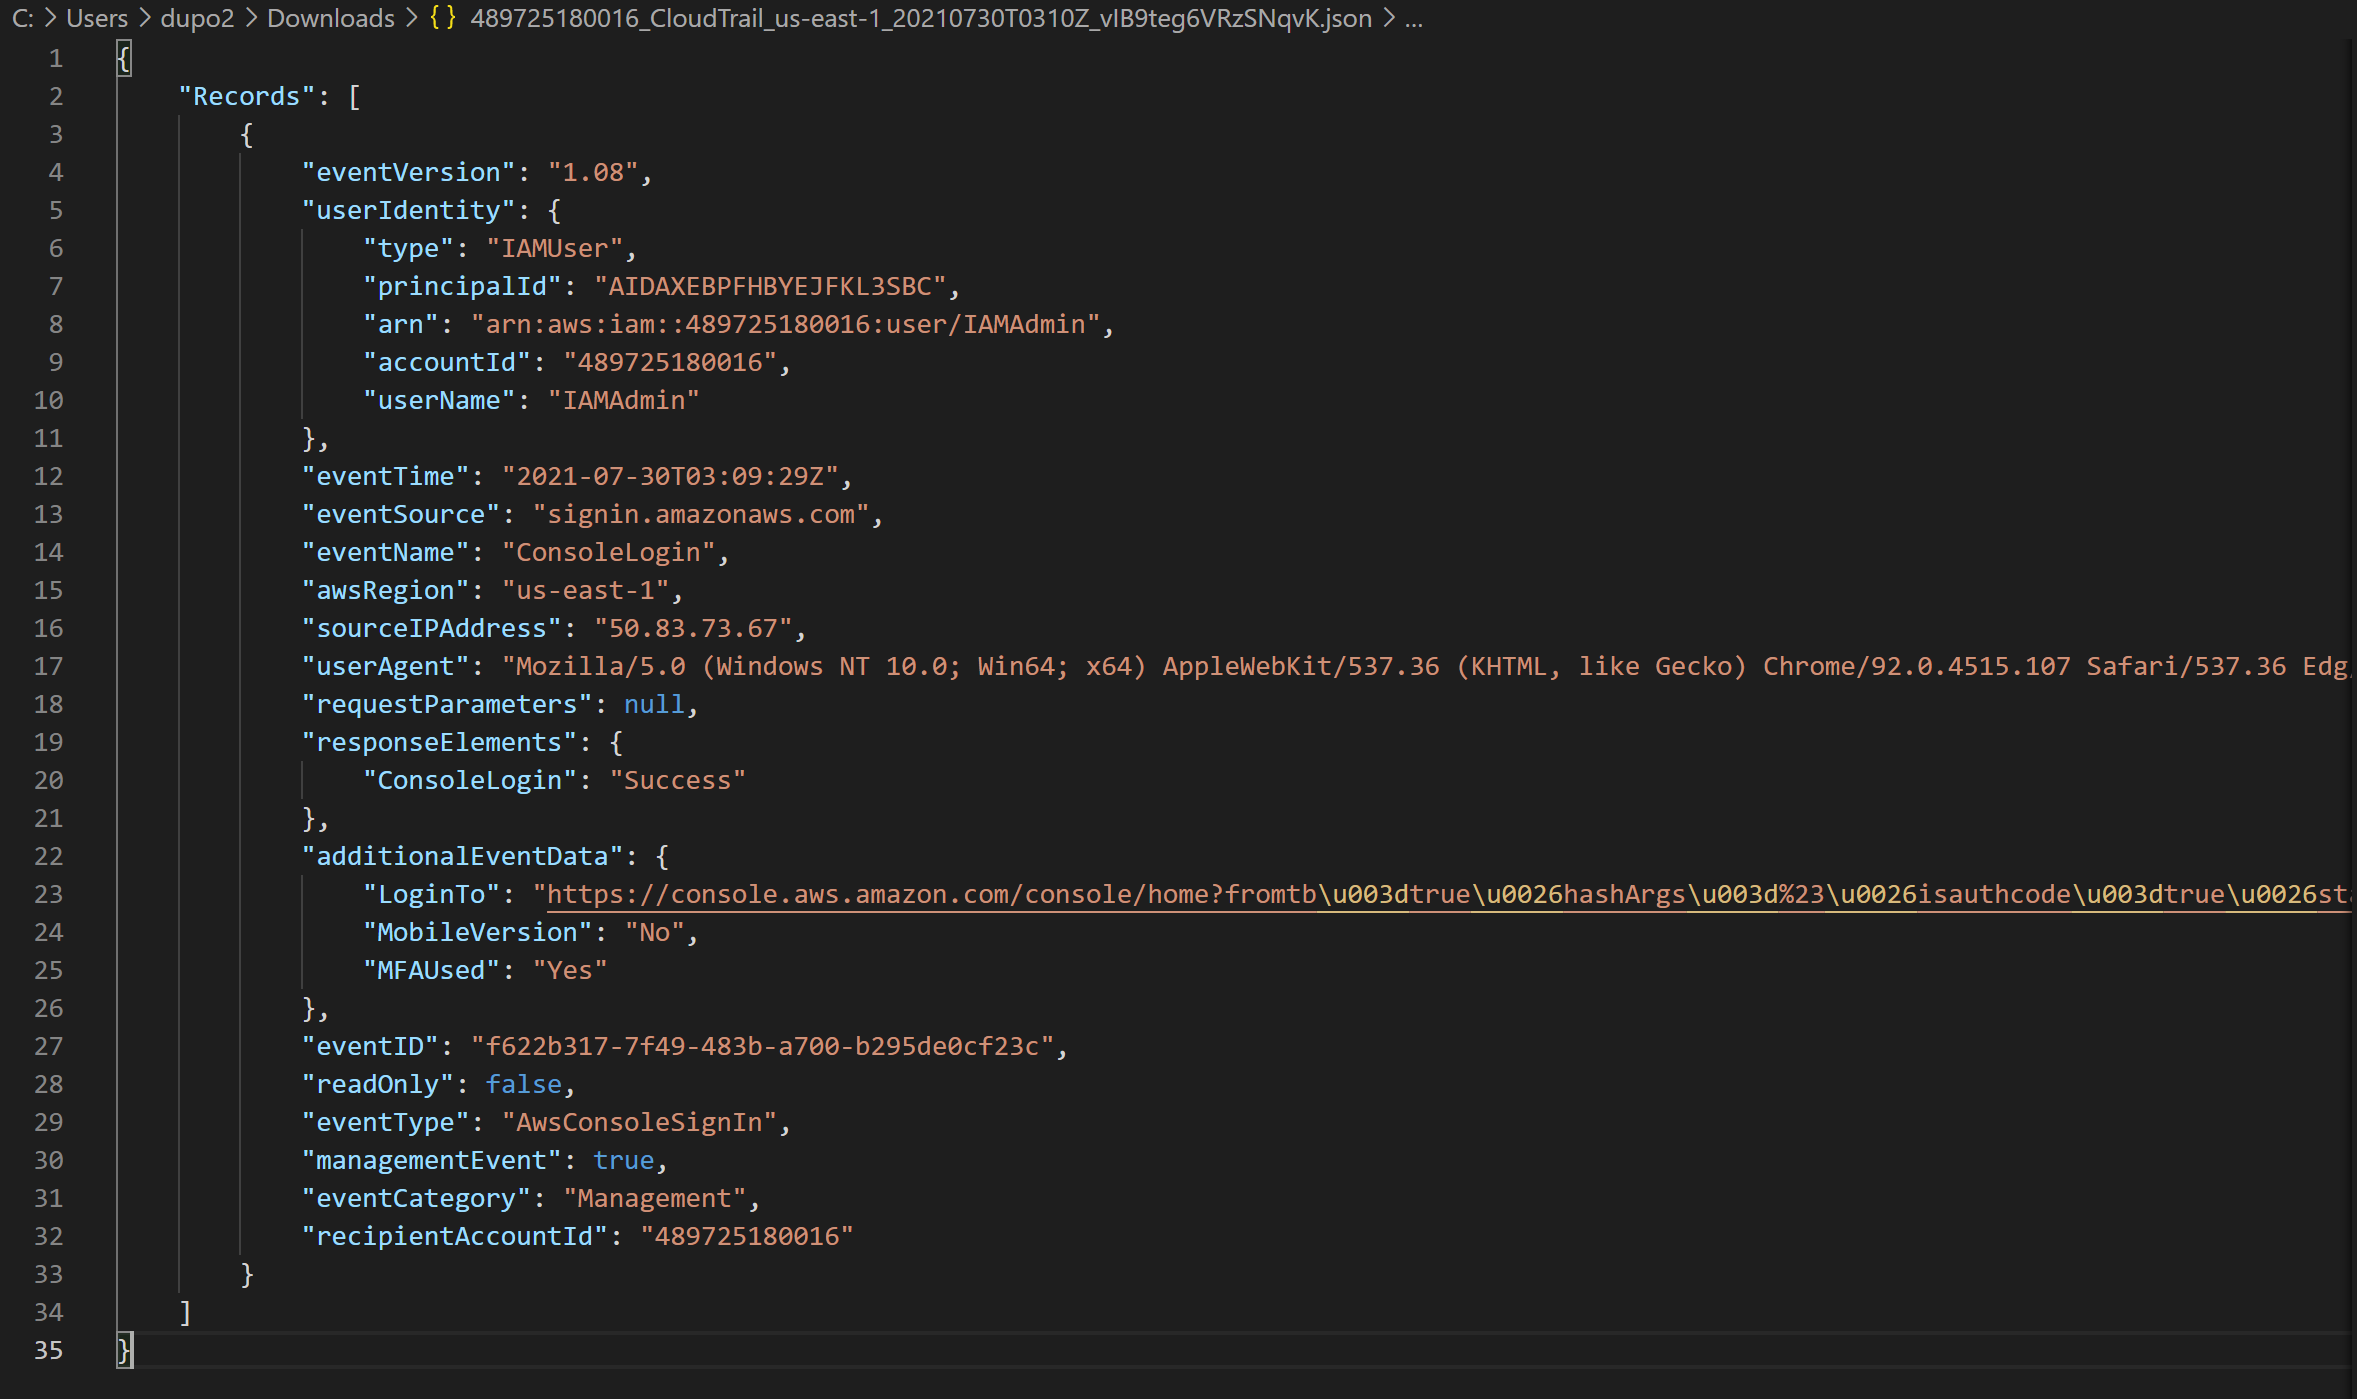
- Click on the S3 bucket
- Navigate through the folder structure. Notice that there are more regions than you have resources in.
- Click through to one of the JSON files.
Viewing the Logs in CloudWatch.
- Navigate to the CloudWatch console.
- Click on Logs to expand and then click on Log Groups.
- Click on the log group that you named above.
- Click on the log stream that corresponds to the data you are gathering.
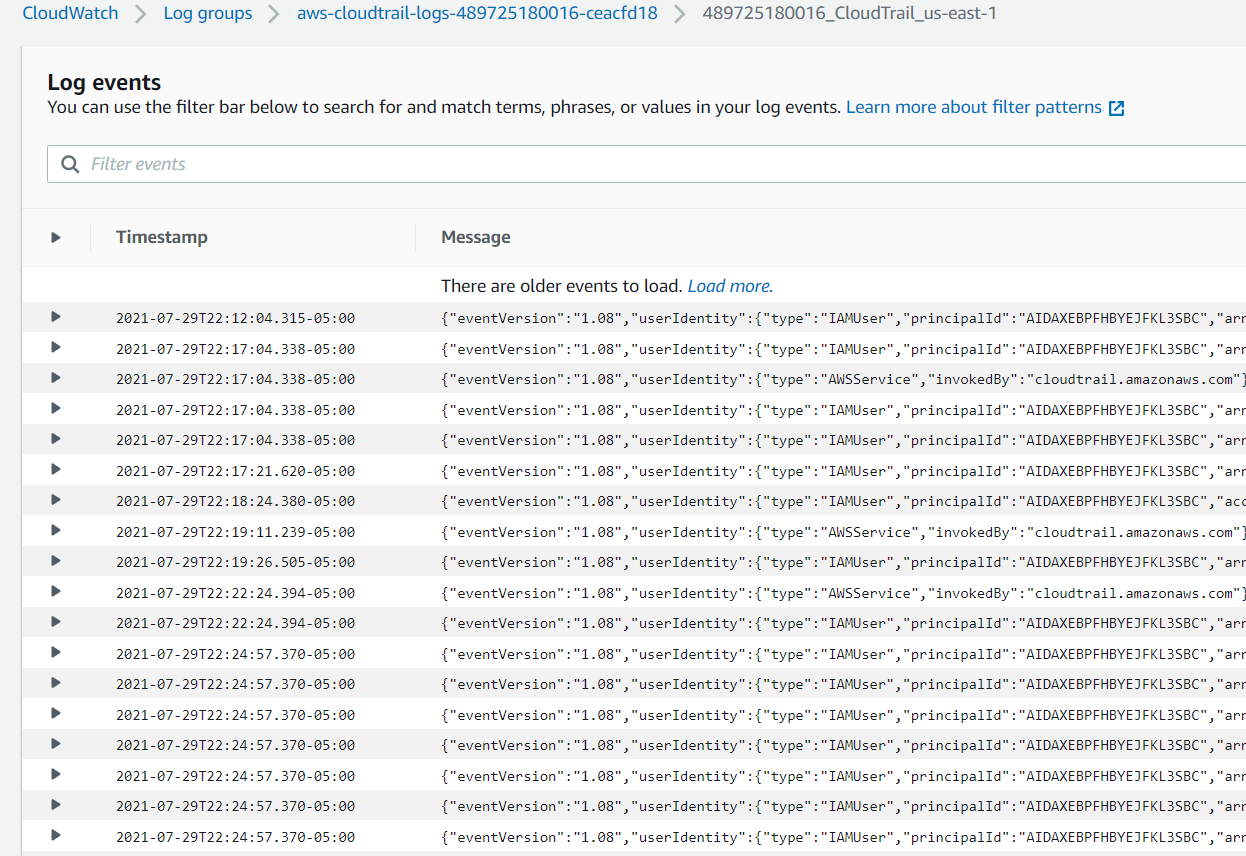
- Expand an entry to view the log.
- While you're in this console, click on event history to view the last 90 days of logs.
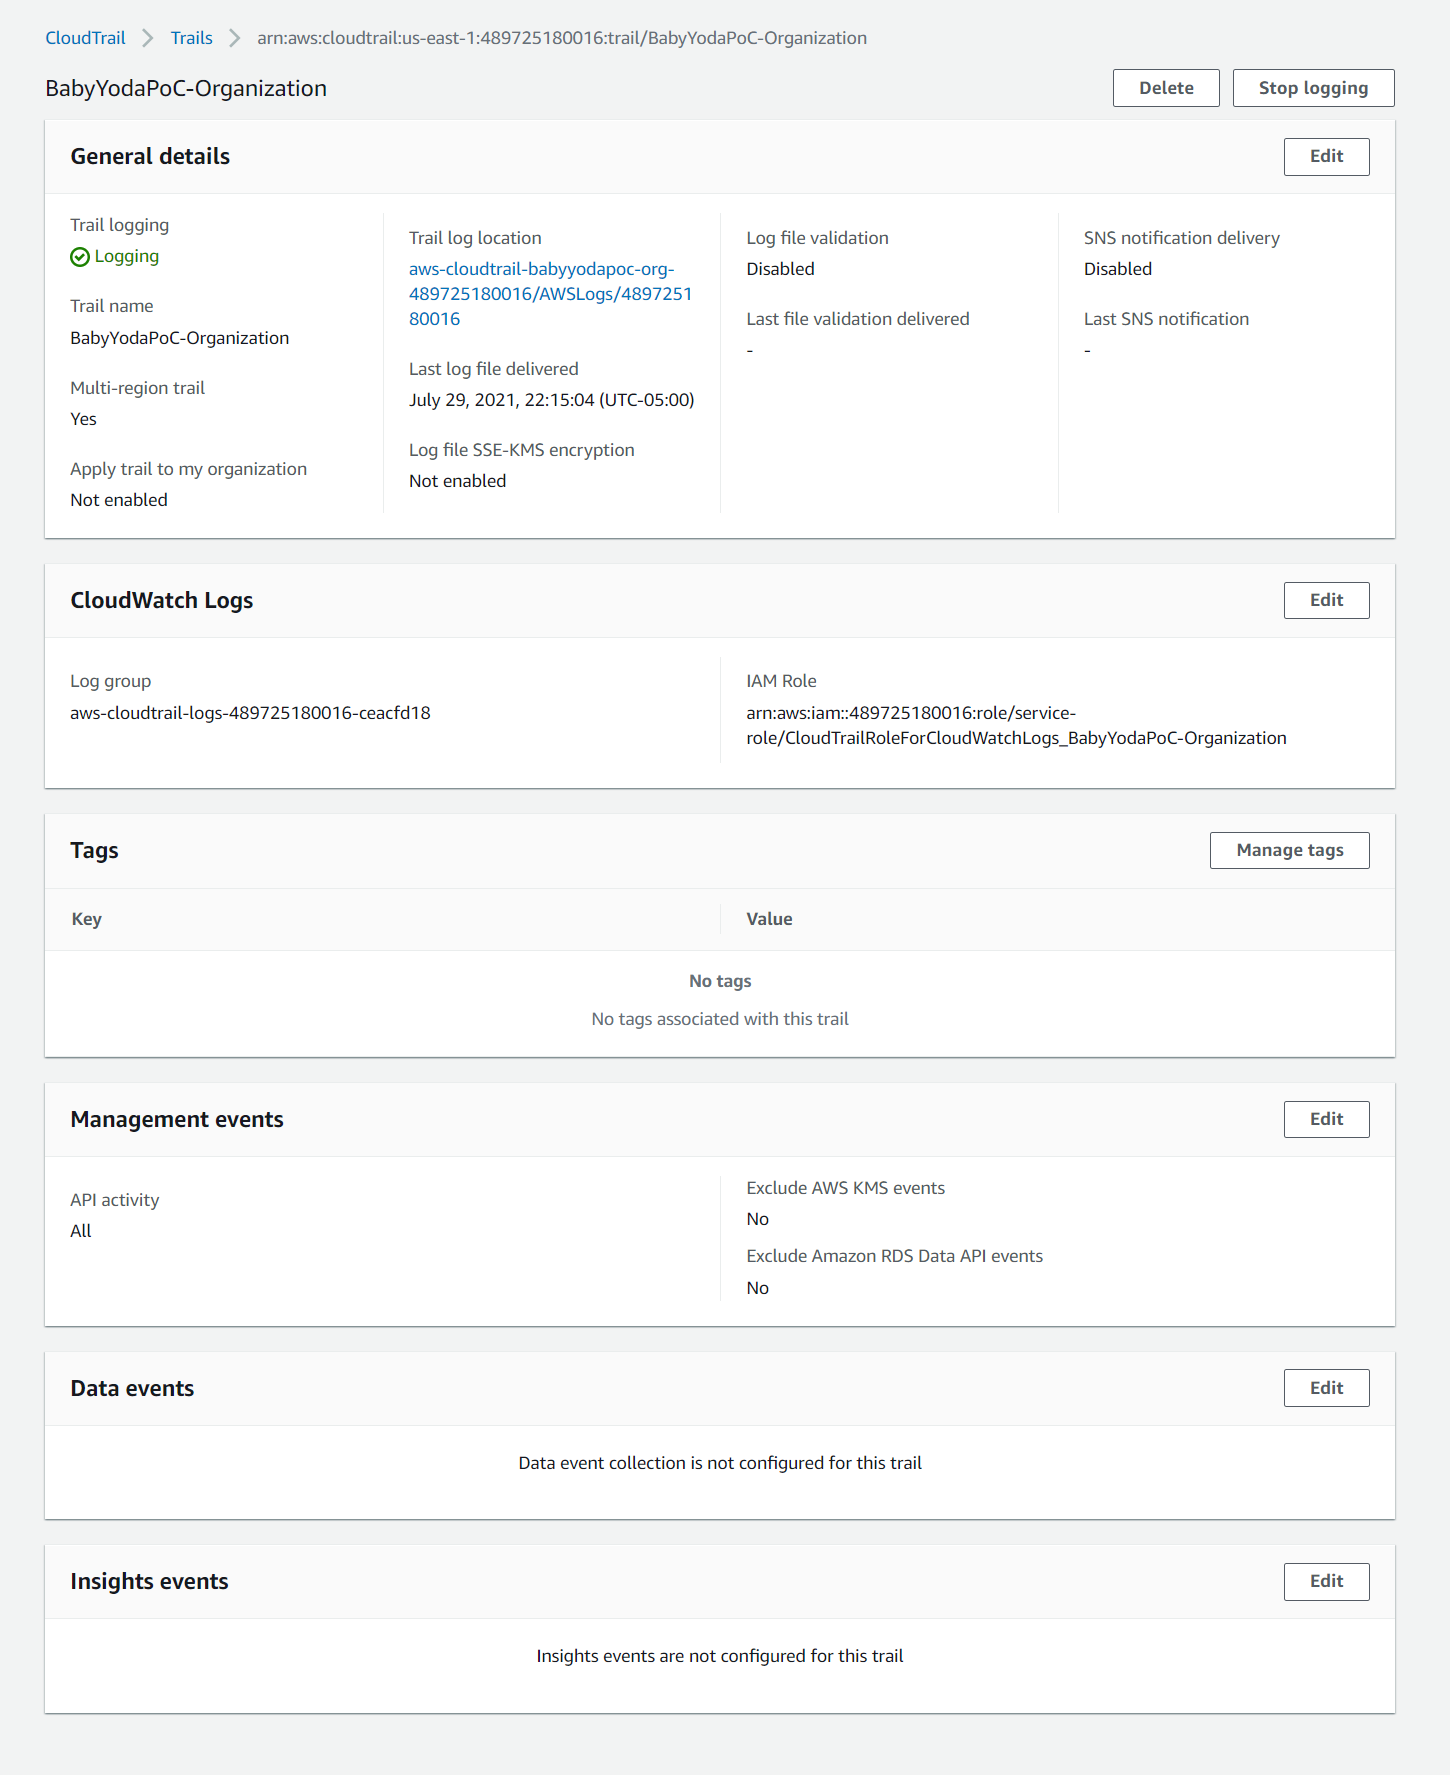
Finished Trail:
Clean Up
- Delete the trail or click the stop logging button. This doesn't cost too terribly much, maybe a few cents here and there per month if you're not actively using the account.