Demo: Architecture Evolution
Deploy Base Architecture
- Log into AWS and make sure you are in the N. Virgina Region.
- Click the deployment link to create the stack
- This should create a basic VPC with 3 tier architecture (DB, APP, WEB) spread across 3 availability zones.
- Navigate to the EC2 console
- Launch an Amazon Linux 2 AMI on a free tier instance type into the sn-pub-A subnet. a. make sure you select the IAM role before deploying b. also select the Unlimited Credit specification. c. Leave the storage, add a tag Name: WP-Manual, add to the SGWordpress Security Group d. You can ignore the SSH port warning and then launch WITHOUT a key pair.
- Once this is in the running state, you can continue with this tutorial.
Systems Manager Parameters
- Navigate to the Systems Manager console and click on Parameter store.
- Create the following parameters:
/BY/WP/DBUser - Database User - Standard - String - text - bywpuser
/BY/WP/DBName - Database Name - Standard - String - text - bywpdb
/BY/WP/DBEndpoint - Database Endpoint - Standard - String - text - localhost
/BY/WP/DBPassword - Database PW - Standard - SecureString - My Current Account - KMS Key ID: alias/aws/ssm and set password to BabyYoda123!
/BY/WP/DBRootPassword - Database Root PW - Standard - SecureString - My Current Account - KMS Key ID: alias/aws/ssm and set password to BabyYoda123!

Install WordPress
- Connect to the EC2 instance via session manager.
- run
sudo bashand thencdand thenclearto tidy up the screen a bit.

- Type each one of these commands in manually, do not copy and paste.
DBPassword=$(aws ssm get-parameters --region us-east-1 --names /BY/WP/DBPassword --with-decryption --query Parameters[0].Value)
DBPassword=`echo $DBPassword | sed -e 's/^"//' -e 's/"$//'`

DBRootPassword=$(aws ssm get-parameters --region us-east-1 --names /BY/WP/DBRootPassword --with-decryption --query Parameters[0].Value)
DBRootPassword=`echo $DBRootPassword | sed -e 's/^"//' -e 's/"$//'`

DBUser=$(aws ssm get-parameters --region us-east-1 --names /BY/WP/DBUser --query Parameters[0].Value)
DBUser=`echo $DBUser | sed -e 's/^"//' -e 's/"$//'`

DBName=$(aws ssm get-parameters --region us-east-1 --names /BY/WP/DBName --query Parameters[0].Value)
DBName=`echo $DBName | sed -e 's/^"//' -e 's/"$//'`

DBEndpoint=$(aws ssm get-parameters --region us-east-1 --names /BY/WP/DBEndpoint --query Parameters[0].Value)
DBEndpoint=`echo $DBEndpoint | sed -e 's/^"//' -e 's/"$//'`
- I mean, you could have copied them, but I really wanted you to get a feel for how tedious that was. Sorry.
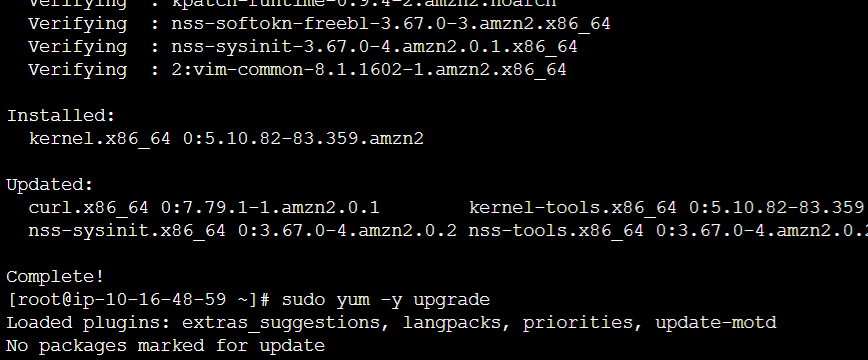
- Update the os by running
sudo yum -y updateandsudo yum -y upgrade
- Clear the screen by running
clear - Install dependencies
sudo yum install -y mariadb-server httpd wget
sudo amazon-linux-extras install -y lamp-mariadb10.2-php7.2 php7.2
sudo amazon-linux-extras install epel -y
sudo yum install stress -y
- Set the server and database to start on boot
sudo systemctl enable httpd
sudo systemctl enable mariadb
sudo systemctl start httpd
sudo systemctl start mariadb
- Set the MariaDB default PW
sudo mysqladmin -u root password $DBRootPassword - Download and extract Wordpress and remove the tarball and folder.
sudo wget http://wordpress.org/latest.tar.gz -P /var/www/html
cd /var/www/html
sudo tar -zxvf latest.tar.gz
sudo cp -rvf wordpress/* .
sudo rm -R wordpress
sudo rm latest.tar.gz
- Replace the config.php with the environment variables taken from the parameter store.
sudo cp ./wp-config-sample.php ./wp-config.php
sudo sed -i "s/'database_name_here'/'$DBName'/g" wp-config.php
sudo sed -i "s/'username_here'/'$DBUser'/g" wp-config.php
sudo sed -i "s/'password_here'/'$DBPassword'/g" wp-config.php
- Set perms on the file system:
sudo usermod -a -G apache ec2-user
sudo chown -R ec2-user:apache /var/www
sudo chmod 2775 /var/www
sudo find /var/www -type d -exec chmod 2775 {} \;
sudo find /var/www -type f -exec chmod 0664 {} \;
- Create WP user, set password, create database and then configure perms.
sudo echo "CREATE DATABASE $DBName;" >> /tmp/db.setup
sudo echo "CREATE USER '$DBUser'@'localhost' IDENTIFIED BY '$DBPassword';" >> /tmp/db.setup
sudo echo "GRANT ALL ON $DBName.* TO '$DBUser'@'localhost';" >> /tmp/db.setup
sudo echo "FLUSH PRIVILEGES;" >> /tmp/db.setup
sudo mysql -u root --password=$DBRootPassword < /tmp/db.setup
sudo rm /tmp/db.setup
- Take a moment and realize how tedious that would be to plan and type out.
- Copy the IP address from the EC2 instance and open into the browser (use HTTP, not HTTPS as that is not configured)
- Enter the following information:
- Site Name: BabyYodaPoC
- username: admin
- pw: BabyYoda123!
- email: your personal email address
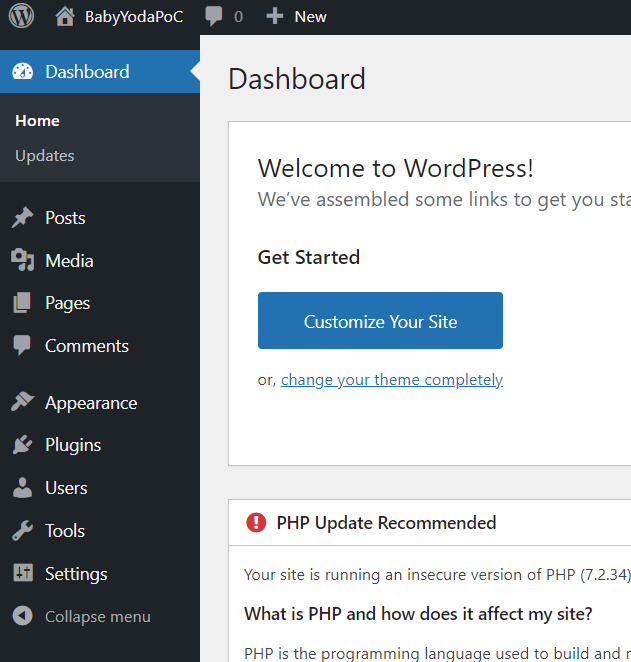
- Log in using the above information
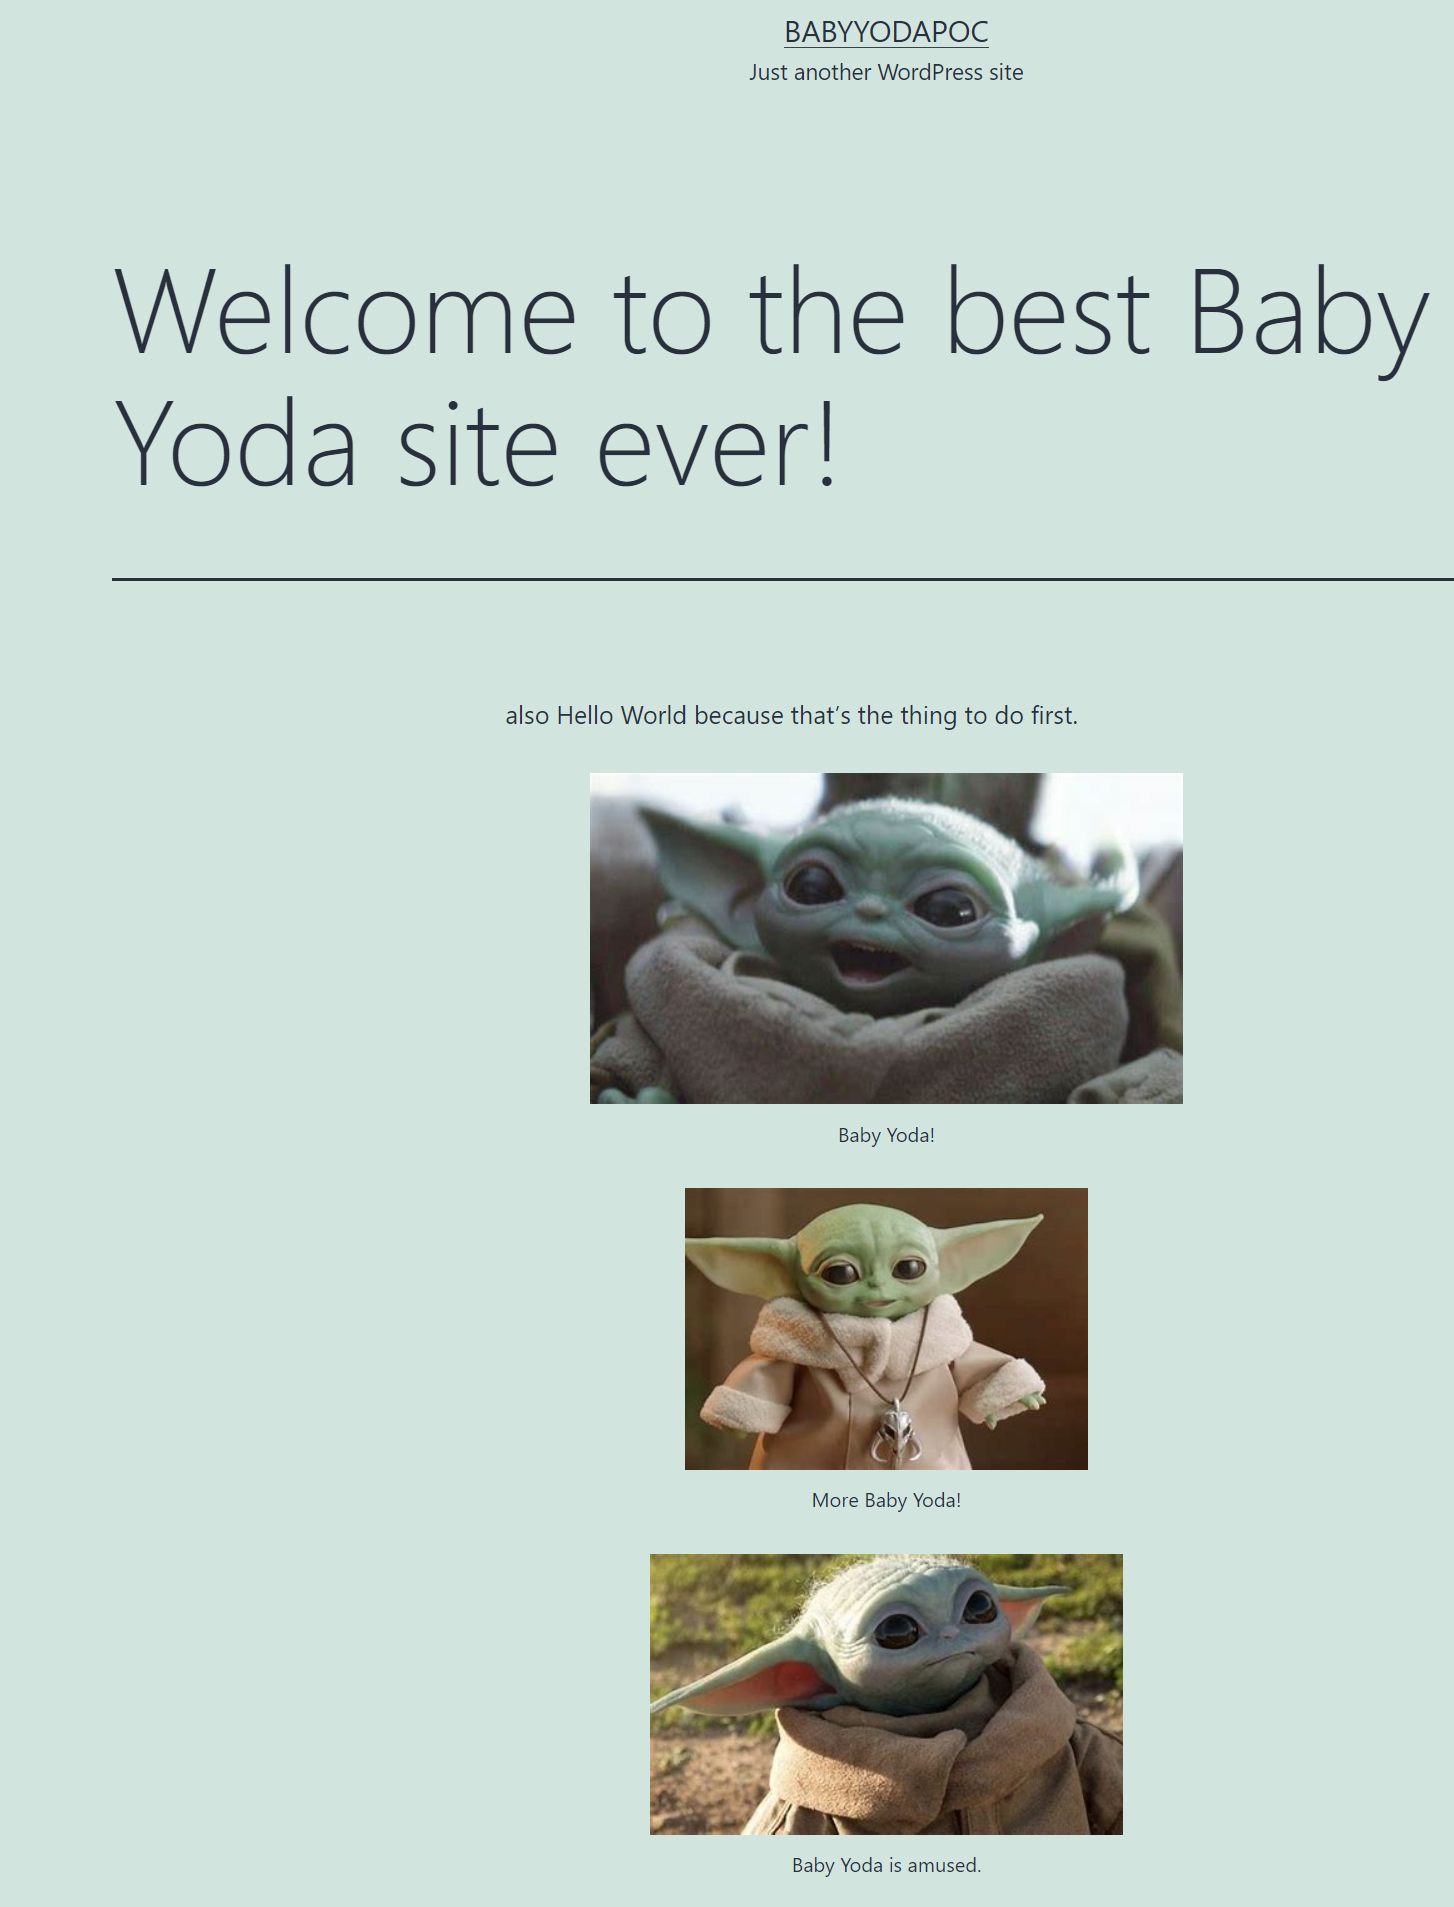
- Create a post of your choosing. I did a welcome to the best Baby Yoda Site. Add some pictures.
a. Uploading the images adds them to the MariaDB on your new site. We'll move this content out as we split up the infrastructure later.
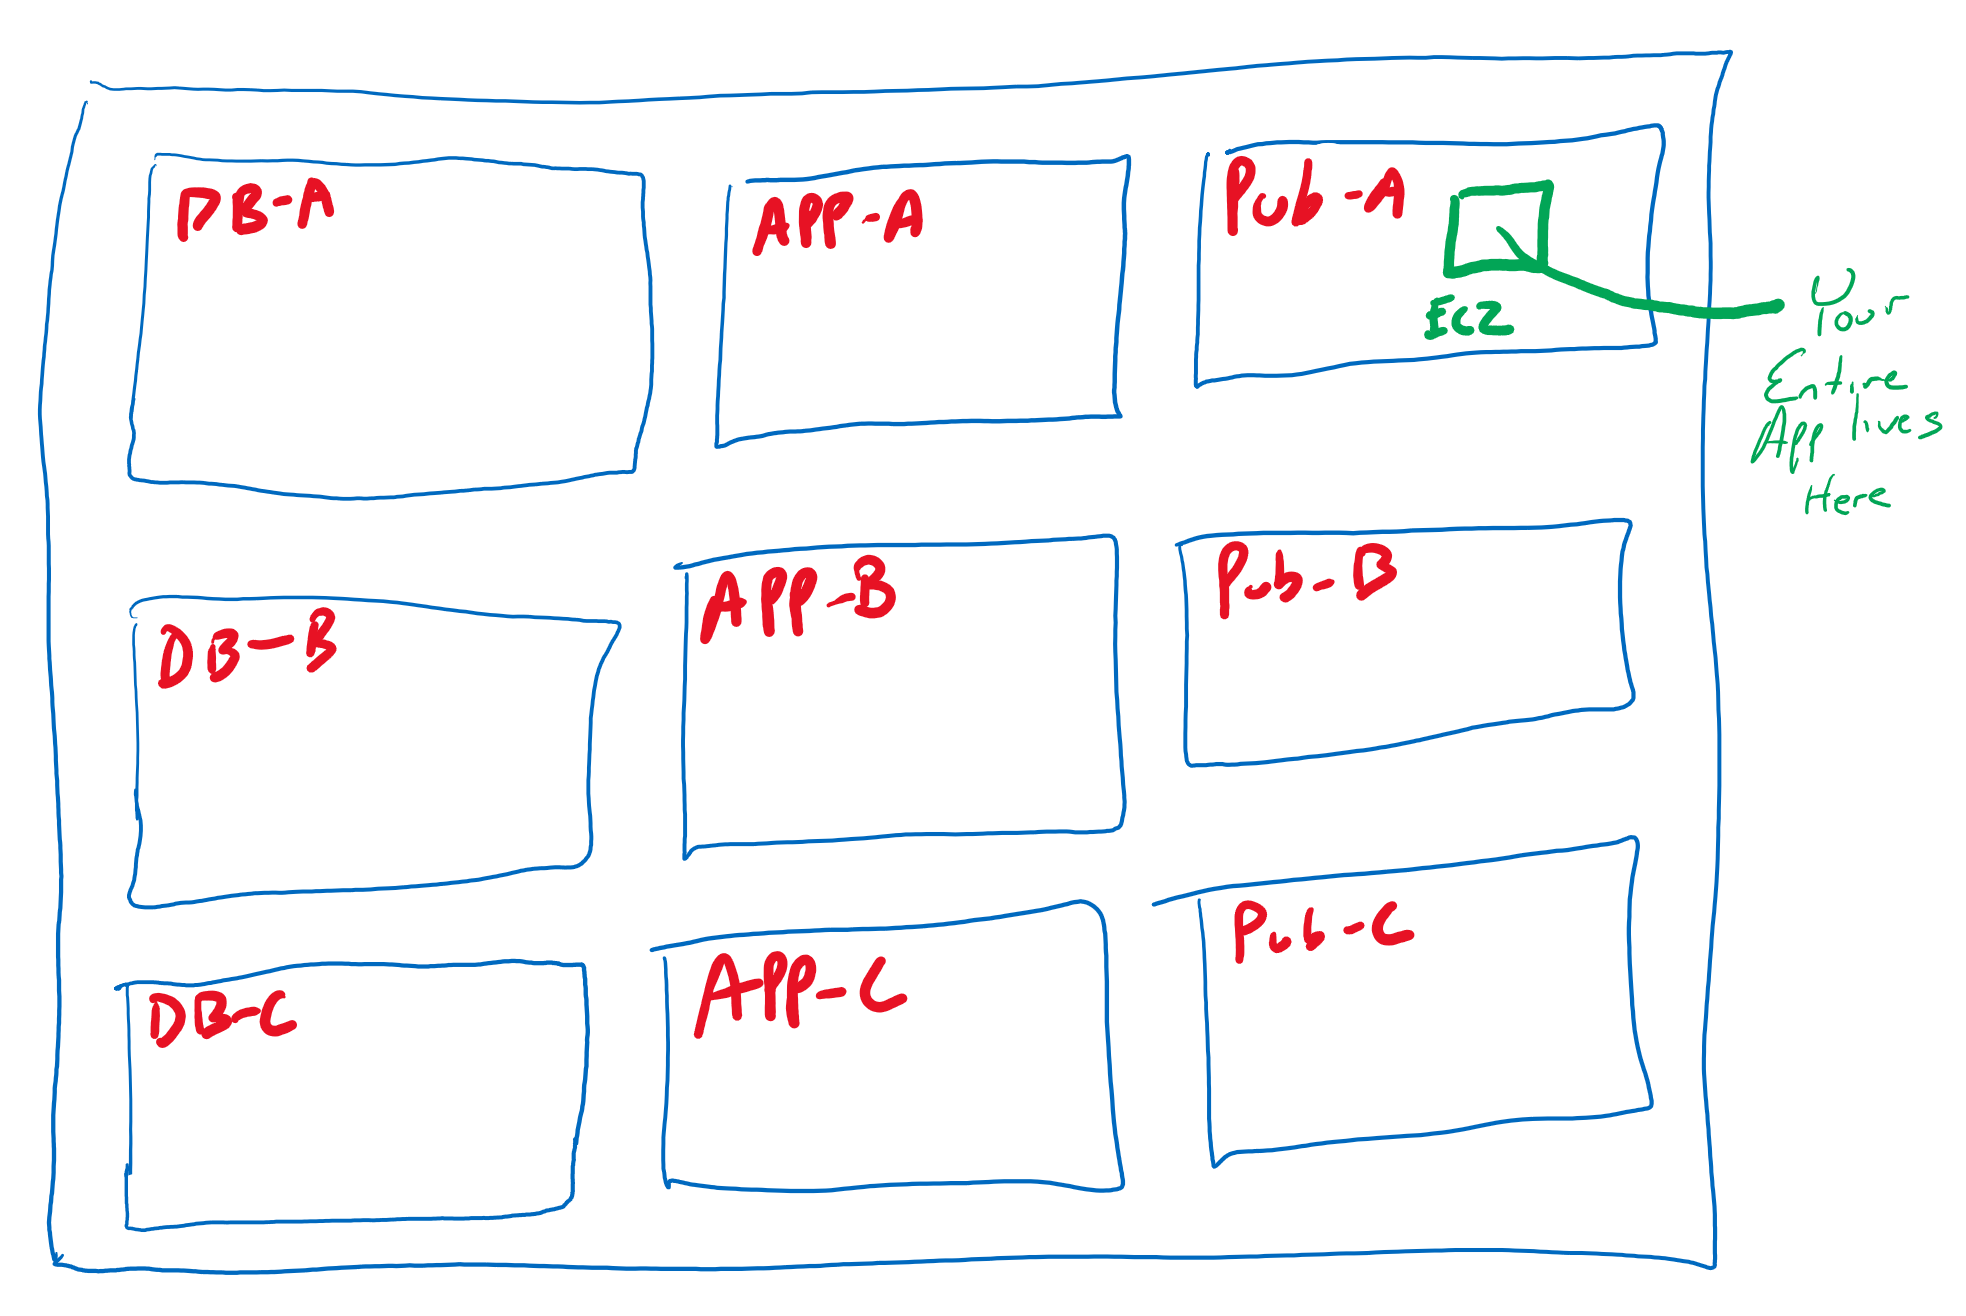
This Wordpress install is very limited. Imagine if your company installed an app like this and relied on it for production usage.
- It's built in one subnet in one AZ on one EC2 instance.
- All of the components of this site exist on the same EC2 instance.
- Traffic is directed to the public IP (not Elastic, either) for this EC2 instance. Imagine if today you had 3 people visit it, and it went viral overnight and had 100,000 views/day. That free tier instance type would just choke and die.
- as soon as this EC2 instance is restarted, the IP address will change. Good luck setting up your hosted domain or Route53 A record.
- Oh, and WordPress hard-codes the IP address into its application php files so it won't work after the instance restarts anyway. Best of luck to you.
- Test this out by stopping and starting the instance. Do it. Go for it.
Just imagine if this site was up for about 2 years and had a ton of data on it. If this instance failed right now, you'd lose your entire site unless it was backed up. Then, you'd need to worry about how you'd restore it.
Terminate this instance
- Last step here, to simulate complete EC2 instance failure, terminate the EC2 instance. Yes. Terminate it. Now, try accessing "your company's application". It's gone. All of it.
Rebuilding with Launch template
- Log into AWS and make sure you're in the N. Virginia region
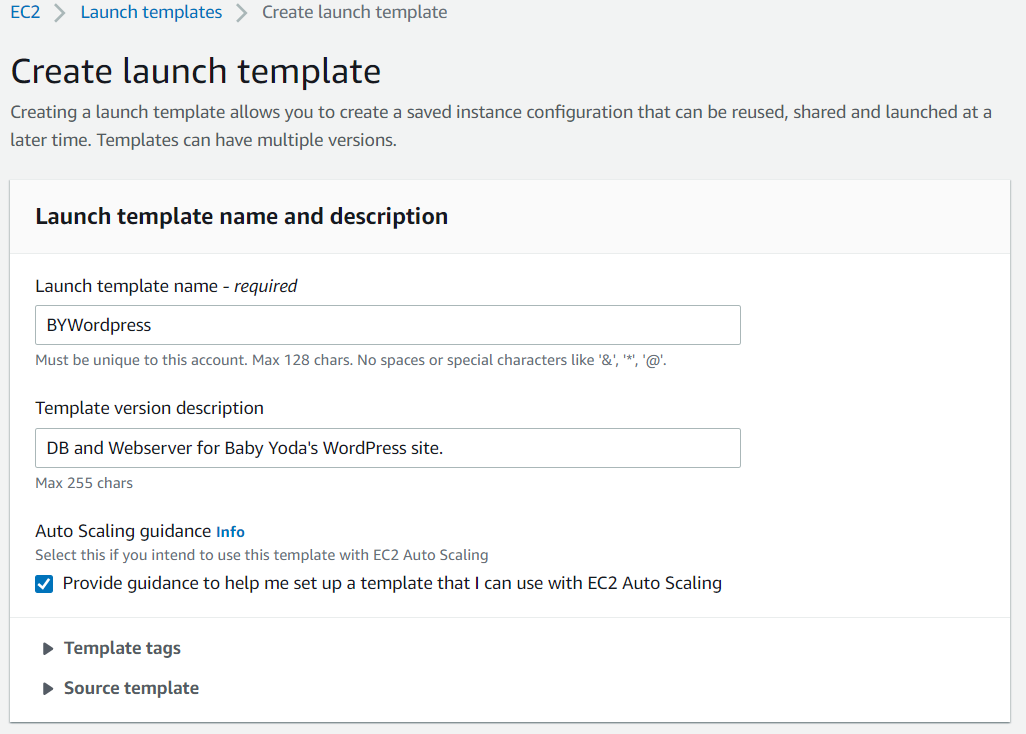
- Navigate to the EC2 console and click on Launch Templates and click Create Launch Template.
- Name this BYWordpress and give it a description
- Under Auto Scaling Guidance, check the "provide guidance" box
- Specify the Amazon Linux 2 AMI.
- Select a free tier instance type.
- Skip the key pair option and select the WordPress Security Group.
- Expand the Advanced Details and select the WordPress Instance Profile
- Set the Credit specification to Unlimited.
- Scroll down to the user data box. Here's where we will include the bootstrapping script that will run on first launch to configure the Wordpress install.
- Copy and paste in this data below. It will look familiar as it's all the code that you manually typed in before.
#!/bin/bash -xe

DBPassword=$(aws ssm get-parameters --region us-east-1 --names /BY/WP/DBPassword --with-decryption --query Parameters[0].Value)
DBPassword=`echo $DBPassword | sed -e 's/^"//' -e 's/"$//'`

DBRootPassword=$(aws ssm get-parameters --region us-east-1 --names /BY/WP/DBRootPassword --with-decryption --query Parameters[0].Value)
DBRootPassword=`echo $DBRootPassword | sed -e 's/^"//' -e 's/"$//'`

DBUser=$(aws ssm get-parameters --region us-east-1 --names /BY/WP/DBUser --query Parameters[0].Value)
DBUser=`echo $DBUser | sed -e 's/^"//' -e 's/"$//'`

DBName=$(aws ssm get-parameters --region us-east-1 --names /BY/WP/DBName --query Parameters[0].Value)
DBName=`echo $DBName | sed -e 's/^"//' -e 's/"$//'`

DBEndpoint=$(aws ssm get-parameters --region us-east-1 --names /BY/WP/DBEndpoint --query Parameters[0].Value)
DBEndpoint=`echo $DBEndpoint | sed -e 's/^"//' -e 's/"$//'`

yum -y update
yum -y upgrade

yum install -y mariadb-server httpd wget
amazon-linux-extras install -y lamp-mariadb10.2-php7.2 php7.2
amazon-linux-extras install epel -y
yum install stress -y

systemctl enable httpd
systemctl enable mariadb
systemctl start httpd
systemctl start mariadb

mysqladmin -u root password $DBRootPassword

wget http://wordpress.org/latest.tar.gz -P /var/www/html
cd /var/www/html
tar -zxvf latest.tar.gz
cp -rvf wordpress/* .
rm -R wordpress
rm latest.tar.gz

sudo cp ./wp-config-sample.php ./wp-config.php
sed -i "s/'database_name_here'/'$DBName'/g" wp-config.php
sed -i "s/'username_here'/'$DBUser'/g" wp-config.php
sed -i "s/'password_here'/'$DBPassword'/g" wp-config.php
sed -i "s/'localhost'/'$DBEndpoint'/g" wp-config.php

usermod -a -G apache ec2-user
chown -R ec2-user:apache /var/www
chmod 2775 /var/www
find /var/www -type d -exec chmod 2775 {} \;
find /var/www -type f -exec chmod 0664 {} \;

echo "CREATE DATABASE $DBName;" >> /tmp/db.setup
echo "CREATE USER '$DBUser'@'localhost' IDENTIFIED BY '$DBPassword';" >> /tmp/db.setup
echo "GRANT ALL ON $DBName.* TO '$DBUser'@'localhost';" >> /tmp/db.setup
echo "FLUSH PRIVILEGES;" >> /tmp/db.setup
mysql -u root --password=$DBRootPassword < /tmp/db.setup
rm /tmp/db.setup
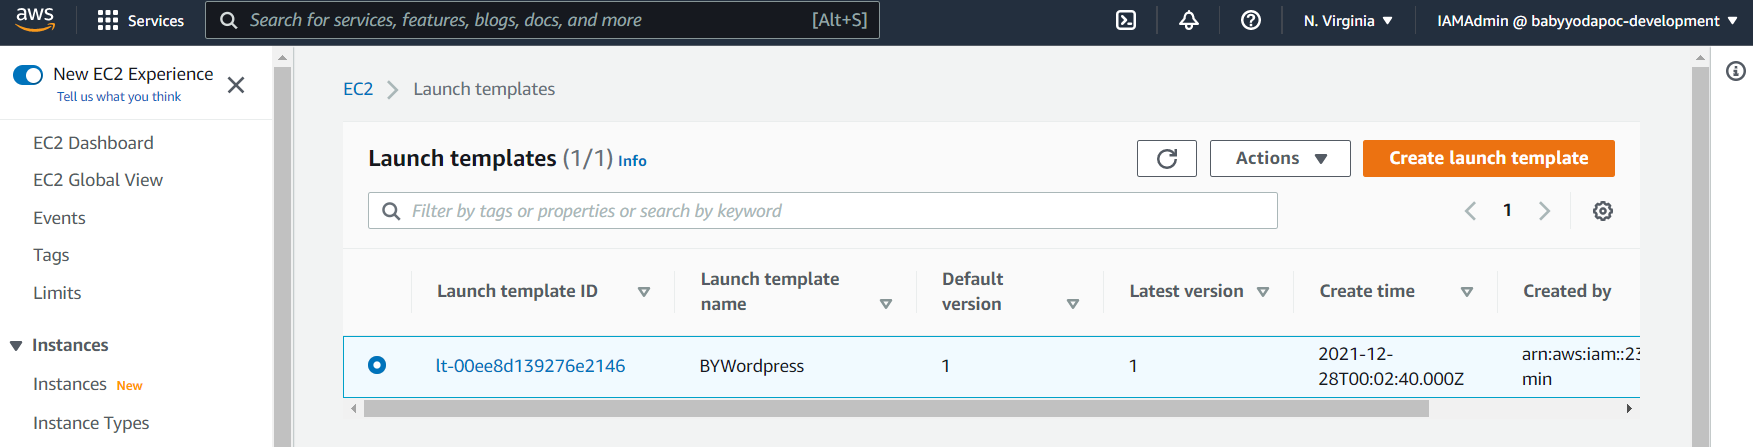
- Click Create Launch Template
Launch new EC2 instance
- Click on the template and then click Actions and then Launch Instance from Template.
- Specify no key pair and a subnet (sn-pub-A) just like the last one.
- Add tag Name: BYWPTemplate
- Click Launch Template.
- Click on the instance and wait a few minutes for it to build. Once it's built, you should be able to copy the Public IP into your browser just like we did before.
- Copy the IP address from the EC2 instance and open into the browser (use HTTP, not HTTPS as that is not configured)
- Enter the following information:
- Site Name: BabyYodaPoC
- username: admin
- pw: BabyYoda123!
- email: your personal email address
- Log in using the above information
- Create a post of your choosing. I did a welcome to the best Baby Yoda Site. Add some pictures.
a. Uploading the images adds them to the MariaDB on your new site. We'll move this content out as we split up the infrastructure later.
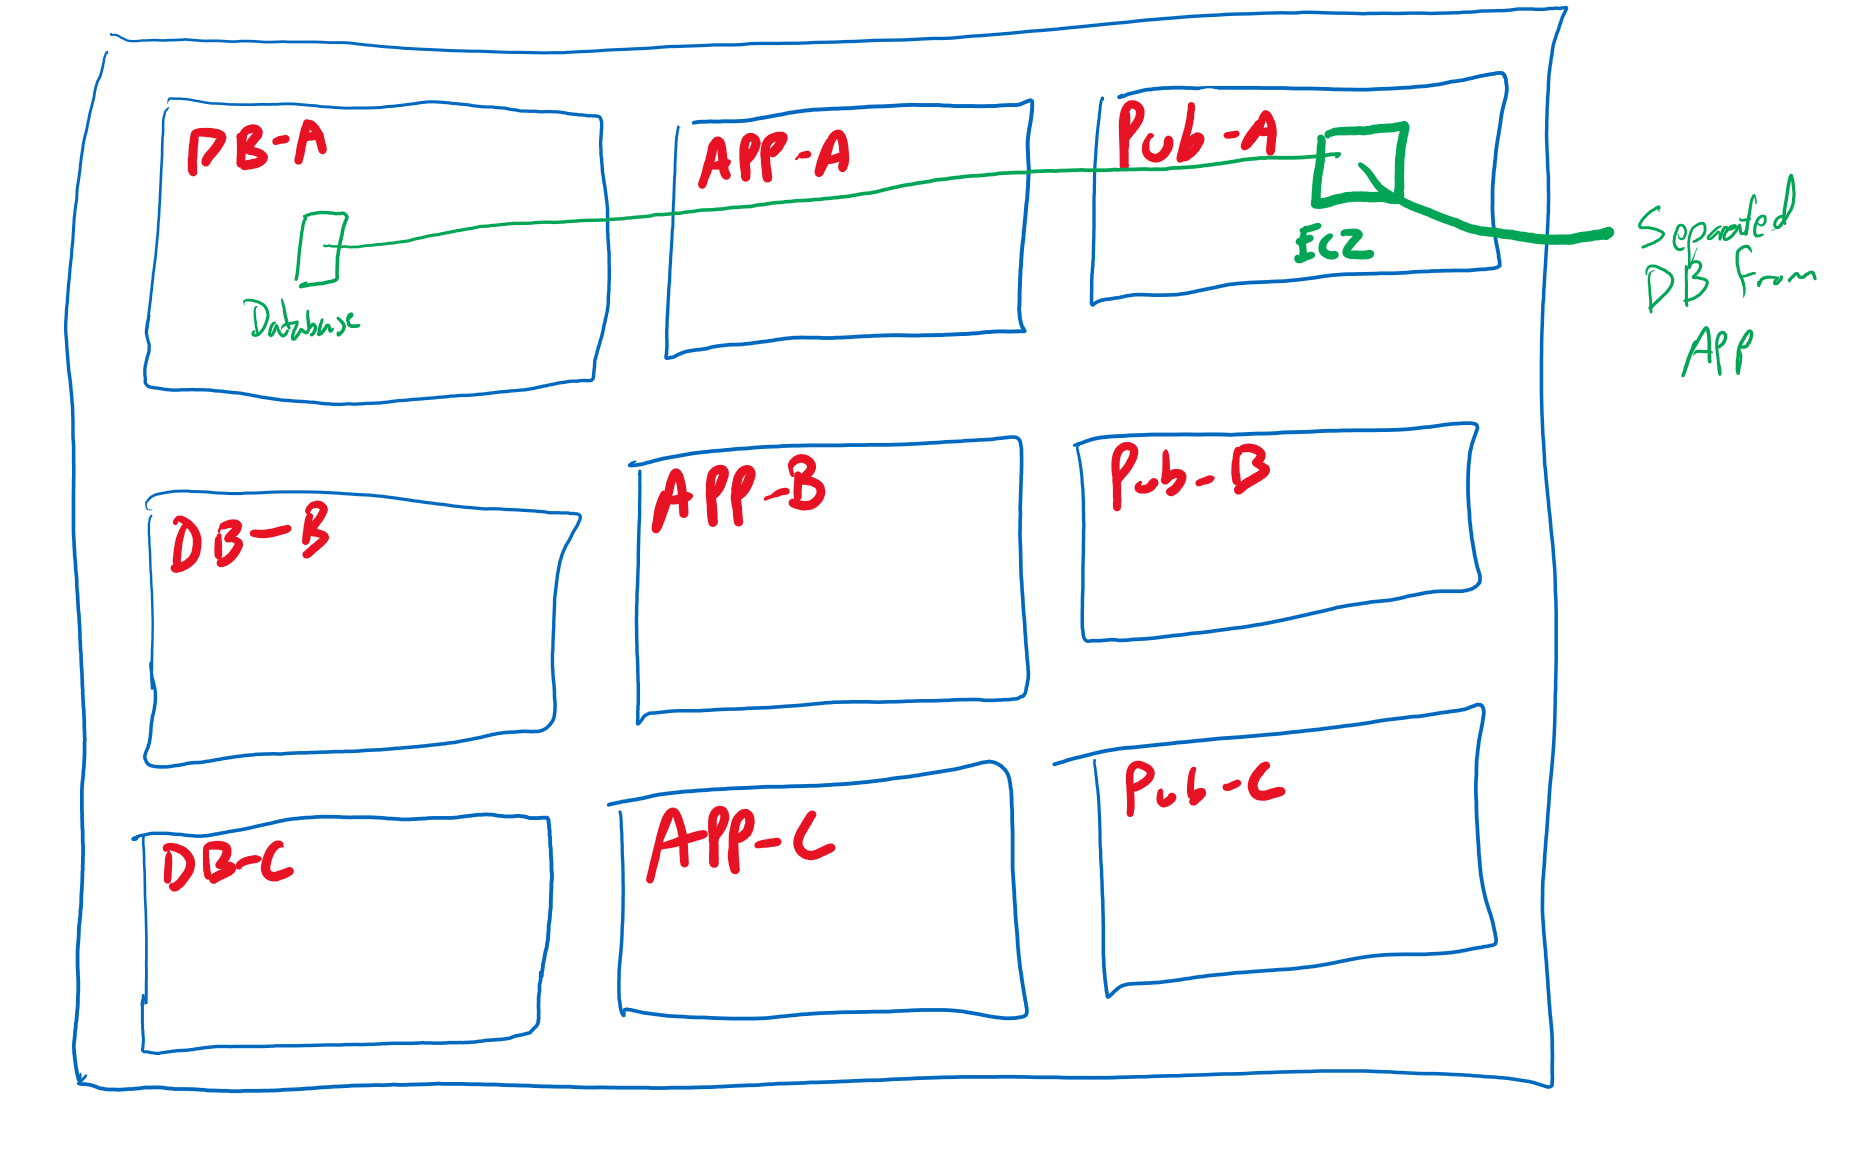
This shows you can automate some of the steps and not do this manually, however with this, all we've done is automate the same architecture as we had before.
- Single EC2 with app and DB, single AZ, direct traffic via IP.
What this also shows is that maybe we can find a way to launch multiple instances of this and then have each one of those instances all have the same copy of the App.
Create RDS Subnet Group
-
Navigate to the RDS console.
-
Click on Subnet Groups on the left.
-
Click Create
-
Name this BYWPRDSSubnetGroup and enter a description
-
Select the VPC
-
Select the Availablity Zones that are in the database tier us-east-1a, 1b, 1c
-
Select the Database subnets (10.16.16.0/20, 10.16.80.0/20, 10.16.144.0/20)
-
Click Create.
Create Database
- Click on Databases and then click Create Database.
- Select Standard and then MySQL.
- For the version, select 5.7.31
- Select the Free tier template
- For the DB instance identifier, name this
byWordPress - For the Credentials, enter in the same username and password as you used to manually create the database.
bywpuser - BabyYoda123!
- Notice we can't select other database sizes due to being in the free tier.
- Scroll down and select our VPC under the Connectivity section
- Notice that the Subnet Group automatically populates.
- Select No on the public access for the database.
- Remove the Default Security group and then select the SGDatabase security group from the dropdown.
- Select us-east-1a from the availability zone dropdown
- Scroll down to Database Authentication and then expand Additional Configuration
- Name this database the same as you had before:
bywpdb - Scroll through the remaining options and click Create database.
- This might take a good 30 minutes to complete the creation of this database.
Migrate Database
- Navigate back to the EC2 Console
- Connect to the EC2 instance via Session Manager.
- Type in
sudo bashfollowed bycdfollowed byclearto give us a fresh window - Copyand paste in the commands below to load the variables from the parameter store into the environment variables.
DBPassword=$(aws ssm get-parameters --region us-east-1 --names /BY/WP/DBPassword --with-decryption --query Parameters[0].Value)
DBPassword=`echo $DBPassword | sed -e 's/^"//' -e 's/"$//'`

DBRootPassword=$(aws ssm get-parameters --region us-east-1 --names /BY/WP/DBRootPassword --with-decryption --query Parameters[0].Value)
DBRootPassword=`echo $DBRootPassword | sed -e 's/^"//' -e 's/"$//'`

DBUser=$(aws ssm get-parameters --region us-east-1 --names /BY/WP/DBUser --query Parameters[0].Value)
DBUser=`echo $DBUser | sed -e 's/^"//' -e 's/"$//'`

DBName=$(aws ssm get-parameters --region us-east-1 --names /BY/WP/DBName --query Parameters[0].Value)
DBName=`echo $DBName | sed -e 's/^"//' -e 's/"$//'`

DBEndpoint=$(aws ssm get-parameters --region us-east-1 --names /BY/WP/DBEndpoint --query Parameters[0].Value)
DBEndpoint=`echo $DBEndpoint | sed -e 's/^"//' -e 's/"$//'`
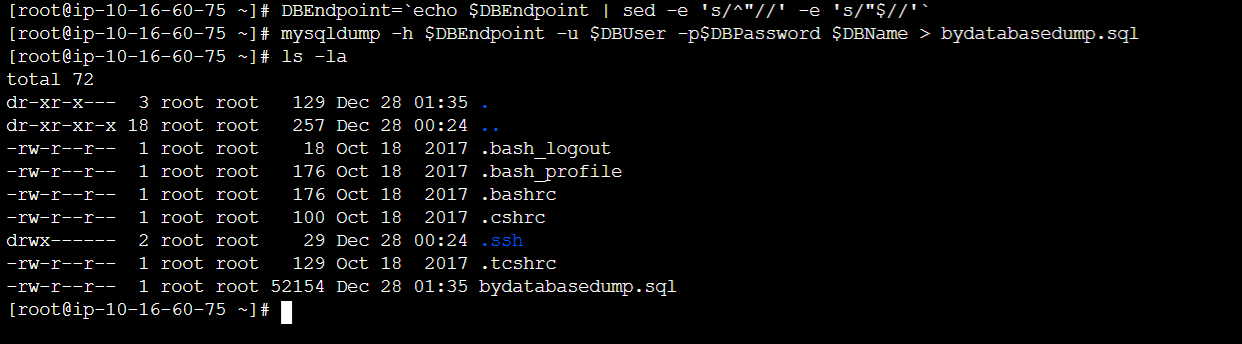
- Backup the database
mysqldump -h $DBEndpoint -u $DBUser -p$DBPassword $DBName > bydatabasedump.sql - Verify the backup exists by running
ls -la
- Navigate back to the RDS console and select the database.
- Copy the endpoint URL and navigate to the Parameter Store.
- Delete the endpoint parameter (the one we set to localhost)
- Create a new parameter to replace this, but this time the value will be
bywordpress.ckdygzaxp0wx.us-east-1.rds.amazonaws.comor whatever you have copied. - Run these commands again to refresh the DBEndpoint:
DBEndpoint=$(aws ssm get-parameters --region us-east-1 --names /BY/WP/DBEndpoint --query Parameters[0].Value)
DBEndpoint=`echo $DBEndpoint | sed -e 's/^"//' -e 's/"$//'`
- Restore the database by running this command:
mysql -h $DBEndpoint -u $DBUser -p$DBPassword $DBName < bydatabasedump.sql
Update WordPress configuration
- Run
sudo sed -i "s/'localhost'/'$DBEndpoint'/g" /var/www/html/wp-config.php - Disable and stop MariaDB
sudo systemctl disable mariadb
sudo systemctl stop mariadb
- Refresh the Baby Yoda Wordpress site and it should load using the MySQL RDS Database.
Modify Launch template
- Navigate back to the EC2 console and select Launch Template
- Modify this template
- Rename the description to
single server App only - Scroll down to the user data section (remember we have the mariaDB code there)
- Remove the two systemctl lines that refer to MariaDB and the section that creates the database. Finished userdata block should look like this:
#!/bin/bash -xe

DBPassword=$(aws ssm get-parameters --region us-east-1 --names /BY/WP/DBPassword --with-decryption --query Parameters[0].Value)
DBPassword=`echo $DBPassword | sed -e 's/^"//' -e 's/"$//'`

DBRootPassword=$(aws ssm get-parameters --region us-east-1 --names /BY/WP/DBRootPassword --with-decryption --query Parameters[0].Value)
DBRootPassword=`echo $DBRootPassword | sed -e 's/^"//' -e 's/"$//'`

DBUser=$(aws ssm get-parameters --region us-east-1 --names /BY/WP/DBUser --query Parameters[0].Value)
DBUser=`echo $DBUser | sed -e 's/^"//' -e 's/"$//'`

DBName=$(aws ssm get-parameters --region us-east-1 --names /BY/WP/DBName --query Parameters[0].Value)
DBName=`echo $DBName | sed -e 's/^"//' -e 's/"$//'`

DBEndpoint=$(aws ssm get-parameters --region us-east-1 --names /BY/WP/DBEndpoint --query Parameters[0].Value)
DBEndpoint=`echo $DBEndpoint | sed -e 's/^"//' -e 's/"$//'`

yum -y update
yum -y upgrade

yum install -y mariadb-server httpd wget
amazon-linux-extras install -y lamp-mariadb10.2-php7.2 php7.2
amazon-linux-extras install epel -y
yum install stress -y

systemctl enable httpd
systemctl start httpd

wget http://wordpress.org/latest.tar.gz -P /var/www/html
cd /var/www/html
tar -zxvf latest.tar.gz
cp -rvf wordpress/* .
rm -R wordpress
rm latest.tar.gz

sudo cp ./wp-config-sample.php ./wp-config.php
sed -i "s/'database_name_here'/'$DBName'/g" wp-config.php
sed -i "s/'username_here'/'$DBUser'/g" wp-config.php
sed -i "s/'password_here'/'$DBPassword'/g" wp-config.php
sed -i "s/'localhost'/'$DBEndpoint'/g" wp-config.php

usermod -a -G apache ec2-user
chown -R ec2-user:apache /var/www
chmod 2775 /var/www
find /var/www -type d -exec chmod 2775 {} \;
find /var/www -type f -exec chmod 0664 {} \;
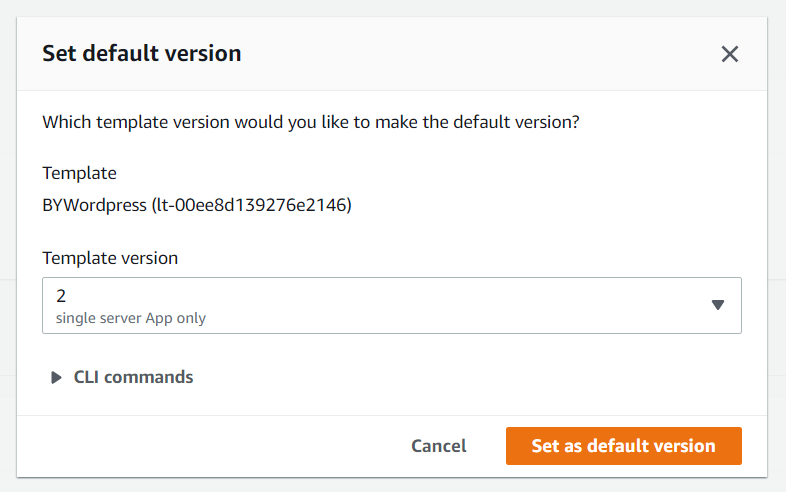
- Save template and then set this new template as the default.
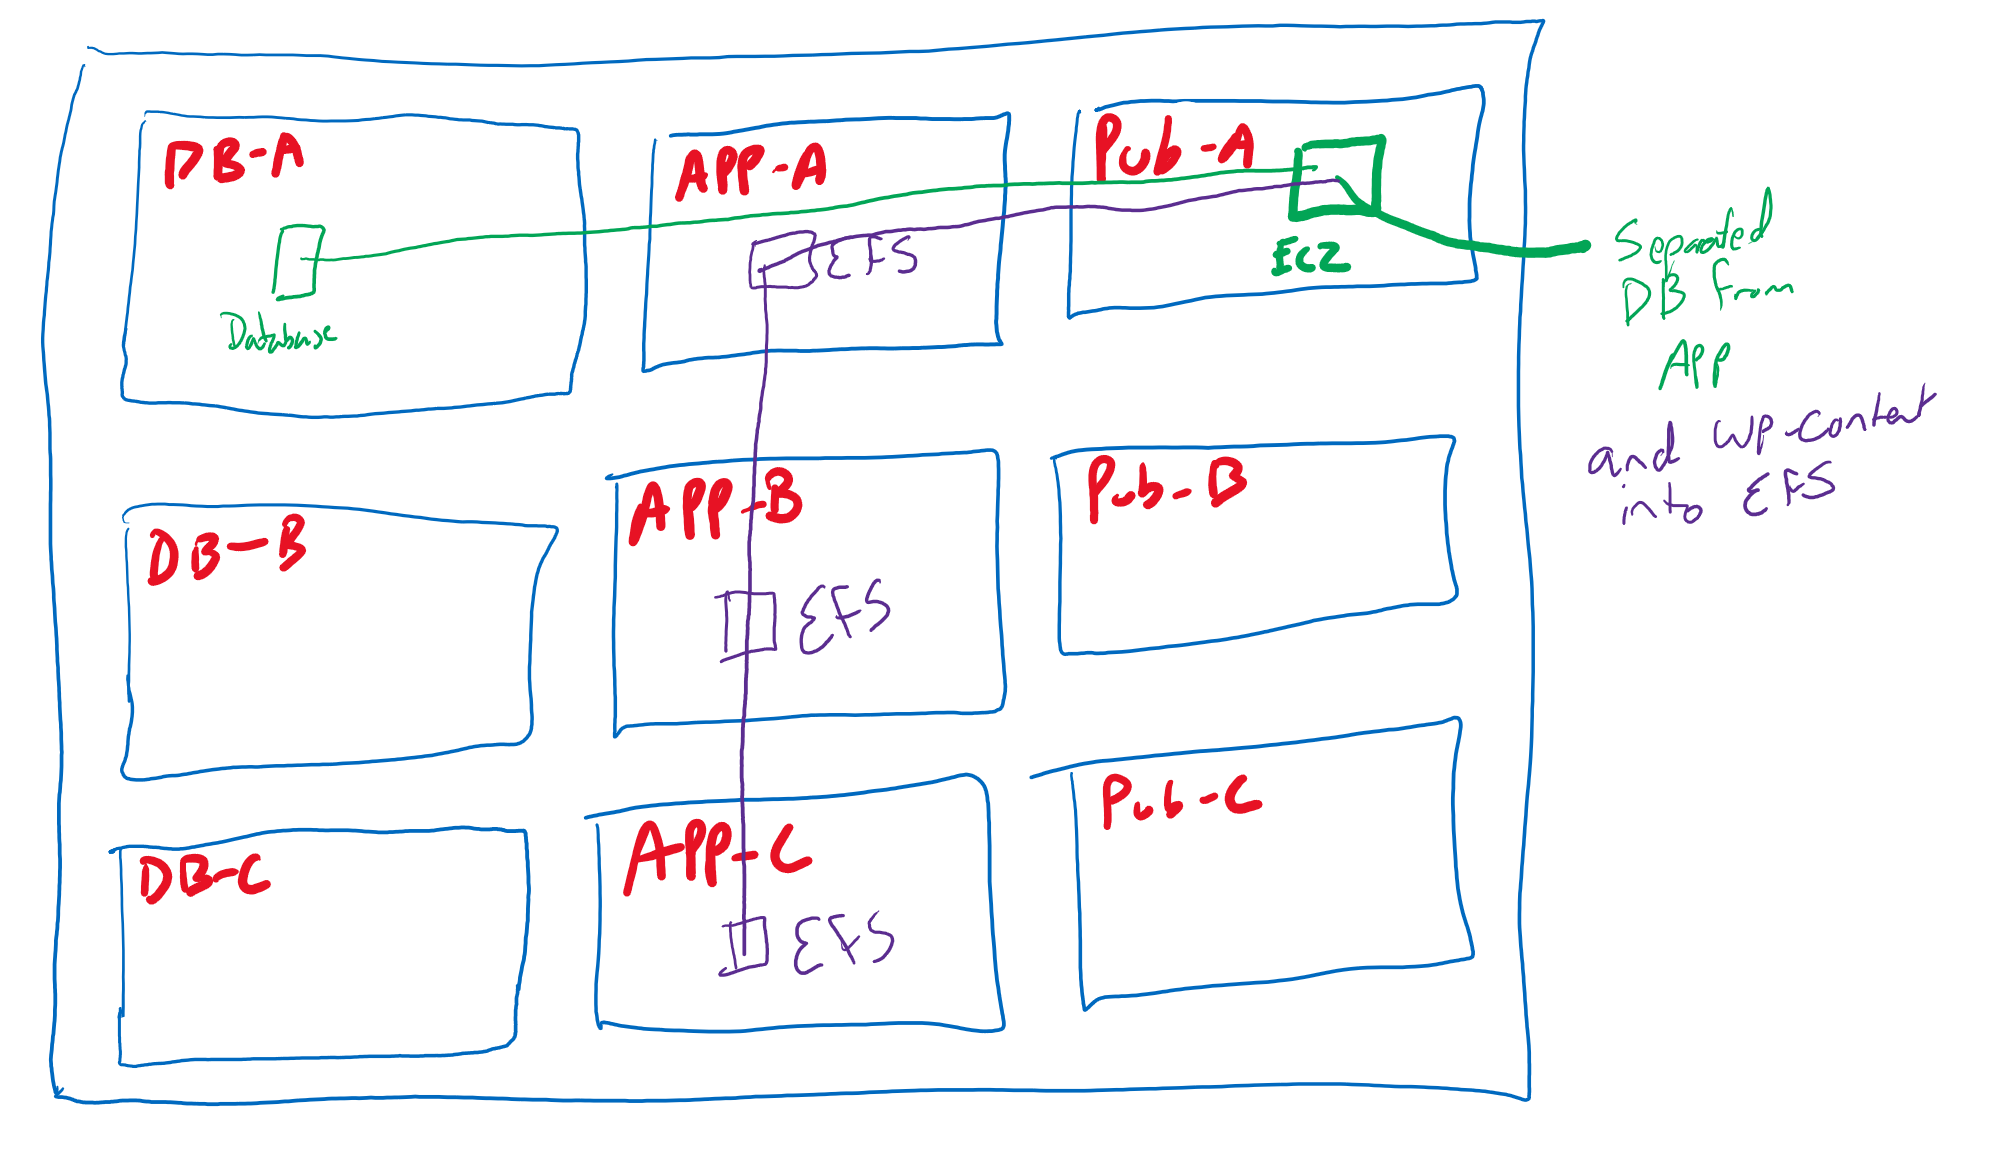
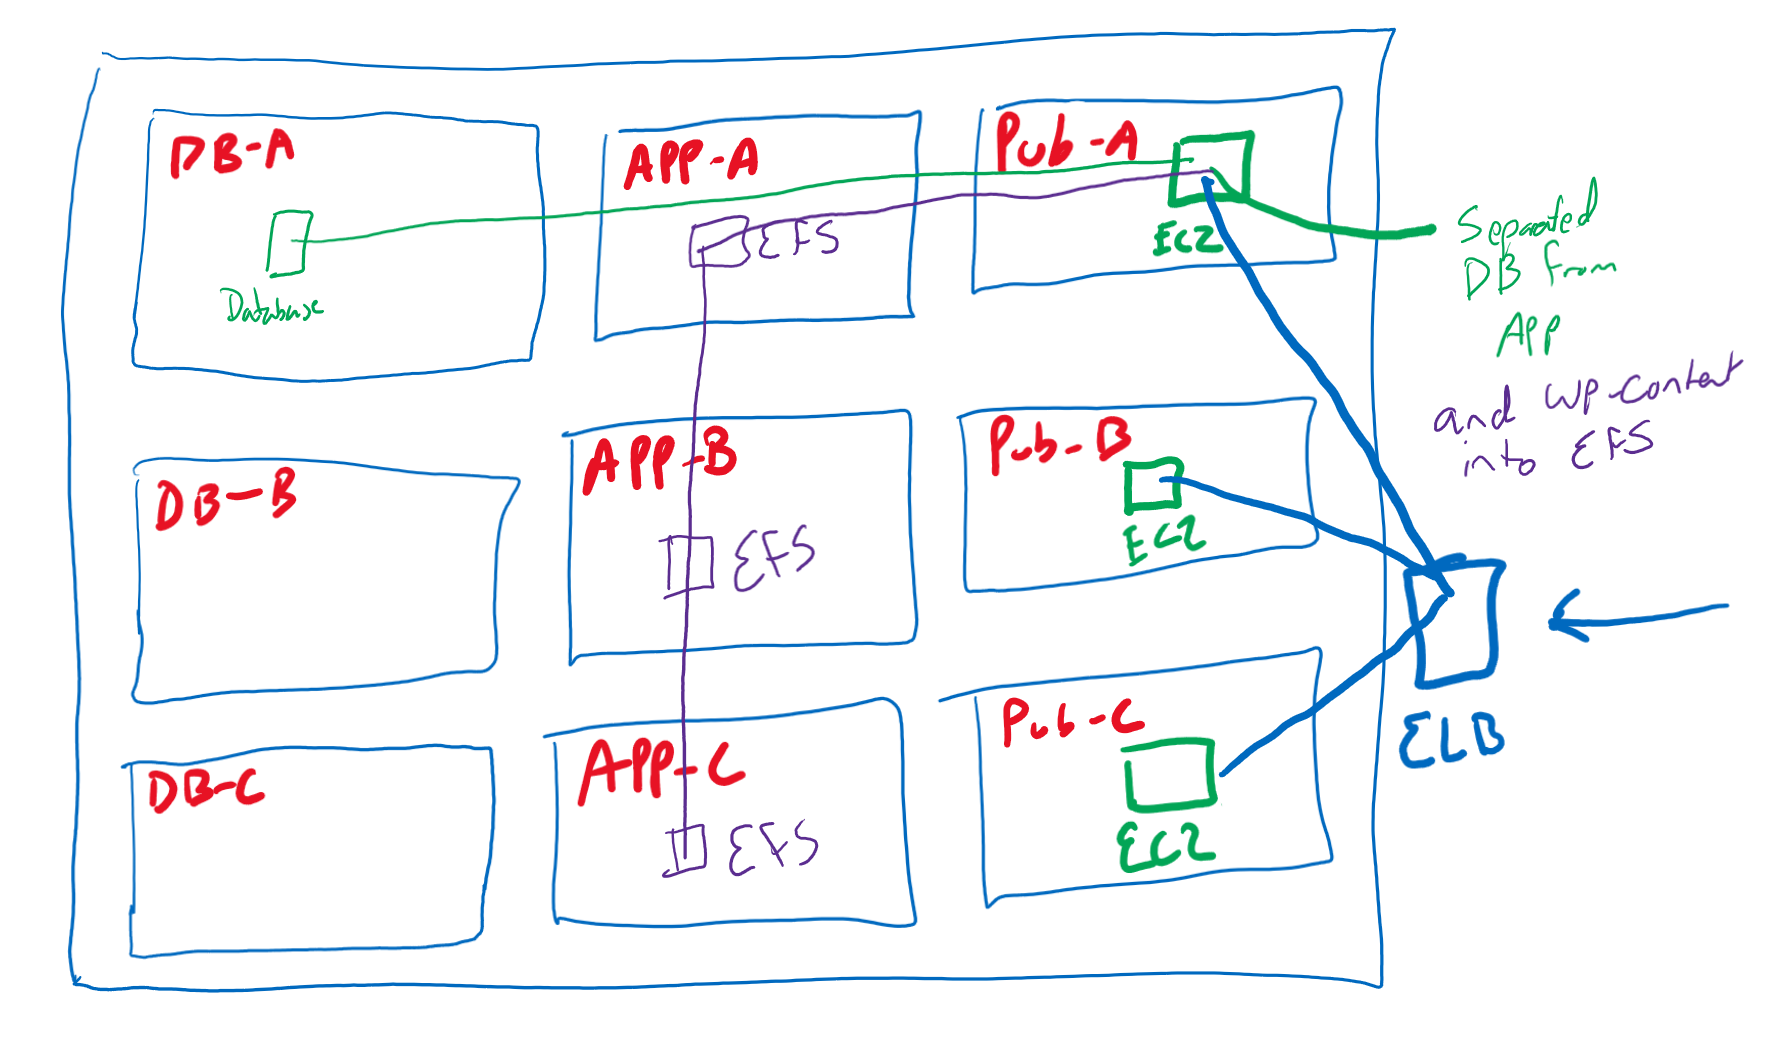
Your infrastructure stack now looks like this.
Separate WPContent from EC2 instance
- Navigate to EFS console in AWS.
- Click on Create File System and click Customize
- Name this BY-WP-Content
- Leave the defaults except for Enable Encryption at rest, uncheck that.
- Click next to configure the network access.
- Select the VPC we are using and then uncheck the default security groups.
- Select the sn-app-A, B, C respectively for the AZs.
- For the security groups, select the SGEFS Groups.
- Click next, review the options here, click next again, and then Create.
- Click on the file system and navigate to the network tab. These are the mountpoints that are being created. These will need to be in the available state.
- Copy the file system ID (fs-0b1636ae73dec8f51
- Navigate back to the parameter store in systems manager.
- Create a new parameter:
/BY/WP/EFSFSID
Filesystem
Standard
Text
fs-0b1636ae73dec8f51
- Navigate back to the EFS console and make sure these mountpoints are in the available state.
Configure EC2 Instance to connect to EFS
- Navigate back to the EC2 console and click on our EC2 instance.
- Connect via session manager.
- Type in
sudo bashfollowed bycdfollowed byclearto give us a fresh window - Install the efs tools by running
sudo yum -y install amazon-efs-utils cd /var/www/htmlinto that folder. Runls -lato view the contents.- Move the wp-content folder to a temp directory by running
sudo mv wp-content/ /tmp - Create a mountpoint folder
sudo mkdir wp-content - Run the next two commands to get the FSID from the parameter store.
EFSFSID=$(aws ssm get-parameters --region us-east-1 --names /BY/WP/EFSFSID --query Parameters[0].Value)
EFSFSID=`echo $EFSFSID | sed -e 's/^"//' -e 's/"$//'`
- Run
cat /etc/fstabto view the file system mounts - Run
echo -e "$EFSFSID:/ /var/www/html/wp-content efs _netdev,tls,iam 0 0" >> /etc/fstabto add the mountpoint to the EFS - Mount the EFS by running
mount -a -t efs defaults - Verify by running
df -k - Move the content back into the new EFS share by running
mv /tmp/wp-content/* /var/www/html/wp-content/ - Fix the permissions on this new folder by running
chown -R ec2-user:apache /var/www/ - Reconnect to the EC2 instance using session manager
- run
df -kto list the volumes. - Copy in the Public IP and you should be able to refresh the site.
Update the Launch Template to use the EFS file system
- Navigate to the EC2 console and into the Launch Templates
- Edit this launch template and change the description to
App Only, Uses EFS - Scroll all the way down to the user data where we will make some changes to configure this to use EFS.
- On the 3rd line, paste the following code:
EFSFSID=$(aws ssm get-parameters --region us-east-1 --names /BY/WP/EFSFSID --query Parameters[0].Value)
EFSFSID=`echo $EFSFSID | sed -e 's/^"//' -e 's/"$//'`
- Scroll down to the
yum install -yline and addamazon-efs-utilsat the end of it. - Add the following code under the
systemctl start httpdline:
mkdir -p /var/www/html/wp-content
chown -R ec2-user:apache /var/www/
echo -e "$EFSFSID:/ /var/www/html/wp-content efs _netdev,tls,iam 0 0" >> /etc/fstab
mount -a -t efs defaults
- The code for the user data section should look like this:
#!/bin/bash -xe

EFSFSID=$(aws ssm get-parameters --region us-east-1 --names /BY/WP/EFSFSID --query Parameters[0].Value)
EFSFSID=`echo $EFSFSID | sed -e 's/^"//' -e 's/"$//'`

DBPassword=$(aws ssm get-parameters --region us-east-1 --names /BY/WP/DBPassword --with-decryption --query Parameters[0].Value)
DBPassword=`echo $DBPassword | sed -e 's/^"//' -e 's/"$//'`

DBRootPassword=$(aws ssm get-parameters --region us-east-1 --names /BY/WP/DBRootPassword --with-decryption --query Parameters[0].Value)
DBRootPassword=`echo $DBRootPassword | sed -e 's/^"//' -e 's/"$//'`

DBUser=$(aws ssm get-parameters --region us-east-1 --names /BY/WP/DBUser --query Parameters[0].Value)
DBUser=`echo $DBUser | sed -e 's/^"//' -e 's/"$//'`

DBName=$(aws ssm get-parameters --region us-east-1 --names /BY/WP/DBName --query Parameters[0].Value)
DBName=`echo $DBName | sed -e 's/^"//' -e 's/"$//'`

DBEndpoint=$(aws ssm get-parameters --region us-east-1 --names /BY/WP/DBEndpoint --query Parameters[0].Value)
DBEndpoint=`echo $DBEndpoint | sed -e 's/^"//' -e 's/"$//'`

yum -y update
yum -y upgrade

yum install -y mariadb-server httpd wget amazon-efs-utils
amazon-linux-extras install -y lamp-mariadb10.2-php7.2 php7.2
amazon-linux-extras install epel -y
yum install stress -y

systemctl enable httpd
systemctl start httpd

mkdir -p /var/www/html/wp-content
chown -R ec2-user:apache /var/www/
echo -e "$EFSFSID:/ /var/www/html/wp-content efs _netdev,tls,iam 0 0" >> /etc/fstab
mount -a -t efs defaults

wget http://wordpress.org/latest.tar.gz -P /var/www/html
cd /var/www/html
tar -zxvf latest.tar.gz
cp -rvf wordpress/* .
rm -R wordpress
rm latest.tar.gz

sudo cp ./wp-config-sample.php ./wp-config.php
sed -i "s/'database_name_here'/'$DBName'/g" wp-config.php
sed -i "s/'username_here'/'$DBUser'/g" wp-config.php
sed -i "s/'password_here'/'$DBPassword'/g" wp-config.php
sed -i "s/'localhost'/'$DBEndpoint'/g" wp-config.php

usermod -a -G apache ec2-user
chown -R ec2-user:apache /var/www
chmod 2775 /var/www
find /var/www -type d -exec chmod 2775 {} \;
find /var/www -type f -exec chmod 0664 {} \;
- Click on create template version
- Set this to the default version.
Your architecture now looks like this:
Adding a Load Balancer
- Navigate to the EC2 console and click on Load Balancers
- Create an ALB.
- Name this BYWPALB, internet facing, IPv4, select the VPC and the Subnets a. check the boxes and then select sn-pub-A, B, C respectively.
- Delete the default security group and select the SGLoadbalancer SG.
- Leave HTTP port 80
- Create a new target group, name this one BYWPALBTG a. Target type is instances, HTTP:80, Select the VPC and set the protocol to HTTP1, health check protocol is HTTP.
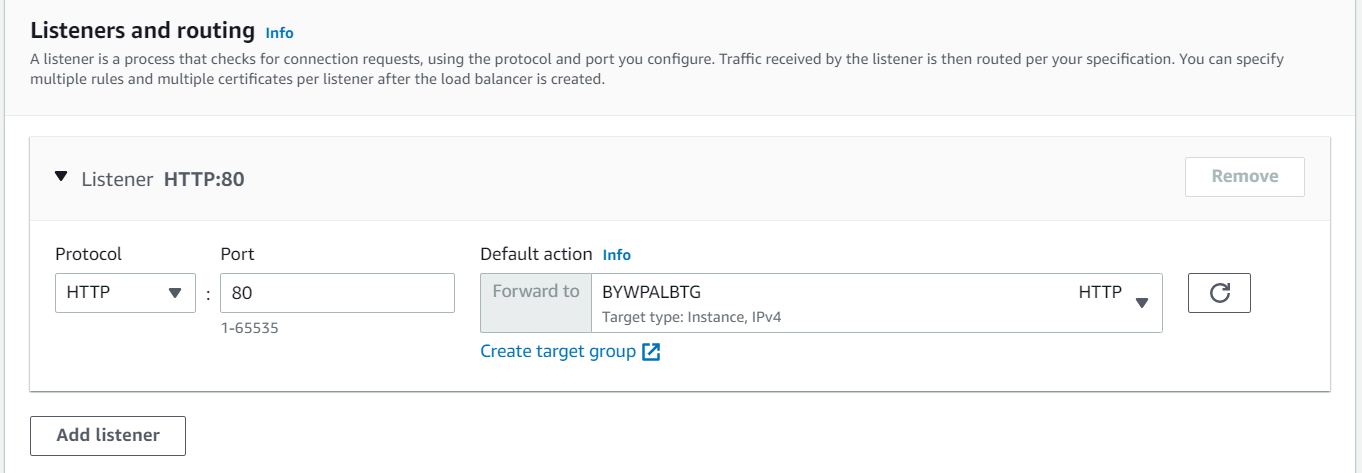
- On the Load balancer tab, click refresh on the Listeners and routing section and then select the new target group.
- Create load balancer.
Create new ELB Parameter
- Copy the DNS name of the newly created load balancer.
BYWPALB-416203232.us-east-1.elb.amazonaws.com - Navigate back to the parameter store and create a new parameter.
/BY/WP/ALBDNSNAME
Load Balancer DNS
Standard
String
text
Value = BYWPALB-416203232.us-east-1.elb.amazonaws.com
Update WP config to use ELB
Remember earlier when we talked about the IP address that is hardcoded into the WP configuration? Well, after creating the Load Balancer, we need to update the WP config to point to the load balancer DNS entry that we just loaded into the Parameter Store. Follow?
- Navigate back to the EC2 console and select the launch template and then Modify that launch template for the 4th time.
- Change the description to
WP APP ELB Version - Scroll all the way to the bottom to user data
- On the 3rd line (right after the first -xe line and an empty), paste this code:
ALBDNSNAME=$(aws ssm get-parameters --region us-east-1 --names /BY/WP/ALBDNSNAME --query Parameters[0].Value)
ALBDNSNAME=`echo $ALBDNSNAME | sed -e 's/^"//' -e 's/"$//'`
- Move to the bottom of this user data block and paste in the following code:
cat >> /home/ec2-user/update_wp_ip.sh<< 'EOF'
#!/bin/bash
source <(php -r 'require("/var/www/html/wp-config.php"); echo("DB_NAME=".DB_NAME."; DB_USER=".DB_USER."; DB_PASSWORD=".DB_PASSWORD."; DB_HOST=".DB_HOST); ')
SQL_COMMAND="mysql -u $DB_USER -h $DB_HOST -p$DB_PASSWORD $DB_NAME -e"
OLD_URL=$(mysql -u $DB_USER -h $DB_HOST -p$DB_PASSWORD $DB_NAME -e 'select option_value from wp_options where option_id = 1;' | grep http)

ALBDNSNAME=$(aws ssm get-parameters --region us-east-1 --names /BY/WP/ALBDNSNAME --query Parameters[0].Value)
ALBDNSNAME=`echo $ALBDNSNAME | sed -e 's/^"//' -e 's/"$//'`

$SQL_COMMAND "UPDATE wp_options SET option_value = replace(option_value, '$OLD_URL', 'http://$ALBDNSNAME') WHERE option_name = 'home' OR option_name = 'siteurl';"
$SQL_COMMAND "UPDATE wp_posts SET guid = replace(guid, '$OLD_URL','http://$ALBDNSNAME');"
$SQL_COMMAND "UPDATE wp_posts SET post_content = replace(post_content, '$OLD_URL', 'http://$ALBDNSNAME');"
$SQL_COMMAND "UPDATE wp_postmeta SET meta_value = replace(meta_value,'$OLD_URL','http://$ALBDNSNAME');"
EOF

chmod 755 /home/ec2-user/update_wp_ip.sh
echo "/home/ec2-user/update_wp_ip.sh" >> /etc/rc.local
/home/ec2-user/update_wp_ip.sh
- Create template version and set as default.
Create an autoscaling group
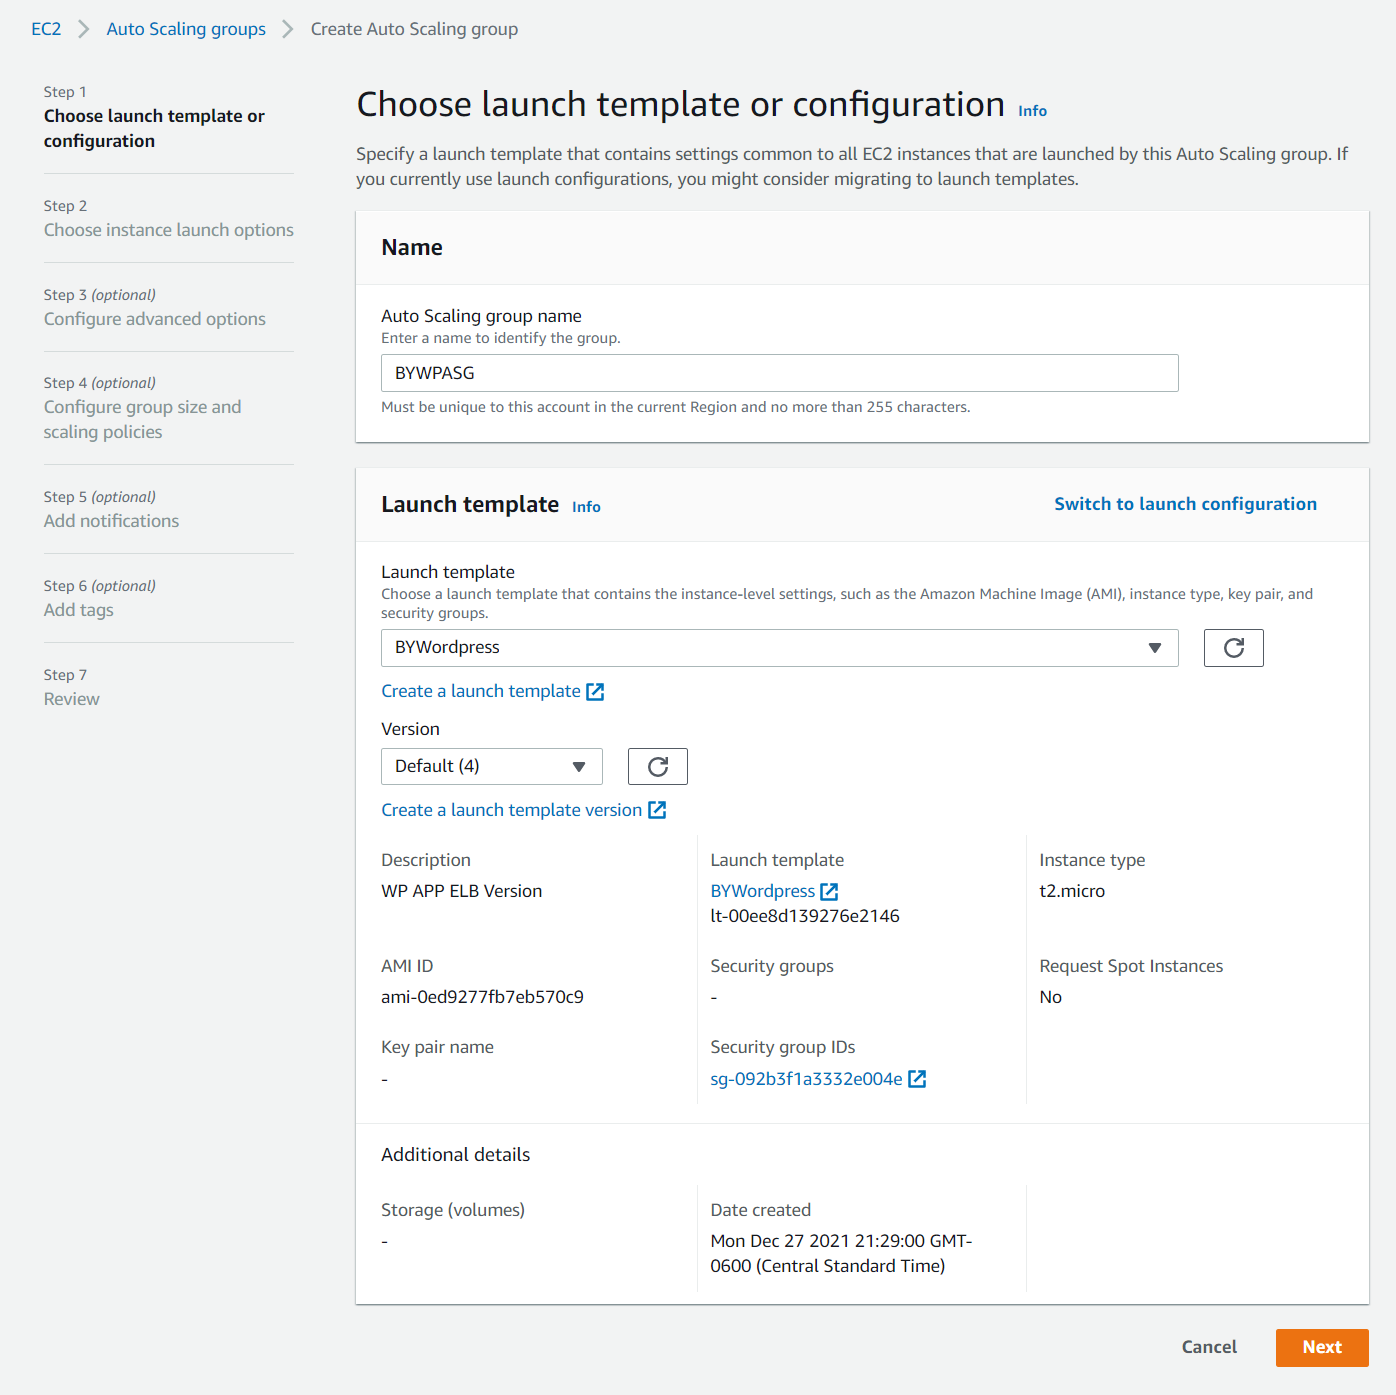
- Navigate to the EC2 instance and then click on Auto Scaling Groups and then click Create Auto Scaling Group
- Name this BYWPASG
- Scroll down and select the LATEST version (4th iteration) of the Launch Template.
- Click next to set up the networking options
- Select the VPC and the 3 public subnets and click next.
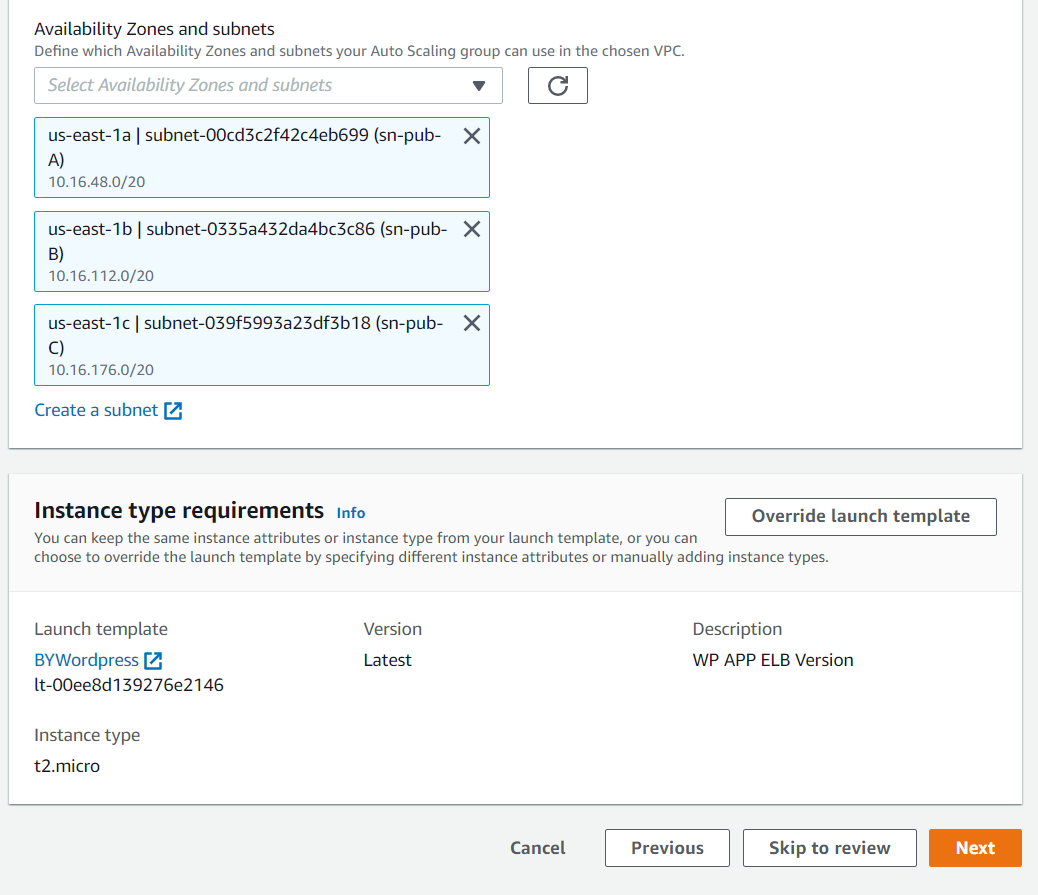
- Select
Attach to an existing load balancerand select the ELB.
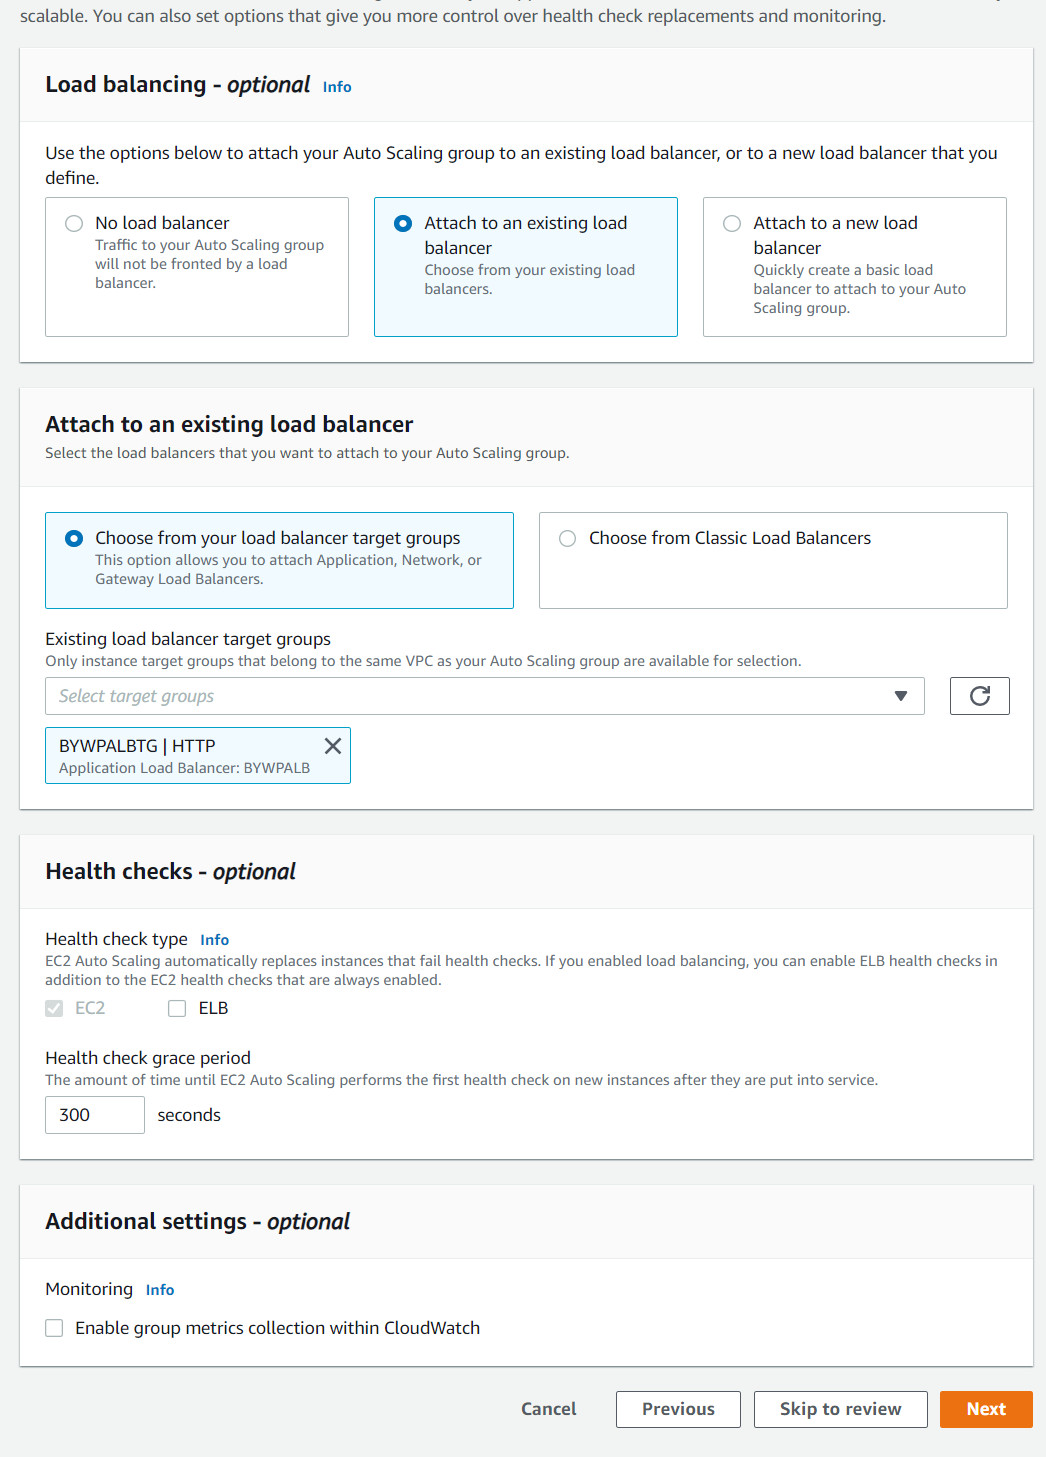
- Select the ELB health check box and click next. 8 Leave the defaults (all at 1) on the next screen.
- Click next, next, add a tag of Name: BYWPASG and then create Auto Scaling Group
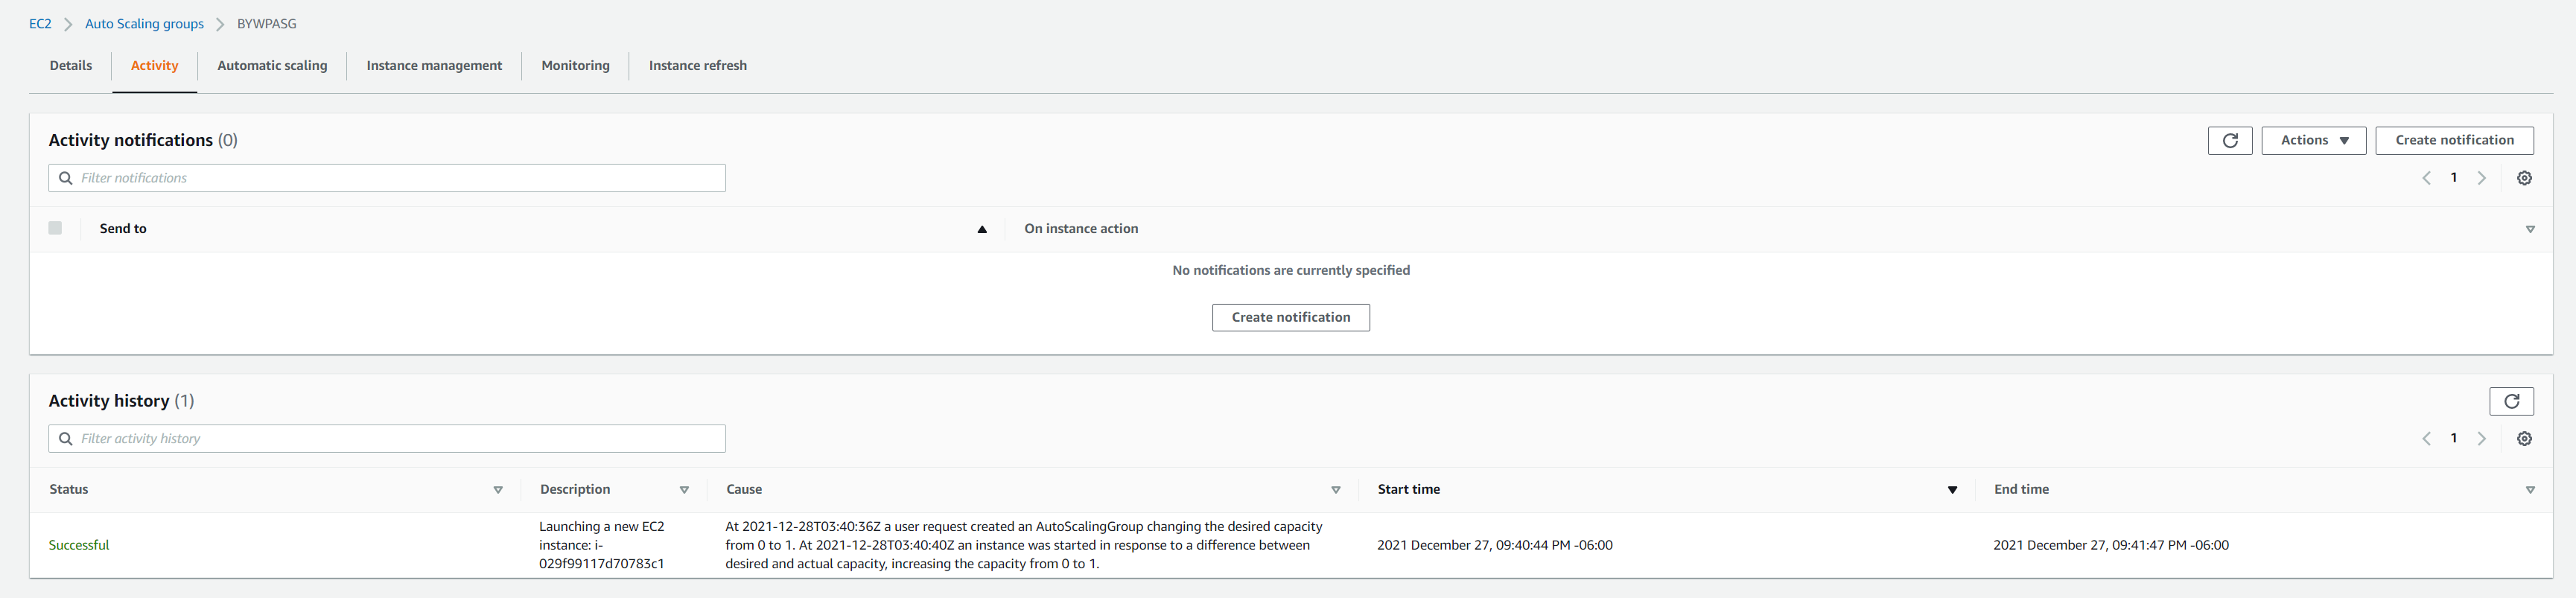
- Navigate back to EC2 and terminate the existing instance that we've been using.
- You may see the 1 new instance that was created as part of the new ASG.
Create scale up ASG Scaling Policy
- Navigate to the EC2 console and select Auto Scaling Groups and the select our ASG.
- Click the Automatic Scaling tab and then click Create Dynamic Scaling Policy.
- Name this HIGHCPU and then Create a CloudWatch Alarm.
- Click Select Metric and select EC2 > By Auto Scaling Group > CPU Utilization.
- Threshold type is Static, Greater than 40.
- Remove anything under notification (although you can set this up to notify when this alarm is triggered)
- Name this WPHighCPU and click Next.
- Make sure this is selected, then click 1 capacity unit to add and then click Create.
Create scale down ASG Scaling Policy
- Navigate to the EC2 console and select Auto Scaling Groups and the select our ASG.
- Click the Automatic Scaling tab and then click Create Dynamic Scaling Policy.
- Name this LOWCPU and then Create a CloudWatch Alarm.
- Click Select Metric and select EC2 > By Auto Scaling Group > CPU Utilization.
- Threshold type is Static, Lower than 40.
- Remove anything under notification (although you can set this up to notify when this alarm is triggered)
- Name this WPLowCPU and click Next.
- Make sure this is selected, then click 1 capacity unit to remove and then click Create.

- Edit the Maximum Capacity to show maximum of 3 instances.
Simulating Load
-
Navigate back to the EC2 console and connect to the EC2 instance using Session Manager.
-
Type in
sudo bashfollowed bycdfollowed byclearto give us a fresh window -
run
stress -c 2 -v -t 3000 -
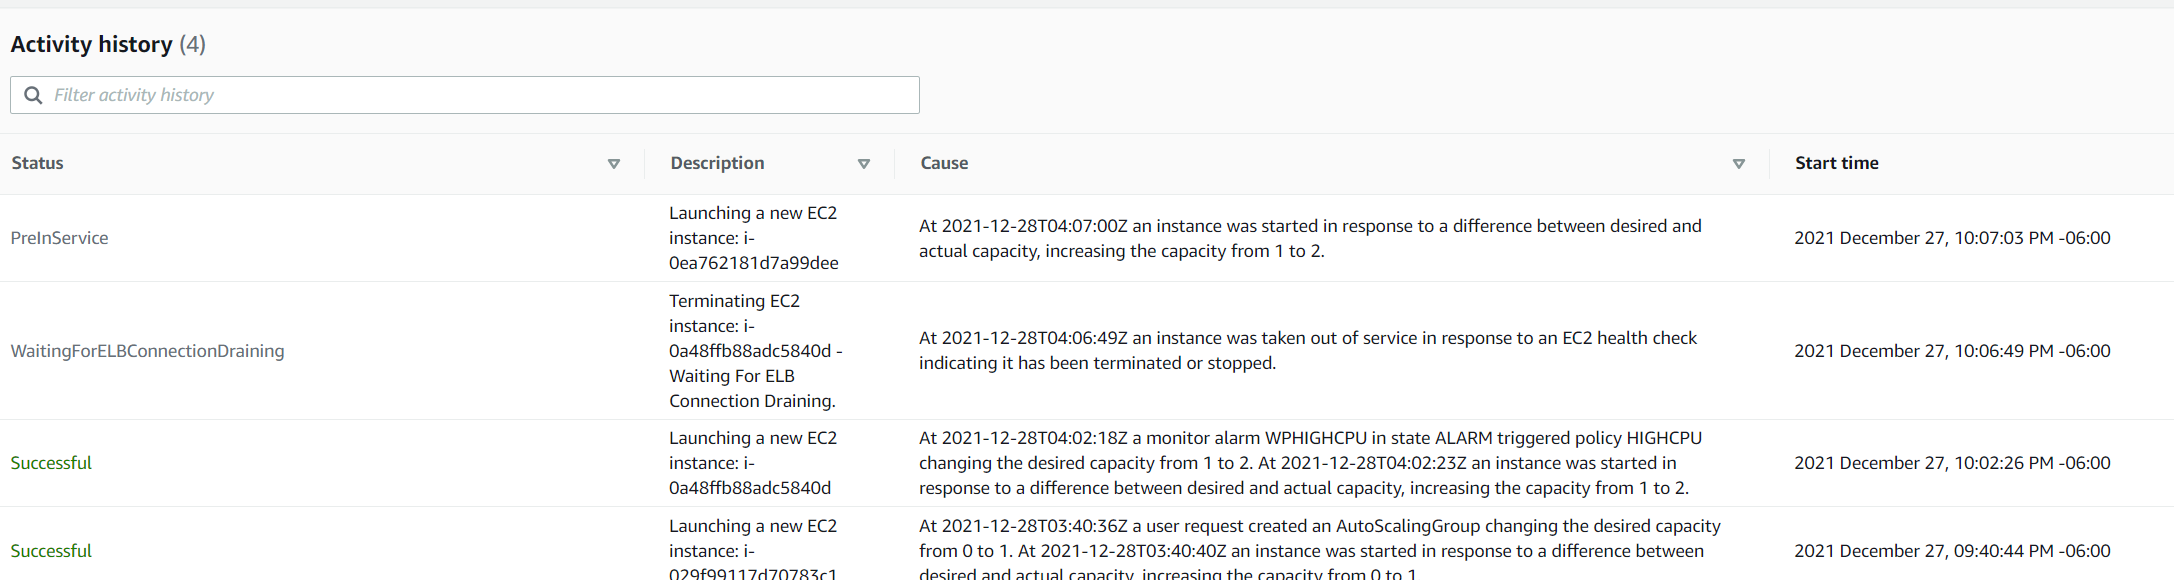
Back in the EC2 > Auto Scaling Groups console, select the ASG and click on the activity tab.
-
In a few minutes you'll see this occur:

-
Navigate to the DNS address of the ELB - BYWPALB-416203232.us-east-1.elb.amazonaws.com
-
The site should still load.
-
Simulate a failure by Terminating this new EC2 instance.
-
That should create a new instance.
-
In the EC2 Session Manager, hit Ctrl+C to stop the stress utility and this should autoscale back down to one instance.
Your Architecture should look like this:
Migrating from RDS to AWS Aurora Cluster
THIS IS NOT FREE TIER AND MIGHT COST A COUPLE BUCKS
- Navigate to the RDS console
- Click on Snapshots, then select the BYWPDatabase and name this BabyYoda-RDS
- Wait for this snapshot to create, it might take a few seconds.
- Click on the box next to the new snapshot and then click Migrate Snapshot.
- Select the aurora-mysql database version 5.7.12 and then select the Burstable db.t3.small (smallest) DB instance.
- For the DB identifier, call it bydb-aurora
- Make sure the VPC and the Subnet Group is selected.
- Select the SGDatabase Security Group and remove the default.
- Availability Zone is set to no preference.
- Click Migrate and wait for the database to migrate
- Once these show available, you can select the database and then click Add Reader
- Name this
bydb-aurora-reader1 - Set this to no preference for the AZs and then Add reader.
- Create a second reader, calling it
bydb-aurora-reader2 - Wait for these to become available

Changing WP Config to use Aurora over RDS
- Copy the Writer endpoint to the Aurora Cluster
- Update the parameter in the Parameter store to the new Aurora Cluster by deleting and recreating it with the new Aurora Cluster DNS name.
- This will cutover from RDS to Aurora.
Refresh instances
- On the Auto Scaling Group, go to the Instance Refresh tab and refresh the instances.
- You want to really have as many instances you need and then create a rolling refresh because using one instance, there may be some downtime.
a. I had a 504 bad Gateway error on my instance refresh:

Accessing this HA environment
Navigate to the DNS entry on the ELB That's it
Clean up
- Delete the Load Balancer
- Delete the Target Group
- Delete the Auto Scaling Groups
- Delete the EFS file system
- Delete the RDS database instances
- Remove all the replicas from the Aurora Cluster
- Delete the launch template
- Verify the RDS and Aurora Cluster has been deleted.
- Delete RDS Snapshots
- Delete CloudFormation Stack
Was sad to see this go :(
