[[TOC]]
CloudFormation Physical and Logical Resources
Template is in YAML or JSON Templates are used to create Stacks Stacks create physical resources from the logical If stacks template changes, the physical resources are changed If a stack is deleted, resources are deleted.
Template
Contains Logical resources with properties used to create physical resources. Once the template moves to a stack and the stack is in a create Complete state, the template can be queried for attributes of the resource. You can update the stack to update the resources
Demo - Simple Non-Portable Template
Non-Portable templates are not recommended.
Write a template
- Navigate to the AWS console in the N. Virginia Region
- Create a key pair in the EC2 console and call it BYKeyPair and save the pem file.
- Move to the CloudFormation console.
- Open up your favorite code editor.
- Don't copy this entire code block at once. Type each line in one line at a time, watching for spacing and set up your code editor to handle the spacing as needed. You may need to substitute in the AMI from the EC2 console.
Resources:
  Bucket:
    Type: "AWS::S3::Bucket"
    Properties:
      BucketName: "babyyodas3bucket242424"
  Instance:
    Type: "AWS::EC2::Instance"
    Properties:
      KeyName: "BabyYodaKeyPair"
      InstanceType: "t2.micro"
      ImageId: "ami-0c02fb55956c7d316"
- Save this as
nonportable.yaml
Deploy this Template
-
Navigate back to the CloudFormation console and click
Create Stack -
Upload this stack
-
Click Next, Next, Create Stack
-
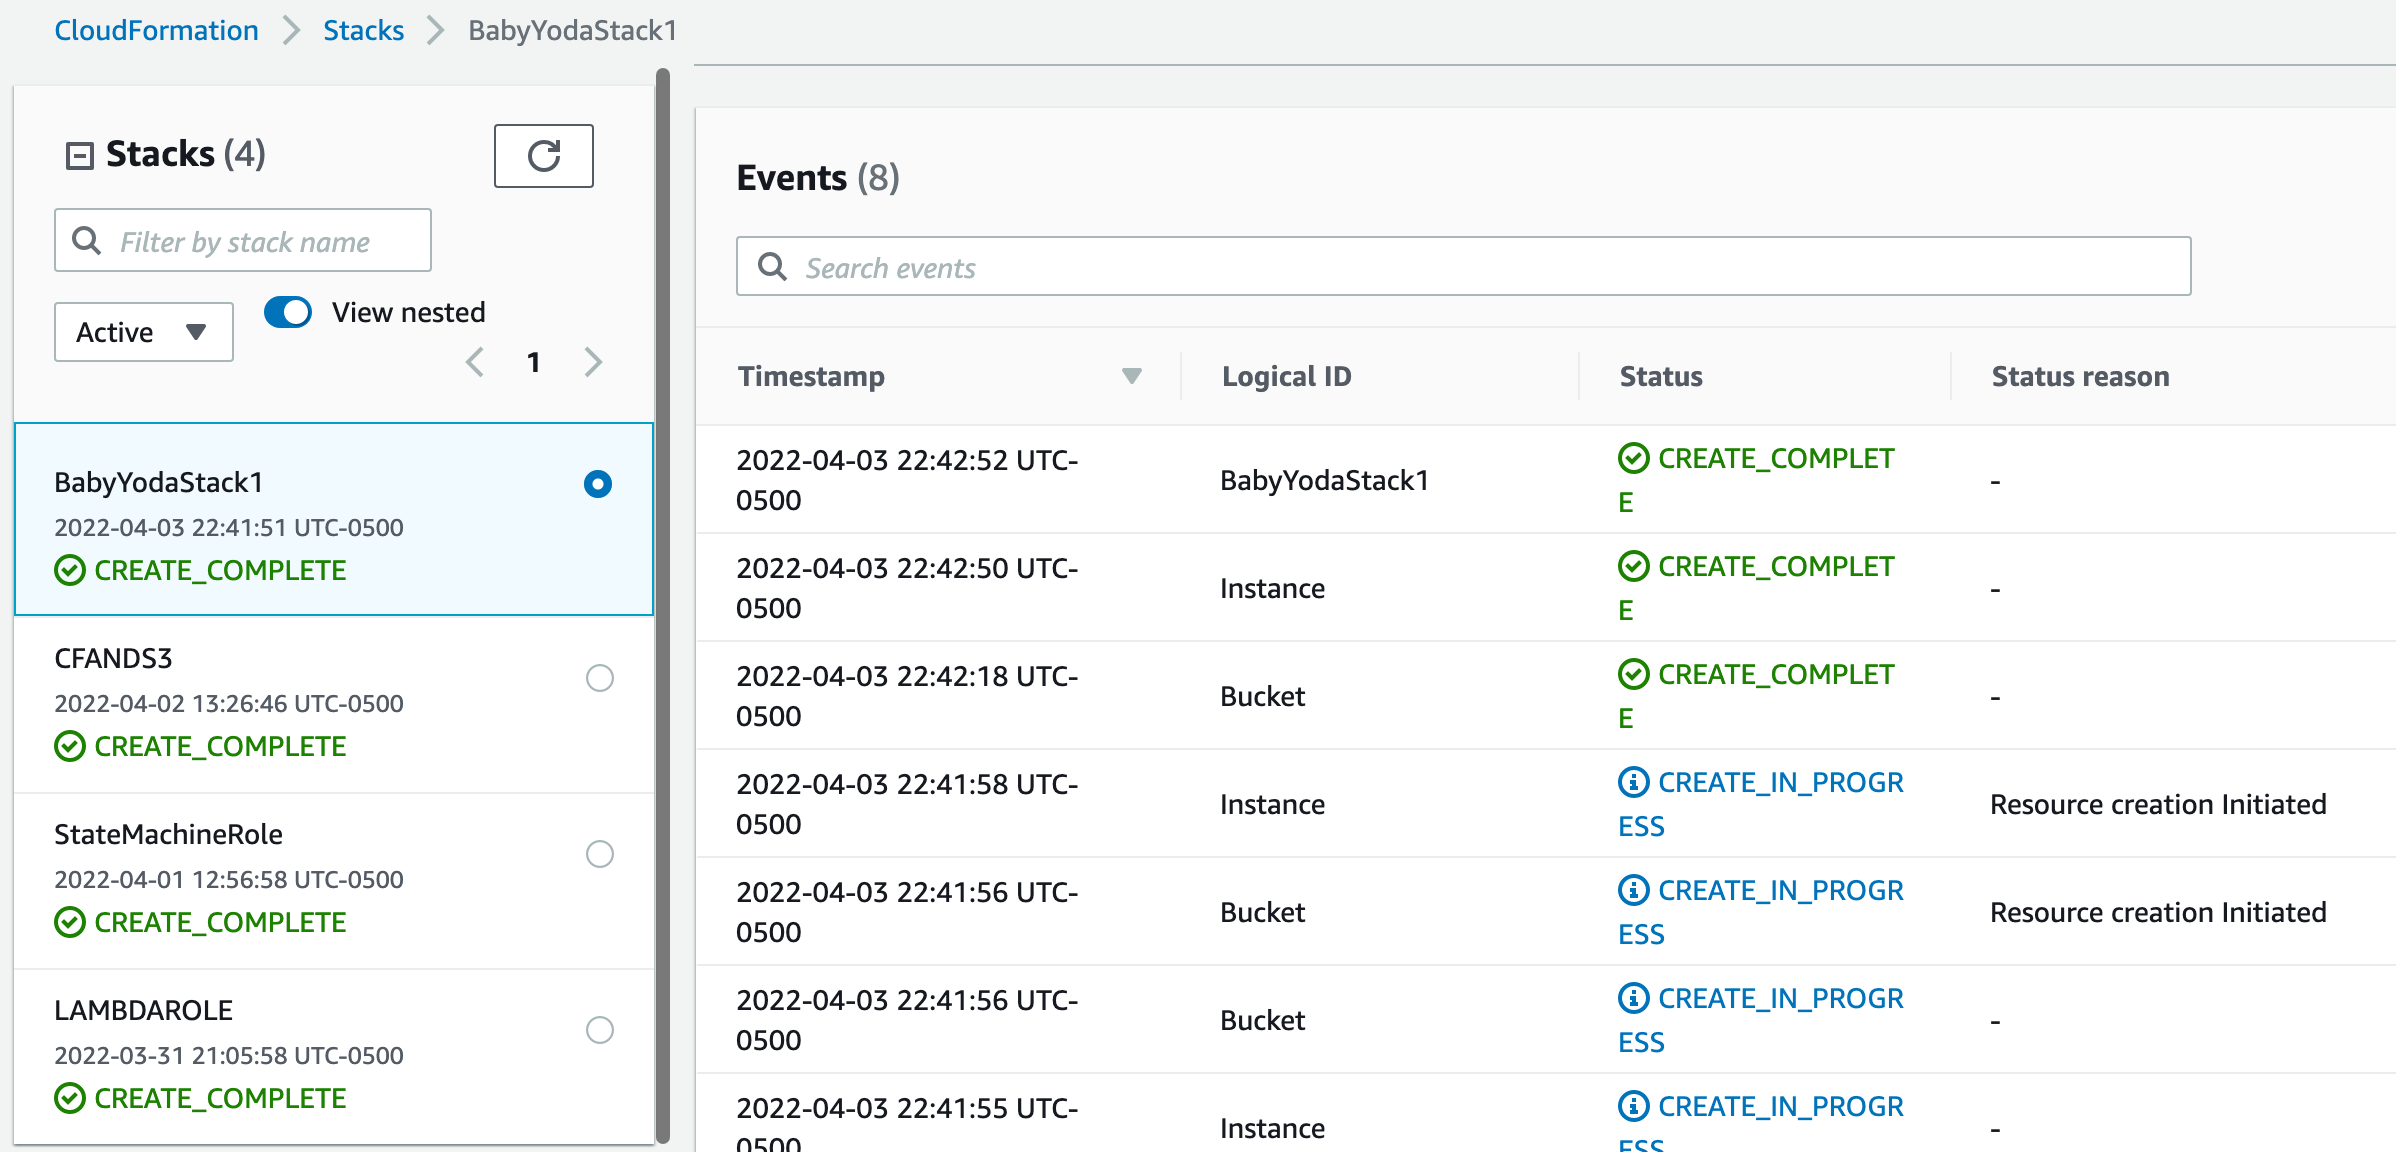
This should create 2 resources when it moves into the Create Complete state.
-
Now, create a new stack and then upload this same file again and it will fail.
-
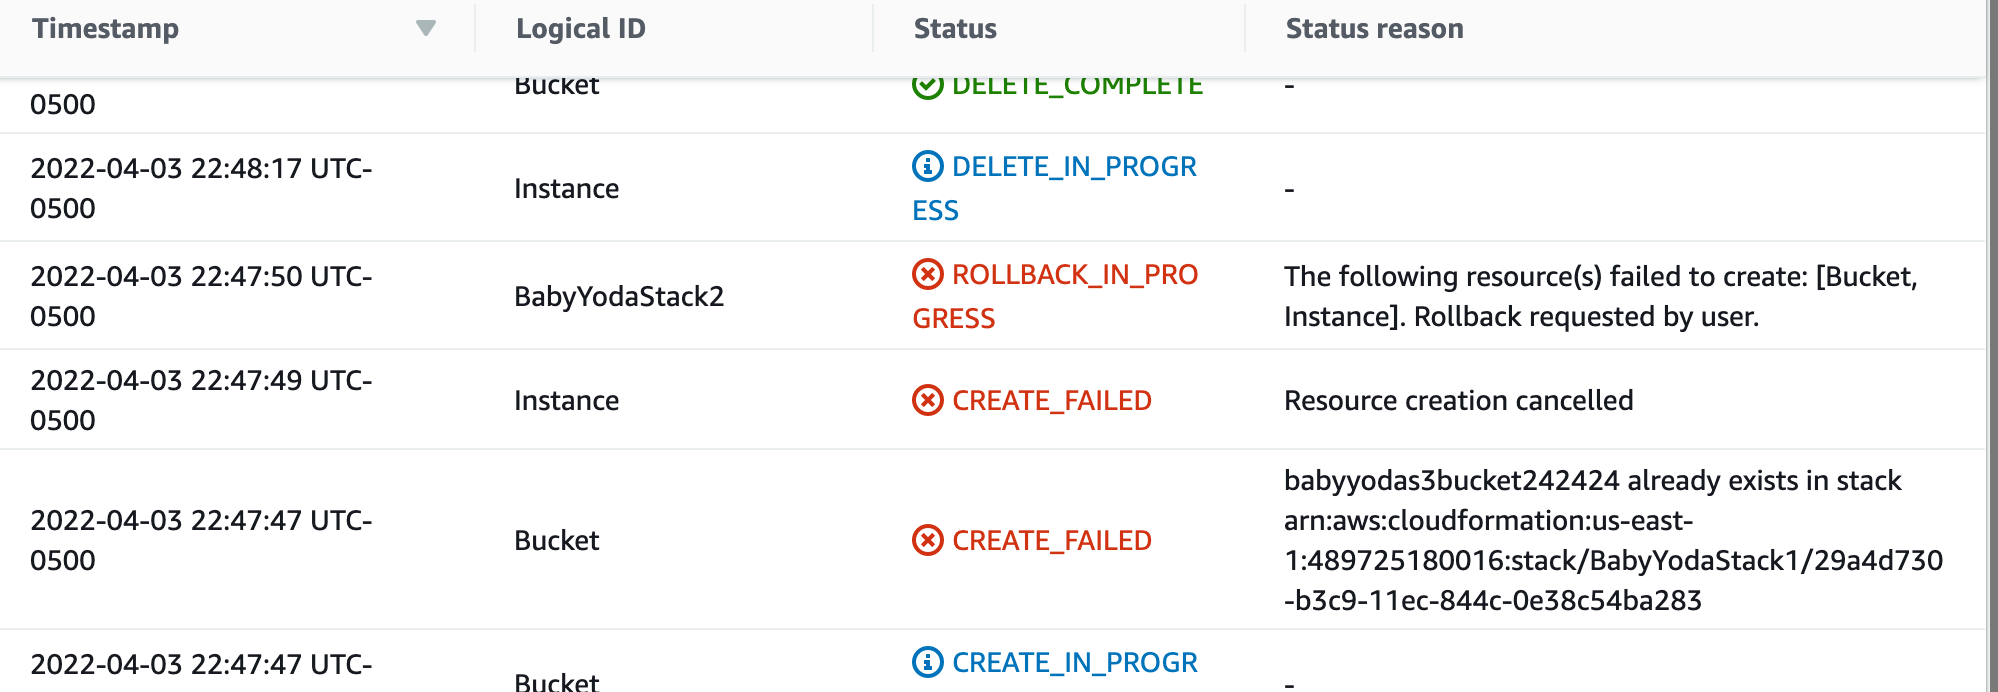
Look under events to see why it failed. You'll notice that it failed because the bucket already exists. Looking at your template, it has the name hardcoded in and if you try to run it more than once, it fails. The best solution is to create a way to add some random characters to the end of this so that you can run it 100 times and it works every (almost) every time. Non-portable templates are not recommended. I'll repeat that again.
-
Delete both of these stacks to delete the resources
-
Click another region and create another stack and upload the file and click Create Stack. The bucket name doesn't exist this time, so it should create. No. It doesn't. Why?

-
AMI is specific to regions. You're using the us-east-1 AMI in another region.
-
Delete this stack to clean up.
Template and Pseudo Parameters
Template Parameters accept input - console/CLI/API when a stack is created or updated These can be referenced from within Logical Resources and can influence physical resources and/or configuration.
Can be configured with:
- Defaults
- AllowedValues
- Min and Max length
- Allowed Patterns
- NoEcho - to mask passwords
- Type
Pseudo Parameter
These are parameters that are provided by AWS based on the environment. These will help with the previous demo to declare dynamic resources based on the environment.
AWS::Region
AWS::Stackname
AWS::AccountID
AWS::StackID
Use these rather than hardcoding in the parameter variables whenever possible.
CloudFormation Intrinsic Functions
Everything so far has been static or parameters. What is an intrinsic function?
Ref and Fn::GetAtt Fn::Join and Fn::Split Fn::GetAZs and Fn:Select Conditions (Fn::If, And, Equals, Not, Or) Fn::Base64 and Fn::Sub to substitute Fn::Cidr Others: Fn::ImportValue, Fn::FindInMap, Fn::Transform
Ref and Fn::GetAtt
Using !Ref on template or pseudo parameters gets their value !GetAtt is used to retrieve any attribute associated with the resource. This will return detailed configuration of the physical resource.
Fn::GetAZs and Fn::Select
!GetAZs returns a list of AZs in the explicit region or the current region. These will be limited to the subnets in VPCs.
AvailabilityZone: !Select [ 0, !GetAZs '']
Fn::Join and Fn::Split
Joins and splits.
Fn::Base64 and Fn::Sub
Encodes into a Base64
- Substitutes variables in the input which is their actual runtime values.
${Parameter}
${LogicalResource}
${LogicalResource.AttributeName}
Fn::Cidr
Reference the CIDR block as a variable in order to automatically assign the correct CIDRs to subnets in an automated way.
CloudFormation Mappings
Templates contain a mappings object that can contain many mappings which map keys to values - allowing lookup.
- Can have one key or top and second level.
- Mappings use the !FindInMap intrinsic function
- common use is to retrieve the AMI for a given region and architecture
Mappings improve Template portability.

CloudFront Outputs
Completely Optional, however very useful.
- Values can be declared in this section, visibile as outputs when using the CLI or console UI that are accessible from the parent stack when using nesting.
- These can be exported allowing you to use cross-stack references.
Demo - Cloudfront Portable Template
Now that we've learned a little bit more about templates, lets put what we learned to use to bring that non-portable template into something more portable.
- Log into AWS console in the N. Virginia region.
- Remember that we can't apply this template due to hardcoding of the bucket name into the template. Yes, it builds once, but only once.
Resources:
  Bucket:
    Type: "AWS::S3::Bucket"
    Properties:
      BucketName: "babyyodas3bucket242424"
  Instance:
    Type: "AWS::EC2::Instance"
    Properties:
      KeyName: "BabyYodaKeyPair"
      InstanceType: "t2.micro"
      ImageId: "ami-0c02fb55956c7d316"
Bucket fix
- Let's remove the bucket name and then run this template a few times.
- If you change regions on this, you'll fail this template due to not having a Key Pair in that region and the AMI is unique to the region, but, you'll notice that the bucket creates every time. a. What this does is creates a bucket with the name of the stack and the logical id and then appends some random characters to the end of it, making it more likely to be unique.
- Delete those stacks
AMI fix
- One thing you can do is to add some parameters to the file so that you are prompted for these input values.
Parameters:
  KeyName:
    Type: "AWS::EC2::KeyPair::KeyName"
    Description: "Key Pair for EC2"
  AMIID:
    Type: "String"
    Description: "AMI for EC2"
Resources:
  Bucket:
    Type: 'AWS::S3::Bucket'
  Instance:
    Type: 'AWS::EC2::Instance'
    Properties:
      KeyName: !Ref "KeyName"
      InstanceType: "t2.micro"
      ImageId: !Ref "AMIID"
- Notice what happened with the KeyName Type. When you run this, you can click a dropdown that specifies the valid Keys in whatever region you're running this in.
- This template is now considered portable.
Improving this template
- Yes, it's portable, but can we make it more user friendly? Having a list of parameters to grab isn't necessarily the most fun thing to do.
- Take a look at the CFN template below, line by line.
Parameters:
  LatestAmiId:
    Description: "AMI for EC2"
    Type: 'AWS::SSM::Parameter::Value<AWS::EC2::Image::Id>'
    Default: '/aws/service/ami-amazon-linux-latest/amzn2-ami-hvm-x86_64-gp2'
Resources:
  Bucket:
    Type: 'AWS::S3::Bucket'
  Instance:
    Type: 'AWS::EC2::Instance'
    Properties:
      InstanceType: "t2.micro"
      ImageId: !Ref "LatestAmiId"
- We've removed the option for the Key Pair because you don't need a key pair to connect within AWS, and as long as you're fine with that, so am I.
- We've also created a parameter for the LatestAmiId that uses special parameters in the Parameter Store to dynamically look up the ami id that matches in each region.
- If you run this template, you'll notice that the LatestAmiId shows as a parameter, but is automatically filled with some prepopulated data. All we need to do now is name this stack and then deploy it.
Cleanup
Delete all the stacks
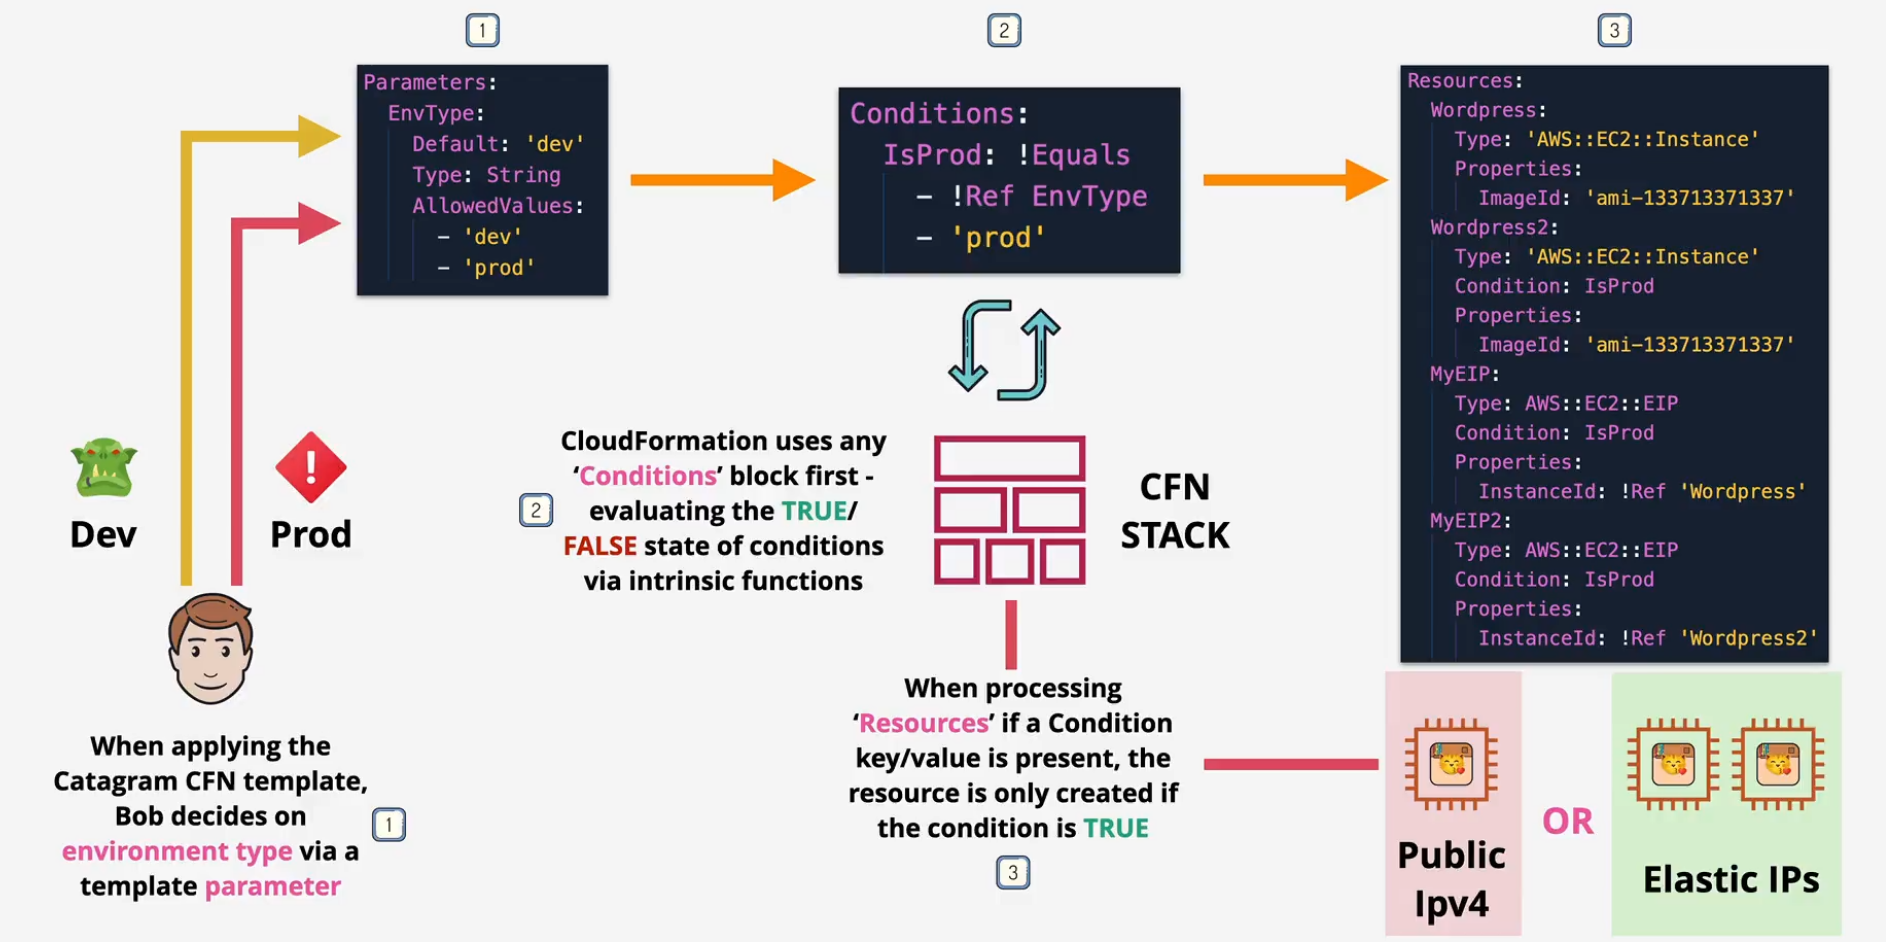
CloudFormation Conditions
These allow CFN to apply different options based on certain conditions Each condition evaluates to True or False
- uses AND, EQUALS, IF, NOT, OR
- IF true, create, if not, don't.
Examples:
- Prod, Dev
- How many AZs.
CloudFormation DependsOn
CFN tries to be efficient - creating, updating and deleting things in parallel. For example, it tries to create multiple EC2 instances at once, but it needs the VPC and subnets created first.
The depends on lets you EXPLICITLY define these dependencies. Lets say you want to create one EC2 instance at the very end of the CFN stack. You can create a DependsOn on this resource to build when everything else has been completed.
- You cannot reference another resource unless that resource is in a Create Complete state.
CloudFormation Wait Conditions and cfn-signal with CreationPolicy
When the template is run, the stack is created and then the resources are deployed. Once the resource is deployed, the physical resource shows that it is in a Create Complete status, but what about the things running on that instance, such as post-deploy configurations such as User Data?
This is where cfn-signal comes into play. You can create a signal inside the user-data that runs at the end of the post deploy configuration to relay back to CloudFormation that the post-deploy has completed and you can now move this resource into a Create Complete state. You also configure a timeout on this in case the post-deploy configuration fails. It can also send failure signals to fail the creation of the stack.
- CreationPolicy or WaitCondition
WaitCondition
This can depend on other resources. Other resources can depend on this WaitCondition. You can use this to set a 300s timeout or pause your stack formation.
CloudFormation Nested Stacks
You can put stacks inside of stacks.
- Limit of 500 resources in a stack
- can't easily reuse resources - like a VPC
- can't easily reference other stacks
- resources inside a stack share a lifecycle.
Implementation
Root stack and Parent stacks these call other stacks within this stack.
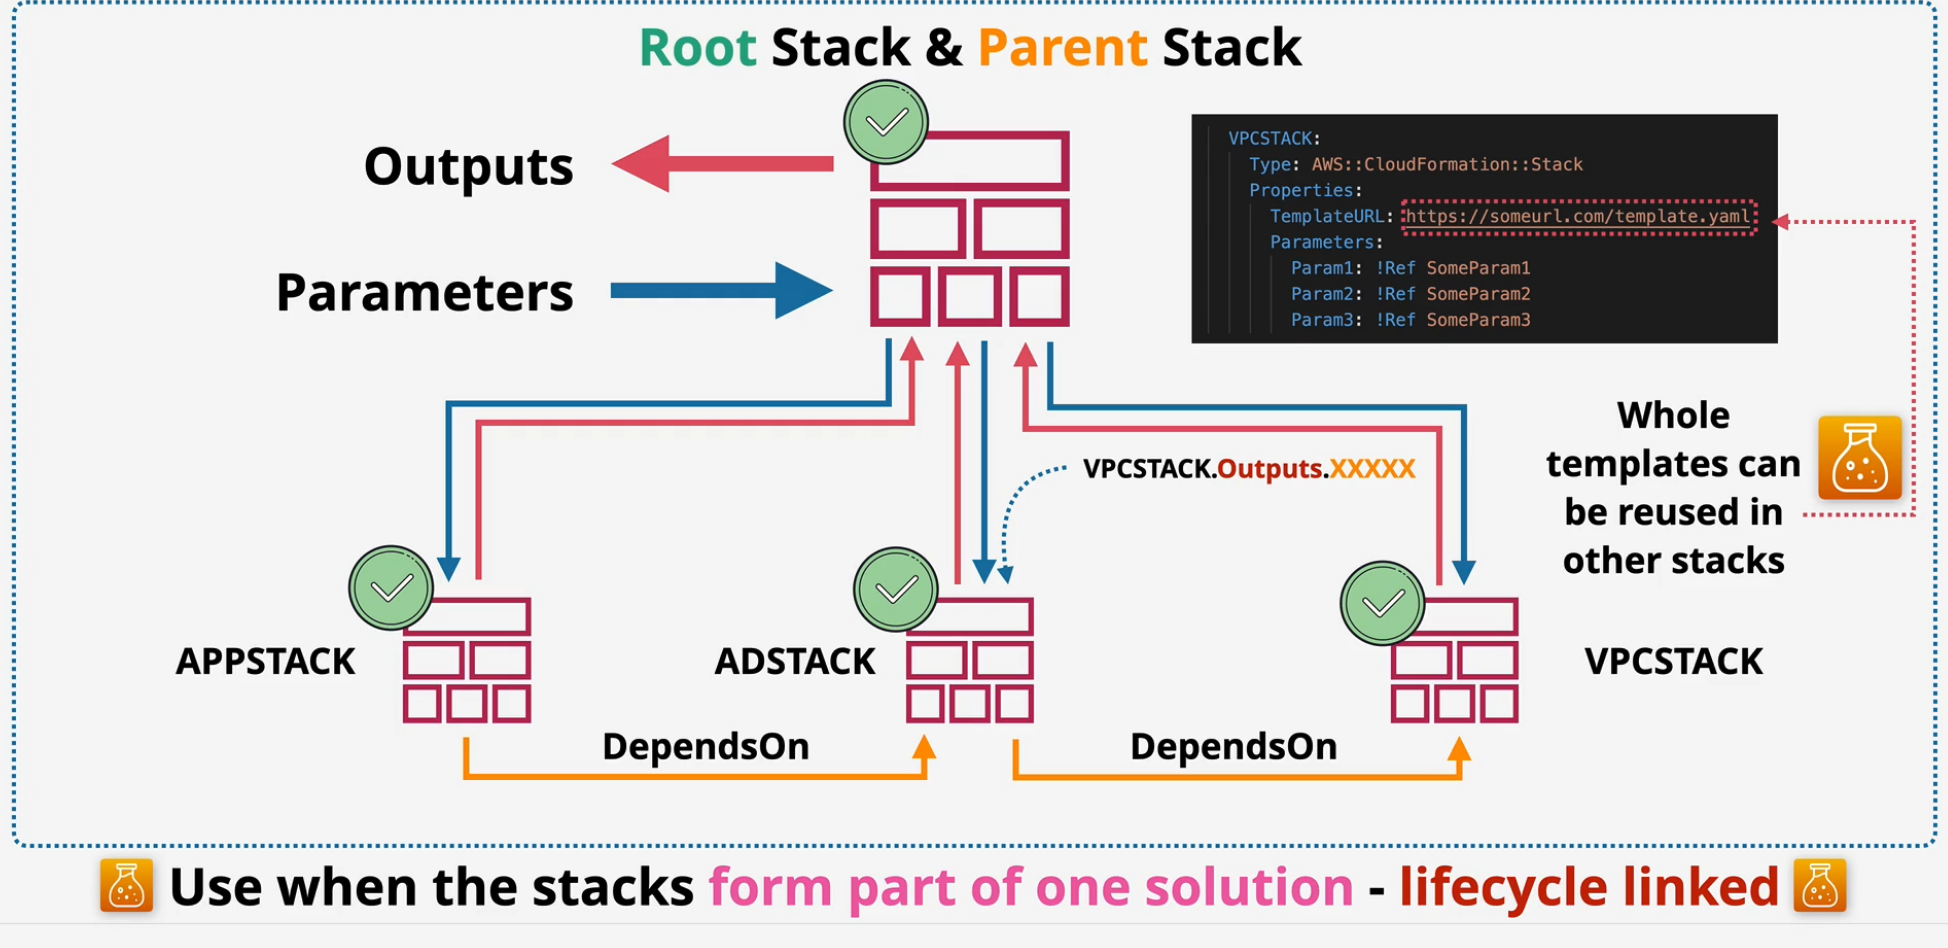
Tips
- overcome the 500 Resource Limit
- Modular templates - reuse code
- make the installation process easier by using nested stacks created by the root stack.
- stacks need to be portable so that you can create multiple instances all the way through the nested stacks. ** Use only when everything is lifecycle linked **
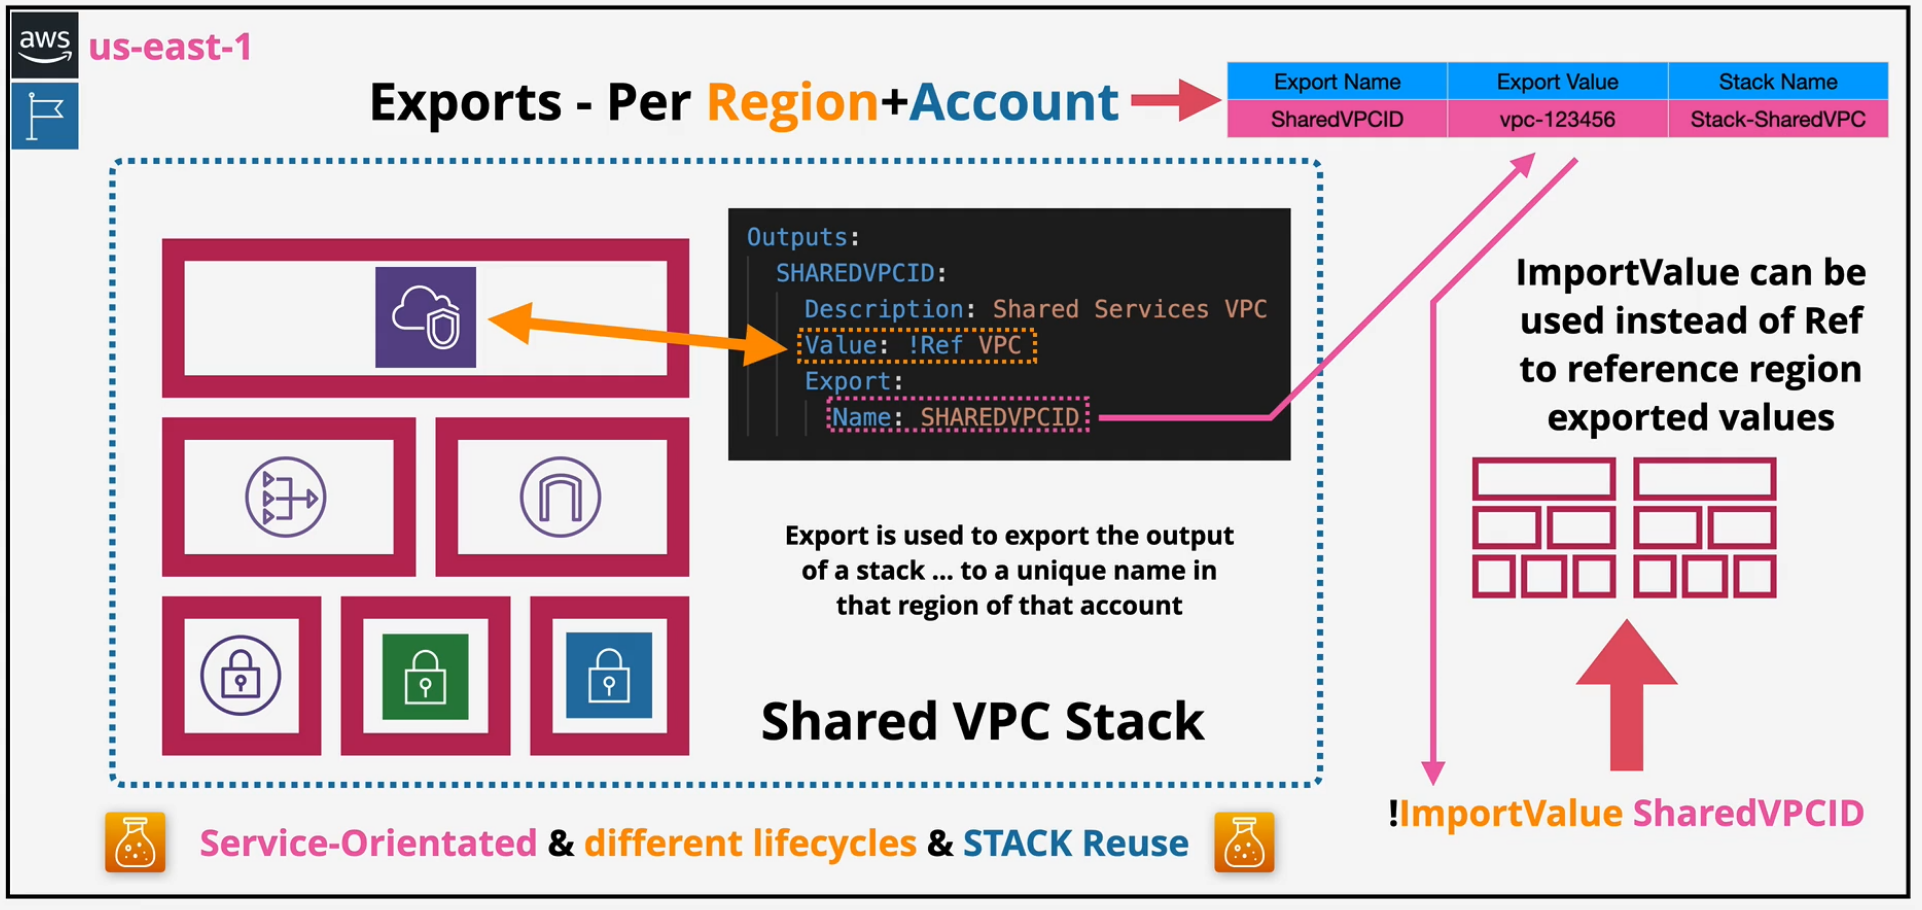
CloudFormation Cross-Stack References
So what happens when we want to deploy a VPC and some resources and then someone else comes along and wants to add one EC2 instance to that VPC? You could create a new stack with just the EC2 and then set the VPC and Subnet ID's hardcoded, but that doesn't make that code portable or reusable.
Outputs are normally not visible from other stacks. Outputs can be exported - making them visible from other stacks Exports must have a unique name in the region. You can use Fn::ImportValue instead of !Ref to import the exported output.
Implementation
Inside the shared stack, make sure anything that we'd want to use outside of it is exported.
CloudFormation StackSets
Allow you to deploy CFN across many accounts and regions. StackSets are containers in admin accounts.
- contain stack instances which reference stacks.
- Stack instances and stacks are located in "target accounts"
- each stack = 1 region and 1 account.
** Security = self-managed or service-managed roles **
Tips
Concurrent accounts Failure Tolerance - how many failures are allowed before the entire thing fails Retain Stacks - keep some of the stacks
Uses:
- Enabling AWS Config
- AWS Config Rules - MFA, EIPS, EBS Encryption
- IAM Roles for cross-account access.
CloudFormation Deletion Policy
If you delete a logical resource, the physical resource gets deleted. But what if you want to delete a EC2 instance and keep the EBS volume attached? Or if you want to at the very least, preserve the data as a snapshot before deletion? You can create a flag to snapshot before deletion
- you need to manage these manually outside of CFN Only applies to Delete operations, not Replace.
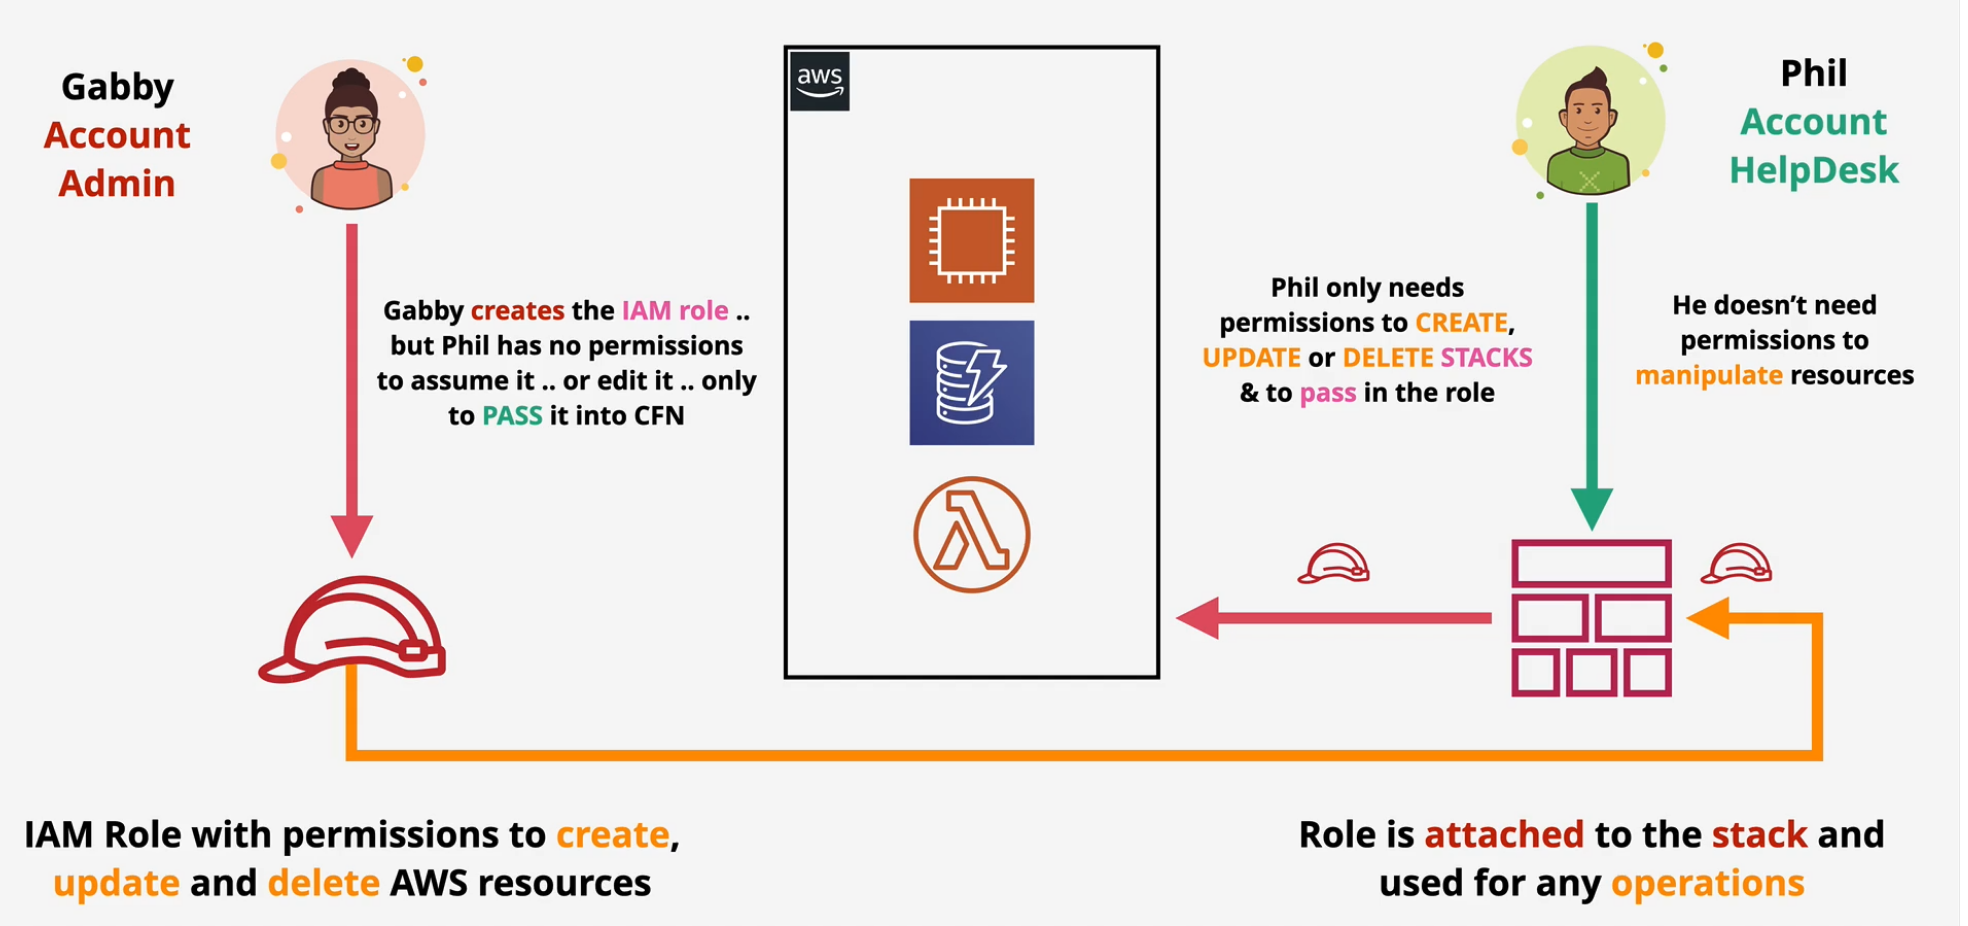
CloudFormation Stack Roles
As you know, you create a stack, the stack creates physical resources.
- Default permissions in AWS is 0.
- CFN uses the permissions of the logged in identity which means you need permissions for AWS.
- CFN can assume a role to gain the permissions
- This lets you implement Role Separation
- the identity creating the stack doesn't need resource permissions - only PassRole
CloudFormation Init - CFN-INIT
Bootstrapping not using UserData You store configuration directives inside of the template and then use AWS::CloudFormation:init as part of the logical resource to pass in the procedural info. This is desired state rather than one time UserData.
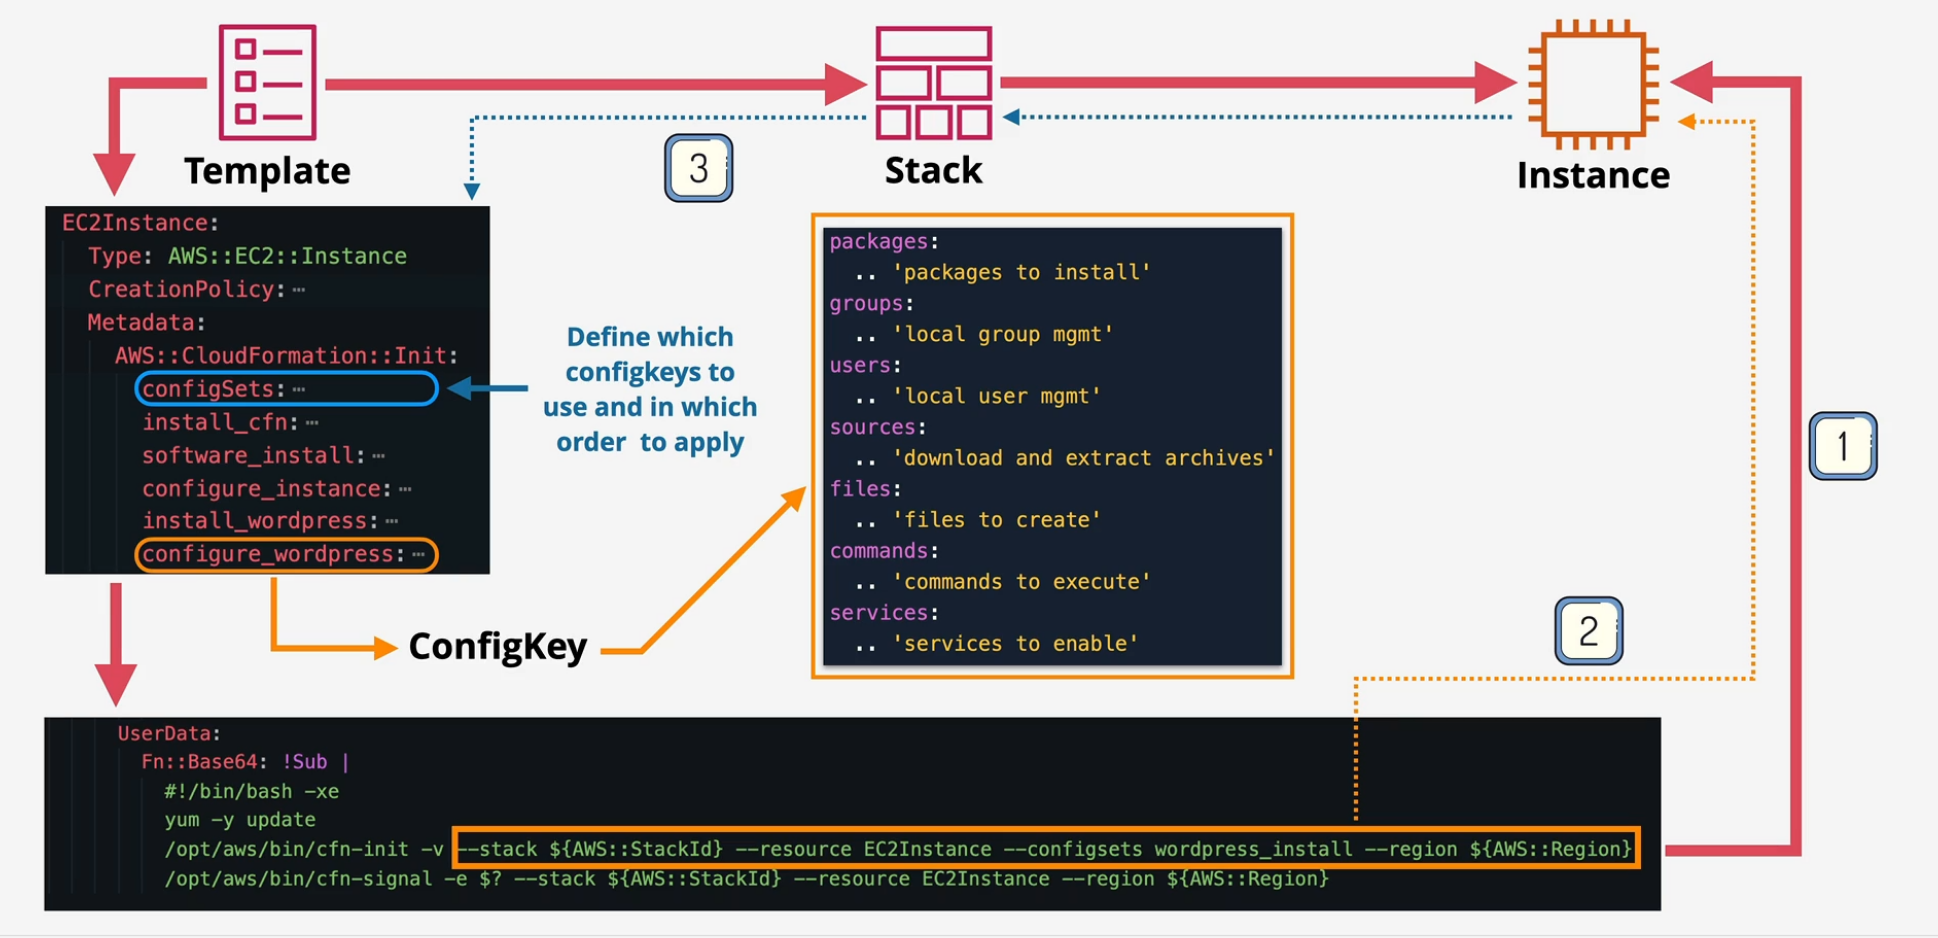
CloudFormation cfn-hup
Handles Updating of the Stack and the resources. Also used for configuration drift cfn-init is run as part of bootstrapping using userdata once. If you update Init, it isn't rerun
- cfn-hup is a daemon which can be installed that detects changes in resource metadata adn runs configurable actions when a change is detected.
UpdateStack -> updated config on EC2 instances
Demo - WaitConditions, cfnsignal, cfninit, and cfnhup
Lets take everything we've learned and put it all together.
- Take a look at this stack template below. You should at least be familiar enough with CFN to write this from scratch and understand what each line does.
Parameters:
  LatestAmiId:
    Description: "AMI for EC2"
    Type: 'AWS::SSM::Parameter::Value<AWS::EC2::Image::Id>'
    Default: '/aws/service/ami-amazon-linux-latest/amzn2-ami-hvm-x86_64-gp2'
  Message:
    Description: "Data for HTML page"
    Default: "Welcome to your first website created by CFN"
    Type: "String"
Resources:
  InstanceSecurityGroup:
    Type: 'AWS::EC2::SecurityGroup'
    Properties:
      GroupDescription: Enable SSH and HTTP access via port 22 IPv4 & port 80 IPv4
      SecurityGroupIngress:
        - Description: 'Allow SSH IPv4'
          IpProtocol: tcp
          FromPort: '22'
          ToPort: '22'
          CidrIp: '0.0.0.0/0'
        - Description: 'Allow HTTP IPv4'
          IpProtocol: tcp
          FromPort: '80'
          ToPort: '80'
          CidrIp: '0.0.0.0/0'
  Bucket:
    Type: 'AWS::S3::Bucket'
  Instance:
    Type: 'AWS::EC2::Instance'
    Properties:
      InstanceType: "t2.micro"
      ImageId: !Ref "LatestAmiId"
      SecurityGroupIds:
        - !Ref InstanceSecurityGroup
      Tags:
        - Key: Name
          Value: BY-UserData Test1
      UserData:
        Fn::Base64: !Sub |
          #!/bin/bash -xe
          yum -y update
          yum -y upgrade
          sleep 650
          yum install -y httpd
          systemctl enable httpd
          systemctl start httpd
          echo "<html><head><title>The BabyYoda Test Page</title></head><body><h1><center>${Message}</center></h1></body></html>" > /var/www/html/index.html
- There's one line in particular that gives a great example of why we need cfninit and cfnsignal.
- Create a stack based on this, wait for it to go into the Create Complete state, find the EC2 instance and copy the public IP into your browser to load the website...or don't?
- It's completed, right? Why isn't it loading? Well, because there's a sneaky line called sleep 650 there that pauses the init script long enough to show us what running processes might look like before the post-deploy configuration completes. You can see that the Create Complete goes into effect roughly 642 seconds before the script finishes running on the instance.
Updating the Stack
- Let's look at how the Message parameter is used.
- Change the test in the Default: "Welcome..." to whatever you'd like and then reapply this stack.
- It goes into an updating state, but behind the scenes, it's actually restarting your EC2 instance. Open up the EC2 console to verify this.
- Once the EC2 instance is running, click on the new public IP address and then navigate to it in the browser and notice that the original message hasn't updated. Why? a. every time you make a change to the resource, it restarts the instance, but...user data is only applied at the initial launch, not updated.
- So...two problems. Can't update and there could be a delay between Create Complete and whether the instance is ready to use.
Fix these using cfninit and cfnsignal
- Look at the updated CFN template below.
Parameters:
  LatestAmiId:
    Description: "AMI for EC2"
    Type: 'AWS::SSM::Parameter::Value<AWS::EC2::Image::Id>'
    Default: '/aws/service/ami-amazon-linux-latest/amzn2-ami-hvm-x86_64-gp2'
  Message:
    Description: "Data for HTML page"
    Default: "Welcome to your first website created by CFN"
    Type: "String"
Resources:
  InstanceSecurityGroup:
    Type: 'AWS::EC2::SecurityGroup'
    Properties:
      GroupDescription: Enable SSH and HTTP access via port 22 IPv4 & port 80 IPv4
      SecurityGroupIngress:
        - Description: 'Allow SSH IPv4'
          IpProtocol: tcp
          FromPort: '22'
          ToPort: '22'
          CidrIp: '0.0.0.0/0'
        - Description: 'Allow HTTP IPv4'
          IpProtocol: tcp
          FromPort: '80'
          ToPort: '80'
          CidrIp: '0.0.0.0/0'
  Bucket:
    Type: 'AWS::S3::Bucket'
  Instance:
    Type: 'AWS::EC2::Instance'
    CreationPolicy:
      ResourceSignal:
        Timeout: PT15M
    Properties:
      InstanceType: "t2.micro"
      ImageId: !Ref "LatestAmiId"
      SecurityGroupIds:
        - !Ref InstanceSecurityGroup
      Tags:
        - Key: Name
          Value: BY-UserData Test2
      UserData:
        Fn::Base64: !Sub |
          #!/bin/bash -xe
          yum -y update
          yum -y upgrade
          # simulate some other processes here
          sleep 300
          # Continue
          yum install -y httpd
          systemctl enable httpd
          systemctl start httpd
          echo "<html><head><title>The BabyYoda Test Page</title></head><body><h1><center>${Message}</center></h1></body></html>" > /var/www/html/index.html
          /opt/aws/bin/cfn-signal -e $? --stack ${AWS::StackId} --resource Instance --region ${AWS::Region}
- Notice the changes, and lets delete the existing stacks and create one using this template.
- This template will take longer to complete and once it completes, go find the public IP and navigate to the browser and open. You'll notice that it loads the website right away this time.
- Go to the Events tab and look for a status reason that says
Received SUCCESS signal.... - What this did was take the running processes inside the instance and waited until they all completed to send a signal back to the CFN stack that says that all of the post-deploy configs have been completed.
- We do still however have the issue when we want to update this stack.
- Delete this stack to clean up to this point.
Move the userdata to cfn-init.
- Lets move the website page creation from the userdata section to the CFN Init section
Parameters:
  LatestAmiId:
    Description: "AMI for EC2"
    Type: 'AWS::SSM::Parameter::Value<AWS::EC2::Image::Id>'
    Default: '/aws/service/ami-amazon-linux-latest/amzn2-ami-hvm-x86_64-gp2'
  Message:
    Description: "Data for HTML page"
    Default: "Welcome to your first website created by CFN"
    Type: "String"
Resources:
  InstanceSecurityGroup:
    Type: 'AWS::EC2::SecurityGroup'
    Properties:
      GroupDescription: Enable SSH and HTTP access via port 22 IPv4 & port 80 IPv4
      SecurityGroupIngress:
        - Description: 'Allow SSH IPv4'
          IpProtocol: tcp
          FromPort: '22'
          ToPort: '22'
          CidrIp: '0.0.0.0/0'
        - Description: 'Allow HTTP IPv4'
          IpProtocol: tcp
          FromPort: '80'
          ToPort: '80'
          CidrIp: '0.0.0.0/0'
  Bucket:
    Type: 'AWS::S3::Bucket'
  Instance:
    Type: 'AWS::EC2::Instance'
    Metadata:
      'AWS::CloudFormation::Init':
        config:
          packages:
            yum:
              httpd: []
          files:
            /var/www/html/index.html:
              content: !Sub |
                <html><head><title>The BabyYoda Test Page</title></head><body><h1><center>${Message}</center></h1></body></html>
          commands:
            simulatebootstrap:
              command: "sleep 300"
          services:
            sysvinit:
              httpd:
                enabled: "true"
                ensureRunning: "true"
                files:
                  - "/var/www/html/index.html"
    CreationPolicy:
      ResourceSignal:
        Timeout: PT15M
    Properties:
      InstanceType: "t2.micro"
      ImageId: !Ref "LatestAmiId"
      SecurityGroupIds:
        - !Ref InstanceSecurityGroup
      Tags:
        - Key: Name
          Value: BY-UserData Test3
      UserData:
        Fn::Base64: !Sub |
          #!/bin/bash -xe
          /opt/aws/bin/cfn-init -v --stack ${AWS::StackId} --resource Instance --region ${AWS::Region}
          /opt/aws/bin/cfn-signal -e $? --stack ${AWS::StackId} --resource Instance --region ${AWS::Region}
- Create a new stack with this template and wait for it to complete
- Make sure it goes into a Create Complete state and then navigate to the public IP address. This loads as it should.
- Before we update the stack, lets look into the EC2 instance to see what this does.
- Use EC2 instance connect to log into this instance
cd /var/loginto the log folder and run anls -la- Look for two files starting with
cloud-init. cat cloud-init-output.logto open this.- You'll see that the only thing in this is the output of the userdata component.
cat cfn-init-cmd.logto open up the cfn init log.- This shows everything that the cfn-init ran when it completed the post-deploy configuration.
cat cfn-init.logto show a more compressed verbose version of this.
** USE THIS TO HELP DIAGNOSE YOUR ISSUES WHEN YOU ARE TRYING TO CREATE YOUR POST-DEPLOYS **
Also, delete your stacks.
Fix the Update issue
- Take a look at the CFN template below.
Parameters:
  LatestAmiId:
    Description: "AMI for EC2"
    Type: 'AWS::SSM::Parameter::Value<AWS::EC2::Image::Id>'
    Default: '/aws/service/ami-amazon-linux-latest/amzn2-ami-hvm-x86_64-gp2'
  Message:
    Description: "Data for HTML page"
    Default: "Welcome to your first website created by CFN - enhanced with CFN-INIT and CFN-HUP"
    Type: "String"
Resources:
  InstanceSecurityGroup:
    Type: 'AWS::EC2::SecurityGroup'
    Properties:
      GroupDescription: Enable SSH and HTTP access via port 22 IPv4 & port 80 IPv4
      SecurityGroupIngress:
        - Description: 'Allow SSH IPv4'
          IpProtocol: tcp
          FromPort: '22'
          ToPort: '22'
          CidrIp: '0.0.0.0/0'
        - Description: 'Allow HTTP IPv4'
          IpProtocol: tcp
          FromPort: '80'
          ToPort: '80'
          CidrIp: '0.0.0.0/0'
  Bucket:
    Type: 'AWS::S3::Bucket'
  Instance:
    Type: 'AWS::EC2::Instance'
    Metadata:
      'AWS::CloudFormation::Init':
        config:
          packages:
            yum:
              httpd: []
          files:
            /etc/cfn/cfn-hup.conf:
              content: !Sub |
                [main]
                stack=${AWS::StackName}
                region=${AWS::Region}
                interval=1
                verbose=true
              mode: '000400'
              owner: 'root'
              group: 'root'
            /etc/cfn/hooks.d/cfn-auto-reloader.conf:
              content: !Sub |
                [cfn-auto-reloader-hook]
                triggers=post.update
                path=Resources.Instance.Metadata.AWS::CloudFormation::Init
                action=/opt/aws/bin/cfn-init -v --stack ${AWS::StackId} --resource Instance --region ${AWS::Region}
                runas=root
              mode: '000400'
              owner: 'root'
              group: 'root'
            /var/www/html/index.html:
              content: !Sub |
                <html><head><title>The BabyYoda Test Page</title></head><body><h1><center>${Message}</center></h1></body></html>
          commands:
            simulatebootstrap:
              command: "sleep 300"
          services:
            sysvinit:
              cfn-hup:
                enabled: "true"
                ensureRunning: "true"
                files:
                  - /etc/cfn/cfn-hup.conf
                  - /etc/cfn/hooks.d/cfn-auto-reloader.conf
              httpd:
                enabled: "true"
                ensureRunning: "true"
                files:
                  - "/var/www/html/index.html"
    CreationPolicy:
      ResourceSignal:
        Timeout: PT15M
    Properties:
      InstanceType: "t2.micro"
      ImageId: !Ref "LatestAmiId"
      SecurityGroupIds:
        - !Ref InstanceSecurityGroup
      Tags:
        - Key: Name
          Value: BY-UserData TestFinal
      UserData:
        Fn::Base64: !Sub |
          #!/bin/bash -xe
          /opt/aws/bin/cfn-init -v --stack ${AWS::StackId} --resource Instance --region ${AWS::Region}
          /opt/aws/bin/cfn-signal -e $? --stack ${AWS::StackId} --resource Instance --region ${AWS::Region}
- Create a stack using this template and verify that it loads in the browser
- Login to this using EC2 instance connect and then
cd /var/logand notice there is a new filecfn-hup.log cat cfn-hup.logto view the contents.- run
tail -f cfn-hup.logand this will check that file for updates every minute - Make the change to the Default: message and save and update this stack with this new template.
- Wait for the stack to be in an Update_Complete state and then navigate back to the EC2 bash prompt to watch the updates to the cfn-hup.log file.
- It should detect a change to the data and then rerun cfn-init.
- This should now update the website in the background and when you refresh your browser, you will see the new, updated page.
- Delete this stack to clean up.
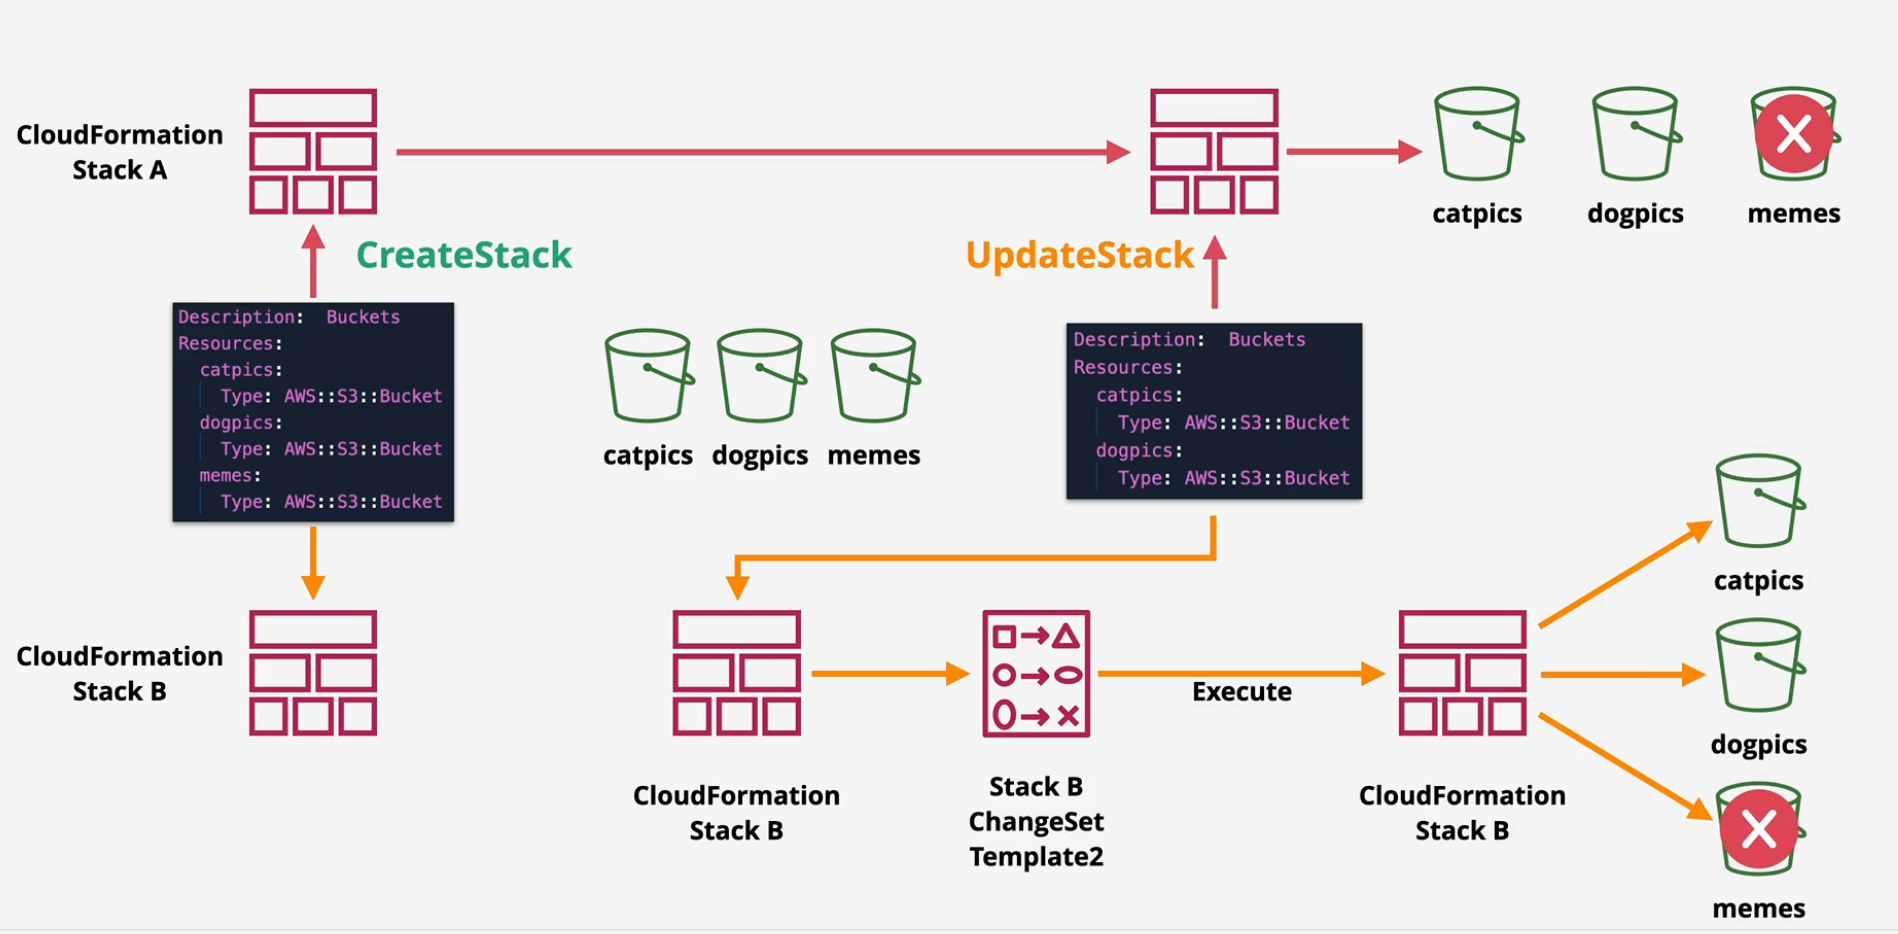
CloudFormation ChangeSets
Template -> Stack -> Create physical resources or Stack Delete -> Delete Physical resources or v2 Template -> Existing Stack -> Resources Change
Three possible outcomes to this:
- No interruption
- Some interruption
- Complete replacement with data loss
Change Sets allow you to preview the changes over multiple different versions
- Chosen changes can be applied by executing the change set.
Quick Demo
- Navigate to the CFN console and apply this template:
Description: Buckets
Resources:
  rolex:
    Type: AWS::S3::Bucket
  ghost:
    Type: AWS::S3::Bucket
  storm:
    Type: AWS::S3::Bucket
- Wait for it to complete and then navigate to S3 to find your 3 S3 buckets.
- Click on the Change Sets tab inside of your CFN stack.
- Create new change set and then remove one of the cats from the template above, save and then select that template
- Click next and then when it comes to the Create Change set, name this
changeset-remove-kittyand then click Create change set. - Notice that this doesn't update the stack. Check for S3 buckets and make sure they're all there.
- On the changeset, you can view the changes that this changeset is going to make. You should see a red Remove next next to one of the S3 buckets.
- Execute this changeset.
- This will update and remove one of the cat's S3 buckets.
- Delete this stack.
CloudFormation Custom Resources
Logical resources in a template - what you want CFN uses them to Create Update and Delete physical resources Custom resources let CFN integrate with anything it doesn't yet or doesn't natively support. Think of this scenario: Template -> Stack -> S3 Bucket -> someone adds objects to bucket manually -> delete stack -> error, bucket not empty.
Fix this by adding a custom resource that invokes Lambda to empty the bucket before delete.
Final Demo - CloudFormation Custom Resources
Let's build what we discussed in the previous lesson.
- Log into AWS into the N. Virginia Region
- Deploy this simple template (similar to the one above)
Description:  One BabyYoda S3 Bucket
Resources:
  babyyoda:
    Type: AWS::S3::Bucket
- Delete this stack and it should delete without issue
- Redeploy this stack again.
- Add some pictures to this bucket.
- Delete the stack. Uh oh. Error as expected.
- Empty the bucket, delete the stack. Perfect.
Use Custom Resources
- Apply this template here.
Description:  Custom Resources
Resources:
  babyyoda:
    Type: AWS::S3::Bucket
  copypics:
    Type: "Custom::S3Objects"
    Properties:
      ServiceToken: !GetAtt CopyS3ObjectsFunction.Arn
      SourceBucket: "bycustomresources"
      SourcePrefix: "customresource"
      Bucket: !Ref babyyoda
  S3CopyRole:
    Type: AWS::IAM::Role
    Properties:
      Path: /
      AssumeRolePolicyDocument:
        Version: 2012-10-17
        Statement:
          -
            Effect: Allow
            Principal:
              Service: lambda.amazonaws.com
            Action: sts:AssumeRole
      Policies:
        -
          PolicyName: S3Access
          PolicyDocument:
            Version: 2012-10-17
            Statement:
              -
                Sid: AllowLogging
                Effect: Allow
                Action:
                  - "logs:CreateLogGroup"
                  - "logs:CreateLogStream"
                  - "logs:PutLogEvents"
                Resource: "*"
              -
                Sid: ReadFromLCBucket
                Effect: Allow
                Action:
                  - "s3:ListBucket"
                  - "s3:GetObject"
                Resource:
                  - !Sub "arn:aws:s3:::bycustomresources"
                  - !Sub "arn:aws:s3:::bycustomresources/*"
              -
                Sid: WriteToStudentBuckets
                Effect: Allow
                Action:
                  - "s3:ListBucket"
                  - "s3:GetObject"
                  - "s3:PutObject"
                  - "s3:PutObjectAcl"
                  - "s3:PutObjectVersionAcl"
                  - "s3:DeleteObject"
                  - "s3:DeleteObjectVersion"
                  - "s3:CopyObject"
                Resource:
                  - !Sub "arn:aws:s3:::${babyyoda}"
                  - !Sub "arn:aws:s3:::${babyyoda}/*"
  CopyS3ObjectsFunction:
    Type: AWS::Lambda::Function
    Properties:
      Description: Copies objects into buckets
      Handler: index.handler
      Runtime: python3.9
      Role: !GetAtt S3CopyRole.Arn
      Timeout: 120
      Code:
        ZipFile: |
          import os
          import json
          import cfnresponse
          import boto3
          import logging

          from botocore.exceptions import ClientError
          client = boto3.client('s3')
          logger = logging.getLogger()
          logger.setLevel(logging.INFO)

          def handler(event, context):
            logger.info("Received event: %s" % json.dumps(event))
            source_bucket = event['ResourceProperties']['SourceBucket']
            source_prefix = event['ResourceProperties'].get('SourcePrefix') or ''
            bucket = event['ResourceProperties']['Bucket']
            prefix = event['ResourceProperties'].get('Prefix') or ''

            result = cfnresponse.SUCCESS

            try:
              if event['RequestType'] == 'Create' or event['RequestType'] == 'Update':
                result = copy_objects(source_bucket, source_prefix, bucket, prefix)
              elif event['RequestType'] == 'Delete':
                result = delete_objects(bucket, prefix)
            except ClientError as e:
              logger.error('Error: %s', e)
              result = cfnresponse.FAILED

            cfnresponse.send(event, context, result, {})

          def copy_objects(source_bucket, source_prefix, bucket, prefix):
            paginator = client.get_paginator('list_objects_v2')
            page_iterator = paginator.paginate(Bucket=source_bucket, Prefix=source_prefix)
            for key in {x['Key'] for page in page_iterator for x in page['Contents']}:
              dest_key = os.path.join(prefix, os.path.relpath(key, source_prefix))
              if not key.endswith('/'):
                print('copy {} to {}'.format(key, dest_key))
                client.copy_object(CopySource={'Bucket': source_bucket, 'Key': key}, Bucket=bucket, Key = dest_key)
            return cfnresponse.SUCCESS

          def delete_objects(bucket, prefix):
            paginator = client.get_paginator('list_objects_v2')
            page_iterator = paginator.paginate(Bucket=bucket, Prefix=prefix)
            objects = [{'Key': x['Key']} for page in page_iterator for x in page['Contents']]
            client.delete_objects(Bucket=bucket, Delete={'Objects': objects})
            return cfnresponse.SUCCESS
- Add some objects to the bucket.
- Delete stack. Perfect.