[[TOC]]
Demo: Bootstrapping WordPress directly and with CFN
Prerequisites:
- Familiarity with the previous demos where we installed WP and the AMI's onto EC2 instances
Launch Instance
- Create an EC2 instance of whichever size
- when you get to Step 3: Configure Instance Details, into the User Data section at the very bottom, copy and paste your script that looks something similar to this:
#!/bin/bash -xe
DBName='soloswordpress'
DBUser='soloswordpress'
DBPassword='Solo12345$$'
DBRootPassword='Solo12345$$'
yum -y update
yum -y upgrade
yum install -y mariadb-server httpd wget cowsay
amazon-linux-extras install -y lamp-mariadb10.2-php7.2 php7.2
systemctl enable httpd
systemctl enable mariadb
systemctl start httpd
systemctl start mariadb
mysqladmin -u root password $DBRootPassword
wget http://wordpress.org/latest.tar.gz -P /var/www/html
cd /var/www/html
tar -zxvf latest.tar.gz
cp -rvf wordpress/* .
rm -R wordpress
rm latest.tar.gz
cp ./wp-config-sample.php ./wp-config.php
sed -i "s/'database_name_here'/'$DBName'/g" wp-config.php
sed -i "s/'username_here'/'$DBUser'/g" wp-config.php
sed -i "s/'password_here'/'$DBPassword'/g" wp-config.php
usermod -a -G apache ec2-user
chown -R ec2-user:apache /var/www
chmod 2775 /var/www
find /var/www -type d -exec chmod 2775 {} \;
find /var/www -type f -exec chmod 0664 {} \;
echo "CREATE DATABASE $DBName;" >> /tmp/db.setup
echo "CREATE USER '$DBUser'@'localhost' IDENTIFIED BY '$DBPassword';" >> /tmp/db.setup
echo "GRANT ALL ON $DBName.* TO '$DBUser'@'localhost';" >> /tmp/db.setup
echo "FLUSH PRIVILEGES;" >> /tmp/db.setup
mysql -u root --password=$DBRootPassword < /tmp/db.setup
sudo rm /tmp/db.setup
echo "#!/bin/sh" > /etc/update-motd.d/40-cow
echo 'cowsay "Amazon Linux 2 AMI - WordPress Edition"' >> /etc/update-motd.d/40-cow
chmod 755 /etc/update-motd.d/40-cow
rm /etc/update-motd.d/30-banner
update-motd
- On the rest of the steps, configure how you'd like your EC2 instance configured and then click Launch
- Wait a few minutes for the machine to launch.
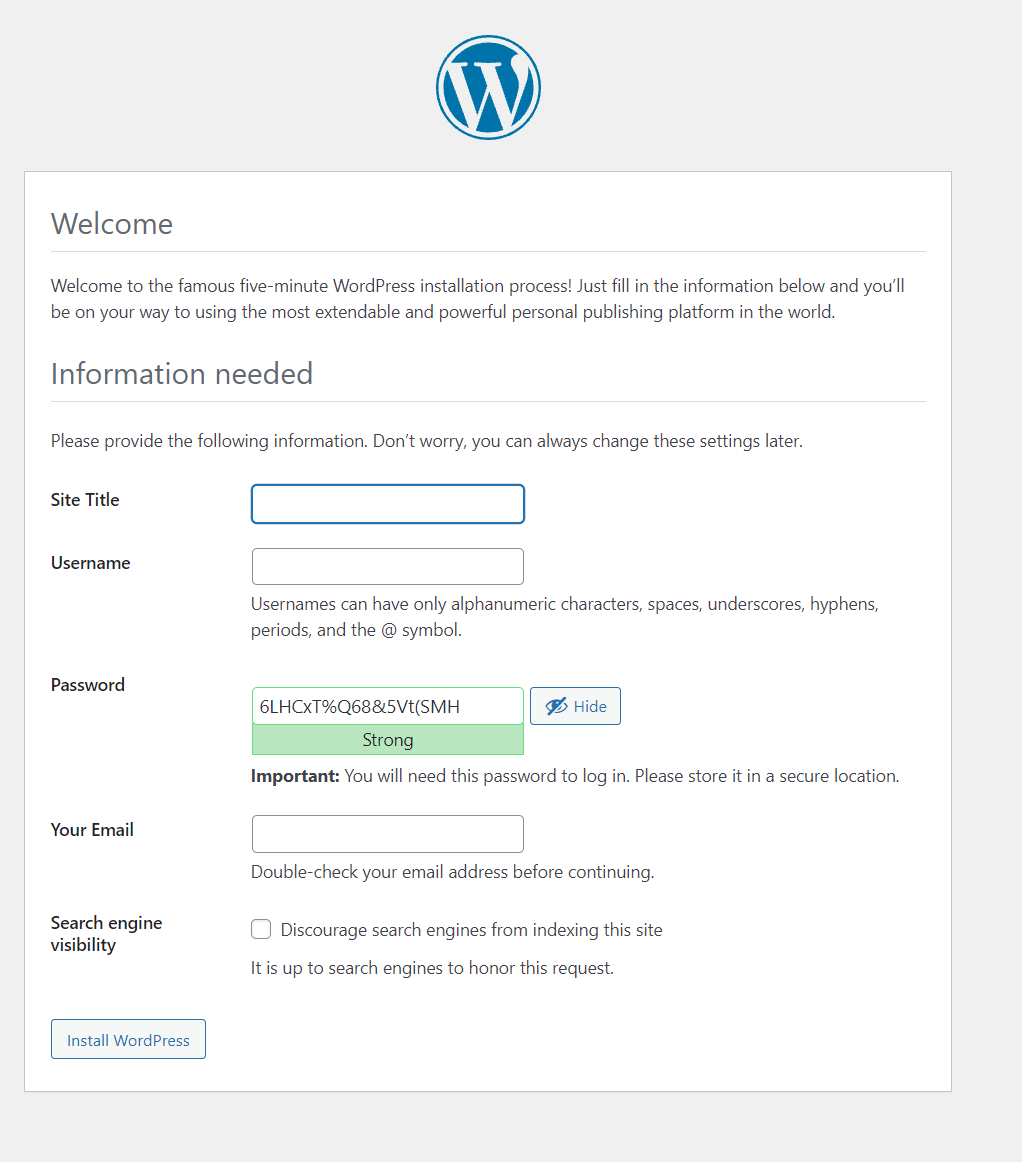
- Copy the IP address to your browser and you should be taken to the initial Wordpress install screen:
- In Terraform, we can provision this per the provider documentation using the user data attribute
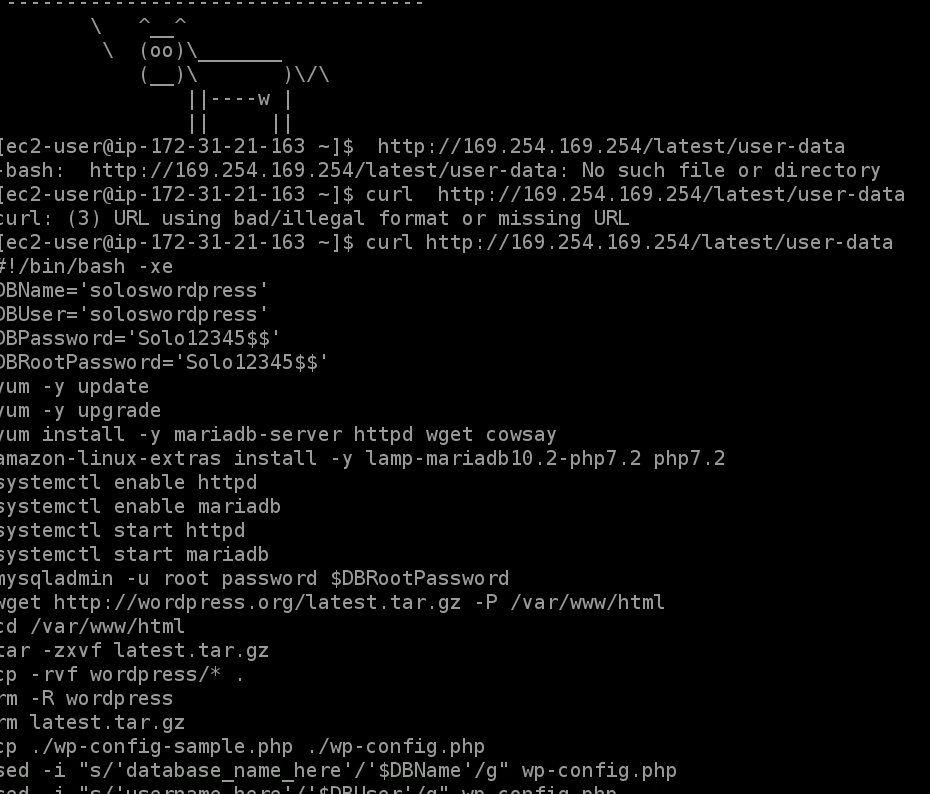
- If you connect to this instance using EC2 Instance Connect, you should see the cowsay from what we told it to say.
- Also, inside the machine, you can log into the user data link using
curl http://169.254.169.254/latest/user-data:
- To view the log file from within the EC2 instance, run
less /var/log/cloud-init-output.log - That's it for this demo. You can terminate the instance to clean up.
Using CloudFormation
- You can use CloudFormation to build your EC2 instance
- Have your CF template ask for the variables that you need in your script
- Copy the script into the user data fields in the CF template (take out the parts where you hardcode the variables in
- Run the CF Template to build.
Using Terraform
data "aws_ami" "ubuntu" {
  most_recent = true

  filter {
    name   = "name"
    values = ["ubuntu/images/hvm-ssd/ubuntu-focal-20.04-amd64-server-*"]
  }

  filter {
    name   = "virtualization-type"
    values = ["hvm"]
  }
}

resource "aws_instance" "soloscatweb" {
  ami           = data.aws_ami.ubuntu.id # or specifiy the ID right here without pulling the data above
  instance_type = "t3.micro"

  tags = {
    Name = "SolosCatWeb"
  }
  user_data = { <<EOF
#!/bin/bash -xe
DBName='soloswordpress'
DBUser='soloswordpress'
DBPassword='Solo12345$$'
DBRootPassword='Solo12345$$'
yum -y update
yum -y upgrade
yum install -y mariadb-server httpd wget cowsay
amazon-linux-extras install -y lamp-mariadb10.2-php7.2 php7.2
systemctl enable httpd
systemctl enable mariadb
systemctl start httpd
systemctl start mariadb
mysqladmin -u root password $DBRootPassword
wget http://wordpress.org/latest.tar.gz -P /var/www/html
cd /var/www/html
tar -zxvf latest.tar.gz
cp -rvf wordpress/* .
rm -R wordpress
rm latest.tar.gz
cp ./wp-config-sample.php ./wp-config.php
sed -i "s/'database_name_here'/'$DBName'/g" wp-config.php
sed -i "s/'username_here'/'$DBUser'/g" wp-config.php
sed -i "s/'password_here'/'$DBPassword'/g" wp-config.php
usermod -a -G apache ec2-user
chown -R ec2-user:apache /var/www
chmod 2775 /var/www
find /var/www -type d -exec chmod 2775 {} \;
find /var/www -type f -exec chmod 0664 {} \;
echo "CREATE DATABASE $DBName;" >> /tmp/db.setup
echo "CREATE USER '$DBUser'@'localhost' IDENTIFIED BY '$DBPassword';" >> /tmp/db.setup
echo "GRANT ALL ON $DBName.* TO '$DBUser'@'localhost';" >> /tmp/db.setup
echo "FLUSH PRIVILEGES;" >> /tmp/db.setup
mysql -u root --password=$DBRootPassword < /tmp/db.setup
sudo rm /tmp/db.setup
echo "#!/bin/sh" > /etc/update-motd.d/40-cow
echo 'cowsay "Amazon Linux 2 AMI - WordPress Edition"' >> /etc/update-motd.d/40-cow
chmod 755 /etc/update-motd.d/40-cow
rm /etc/update-motd.d/30-banner
update-motd
EOF
}
Demo: CFN: INIT and CFN Creation Policies
Prerequisites:
- Familiarity with the previous demos where we installed WP and the AMI's onto EC2 instances
Write CloudFormation Script
AWSTemplateFormatVersion: 2010-09-09
Parameters:
  LatestAmiId:
    Description: AMI (it's gonna be Ubuntu something)
    Type: 'AWS::SSM::Parameter::Value<AWS::EC2::Image::Id>'
    Default: '/aws/service/ami-amazon-linux-latest/amzn2-ami-hvm-x86_64-gp2'
  KeyName:
    Type: AWS::EC2::KeyPair::KeyName
    Description: "SSH Keypair"
  DBName:
    AllowedPattern: '[a-zA-Z][a-zA-Z0-9]*'
    ConstraintDescription: must begin with a letter and be alphanumeric
    Default: solowpdb
    Description: name of the WordPress database
    MaxLength: '20'
    MinLength: '1'
    Type: String
  DBPassword:
    AllowedPattern: '[a-zA-Z0-9]*'
    ConstraintDescription: must be alphanumeric and longer than 8
    Description: The WordPress database admin pwd
    MaxLength: '20'
    MinLength: '8'
    NoEcho: 'true'
    Type: String
  DBRootPassword:
    AllowedPattern: '[a-zA-Z0-9]*'
    ConstraintDescription: must be alphanumeric and longer than 8
    Description: MySQL root pwd
    MaxLength: '20'
    MinLength: '8'
    NoEcho: 'true'
    Type: String
  DBUser:
    AllowedPattern: '[a-zA-Z][a-zA-Z0-9]*'
    ConstraintDescription: must begin with a letter and be alphanumeric
    Description: The WordPress database admin username
    Default: soloswpdb
    MaxLength: '16'
    MinLength: '1'
    NoEcho: 'true'
    Type: String
Resources:
  VPC:
    Type: AWS::EC2::VPC
    Properties:
      CidrBlock: 10.0.0.0/16
      EnableDnsSupport: true
      EnableDnsHostnames: true
      InstanceTenancy: default
      Tags:
        - Key: Name
          Value: Linux Target VPC
  InternetGateway:
    Type: AWS::EC2::InternetGateway
  VPCGatewayAttachment:
    Type: AWS::EC2::VPCGatewayAttachment
    Properties:
      VpcId: !Ref VPC
      InternetGatewayId: !Ref InternetGateway
  SubnetA:
    Type: AWS::EC2::Subnet
    Properties:
      AvailabilityZone: us-east-2a
      VpcId: !Ref VPC
      CidrBlock: 10.0.0.0/24
      MapPublicIpOnLaunch: true
  RouteTable:
    Type: AWS::EC2::RouteTable
    Properties:
      VpcId: !Ref VPC
  InternetRoute:
    Type: AWS::EC2::Route
    DependsOn: InternetGateway
    Properties:
      DestinationCidrBlock: 0.0.0.0/0
      GatewayId: !Ref InternetGateway
      RouteTableId: !Ref RouteTable
  SubnetARouteTableAssociation:
    Type: AWS::EC2::SubnetRouteTableAssociation
    Properties:
      RouteTableId: !Ref RouteTable
      SubnetId: !Ref SubnetA
  DefaultInstanceSecurityGroup:
    Type: 'AWS::EC2::SecurityGroup'
    Properties:
      VpcId: !Ref VPC
      GroupDescription: SSH port 22 across all internet.
      SecurityGroupIngress:
        - Description: 'Allow SSH IPv4 IN'
          IpProtocol: tcp
          FromPort: '22'
          ToPort: '22'
          CidrIp: '0.0.0.0/0'
        - Description: 'Allow HTTP IPv4 IN'
          IpProtocol: tcp
          FromPort: '80'
          ToPort: '80'
          CidrIp: '0.0.0.0/0'
        - Description: 'Allow SSH IPv6 IN'
          IpProtocol: tcp
          FromPort: '22'
          ToPort: '22'
          CidrIpv6: ::/0
  ElasticIP:
    Type: AWS::EC2::EIP
    Properties:
      Domain: vpc
      InstanceId: !Ref EC2Instance
  EC2Instance:
    Type: AWS::EC2::Instance
    CreationPolicy:
      ResourceSignal:
        Timeout: PT10M
    Metadata:
      AWS::CloudFormation::Init:
        configSets:
          wordpress_install:
            - 1_install
            - 2_moreinstall
            - 3_configuration
            - 4_configure_wp
            - 5_configurewp
        1_install:
          files:
            /etc/cfn/cfn-hup.conf:
              content: !Sub |
                [main]
                stack= ${AWS::StackId}
                region=${AWS::Region}
              group: root
              mode: '000400'
              owner: root
            /etc/cfn/hooks.d/cfn-auto-reloader.conf:
              content: !Sub |
                [cfn-auto-reloader-hook]
                triggers=post.update
                path=Resources.EC2Instance.Metadata.AWS::CloudFormation::Init
                action=/opt/aws/bin/cfn-init -v --stack ${AWS::StackName} --resource EC2Instance --configsets wordpress_install --region ${AWS::Region}
              group: root
              mode: '000400'
              owner: root
          services:
            sysvinit:
              cfn-hup:
                enabled: true
                ensureRunning: true
                files:
                - /etc/cfn/cfn-hup.conf
                - /etc/cfn/hooks.d/cfn-auto-reloader.conf
        2_moreinstall:
          packages:
            yum:
              cowsay: []
              httpd: []
              mariadb-server: []
              wget: []
          commands:
            0_extra_installs_php72_lampmariadb:
              command: amazon-linux-extras install -y lamp-mariadb10.2-php7.2 php7.2
          services:
            sysvinit:
              httpd:
                enabled: true
                ensureRunning: true
              mariadb:
                enabled: true
                ensureRunning: true
        3_configuration:
          files:
            /etc/update-motd.d/40-cow:
              content: !Sub |
                #!/bin/sh
                cowsay "Amazon Linux 2 AMI - Animals4Life"
              group: root
              mode: '000755'
              owner: root
          commands:
            01_set_mysql_root_password:
              command: !Sub |
                mysqladmin -u root password '${DBRootPassword}'
              test: !Sub |
                $(mysql ${DBName} -u root --password='${DBRootPassword}' >/dev/null 2>&1 </dev/null); (( $? != 0 ))
            02_remove_original_banner:
              command: rm /etc/update-motd.d/30-banner
            03_updatemotd:
              command: update-motd
        4_configure_wp:
          sources:
            /var/www/html: http://wordpress.org/latest.tar.gz
          files:
            /tmp/create-wp-config:
              content: !Sub |
                #!/bin/bash -xe
                cp /var/www/html/wp-config-sample.php /var/www/html/wp-config.php
                sed -i "s/'database_name_here'/'${DBName}'/g" wp-config.php
                sed -i "s/'username_here'/'${DBUser}'/g" wp-config.php
                sed -i "s/'password_here'/'${DBPassword}'/g" wp-config.php
              group: root
              mode: '000500'
              owner: root
            /tmp/db.setup:
              content: !Sub |
                CREATE DATABASE ${DBName};
                CREATE USER '${DBUser}'@'localhost' IDENTIFIED BY '${DBPassword}';
                GRANT ALL ON ${DBName}.* TO '${DBUser}'@'localhost';
                FLUSH PRIVILEGES;
              group: root
              mode: '000400'
              owner: root
        5_configurewp:
          files:
            /tmp/permissionsfix:
              content: !Sub |
                usermod -a -G apache ec2-user
                chown -R ec2-user:apache /var/www
                chmod 2775 /var/www
                find /var/www -type d -exec chmod 2775 {} \;
                find /var/www -type f -exec chmod 0664 {} \;
              group: root
              mode: '000500'
              owner: root
          commands:
            01_create_database:
              command: !Sub |
                mysql -u root --password='${DBRootPassword}' < /tmp/db.setup
              test: !Sub |
                $(mysql ${DBName} -u root --password='${DBRootPassword}' >/dev/null 2>&1 </dev/null); (( $? !=0))
            02_move_wordpress:
              command: !Sub |
                cp -rvf /var/www/html/wordpress/* /var/www/html/
            03_tidyup:
              command: !Sub |
                rm -R /var/www/html/wordpress
            04_5_configurewp:
              command: /tmp/create-wp-config
              cwd: /var/www/html
            04_fix_permissions:
              command: /tmp/permissionsfix
    Properties:
      KeyName: !Ref KeyName
      InstanceType: "t2.micro"
      ImageId: !Ref LatestAmiId
      SubnetId: !Ref SubnetA
      SecurityGroupIds:
        - !Ref DefaultInstanceSecurityGroup
      Tags:
        - Key: Name
          Value: SoloWordpress
        - Key: "Managed By"
          Value: "Solomon"
      UserData:
        Fn::Base64: !Sub |
          #!/bin/bash -xe
          yum -y update
          /opt/aws/bin/cfn-init -v --stack ${AWS::StackId} --resource EC2Instance --configsets wordpress_install --region ${AWS::Region}
          /opt/aws/bin/cfn-signal -e $? --stack ${AWS::StackId} --resource EC2Instance --region ${AWS::Region}
- Deploy Stack
- Notice that the EC2 instance doesn't show complete until the signal is received back from cfn-signal
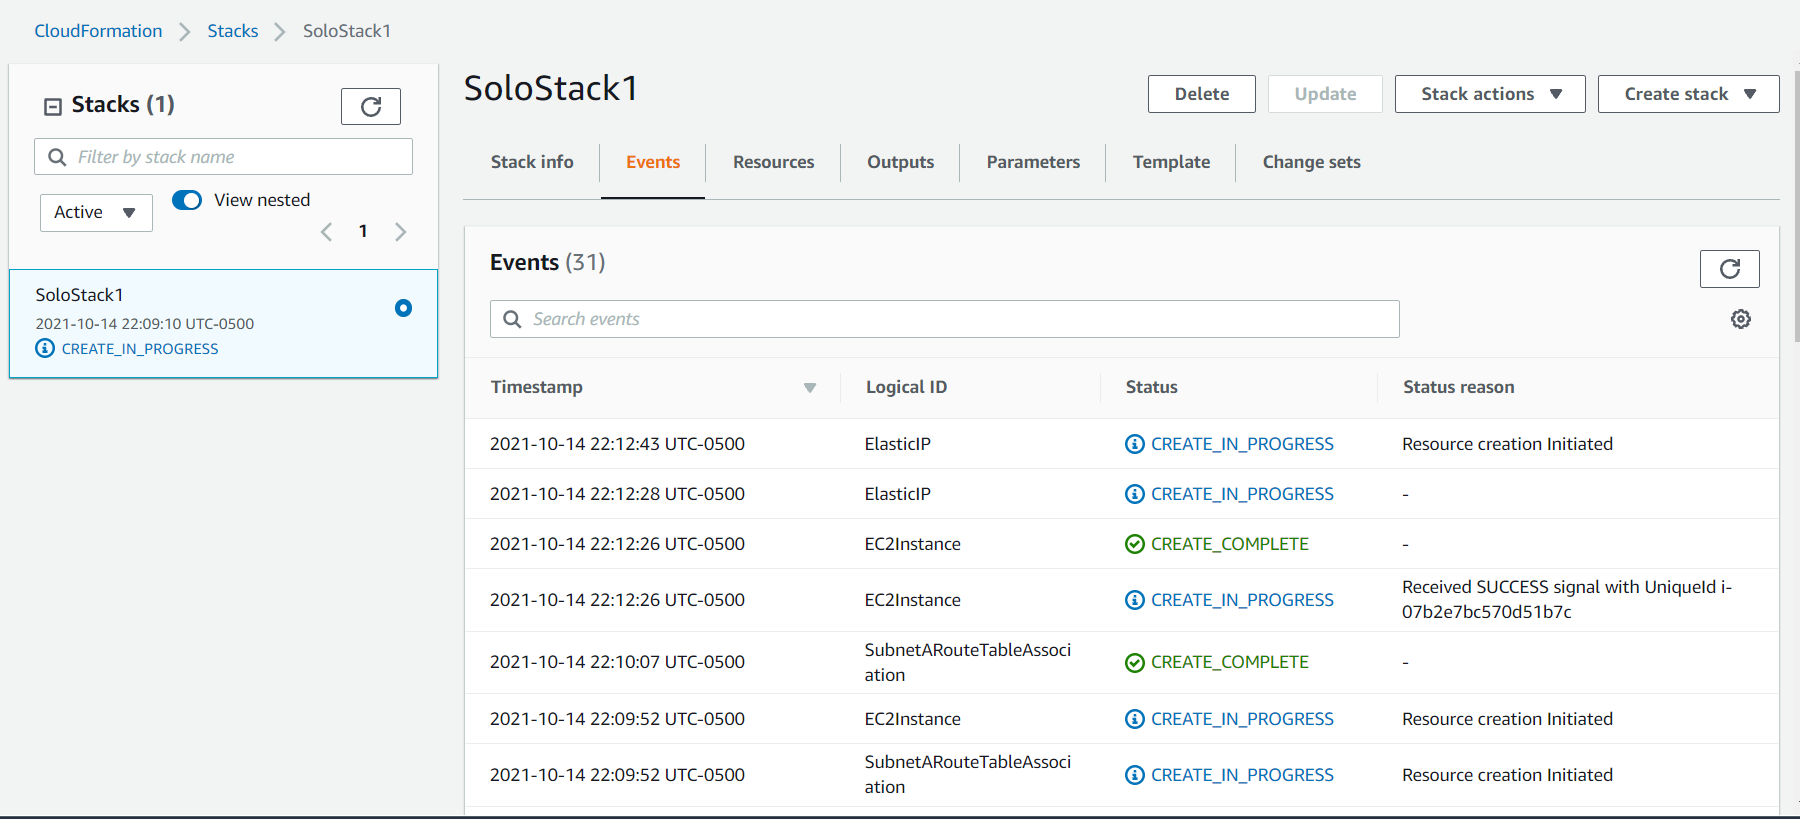
- If you now navigate to the Elastic IP address, you should have your full WordPress install available.
Clean up
Delete the stack and ensure all resources have been deleted.
Providing permissions and credentials to EC2 using Instance Roles
- Run 1-click deployment
- Connect to the running instance with EC2 instance connect
- run
aws s3 lsto check to see if the configuration is set up - Notice that it cannot locate the credentials
- Navigate to the IAM console in AWS.
- Create a role using "AWS Service"
- Click EC2 and then look for "S3 Read Only Access" and attach
- Name this role "AWSInstanceRole" and save.
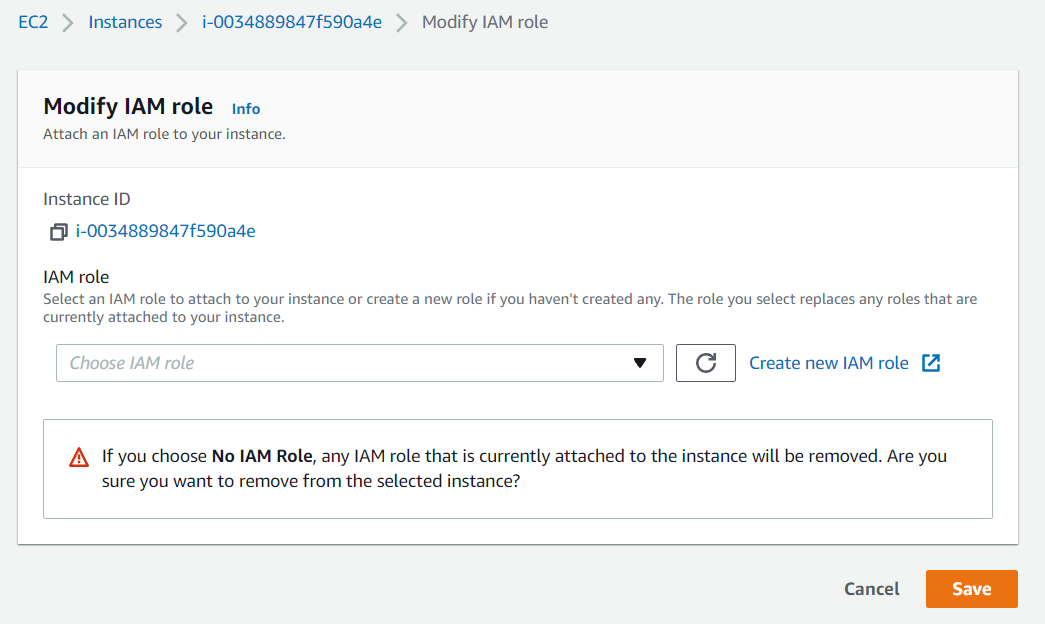
- Go back to the EC2 console and then right click on the instance and select > security > modify IAM role.
- Choose the existing IAM role that you just created.
- Log back into the EC2 instance using EC2 Instance Connect and run
aws s3 lsand it should work this time. - run
curl http://169.254.169.254/latest/metadata/iam/security-credentials/and you'll see the name of the credentials.
Demo: Parameter Store
Creating parameters
- Log into the AWS console and go to the Systems Manager
- Select Parameter store from the menu on the left.
- Click Create Parameter and enter in your parameter
- Choose what type of parameter you want
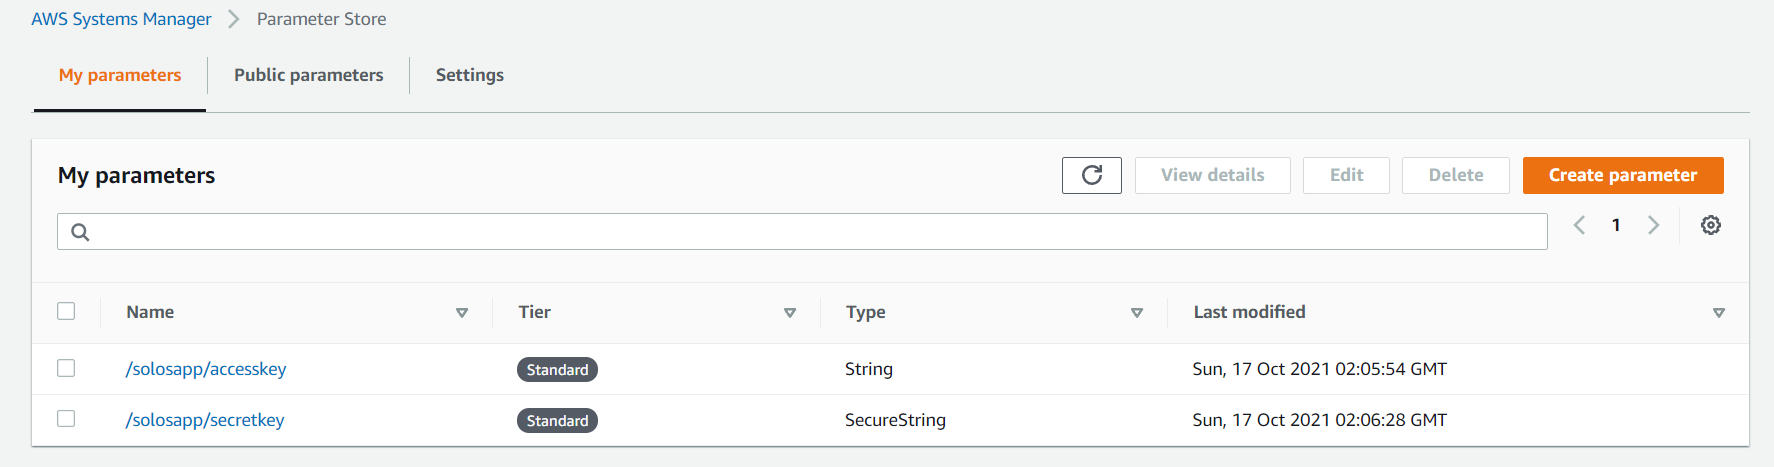
- You create the parameters in a folder type structure /solosapp/ is the "folder" and the key is accesskey
Accessing Parameters
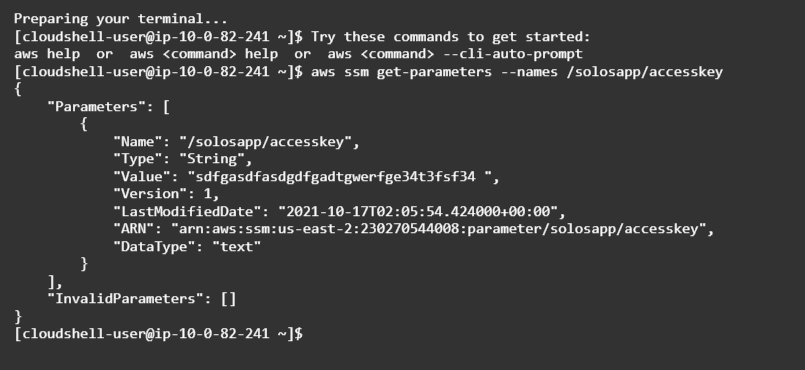
One of the quick ways to test this is to use the AWS Cloud Shell
- Commands:
aws ssm get-parameters --names /solosapp/accesskey
aws ssm get-parameters-by-path --path /solosapp/
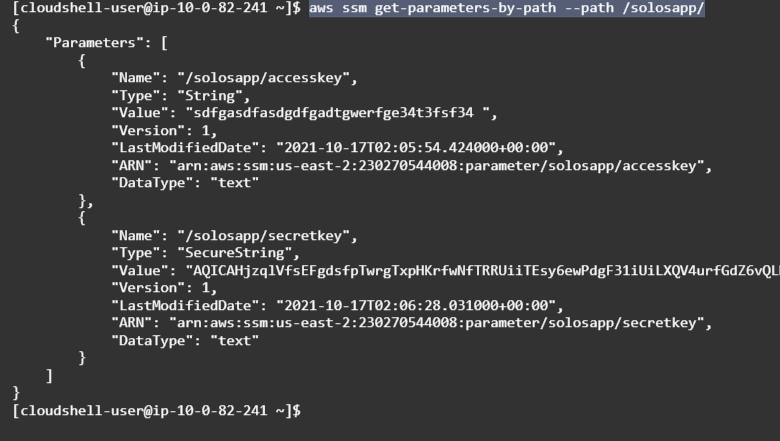
- Note how the SecretString is encrypted.
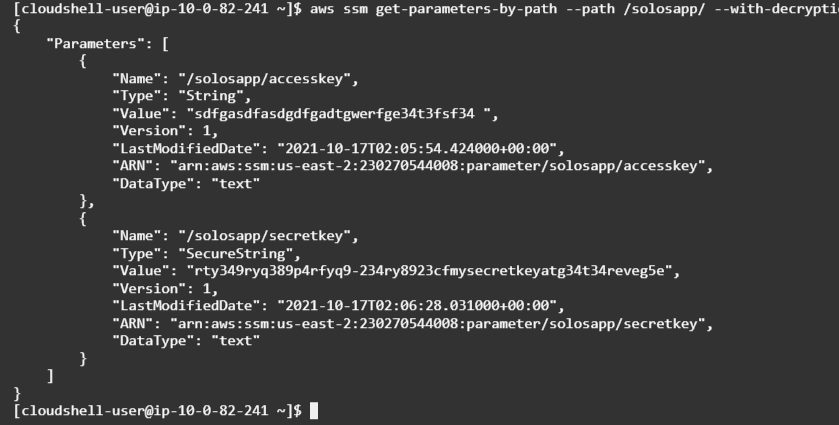
- To get the plain text, run
aws ssm get-parameters-by-path --path /solosapp/ --with-decryption
Demo: Logging and Metrics with CloudWatch Agent
Installing the CloudWatch Agent
- First, you'll need to spin up an EC2 instance with httpd. You can either spin one up manually or use the code here:
- Once this instance is spun up, connect to it using EC2 Instance Connect.
- Download the CloudWatch agent by running
wget https://s3.amazonaws.com/amazoncloudwatch-agent/amazon_linux/amd64/latest/amazon-cloudwatch-agent.rpm - use rpm to install the agent:
sudo rpm -U ./amazon-cloudwatch-agent.rpm - Go to the IAM console and create a service role using EC2 a. Attach the CloudWatchAgentServerPolicy and the AmazonSSMFullAccess policies.
- Attach this role to the EC2 instance by clicking on the instance and then Security, then Modify IAM role.
- Back in the EC2 instance, run
sudo /opt/aws/amazon-cloudwatch-agent/bin/amazon-cloudwatch-agent-config-wizard8 Accept the defaults on each of the questions, but take note and stop at the default metrics question.
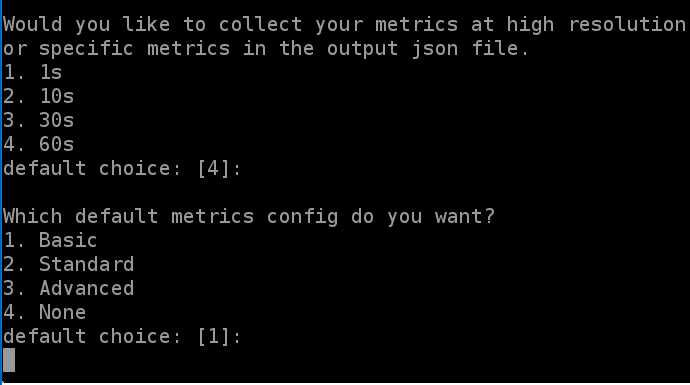
- Select Advanced here and press enter.
- Press enter the rest of these until you get to the log file path.
- Enter in /var/log/secure and hit enter
- Enter in the entire path to the log as the name, hit enter until you want to specify any additional log files
- For the second log, enter in /var/log/httpd/access_log
- Repeat again for the 3rd log
- Enter in /var/log/httpd/error_log
- Select no when it asks for another log file. You should have 3 log files
- Note and accept the defaults for the rest, noting the credential for the role that you created.
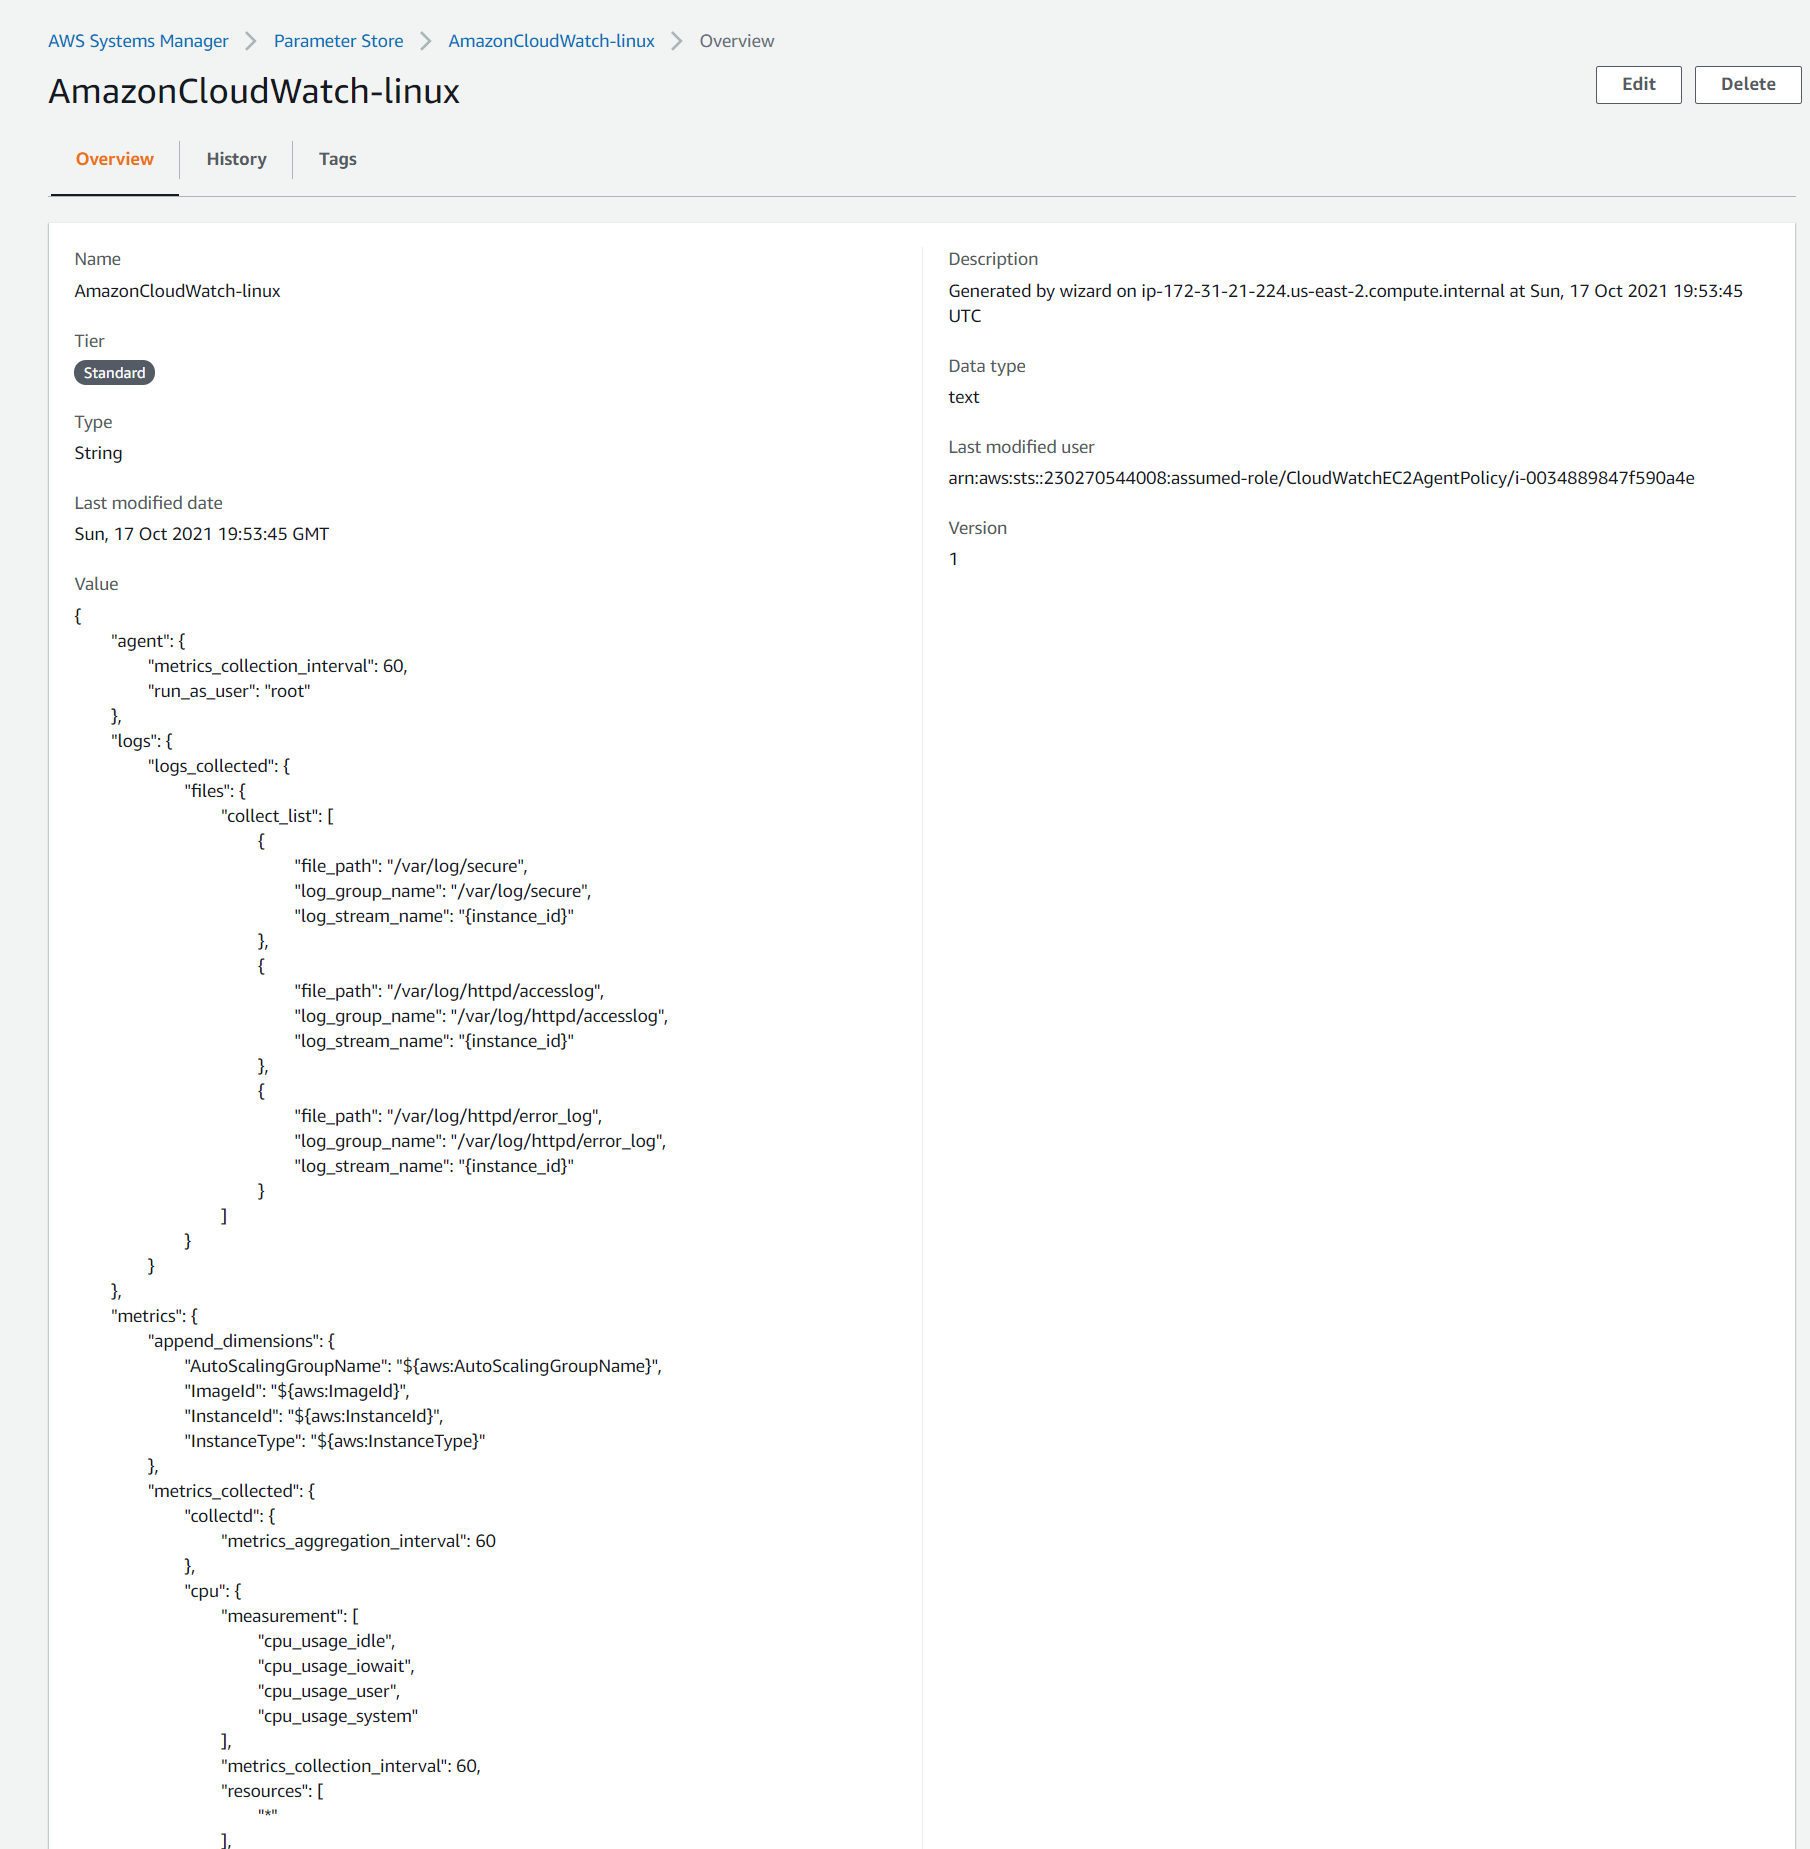
- Navigate back to the parameter store in Systems Manager and look for the
AmazonCloudWatch-linuxparameter. a.When you save these into the parameter store, you can use this to create other EC2 instances at scale by referencing this parameter.
Starting the CloudWatch agent
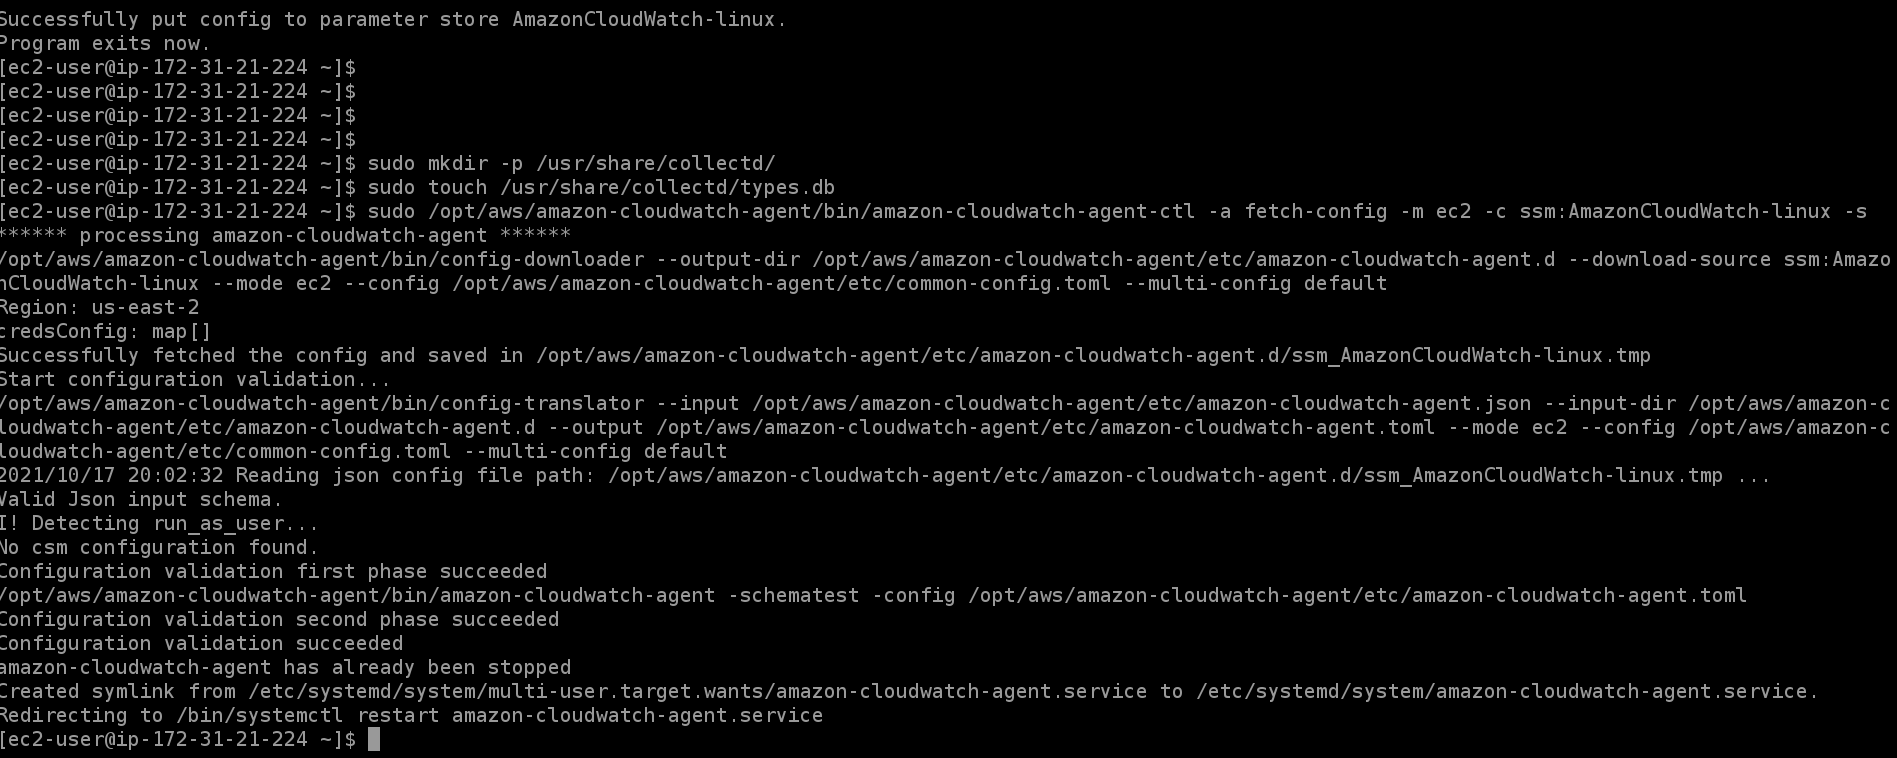
- You'll need to install collectd as you referenced it in the config file.
sudo mkdir -p /usr/share/collectd/andsudo touch /usr/share/collectd/types.db - Start agent
sudo /opt/aws/amazon-cloudwatch-agent/bin/amazon-cloudwatch-agent-ctl -a fetch-config -m ec2 -c ssm:AmazonCloudWatch-linux -s
Viewing the logs from the CloudWatch Agent
- Navigate to the CloudWatch console.
- Click on Log Groups
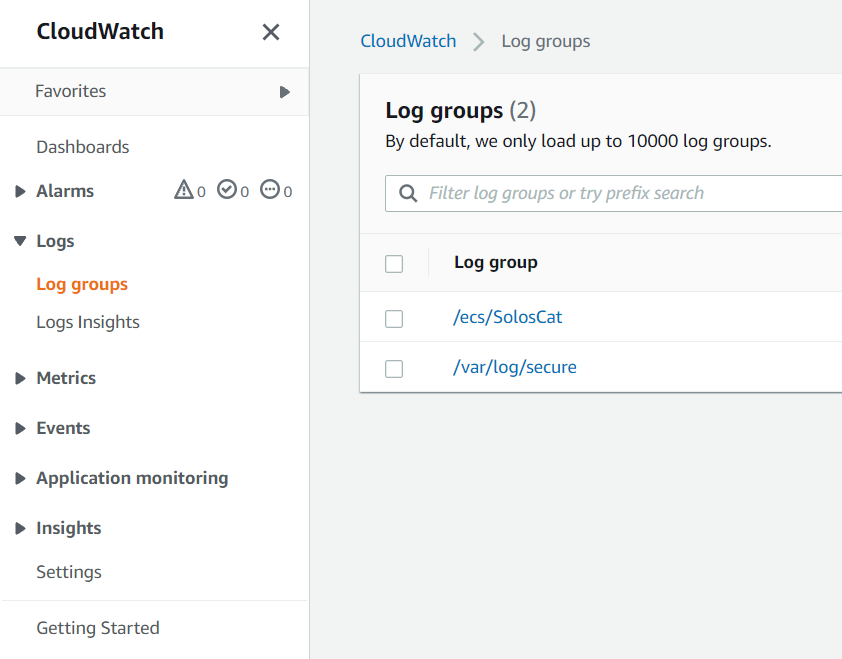
- You can look inside the group and then click on the instance names
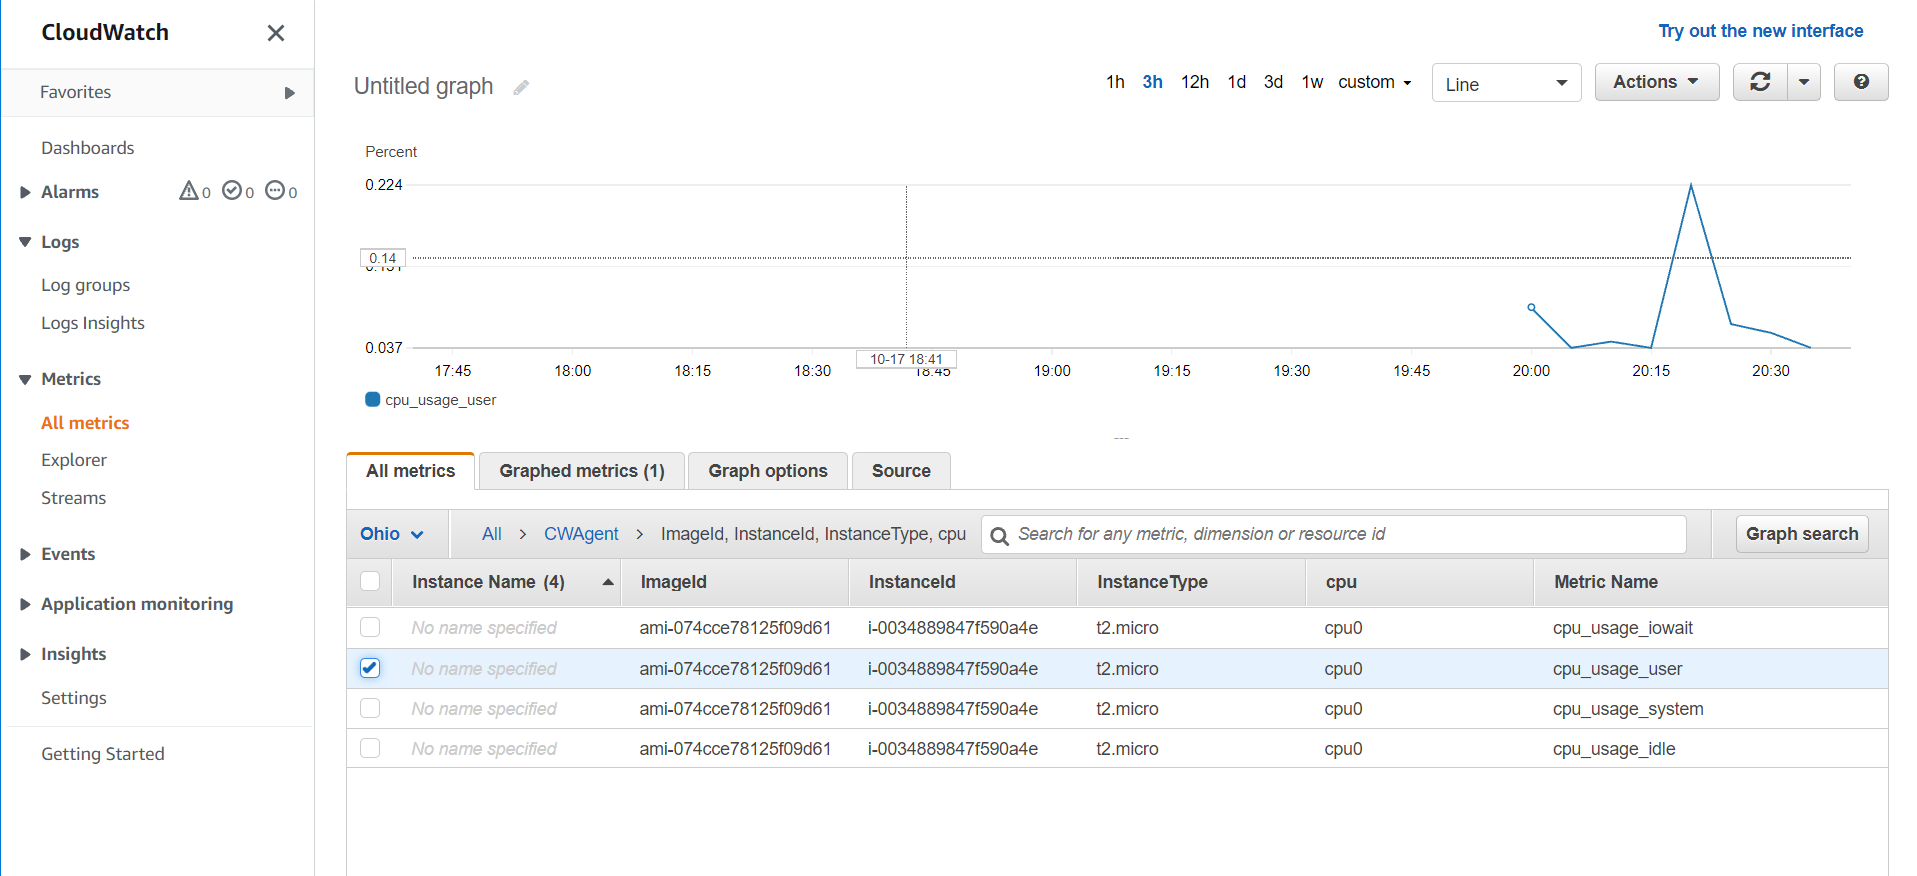
Metrics from EC2 instance
- Click on Metrics within the CloudWatch console
- You will now see a CWAgent metric that you can use to view inside the EC2 instance.
- You can explore these and find out what works for you
Clean Up
Remove the role from the instance
 Delete the Role
Delete the instance
(don't delete the parameter as it's free and could be used later)
Delete the Role
Delete the instance
(don't delete the parameter as it's free and could be used later)