8. Container Services
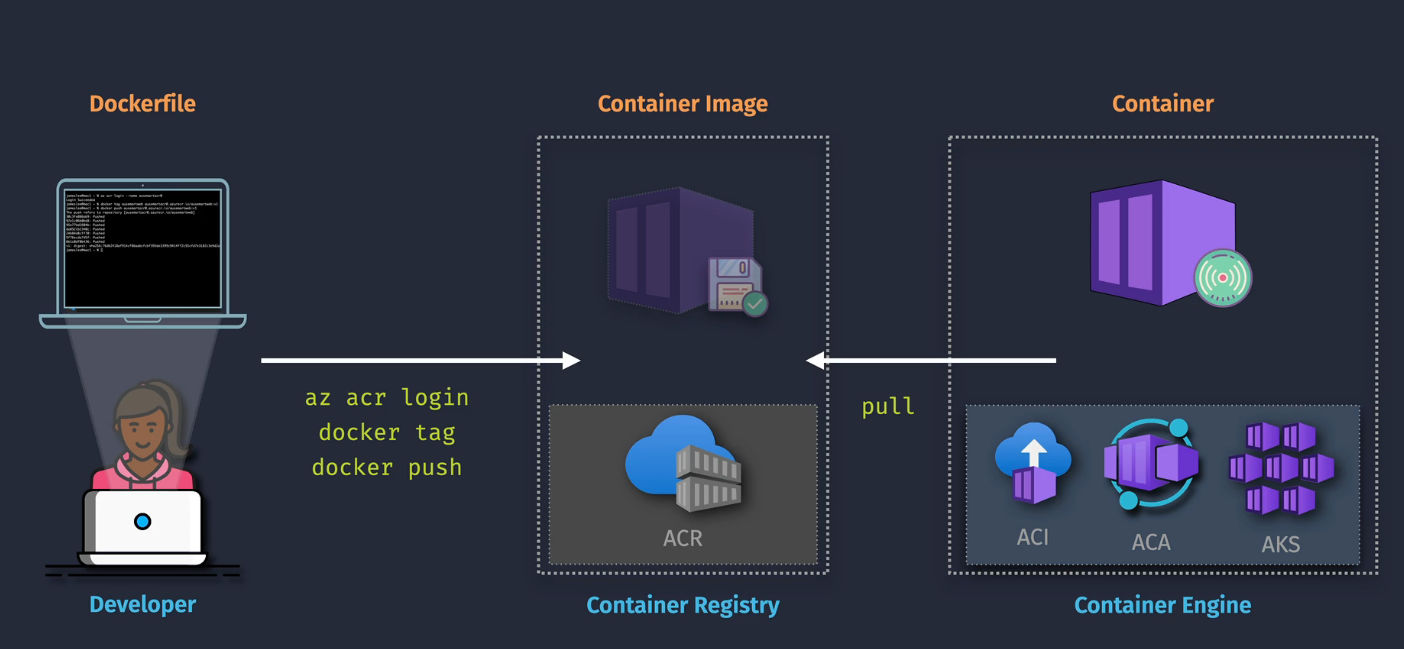
Azure Container Registry
Why do we need these? We have a Dockerfile - the source of all of our application dependencies and code and need to put it someplace so that something else can grab it and run it.
Features:
- Container Storage and Azure AD integration
- More storage
- VNet security, geo-replication, content trust
ACR Tasks provide some automation around the ACR
Hierarchy
- Registry - IAM, networking, pricing
- Repository - where the images are stored
- Artifacts - Helm
Demo: Create a Container Registry and Push a Container
- Clone a repo
- Build the image
- List the image
- Create ACR
- Create Repository
- Push image to the repository
Commands
- Clone the repo:
git clone [https://github.com/org/repo.git] - Build the docker image:
docker build -t appname -f Dockerfile . - List docker images: docker image ls
- Login to Azure:
az login - Login to ACR:
az acr login -n registryname - Tag image for ACR:
docker -t appname registryname.azurecr.io/appname:v1 - Push image to ACR:
docker push registryname/azurecr.io/appname:v1
Demo: Push an image with ACR tasks
This one uses Azure CloudShell
- Make a new folder in Cloud Shell:
mkdir dev - Change to new folder:
cd dev - Clone the repo:
git clone https://github.com/org/repo.git - Change to dev/appname folder:
cd appname - Build and push:
az acr build --image acrtasks/appname:v1 --registry registryname --file Dockerfile .
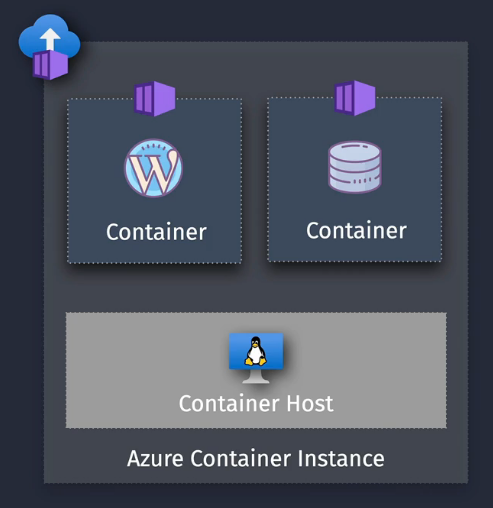
Azure Container Instances
- Doesn't include scaling, healing, orchestration
- Pricing is based on resource allocation
- For simple solutions
Hierarchy
Container Instance Connectivity - public or VNet, DNS Persistent storage via Azure Files
plus....
- Container Groups
- Hosting
Demo: Create an Azure Container Instance
- Turn on the Access Keys on the ACR
- In real life, use RBAC.
- Navigate to Container Instances and Create a new instance
- Check the zonal deployments
- Select the image
- Configure networking
- private or public
- Set the DNS label
- Select the ports for your app - 443 or 80 or whatever
- Restart Policy - restarts on failure or always or never
- Look at encryption options
- Environment Variables are sometimes needed
- Click Create
- Check the metrics, logs, and then copy the FQDN to a browser and see if the site is up.
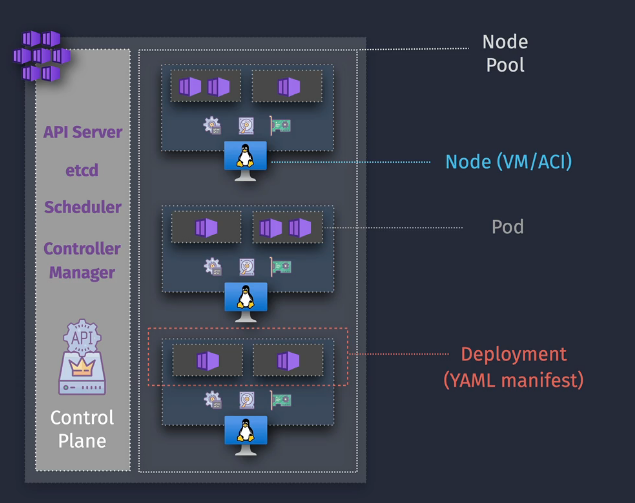
Azure Kubernetes Service - AKS
Built by Google to host their own solutions.
- Discovery and Load Balancing
- Automation
- Healing
- Scaling

Considerations:
- Entra ID
- Supports VMs and ACS
- Orchestration, healing, monitoring
- Only pay for the compute, not the control plane.
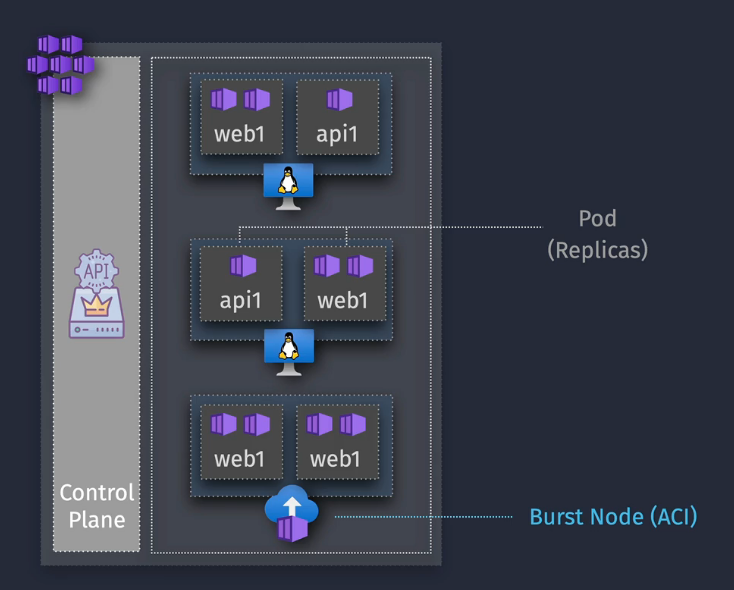
Hierarchy
- Containers
- Clusters - API, etcd, scheduler, controller manager
- Node pool - contains nodes (the VMs)
- Deploy - command line tools (kubectl)
- Pods - Deployments (YAML Manifest)
AKS Networking
- Kubenet - network to pods via nodes
- special CIDRs
- Azure CNI - pods connect to VNet
- Each pod gets an IP from your network.
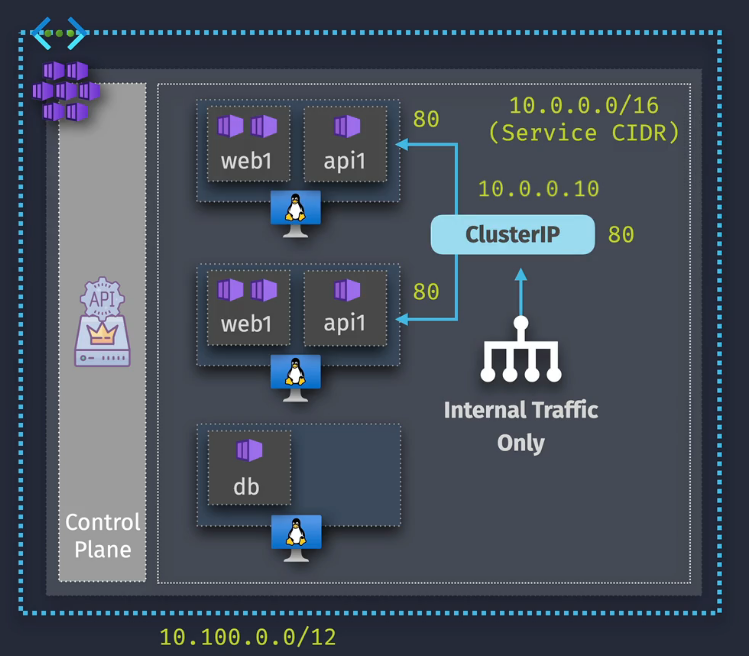
Services
Services are created in a Service CIDR
Cluster IP:
- Exports the service on a cluster service IP - Internal Only
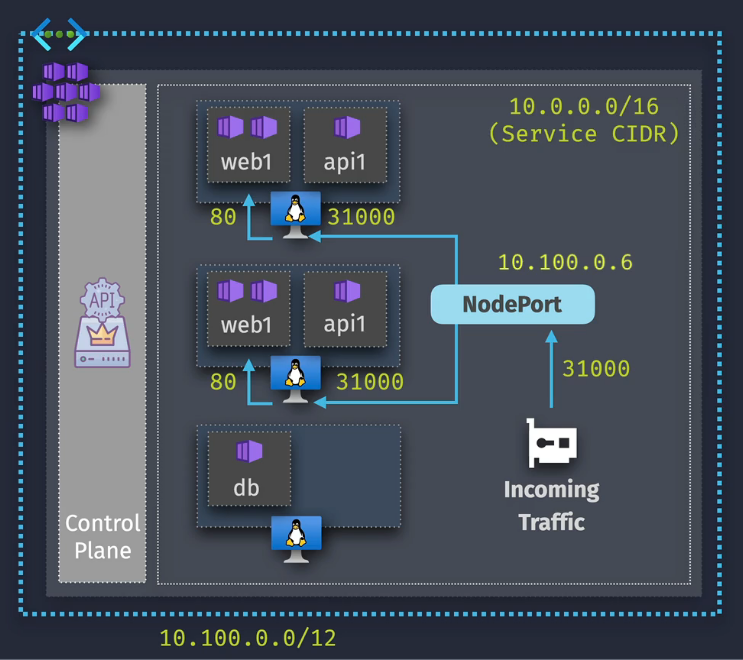
NodePort
- Exposes the service on a fixed port via the node IP - port translation
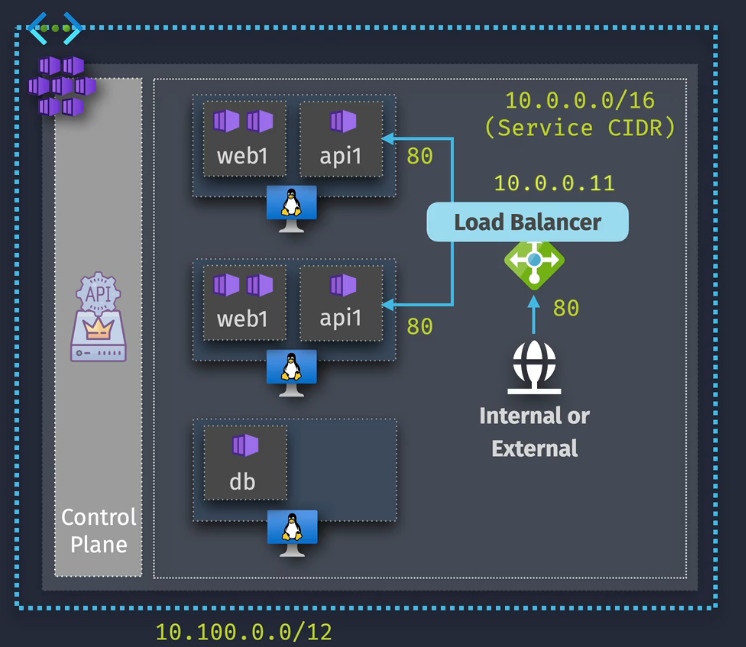
Load Balancer
- Exposes the service via an Azure Load Balancer
ExternalName
- Provides DNS for the service
Network Policies
- Azure NPM (Network Policy Manager)- supports Azure CNI only
- Calico - supports Azure CNI and Kubenet
Demo: Create and manage an AKS Cluster
- Navigate to Azure Kubernetes and Click Create
- name it, select the region, set the automatic upgrades to disabled, select some small cheapie nodes and then scale manually.
- Node pools - you can create multiple node pools here or use virtual nodes
- Access - Azure RBAC or Kubernetes RBAC
- Networking - if you choose Azure CNI, you'll need to set it inside a VNet.
- Network Policy as we learned is only selectable
- Integrations - no ACR integration, no monitoring, etc.
- Advanced - leave this
- Tags - add some basic tags if needed
- Create the Cluster and wait for it to deploy.
Tips
Note the API address Note the infrastructure Group - MC_ - the stuff that MS manages
Cluster Configuration - can upgrade your version or set an upgrade policy
ACR Integration
- Attach AKS to your ACR:
az aks update -n AKSNAME -g AKSRG --attach-acr ACRNAME - Show AKS:
az aks show -g AKSRG -n AKSNAME -o table - (Optional) Upgrade cluster:
az aks upgrade -g AKSRG -n AKSNAME --kubernetes-version VERSION
Demo: Deploy an app to AKS using YAML
- Do the previous demo
- Open VSCode
- Paste this into a new file:
apiVersion: apps/v1
kind: Deployment
metadata:
  name: dupositeweb
spec:
  replicas: 1
  selector:
    matchLabels:
      app: dupositeweb
  template:
    metadata:
      labels:
        app: dupositeweb
    spec:
      containers:
      - name: dupositeweb
        image: <IMAGEREF>
        resources:
          limits:
            memory: "128Mi"
            cpu: "100m"
        ports:
        - containerPort: 80
---
apiVersion: v1
kind: Service
metadata:
  name: dupositeweb
spec:
  type: LoadBalancer
  ports:
  - port: 80
  selector:
    app: dupositeweb
-
Save
-
Run
kubectl apply filename.yaml -
Look for the public IP on the service LoadBalancer
-
Check the nodes and the workloads on that nodepool to see if your pod is running.
Cleanup
- Run
kubectl delete -f filename.yaml
AKS Storage Overview
Pods are ephemeral - so what happens to the data or what happens if you need to persist data? You need to define this externally from the
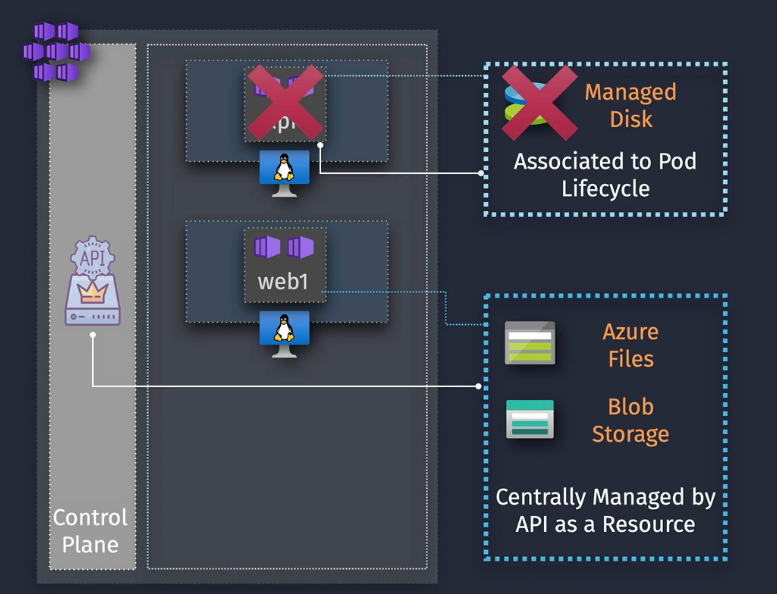
You really want to abstract the storage away from the pod using storage classes and persistent volumes and persistent volume claims
- Storage class - used to define tiers of storage
- Persistent Volume Claim - used to request volume of a specific class from the control plane.
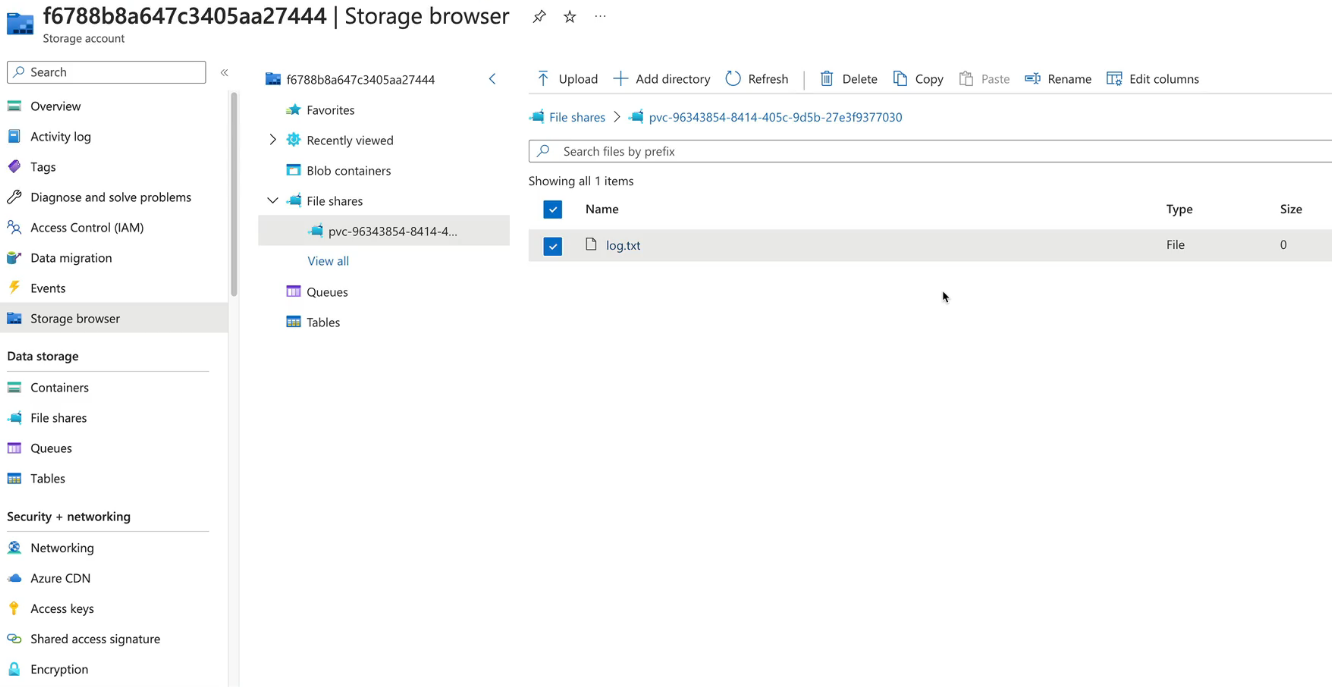
Demo: Configure an Azure Files Volume for an app in AKS
- Check out this YAML fil showLineNumberse:
kind: StorageClass
apiVersion: storage.k8s.io/v1
metadata:
  name: sc-azurefile-std
provisioner: file.csi.azure.com
allowVolumeExpansion: true
mountOptions:
  - dir_mode=0777
  - file_mode=0777
  - uid=0
  - gid=0
  - mfsymlinks
  - cache=strict
  - actimeo=30
parameters:
  skuName: Standard_LRS
Read through it and understand what it does
- kubectl apply -f file.yaml
- Create a deployment using this fil showLineNumberse:
apiVersion: apps/v1
kind: Deployment
metadata:
  name: duposwebappmon
spec:
  replicas: 1
  selector:
    matchLabels:
      app: duposwebappmon
  template:
    metadata:
      labels:
        app: duposwebappmon
    spec:
      containers:
      - name: duposwebapp
        image: <IMAGE>
        resources:
          limits:
            memory: "128Mi"
            cpu: "100m"
        ports:
        - containerPort: 80
      - name: duposwebappmon
        image: curlimages/curl:latest
        command:
          - sh
          - -c
          - watch -n 60 curl -I http://localhost >> /mnt/azure/log.txt
        resources:
          limits:
            memory: "128Mi"
            cpu: "100m"
        volumeMounts:
        - name: volume
          mountPath: "/mnt/azure"
      volumes:
        - name: volume
          persistentVolumeClaim:
            claimName: claim-webapp-azurefile
---
apiVersion: v1
kind: PersistentVolumeClaim
metadata:
  name: claim-webapp-azurefile
spec:
  accessModes:
    - ReadWriteMany
  storageClassName: sc-azurefile-std
  resources:
    requests:
      storage: 100Gi
---
apiVersion: v1
kind: Service
metadata:
  name: duposwebappmon-lb
spec:
  type: LoadBalancer
  ports:
  - port: 80
  selector:
    app: duposwebappmon
- Check in the MC_ Resource Group and you'll see a new Storage Account
Commands:
- Change to new folder:
cd dev - Setup a new YAML (storage class):
code filename.yaml - Apply YAML:
kubectl apply -f filename.yaml - Setup a new YAML (webmon deployment using SC):
code duposwebmon.yaml - Apply YAML:
kubectl apply -f duposwebmon.yaml
Clean Up
Delete the deployment
- Remove deployment:
kubectl delete -f duposwebmon.yaml
AKS Autoscale
Need to scale the pods AND the nodes
Cluster Autoscaler - increases the number of nodes based on demand Horizontal Pod Autoscaler - increases the number of replicas
Demo: Configure Application and Cluster Autoscale
- Look at the same yaml above - change the part in it to say
replicas: 40 - Apply that
- You'll see a warning on the deployments - insufficient mem/cpu, due to the fact we have 1 node and no autoscaling
- Change the scaling to autoscale and set to 5.
- Notice that the replicas then start to update to meet the 40.
- Change the replicas back to 1

Horizontal Pod Autoscaling
- Look at this YA showLineNumbersML
apiVersion: autoscaling/v1
kind: HorizontalPodAutoscaler
metadata:
  name: duposwebmon-hpa
spec:
  maxReplicas: 10 # define max replica count
  minReplicas: 2  # define min replica count
  scaleTargetRef:
    apiVersion: apps/v1
    kind: Deployment
    name: duposwebmon
  targetCPUUtilizationPercentage: 20 # target CPU utilization
- Apply this yaml file
- Create a new pod to generate load
- Make sure you change
ADDRESSto match your load balancer - Get your load balancer details:
kubectl get servicekubectl run load-generator --image=busybox --restart=Never -- /bin/sh -c "while sleep 0.0001; do wget --server-response --spider --quiet http://<LBIPADDRESS> 2>&1 | grep 'HTTP' ; done"
- Monitor what's happening
kubectl get hpakubectl top pod
- Notice that the pods increase up from 1 pod.
Clean up
Delete the load-generator pod Delete the deployment Set it back to manual - 1 node.
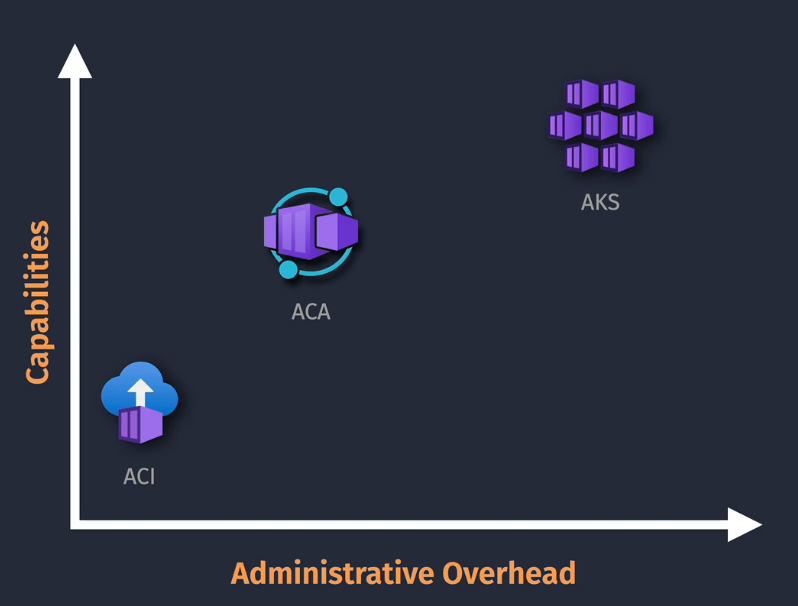
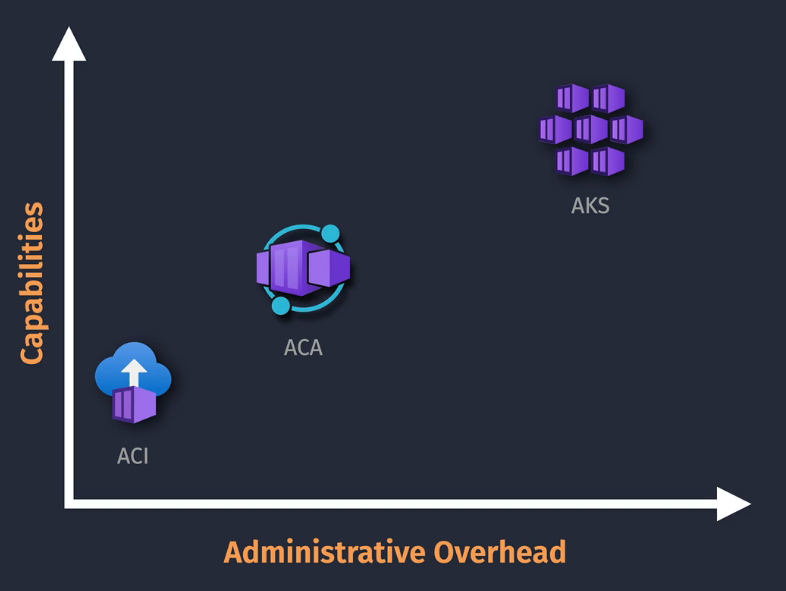
Azure Container Apps - ACA
Container Instances or Kubernetes Services? Minimal features vs Advanced features ACA is in the middle - serverless.
KEDA, DAPR, envoy - Learn these terms :)
Serverless
- Can scale down to zero - does take some time to spin back up.
NOTE: This has no Kubernetes API or control plane access.
Prerequisites:
- Containers
- Deploy
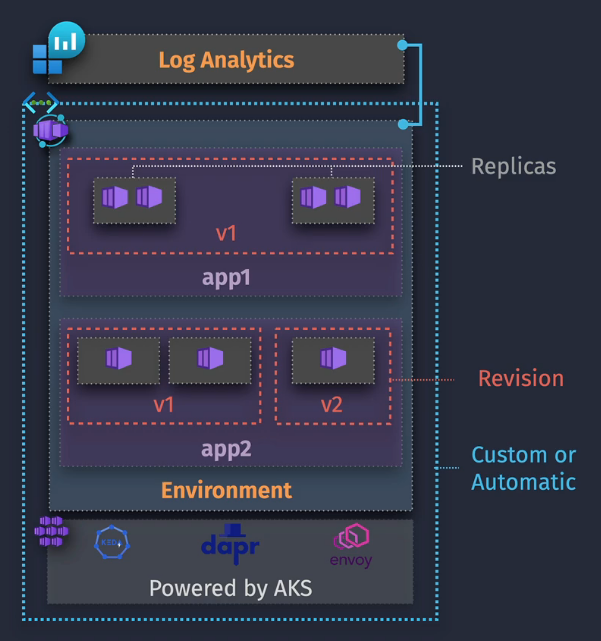
Key Components
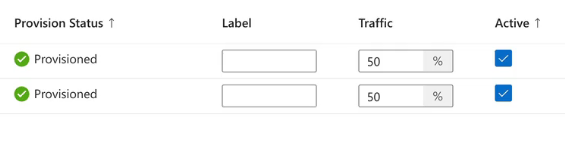
Environment - logging via LA workspace, VNET configured here Container App - one or more containers that make up your app Revision - Uses immutable container app snapshots - v1, v2, v3, etc. Can roll back as needed or split between two different versions as a 50/50%
Demo: Get started with Azure Container Apps
Create a Container app
2. Add a RG
3. Name it
4. Select region and create a new Container Apps Environment
5. Create a new LA workspace if needed
6. Create a new VNet if needed
 7. Use the ACR that we created earlier, select an image, select CPU and memory, configure environment variables if needed
8. Tag as needed
9. Review and Create
10. Create ingress into this environment.
7. Use the ACR that we created earlier, select an image, select CPU and memory, configure environment variables if needed
8. Tag as needed
9. Review and Create
10. Create ingress into this environment.
- IP restrictions can be set here
- Access via the URL from the Overview tab. qw
Revisions
- Edit and deploy
- Scale with a new scale rule based on HTTP scaling or Azure Queue
- Scale to like 3 replicas
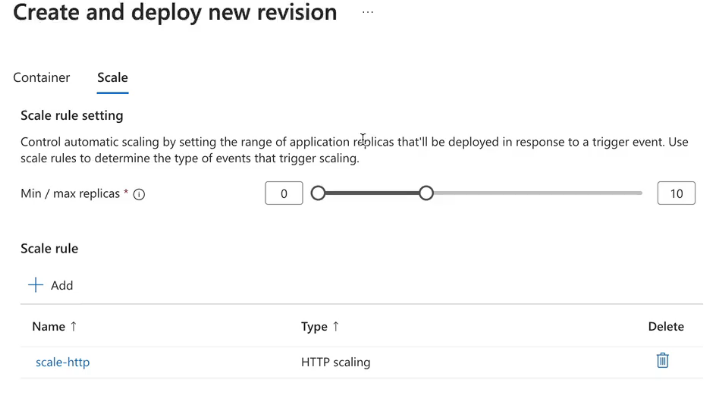
- Split the traffic between the different versions - like deployment slots
Clean Up
Delete the Container App and everything associated with it.
Case Study - Containerized Solutions
Implementing Kubernetes - backend Unchanged - frontend
Azure CNI would be the networking mode. Bursty performance would need to be virtual nodes using container Instances Premium SKU of ACR for image signing.